- # Highlight text with HTML tag
- # Default styling
- # Custom Styling with CSS
- # vs Other Text HTML Tags
- # strong
- # b
- # em
- # mark
- # Why semantic HTML tag is important
- # HTML5 tag and SEO
- # Accessibility Concerns
- # BUT.
- # Use Case: Search Result
- # Use Case: Quotes
- # Browser Support
- How to Highlight Text Using CSS
- Method 1: Highlight Text Using HTML Tag
- Method 2: Highlight Text Using HTML Tag
- Method 3: Highlight Text Using CSS Gradient Colors
- Conclusion
- About the author
- Sharqa Hameed
- HTML Tag
- Browser Support
- Global Attributes
- Event Attributes
- Related Pages
- Default CSS Settings
- Example
- COLOR PICKER
- Report Error
- Thank You For Helping Us!
# Highlight text with HTML tag
If you ever need to mark text within a paragraph, better use the tag. It’s HTML version of a yellow highlighter. I’ve always used a tag with some CSS styling sprinkled on it, not realizing this more semantic option existed. HTML5 is filled with all kind of goodies, am I right 😆
p> mark>Highlightmark> text with HTML <mark> tag p> # Default styling
The default background color of is yellow.
p> mark>Default Yellow Highlightmark> p> # Custom Styling with CSS
Of course, like any text HTML tag, you can apply custom styling with CSS. You can think of it similarly to how you would style a
tag.
mark background: red; color: white; > # vs Other Text HTML Tags
# strong
is used to indicate text that has strong importance than the surrounding text, such as a warning or error. Semantically, its importance. It appears as bold
# b
is very similar to as it also appears as bold. However, unlike it, it doesn’t really convey any importance and it’s more a stylistic thing than semantics.
# em
is used to stress emphasis on a particular word. It appears as italics
# mark
merely highlights the relevance of a certain piece of text. Prior to the existence of this tag, many have used em or strong to give the highlighted content some semantic meaning. Well no more! If you need to highlight, use this tag 🌟
# Why semantic HTML tag is important
The reason you don’t just use tags everywhere is because they are not semantic. You might be like me when I first started learning programming — who cares about being semantically-correct 🙄. Wrong ❌. In fact, search engines like Google do! Because semantics convey meaning about your site. When search robots crawl through your site, they’ll know what’s up. In other words, ding ding ding on your SEO or search engine optimization 🏆
Another reason to be semantically-correct is for accessibility. A lot of the accessibility tools rely on the tags’ semantics to convert your site into meaning to the human user using it (ie. screen readers). Here’s an analogy. Remember back in the days, when we got the computer reading text from a site. It sounded super robotic and odd 🤖. Without the proper semantics, it’s just like that. Does it work, sure — but the listening experience is terrible 😱. However, when you use proper semantics, it’s like listening to Siri. It sounds way more human-y because it has all the different inflection, changes in pitch, and even know when to pause. And this is the similar type of better experience you can achieve when using semantically-correct HTML tags 👍
# HTML5 tag and SEO
I do want to point out one thing though.
mentioned this in a Twitter response:
It certainly makes sense to use HTML5 properly if you can, there’s no SEO downside to doing so 😃.
Here’s what I gather from this. Whether or not you use HTML5 tags, it won’t hurt your Google search result ranking. However, does that mean you should use HTML5 tags. Not at all! The accessibility benefits are still there. And some HTML5 tags have really interesting browser behavior and it opens up your user to more advanced feature that it didn’t before 🤩
# Accessibility Concerns
Alright, hopefully, I have successfully conveyed to you the importance of semantic HTML tags. And you can now understand how is not simply to style texts, but it’s semantically a good thing.
But! there is some concern with its accessibility. Unfortunately, the use of the tag is not announced by most screen readers in its default settings. But good news, there’s is a way around it. You can use the CSS content property and pseudo-element to make an announcement.
mark::before content: ' [highlight start] '; > mark::after content: ' [highlight end] '; > /* Hide the text created in the CSS content property */ mark::before, mark::after clip-path: inset(100%); clip: rect(1px, 1px, 1px, 1px); height: 1px; overflow: hidden; position: absolute; white-space: nowrap; width: 1px; > So what the screen reader will do here. When it encounters text that’s wrapped in the tag, it will announce «highlight start» followed by the text within the tag. and then announce «highlight end» once the mark tag ends.
# BUT.
Please note: if you have a lot of these «announcement», it can be very verbose and add in sometimes annoying unnecessary information. Which can cause some screen reader users to turn off this feature. So, the lesson here is. «With great power comes great responsibility 🕷». Don’t abuse this technique and ONLY apply it in instances where NOT knowing the highlighted content can adversely affect understanding for the user.
# Use Case for
The fun part now! Let’s take at some use cases for :
# Use Case: Search Result
Here’s a popular one. You can use it to highlight the term a user has searched for.
p>Search Result for "Vue"p> hr /> p> mark>Vuemark> is a awesome JavaScript framework. mark>Vuemark> is awesome. Can you tell I really like mark>Vuemark> 😆 p> Search Result for «Vue»
Vue is a awesome JavaScript framework. Vue is awesome. Can you tell I really like Vue 😆
# Use Case: Quotes
It’s great to provide highlights for quotation ( ) and block quote ( ).
p> According to Samantha, q>Vue is mark>AWESOMEmark>q> p> According to Samantha, Vue is AWESOME
# Browser Support
Browser support for this is quite good! All major browser supports this including Internet Explorer. Check it!
How to Highlight Text Using CSS
![]()
While reading notes or articles, some important points or terminologies need to be revised later. For this, we use highlighters to mark the important things instead of studying the whole article each time. It also gives a compelling look to that information. So, to mark the information on the website, HTML offers us the “ ” tag, and CSS permits us to use different properties for highlighting text.
The outcome of this blog are:
Method 1: Highlight Text Using HTML Tag
The HTML “ ” tag is utilized to highlight or mark text that provides important information. By default, browsers render the marked text with a yellow background color.
Syntax
The syntax of using the “ ” HTML element is mentioned below:
Example: How to Add Element in HTML?
In HTML, first, create a div with the class name “box”. Then, is added to include the heading, and the
tag is used to add a paragraph to the web page. Within the
element, use the “ ” element to highlight the required text:
HTML mark Element < / h1 >
The mark element is used to define the marked < / mark>text . < / p >
< / div >
Then, apply CSS properties to the HTML elements.
Style box div
.box {
border : 5px solid #9A1663;
background- color : #FDF0E0;
width : 90 %;
height : 200px;
margin: auto;
padding: auto;
text- align : center;
font- size : 20px;
}
Here, “.box” is used to access the div element with the class box and apply the following properties: –
- “border” property can have more than two values to specify the border style, such as width, line type, and color.
- “width” attribute is utilized to specify the element’s width.
- “background-color” property is utilized for specifying the color of the element’s background.
- “height” property defines the height of the HTML element.
- “margin” property defines the space outside the element.
- “padding” property defines the space inside the element.
- “text-align” property is utilized to adjust the alignment of the text.
- “font-size” specifies the size of fonts.
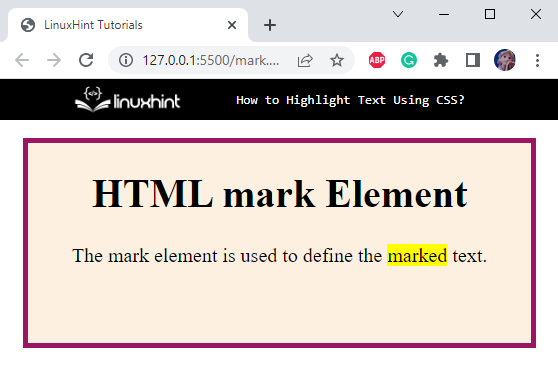
The above-provided code will generate the following result:
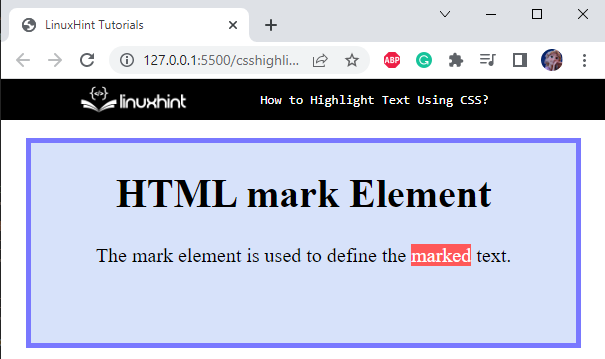
We can also apply different styles to the element with CSS.
Style HTML Element
By default, the “ ” tag shows a yellow color. But with the help of CSS, you can apply different properties to change the style of the HTML mark element.
In this example, we have used inline CSS for styling the HTML tag:
The mark element is used to define the marked < / mark>text .It can be observed that now the text is highlighted using the red color:
Method 2: Highlight Text Using HTML Tag
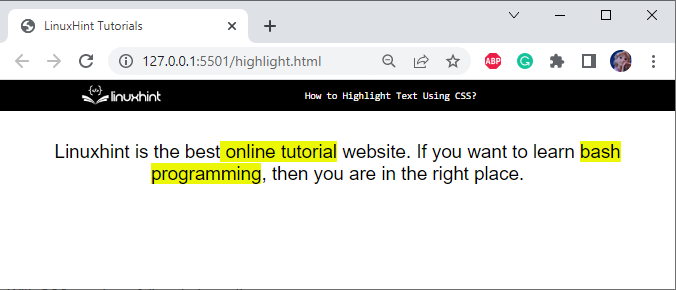
The HTML “ ” element is an inline element utilized to mark some part of a document.
Example: How to Add Element to HTML?
First, a
tag is placed to add a paragraph. Inside the
tag, the “ ” tag is used to mark a specific part of the paragraph. Each span tag is given an id as “s1”.
Linuxhint is the best online tutorial < / span > website.
If you want to learn bash programming < / span >, then you are in the right place. < / p >
Now, apply CSS styles to the above span elements.
The “#s1” refers to the span id. Here, the property “background-color” with the value rgb(233, 247, 6) is applied to the span element.
It can be observed from the output that the text within the span element is marked with the specified color:
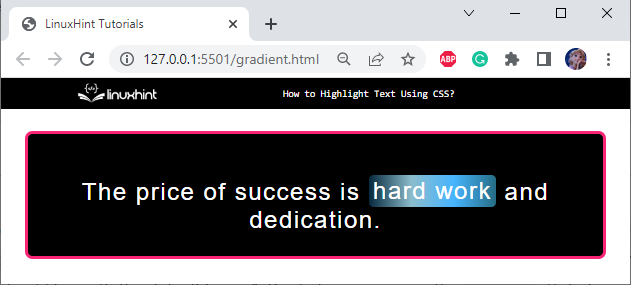
Method 3: Highlight Text Using CSS Gradient Colors
In HTML, add a with id as “main”. Then, inside this div element, place
tag to add content. Within the content of
tag, place tag with class name as “highlight”. Lastly, we will apply the CSS “gradient” property to this span area.
Style Class highlight of Element
.highlight {
background-image: linear-gradient ( to right, #06283D, #8BBCCC, #47B5FF, #256D85 ) ;
border-radius: 6px;
padding: 3px 6px;
}
The description of the above CSS properties is provided below:
- “.highlight” is used to access the class highlight of the element.
- “background-image” property as “linear-gradient” uses the parameters as direction, then two or more colors.
- “border-radius” property is utilized to make the edges of the elements round.
- “padding” is used to provide space around the element’s content.
Style main div
#main {
margin: 10px auto;
width : 90 %;
height : 150px;
border : 5px solid #FB2576;
border-radius: 10px;
background- color : black;
padding: 5px;
}
The below described CSS properties are applied to the div element with id as “main”:
- “#main” is referred to the id main of the div element.
- “margin” property applies spacing outside the div element.
- “width” property is used to set the container’s width.
- “height” sets the height of the container.
- “border” specifies the border’s width, type, and color.
- “border-radius” applies to make the edges of the elements round.
- “background-color” is used to apply color to the background of the div element.
- “padding” is applied to give space around the content of the div.
Style
element
#main>p {
color : #fff;
text- align : center;
font-family: sans-serif;
letter-spacing: 2px;
padding: 20px 0 ;
font- size : 2em;
The
element of div main is applied styles with the listed CSS properties:
- “color” property specifies the color to the text.
- “text-align” property applies alignment to the text, such as center, left, and more.
- “font-family” is utilized for setting the font family of the text.
- “letter-spacing” property maximizes or minimizes the spacing among the text’s characters.
- “padding” represents space around the content of an element.
- “font-size” indicates the size of the font.
After saving the above code, the web page in our web browser will look like this:
We have discussed some methods to highlight the text using CSS.
Conclusion
For highlighting text, HTML and CSS facilitates us with many techniques. HTML “ ” and “ ” tags are used to mark the text, but we can customize the highlight style using CSS. This blog discussed the procedure of highlighting text using HTML , , and gradient colors.
About the author
Sharqa Hameed
I am a Linux enthusiast, I love to read Every Linux blog on the internet. I hold masters degree in computer science and am passionate about learning and teaching.
HTML Tag
The tag defines text that should be marked or highlighted.
Browser Support
The numbers in the table specify the first browser version that fully supports the element.
| Element | |||||
|---|---|---|---|---|---|
| 6.0 | 9.0 | 4.0 | 5.0 | 11.1 |
Global Attributes
Event Attributes
Related Pages
Default CSS Settings
Most browsers will display the element with the following default values:
Example

COLOR PICKER


Report Error
If you want to report an error, or if you want to make a suggestion, do not hesitate to send us an e-mail:
Thank You For Helping Us!
Your message has been sent to W3Schools.
Top Tutorials
Top References
Top Examples
Get Certified
W3Schools is optimized for learning and training. Examples might be simplified to improve reading and learning. Tutorials, references, and examples are constantly reviewed to avoid errors, but we cannot warrant full correctness of all content. While using W3Schools, you agree to have read and accepted our terms of use, cookie and privacy policy.