- Лабораторная работа №4: Cisco Packet Tracer (12.04.2018)
- Создание модели
- Настройка модели
- Протокол HTTP
- Возможно, Вам будет интересно почитать:
- 2 комментариев(я) к “ Лабораторная работа №4: Cisco Packet Tracer ”
- How to configure a web server in packet tracer and access the internet in packet tracer
- BlackLotus@LinuxMint:~$
- Welcome in Ulahkitu Login Screen
- Packet Tracer 8.0 — Real HTTP server using SBC device
- Javascript API
- Python API
Лабораторная работа №4: Cisco Packet Tracer (12.04.2018)
Целью лабораторной работы является изучение архитектуры и настройки локальной вычислительной сети, которая имеет в своём составе три сервера: DNS, HTTP и DHCP. Используется промежуточное сетевое устройство коммутатор.
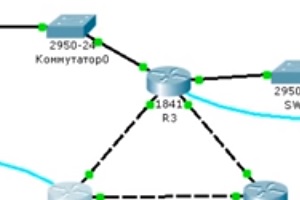
Создание модели
1.Создать модель локальной сети, состоящей из персонального компьютера, ноутбука, принтера и двух серверов, связанных между собой коммутатором. Использовать в качестве промежуточного сетевого устройства свич, или, говоря по-русски, коммутатор. 2. Настроить работу HTTP, DNS, DHCP серверов.

Настройка модели
Настройку модели рекомендуется выполнять по следующей методике. 1.Создаем WEB-документ на сервере. 2.Настраиваем статические ip адреса серверов и DHCP на персональном компьютере, ноутбуке и принтере. Внимание: не забудьте указать адрес DNS на первом сервере.
3.Настраиваем службы DNS и HTTP первом сервере.
Пояснения: Запись типа A сообщает, что машина с именем server1.yandex.ru имеет ip-адрес 10.0.0.1. Запись типа C говорит о том, что домен www.yandex.ru хостится на машине server1.yandex.ru.
Перед выполнением лабораторной работы по видео cкачайте файл-заготовку DNS-и-HTTP-заготовка.zip . Для аутентификации на маршрутизаторах R1 и R2 используйте имя пользователя admin, для привилигированного режима пароль 123, для режима глобального конфигурирования пароль 123456.
4.Настраиваем службу DHCP на втором сервере. 5.Проверяем работу служб на персональном компьютере, ноутбуке и принтере.
Перед выполнением лабораторной работы по видео cкачайте файл-заготовку DHCP_файл-заготовка.zip . Напоминаю, что для аутентификации на маршрутизаторах R1 и R2 используйте имя пользователя admin, для привилигированного режима пароль 123, для режима глобального конфигурирования пароль 123456.
5.Настройка DHCP-сервера непосредственно на маршрутизаторе. Перед выполнением лабораторной работы по видео cкачайте файл-заготовку DHCP-на-маршрутизаторе-файл-заготовка.zip. Напоминаю, что для аутентификации на маршрутизаторах R1 и R2 используйте имя пользователя admin, для привилигированного режима пароль 123, для режима глобального конфигурирования пароль 123456.
6.Настройка серверов: FTP, Mail, DNS, HTTP, DHCP. Файл-заготовка Серверы-FTP-Mail-DNS-HTTP-DHCP-заготовка.zip . Чтобы обратиться к ftp-серверу имеющему ip-адрес 192.168.3.1 с компьютера или ноутбука, необходимо в командной строке набрать ftp 192.168.3.1
Протокол HTTP
По всем вопросам пишите в комментариях. В следующей лабораторной работе мы поговорим о wi-fiКол-во просмотров: 29000
Возможно, Вам будет интересно почитать:


2 комментариев(я) к “ Лабораторная работа №4: Cisco Packet Tracer ”
How to configure a web server in packet tracer and access the internet in packet tracer
To simulate the internet, we have to configure the server endpoint available in the packet tracer. This server has the capability to provide web service.
We have two hosts that will be able to access the internet via an ISP router. Our internal network is connected to the ISP router. The interface of the internal router which is connected to the ISP router has been given public IP address. This is static IP that has been configured on the interface.
ISP router is further connected to the Google web server so after the successful configuration of our network, we should be able to access the google.com
How to configure the web server
We have to open services and click on HTTP service. This service is enabled by default and we can see that server is hosting some files already. These files are present by default and when we point the web browser to this server, this server will serve the web page to our browser.
We have configured this server as a Google web server and it is serving a Google web page. To change the content of the webpage, we have to edit the index file present in the web server.
For testing purposes, we can copy the source code of any side that you want the webserver to show and paste it into the index file. After saving the file, the web server will show sites according to the source code.
Now, we can test the web server by opening the browser on the PC and pointing it to the server.
We have to enter the IP address of the web server in the URL and press enter. If everything is configured properly then we should see the browser loading the webpage successfully.
Before opening the browser, we must make sure that the connectivity of the server is fine.
Download the lab and test the Google web server and if you want the server to host any other site then change the index file present on the server.
This lab is the smaller presentation of a big network like the internet. This is the way how the internet works however there are thousands of routers and servers connected forming a huge network.
You can try adding more servers with different sites and accessing those sites on the browser of the PC.
BlackLotus@LinuxMint:~$
Yow guys, such a beautiful hour to me. Now, i’m gonna share about Cisco Packet Tracer. Jumping to set web server. It’s a basic set, so it should be easy. We cool hah !
Quit, chit-chat and just go to the steps.
First, try to set this picture :

Second, set the each of their IP click them and go to “DESKTOP” tab and look for “IP CONFIGURATION” like this

set the server ip into “192.168.78.1” now the third step.
Third, click server side and go to “CONFIG” tab. Look for “DNS” , set the “Name” into whatever you wish, mine is “http://www.hesemeleh.com“. As for the address, as you set on “IP CONFIGURATION” before into “192.168.78.1” and save like this

Fourth, after you done with your “DNS” now look for “HTTP” in the same tab “CONFIGURE” on sever side. here some code for the page you will see later 😀 like this

Welcome in Ulahkitu Login Screen
Credit goes to Indiego , Palango, Tango-tango, Tutulo, Palgo, Buarto, Cengo, Ndeso-ndeso@”ooo”group
Finally, click the PC and then go to “DESKTOP” tab then choose “WEB BROWSER”. On url box , type the server name. a name that you just gave on third step. Mine is “http://www.hesemeleh.com“. that should be like this

That’s all. Those are just the basic on how to set a web server. You can explore further 😀
Thank’s guys for visiting my blog. Enjoy the time.
blacklotus a.k.a the owner of this blog
Packet Tracer 8.0 — Real HTTP server using SBC device
Packet Tracer 7.2 introduced the capability to create a real HTTP server accessible from the outside of the Packet Tracer emulation environment. This capability is only available on the SBC IoT device.
HTTP server can be programmed using javascript, python, or the visual programming language
Javascript API
The following javascript functions have been added in Packet Tracer 7.2 (SBC device only) to support real HTTP server. The HTTP is able to listen on a custom TCP port and to respond with text/plain or any other content-type (file, . ).
Return Type
Description
HTTPServer.route(path, method, callback);
Sets up a route for path and calls callback when it is requested. Routes also support wildcards using *.
HTTPServer.route(«/hello», function(url, response)
HTTPServer.route(«/*», function(url, response)
Response class
Passed into the HTTPServer route handler.
Sends content back as response.
Sets the content type in the response.
Sends a file back as response. The file path is in the device’s file manager, not relative to the source code of the current project/script.
Sends a file not found as response.
Use the following javascript code to start a real HTTP server listening on TCP port 8080.
var server = new RealHTTPServer(); server.start(8080);Python API
The Python package used for creating the HTTPServer object is named «realhttp».
Include the from realhttp import * line at the beginning of your Python code.
Return Type
Description
Sets up a route for path and calls callback when it is requested. Routes also support wildcards using *.
The route function calls the defined function based on the HTTP method and the request URI.
In the following example, the gest_contacts function is called for each GET request to an URI starting with «/contacts/» and the post_data function is called for each POST request to an URI starting with «data».
server.route("/contacts/*", ["GET"], get_contacts) server.route("/services/*", ["GET"], get_services) server.route("/data/*", ["POST"], post_data) def onRouteHello(url, response):
response.send(«hello»)
HTTPServer.route(«/hello», onRouteHello)
def onRouteAll(url, response):
response.send(«world»)
HTTPServer.route(«/*», onRouteAll)