- Understand the difference between Margin vs Padding in CSS? [+Demo]
- CSS Box model
- Margin
- Margin features
- Can be auto
- Collapsible margins
- Can be negative
- Cannot alter element size
- When to use margin
- Padding
- Padding features
- Cannot be auto or negative
- Not collapsible
- Can alter element size
- When to use padding
- Margin and Padding shorthand syntax
- Margin vs Padding Demo
- Чем отличаются padding и margin
- Padding
- Margin
- Больше статей о выборе
- Организация отступов в верстке (margin/padding)
- Отступы идут от предыдущего элемента к следующему.
- Отступ задается последнему возможному элементу в доме
- Отступы нельзя задавать для независимых элементов ( БЭМ блок )
- У последнего элемента группы, отступ обнуляется (всегда)
- Исключения
Understand the difference between Margin vs Padding in CSS? [+Demo]
Beginner developers often get confused between margin vs padding properties in CSS. They both create the space around the element. But how are they different? What are the use cases? This guide will answer those questions for you.
The difference explained in short:
The padding is the space inside the element, that separates the content from the border.
The margin is the space outside the element, that separates it from other elements.
The image above highlights the button’s padding area in green and the margin area in orange.
Try out an interactive demo to see how margin vs padding works.
CSS Box model
To understand the difference between margin and padding , you need to understand the box model concept first.
The point is that each HTML element is rendered in a browser as a box, that consists of four parts:
Each part is bound by the respective edge:
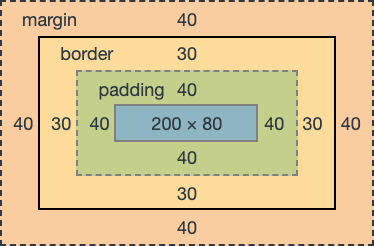
- content area edge
- padding edge
- border edge
- margin edge.
Thus the box model makes padding and margin both a part of the element. And they both directly affect the appearance of one.
Margin and padding have several features that make them different. Knowing these features will help you better understand their behavior and proper usage.
The following sections will break down each feature of both margin and padding.
Margin
The margin area, bounded by the margin edge, extends the border area to include an empty area used to separate the element from its neighbors.
— MDN
The margin is a transparent space outside the element that separates it from other elements. Basically, it pushes the element away from other elements.
Margin features
The features listed below are only inherent to the margin.
Can be auto
Margin value can be set to auto . This means that the browser will automatically define the margin value. Margin’s values will be split evenly, so they can be used to center an element.
p width: 50%; margin: auto; /* this will center paragraph horizontally */ > 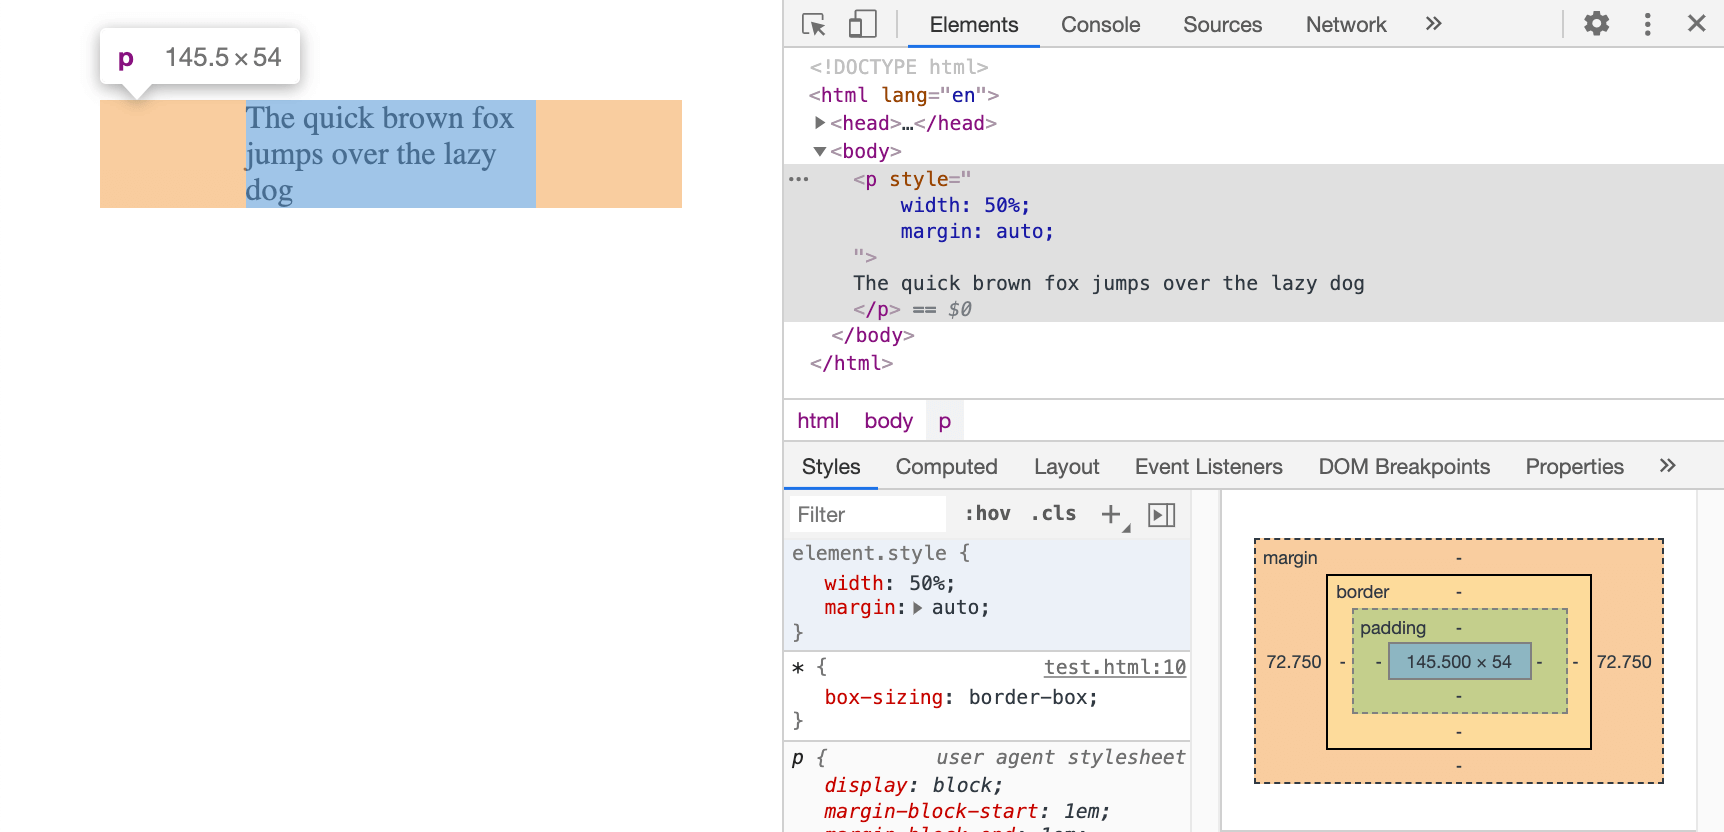
Collapsible margins
In some cases, margins may collapse into a single margin (one of the largest values or one of them if they’re equal).
So when two elements placed side by side or one after another, the margins will collapse. However not always. In some cases, both margins will be applied e.g. floats or absolutely positioned elements.
I highly recommend checking this great article on margin collapse by Josh W. Comeau.
In the example below, the space between h1 and p will be 30px . Margins collapsed and the greater value is applied.
h1 margin-bottom: 30px; > p margin-top: 10px; > Can be negative
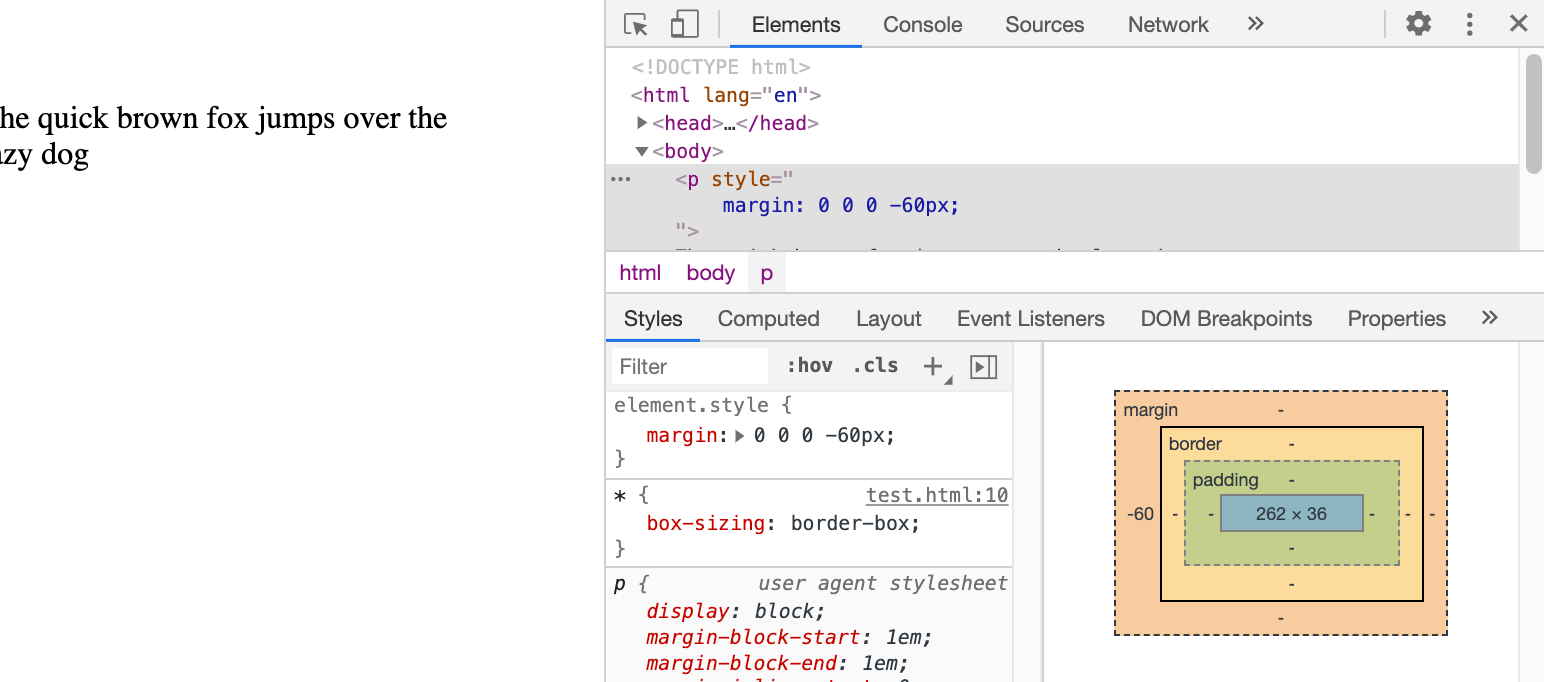
Margins may have negative values. It works sort of like positioning. The negative value will shift the element in an opposite direction.
In the example below the paragraph will be moved to the left by 60px.
Cannot alter element size
Unlike padding , the margin cannot alter element size. If you recall the box model, the margin is “used to separate the element from its neighbors”. So no matter what value you set element size will remain intact.
When to use margin
Margins are generally used to set the space between elements (a “gap”) or to position elements. These powers come from the ability to set auto and negative values.
NOTE: The margin area is not clickable! Due to the fact that this is the empty area outside the element.
Padding
The padding area, bounded by the padding edge, extends the content area to include the element’s padding.
— MDN
The padding is the space between the actual content and the border of the element. It will have any background-color or backgorund-image property that has been applied to an element.
Padding features
The features listed below are only inherent to the padding .
Cannot be auto or negative
Unlike margin , the padding cannot have auto or negative values. If you set auto or a negative value to padding it will not change the appearance of the element, however, in Element Inspector it will be shown as an Invalid property value.
Not collapsible
Since the padding is the space inside the element it cannot collapse.
Can alter element size
Paddings directly affect element size. Visually it can be seen well, especially if the background-color or border property is applied. But if you’re trying to get element size with JavaScript it depends on the CSS box-sizing property and the method you’re using.
You can check my article explaining how to get element size with JavaScript to avoid possible troubles.
When to use padding
Use it to give your elements a visually appealing appearance. Also, additional paddings increase element size, which is quite useful from the UX and Accessibility perspective. E.g. on mobile devices, it is easier to tap a button or an input field that has some paddings. They make elements bigger in size, thus easier to tap.
With the help of padding, you can give your element an aspect ratio. It is called the “padding hack” and is used to maintain the proportions of the element throughout the viewports.
Margin and Padding shorthand syntax
Both padding and margin properties have a shorthand syntax. There are four ways you can set these properties.
single value — sets top, right, bottom, and left margins:
two values — the first one sets vertical (top and bottom), second sets horizontal (right and left) margins:
three values — first and third sets top and bottom accordingly, the second one sets right and left margins.
four values — each margin side is set separately in the following order top, right, bottom, left.
p margin: 10px 20px 15px 0; > Margin vs Padding Demo
Change input values to see how margin and padding properties change for the set of buttons.
Log In Sign Up
Log In Sign Up
This work is licensed under a CC BY 4.0 License.
The code in this work is licensed under an MIT License.
Чем отличаются padding и margin
У этого элемента есть пока невидимая граница border . Если мы отобразим эту границу, то увидим, что она прилипла к тексту.

А если поставим два таких элемента рядом, они почти прилипнут друг к другу, потому что между ними нет пространства:

Padding
Чтобы отодвинуть рамку нужен padding — внутреннее пространство между содержимым элемента и его границей border .
⭐ Padding — внутренний отступ.

padding можно задать отдельно сверху, справа, снизу и слева (то есть по часовой стрелке, начиная сверху). Или задать отдельно для верха-низа и право-лево, или вообще одинаковый для всех сторон.
Или даже все стороны по отдельности — вот так. Это аналог выражения padding: 10px 20px 30px 40px;
Все варианты padding одной картинкой:

Margin
margin — пространство от border , padding или контента до соседних элементов. Задаётся по такой же логике и тоже по часовой стрелке.
margin тоже можно задавать отдельно для всех сторон или сделать сразу одинаковым.
Внутренние и внешние отступы одной картинкой:

⭐ padding — внутри элемента, margin — снаружи.
Больше статей о выборе
«Доктайп» — журнал о фронтенде. Читайте, слушайте и учитесь с нами.
Организация отступов в верстке (margin/padding)
Цель этой статьи не усложнить простые вещи, а акцентировать внимание на известных стандартах, о которых почему-то забывают. Важно соблюдать осмысленную структуру во всех аспектах верстки, и не менее важно придерживаться ее в отступах. И одним из основных принципов верстки является гибкость. А именно, возможность легко вносить какие-либо изменения и ничего при этом не сломать. Правильное обращение с margin и padding играет очень большую роль в этом деле.
Ниже перечисленные принципы выполняются в среде позиционирования элементов на странице. В элементах декора тоже выполняются. Но не так категорично.
Основные принципы:
- Отступы идут от предыдущего элемента к следующему.
- Отступ задается последнему возможному элементу в доме.
- Отступы нельзя задавать для независимых элементов ( БЭМ блок ).
- У последнего элемента группы, отступ обнуляется (всегда).
Отступы идут от предыдущего элемента к следующему.
margin(ы) задаются от предыдущего элемента к следующему, от первого ко второму, сверху вниз, слева направо.

Это значит.что такие свойства как margin-left и margin-top не используются (не без исключений). С padding все немного наоборот (кроме того, что он используется для, декоративных целей, увеличения области ссылки и т.д.). Когда блоку нужен отступ сверху или слева, он его получает за счет padding-top и padding-left родителя.
Отступы идут в направлении потока дом дерева, блок сам себя не толкает.
Изначально он находится в статическом положении, и получает какое-то воздействие, за счет других.
Отступ задается последнему возможному элементу в доме
margin(ы) задаюся только между соседними элементами дом дерева.
В примере 3 списка, в следующей структуре:
Не за счет дочерних элементов, а за счет соседних делается отступ.

В этой ситуации .main-section__item и является последним возможным, кому можно задать отступ, чтоб разделить списки. Такого же эффекта можно добиться, если задать отступ диву, списку, лишке, ссылке, но это будет не правильно.
Этот пример довольно простой. Но если представить на много большую вложенность, где кто-то намусорил отступами, когда какие-то маргины схлопываются. а какие-то суммируются с падингами.
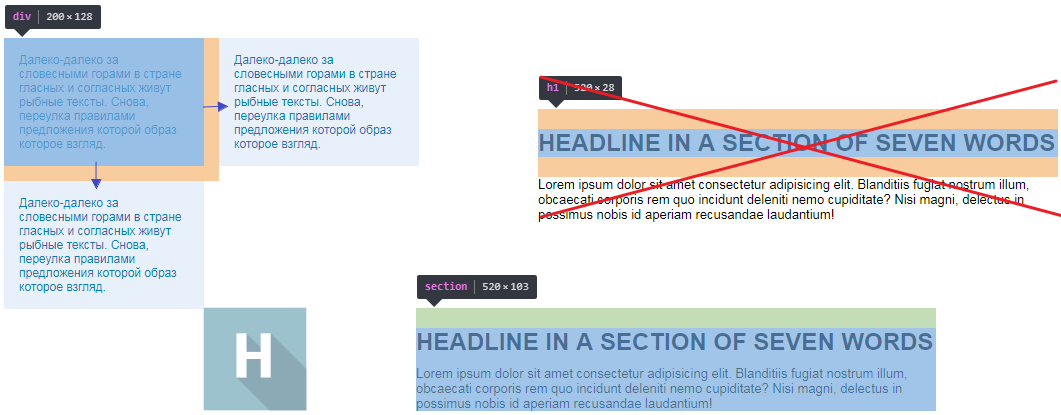
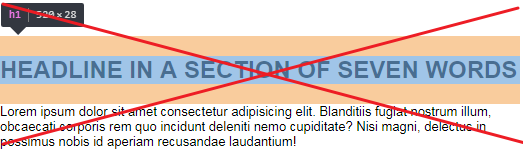
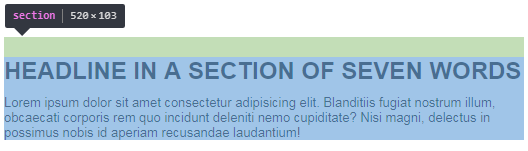
headline in a section of seven words
Если взять пример с заголовком, и нужно сделать отступ для заголовка сверху. то последний элементом будет section и для него задается padding-top, margin(ы) которые стоят по дефолту всегда нужно обнулять.
Самая простая причина, по которой стоит придерживаться данного принципа, это чтоб было проще найти отступ в будущем, либо вам, либо тому, кто будет в дальнейшем работать с вашей версткой. Это если говорить про удобство.
Настоящие проблемы могут возникнуть, когда верстка с плохой структурой отступов выводится динамически или дублируется.
Отступы нельзя задавать для независимых элементов ( БЭМ блок )
Никогда не делайте отступы элементам, которые могут использоваться больше чем один раз. Даже если вы не придерживаетесь методологий, учитывайте перспективу. Для этого есть обертки. Обертки это хорошо. Либо дополнительные классы.
Если нужно сделать блоку отступ. Без ущерба это делается с помощью:
- Наследование через элемент (если вытащить этот блок с элемента, отступа не будет, и его можно будет просто разместить в другом месте).
- Добавление класса (можно сделать блок элементом).
- Обертка (как блок, у которого роль, только в позиционировании).
.block__item > .block < margin-right: 10px; >.block.block__item < margin-right: 10px; >.block-wrap > .block
У последнего элемента группы, отступ обнуляется (всегда)
Это горизонтальное меню и логотип (который почему-то справа).
Между ссылками и логотипом одинаковое расстояние. Но если есть расстояние между последней лишкой и новым блоком, то этот отступ делается не за счет лишки. А список отступает.


Для последней li отступ обнуляется. И отступ делается между соседними элементами ul и img . О чем говорилось во втором принципе.

Интересует нас отступ между новостями, которые задается .blog-preview__item < margin-bottom: 20px; >. Последний margin обнуляется, а нижний отступ делается за счет padding blog-preview . О чем говорилось во втором принципе.
Чаще чем другие псевдоклассы, надо использовать :last-child.
.item:not(:last-child) < margin-bottom: 20px; >// или // .item < // другие стили // margin-bottom: 20px; &:last-child < margin-bottom: 0; >> // или margin-top, основная идея здесь, не в направлении маргина, а в отсутствии лишнего // .item + .item < margin-top: 20px; >// или // .item < // другие стили // & + & < margin-top: 20px; >> Исключения
- В первую очередь это добавление текстового контента через админку. Здесь отлично справляется подход к отступам заданный браузером. Но этот подход нельзя считать подходящим в обычной верстке как и несколько
в коде подряд. - «Динамические элементы». Когда элемент появляется после какого-то блока, то он появится со своим отступом.
- Иногда вертикальные падинги лучше задавать дочерним блокам, нежели всей секции. Если в перспективе, на других страницах в том же месте, это относится ко второму принципу, задавать отступ для последнего возможного, вот иногда секция последний, но не возможный.
- Отрицательные маргины, auto, padding для контейнера.
Конечно есть частные случаи, нетривиальные задачи, и нюансы, при которых невозможно придерживаться этих принципов, но в остальном стоит стремиться к идеальным отступам, чтоб сделать верстку максимально чистой.
P. S. Советую ознакомиться с публикацией Кастомный подход для нормализации и сброса стилей (custom-reset.css). И советую использовать css линтеры. И кому интересно, может решить css задачку.