- Приклейте кнопку к правой стороне div
- Ответы (7)
- Add Space Between Buttons in HTML
- Add an Empty div Element Between Two Buttons to Add Space Between Them in HTML
- Use the margin-right Property to Put Space Between the Buttons in HTML
- Use the margin-right Property and not(:last-child) Selector to Provide Space Between Multiple Buttons in HTML
- How to Give Space Between Two Buttons in CSS
- What is “margin-left” CSS Property?
- What is “margin-right” CSS Property?
- How to Give Space Between Two Buttons?
- Example 1: Giving Space Between Two Buttons Using margin-right Property
- Example 2: Giving Space Between Two Buttons Using margin-left Property
- Example 3: Giving Space Between Two Buttons Using margin-left and margin-right Properties
- Conclusion
- About the author
- Sharqa Hameed
Приклейте кнопку к правой стороне div
http://jsfiddle.net/kn5sH/ Что мне нужно добавить, чтобы прилепить кнопку справа от div на той же строке, что и заголовок? HTML:
- Правая сторона кнопки должна быть на расстоянии x пикселей от правого края div.
- Он должен быть на той же строке, что и заголовок.
- Должен содержаться в div (такие вещи, как float или относительное позиционирование, визуально выталкивают его из div)
Какие методы CSS можно использовать для этого? Спасибо.
Ответы (7)
Обычно я бы рекомендовал плавать, но из ваших 3 требований я бы предложил следующее:
position: absolute; right: 10px; top: 5px; Не забудьте position: relative; в родительском div
Спасибо, это отлично работает. Я пробовал это, но забыл об атрибуте «верхний», который помещал его ниже div. — person Andrew; 30.05.2013
Это зависит от того, чего именно вы хотите добиться.
Если вы просто хотите, чтобы он был справа, то я бы рекомендовал не использовать абсолютную позицию, потому что она открывает целую банку червей в будущем.
HTML также может быть неизменен:
тогда CSS должен быть чем-то вроде:
Вы можете увидеть это в действии здесь: http://jsfiddle.net/azhH5/
Если вы можете изменить HTML, все становится немного проще:
Вы можете увидеть его в действии: http://jsfiddle.net/8WA3k/1/.
Если вы хотите, чтобы кнопка находилась в той же строке, что и текст, вы можете добиться этого, выполнив следующие действия:
Ясно, что в примере вам не пришлось бы настраивать верхнее поле для указанного размера шрифта
Как видите, он не выдвигается из , он остается внутри. это достигается двумя вещами: отрицательной маржей на и overflow: hidden; на
РЕДАКТИРОВАТЬ 2:
Я только что увидел, что вы также хотите, чтобы он был немного в стороне от поля справа. Это легко достижимо с помощью этого метода. Просто добавьте margin-right: 1em; к , вот так:
Вы можете увидеть это в действии здесь: http://jsfiddle.net/QkvGb/
Не могли бы вы подробнее рассказать, как этот overflow: hidden помогает в этой ситуации? и этот отрицательный запас тоже. — person JohnnyQ; 01.12.2016
Add Space Between Buttons in HTML

- Add an Empty div Element Between Two Buttons to Add Space Between Them in HTML
- Use the margin-right Property to Put Space Between the Buttons in HTML
- Use the margin-right Property and not(:last-child) Selector to Provide Space Between Multiple Buttons in HTML
This article will introduce a few methods to add space between two HTML buttons.
Add an Empty div Element Between Two Buttons to Add Space Between Them in HTML
An empty div can be added between the two buttons to add a space between them. Then, we can provide the div with some width which creates some space between buttons.
By default, a div has a display property of block . It means the div takes an entire row of its position.
If we add an element after a div , that element will be placed below the div in the browser.
Therefore we have to change the display property of the div to inline-block . The inline-block elements have the property of both block and inline.
The inline-block elements can have width, margin, padding, etc., but they do not take the entire row of their location, unlike the block elements.
For example, create a div ; inside that div , create two buttons using the button tag. Name those buttons Button 1 and Button 2 .
Create a div between those buttons and give it a class of space . This div should not contain any elements.
Select the inner div with its class space in CSS, and set the display property to inner-block . Give the div some width according to the requirement.
Note that the value of width will be the space between the buttons. Also, set the height property to auto so that the div will take only the required height.
The example below shows that two buttons have a space of 4px .
div> button> Button 1 button> div class="space"> div> button> Button 2 button> div> .space width: 4px; height: auto; display: inline-block; > Use the margin-right Property to Put Space Between the Buttons in HTML
The CSS margin property creates space around elements outside of any defined borders. The margin property combines four properties: margin-top , margin-bottom , margin-left and margin-right .
The margin-top property creates space on the top of an element. Likewise, the margin-bottom , margin-right and margin-left properties create space on the element’s bottom, right and left.
We can use the margin-right property for the first button element to create a space between buttons.
As a result, a margin of a certain width to the button’s right will be created. Then, the other button will reside next to the margin.
For example, create two buttons using the button tag and name Button 1 and Button 2 . Set the classes of the button as B1 and B2 .
In CSS, select the B1 class and set its margin-right property to 4px . This will create a 4px space to Button 1 right, creating a space between the two buttons.
button class="B1"> Button1 button> button class="B2"> Button2 button> Use the margin-right Property and not(:last-child) Selector to Provide Space Between Multiple Buttons in HTML
We can add spaces between the multiple buttons using the margin-right property and the CSS not() selector. The logic behind this approach is we will create the space between each button using the margin-right property as in the second method.
But, we will not create a space after the last button.
For that, we will use the not() selector. Inside, the not selector, we can use :last-child .
The :last-child selector denotes the last child inside a container. As a whole, we can apply the following rule to apply the styles.
.container>.button:not(:last-child) > The > symbol selects every child inside the container . As a result, the styles will be applied to all the children with the class button inside the parent container except the last child.
For example, create a div and give it a class of container .
Inside the div , create three buttons and name them Button 1 , Button 2 , and Button 3 . Also, set the button as the class for each button.
Now, use the rule mentioned above to set the style in CSS. Inside the rule, use the margin-right property and set it to 10px to add space to 10px between the child elements or buttons.
The example below shows that the three buttons have a space of 10px between them.
div class='container'> button class='button'>Button 1button> button class='button'>Button 2button> button class='button'>Button 3button> div> .container>.button:not(:last-child) margin-right: 10px; > How to Give Space Between Two Buttons in CSS
![]()
In HTML, buttons are clickable elements used to perform a specific action. Most buttons are placed close to each other, but you can give space between two buttons using CSS’s margin property. For this, you can use the margin-left property or the margin-right property.
In this article, you will learn how to give space between two buttons with the help of CSS. But, first, learn about the margin-left and margin-right properties one by one. So, let’s start!
What is “margin-left” CSS Property?
In CSS, “margin-left” property is utilized to create space from the left side of the elements. The element will be further away from its neighbors if the value is positive, whereas it becomes closer to its neighbors if the specified value is negative.
The syntax of the margin-left property is as follows:
In the place of “value”, set the margin you want to give to the element from the left side.
What is “margin-right” CSS Property?
The “margin-right” property of CSS is utilized to create space from the right side of the element. It positions the margin area on the element’s right side. The default value of the margin-right property is set as zero; however, you can specify both positive and negative values for it.
The syntax of the margin-right property is given below:
Place the “value” which you want to set as the margin from the right side of the element.
How to Give Space Between Two Buttons?
You can create space between two buttons using the “margin-left” and “margin-right” properties. To do so, in the HTML section, we will add a heading using and create two buttons with the class name “btn1” and “btn2”, respectively.
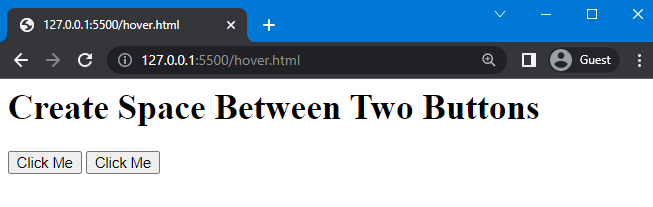
Create Space Between Two Buttons < / h1 >
The default outcome of the given code is:
Now, move to the CSS to create space between these two buttons.
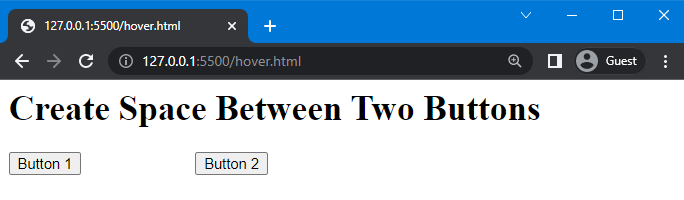
Example 1: Giving Space Between Two Buttons Using margin-right Property
Here, use “.btn1” to access the first button added in the HTML and set the value of the margin-right property as “100px”.
As you can see, space is created on the right side of the first button:
In the next example, we will use the “margin-left” property to create space between two buttons.
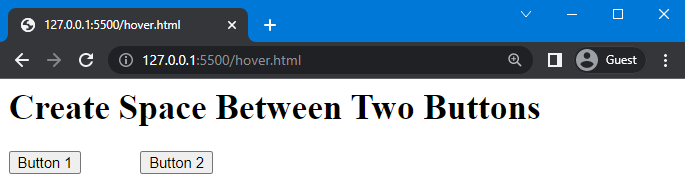
Example 2: Giving Space Between Two Buttons Using margin-left Property
We will use “.btn2” to access the second button created in the HTML file and assign the value of the margin-left property as “50px”:
Upon doing so, space is created left side of the second button which can be seen below:
Want to use both properties at once? Check out the next example!
Example 3: Giving Space Between Two Buttons Using margin-left and margin-right Properties
You can also set the margin of both buttons to give space between them. To do so, we will create space from right side of the first button and from the left side of the second button using margin-right and margin-left properties, respectively:

We have provided the simplest method related to giving space between two buttons in CSS.
Conclusion
“margin-left” and “margin-right” properties of CSS are used to give space between two buttons. Using this, you can adjust the space from the right and left sides of the buttons. In this article, we have explained how to give space between two buttons using two different methods and provided examples for each of them.
About the author
Sharqa Hameed
I am a Linux enthusiast, I love to read Every Linux blog on the internet. I hold masters degree in computer science and am passionate about learning and teaching.