- CSS 100% height of a button element in html doesn’t work
- CSS Style
- HTML Body
- Related
- Bootstrap: How to Create an HTML Button with a Width and Height of 100
- Have BootStrap buttons fill the height of the screen
- Bootstrap empty button inside table. How to set on 100% height? [duplicate]
- Bootstrap Column Same Height with Button
- Link <a> has 100% width in display flex, <button> don’t
- CSS Button Size
- Example 01:
- Example 02: Using Inline CSS to Alter the Size of a Button in an HTML File
- Example 03: Increasing the Size of a Button When It Hovers With Our Cursor in an HTML File
- Example 04: Using the Font Size to Enhance the Size of a Button Using CSS
- Conclusion
- About the author
- Aqsa Yasin
CSS 100% height of a button element in html doesn’t work
The following tutorial shows you how to use CSS to do «CSS 100% height of a button element in html doesn’t work».
CSS Style
The CSS style to do «CSS 100% height of a button element in html doesn’t work» is
html, body < height:100%; > button < height:100%; width:100%; >
HTML Body
body> button id="chartContainer">Testing The following iframe shows the result. You can view the full source code and open it in another tab.
html> head> meta name="viewport" content="width=device-width, initial-scale=1"> style id="compiled-css" type="text/css"> html, body < height: 100%; > button < height: 100%; width: 100%; > body> button id="chartContainer">Testing Related
- CSS Vertically centering the search bar and button in a header
- HTML CSS CSS Page Component Button Example
- CSS (100% — fixed) works for div but not for button (Firefox and Opera issue)
- CSS 100% height of a button element in html doesn’t work
- CSS 2 HTML buttons that I want to be side by side on the same line
- CSS 2 Line Button Value
- CSS 2px difference between button and container element
demo2s.com | Email: | Demo Source and Support. All rights reserved.
Bootstrap: How to Create an HTML Button with a Width and Height of 100
To make margin auto work, it’s necessary to specify a width. You can use margin auto to push the element to the right. Instead of using flex, it’s recommended to use display: block or inline-block if you don’t want it to be full width. For the anchor tag, margin-left: auto won’t work because buttons are block-level elements and anchors are inline elements. You can use the same behavior with padding instead of margin.
Have BootStrap buttons fill the height of the screen
Your problem might be resolved by accessing the provided fiddle link.
Codes are as follows: HTML:
document.getElementById("catalogSearch").onclick = function () < location.href = "https://encore.mpl.on.ca/iii/mobile/homepage?lang=eng"; >; document.getElementById("AccountLogin").onclick = function () < location.href = "https://encore.mpl.on.ca/iii/mobile/homepage/Sdologin?lang=eng&loginReason=doDefault"; >; document.getElementById("hrsLocations").onclick = function () < location.href = "http://www.mpl.on.ca/hours.php"; >; - It is unclear which version of Bootstrap you are utilizing, either v3 or v4.
- When utilizing .col-*-* in your code, ensure that it is only nested within .row elements or other elements that have a predetermined margin: 0 -15px (such as .form-group tags).
- .col-*-4 is utilized to prevent your element from taking up one-third of its parent’s width.
- Having 3 instances of tags on a single page is not recommended from an SEO perspective. It should be avoided.
Assuming you are using Bootstrap v3, the simplest approach to accomplish your goal would be to utilize a combination of .btn-block and flexbox . It’s worth noting that I’ve made substantial modifications to the markup since yours is invalid.
body < margin: 0; >div.jumbotron < font-family: Helvetica Neue, Helvetica, Arial, sans-serif; min-height: 100vh; margin-bottom: 0; >.jumbotron > .btn-block < display: flex; flex-direction: column; min-height: calc(100vh - 60px); align-items: stretch; >.jumbotron > .btn-block > .btn < flex-grow: 1; display: flex; flex-direction: column; align-items: center; justify-content: center; >@media (min-width: 768px) < .jumbotron >.btn-block < min-height: calc(100vh - 120px); >> Catalogue Search
Library Account Login
Hours and Locations
Don’t forget to autoprefix
Experience this design without relying on bootstrap: // initiate the button and its corresponding style
.button < background-color: gray; color: #FFFFFF; padding: 10px; border-radius: 10px; -moz-border-radius: 10px; -webkit-border-radius: 10px; margin:10px >// this will assign sizes of the button you want .btnbig < width: 99%; height: 500px; >//btnbig is the class of your button you want to modify A big button Is everything understandable at this point? Please forgive me as I am new to this.
Set a button group’s width to 100% and make buttons equal width?, Bootstrap has the .btn-group-justified css class. How it’s structured is based on the type of tags you use. With tags
Bootstrap empty button inside table. How to set on 100% height? [duplicate]
To fill the vacant element, one alternative is to insert a (non-breaking space).
Fiddle for the nbsp method
Employing the escaped unicode character with the content property and the ::before selector is a CSS technique that can be utilized. This approach corresponds to a0 that is identical to .
td button.btn.btn-success::before
Fiddle for the css method
To resolve the problem with the blank button, consider using CSS. Rather than assigning a height of 100%, specify a pixel value such as 25px which has been found to be effective in this scenario.
td < padding:0; >td button, td div < width:100%; height:25px; >table th, table td
This is what you asked for: Check out this link — https://jsfiddle.net/79jzkwup/
How to change button width in bootstrap Code Example, “how to change button width in bootstrap” Code Answer’s ; button max width bootstrap. html by Snippets on Dec 04 2020 Comment. 3 ; bootstrap 4 button size.
Bootstrap Column Same Height with Button
Please be aware that buttons cannot be included as children of links, and vice versa.
To resolve the problem, eliminate the align-items-center class and adjust the button height to 100%.
Instead of using the following style with bootstrap , you can try using this alternative.
Bootstrap Button Full Width for Smaller Screen Sizes, Create this new CSS class: @media(max-width: 768px) < button.full-width < width: 100%; >>. And then apply it to your buttons:
Link <a> has 100% width in display flex, <button> don’t
The behavior of buttons is different from links, therefore table can be used in place of flex to achieve the same result.
The reason why margin-left: auto; doesn’t work on the anchor tag is that it is an inline element while the button is a block-level element.
You can try:
To make margin auto function properly, it is necessary to provide a width along with it. Therefore, in order to align an object towards the right using margin auto, the following code can be used:
I suggest using display: block; or inline-block instead of flex if you do not want it to be full width. Including flexbox would be unnecessary if it is not going to be used.
A simpler and more organized approach would be to use the flex version:
CSS Button Size
![]()
This article will go over the concept of the button size in the CSS style approach. As we know, the default button is small in size and is not visible. So, we will use the CSS in two separate ways to increase the button size and alter it on an effect like the hover effect. All these examples will be performed in the Notepad++ environment.
Example 01:
In this example, we will use the width and height property for the button element to increase its size. We will use the CSS Style Tag approach in this example to add several properties. First, we will look at the default size of the button element present in an HTML file.
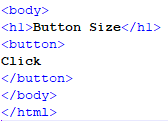
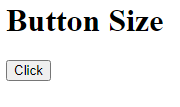
As we can see in the given script, we have not altered the size of the button. In the following output, we can see that the button size is very small and is not feasible for a web page.
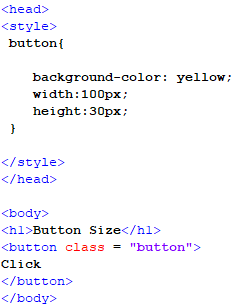
So, now we add the styling to the button. First, we open the head tag for the file. In this tag, the style tag for CSS is called. In this tag, we add all the properties for the button element. We write all the properties for the button element inside the button class parenthesis. First, we set the background color to “yellow”. Then, we set the width in pixel format to “100px”. Finally, we set the height in pixel format to “30px”. We close the style and head tags after all of the formatting are complete. Then, we go to the body tag. We write the page’s headline using the h1 tag in the body tag and then open the button tag. The class from the style tag is called in the button tag. Following that, we close the button tag with the text that displays on the button in between, as well as the body tag.
As explained earlier, we added the code in the previous script. Now, we open this new script on our browser after saving it in the correct format.
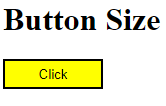
In the given output, we can see that the button has all the formatting including the size that we specified in the style class in the file header.
Example 02: Using Inline CSS to Alter the Size of a Button in an HTML File
In this example, we will use the inline CSS to change the size of an HTML file’s default button element. All the style properties will be assigned inside the button tag. This is an unconventional method to add CSS to any element and will only be associated with the current element.

As we can see in the previous snippet, we directly moved to the body of the file as all the content would be in the body tag. First, we open the h1 tag to write a heading for the page and then close it. Then, we open the button tag. In this tag, we call the style attribute by its keyword. After this, we write all the properties for the button element in the inverted commas and separate them by using the semicolon character. First, we assign the background color, “yellow”. Then, we assign the width in the pixel format. In the end, we assign the height, also in the pixel format. After this, we close the button tag with the text in between, which will appear on the button. And close the body tag along with it. Now, we save this file in the “.html” format and open it on our browser to get the following result:
As we can see in the output of our script, the heading and button from the body tag are visible. The button has all of the values defined in the tag, including the height and width.
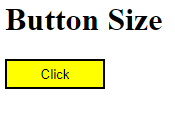
Example 03: Increasing the Size of a Button When It Hovers With Our Cursor in an HTML File
In this example, we will use the width and height properties of the button element to make it bigger, only when the pointer is over it. In this example, we will use the CSS style tags to add numerous attributes and effects to the button element.
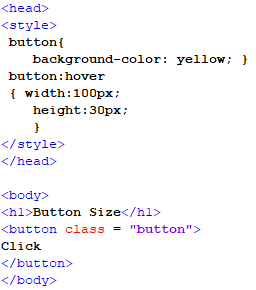
In this example, we customize the button using the CSS style tags. First, we open the file’s head tag. And then, we call the CSS style tag from there. We add all of the button element’s attributes in this tag. Inside the button class parenthesis, we enter all of the properties for the button element; in this example, we set the background color to “yellow.” Then, we open a button class that inherits a method called “hover”. In this function, we do the following: we set the width in pixel format to “100px” and set the height in pixel format to “30px”. After we finish formatting, we close the style and head tags. Then, we go to the body tag. We use the h1 tag to create the page’s title in the body tag, then open the button tag. The button tag uses the class from the style tag and have the text that appears on the button in between. Following that, we close the button tag and the body tag.

As we can see in the previous output, the size and the background color have changed as we hovered on the button with our cursor. This is because the hover function has all these properties defined in the style tag of the header’s file.
Example 04: Using the Font Size to Enhance the Size of a Button Using CSS
In this example, we will opt to a different method to change the size of a button. The font size property will be used to increase the size of a button using the style tag CSS.
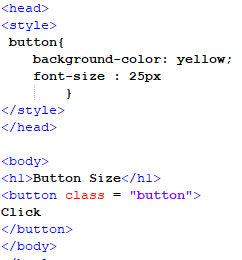
First, we open the style tag in the file header and create a styling class for the button. In this class, we assign a background color to the button. After that, we assign the font size as well. In this case, it is set to “25px”. Then, we close the class and the style and head tags, respectively. Then the body tag has a heading and a button tag which have the style tag class inherited in it. After this, we close the tags and save the file to open it on our browser.
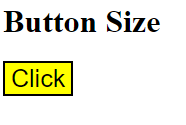
In the output screen, we can see that the button has an increased size from the default button that the HTML provides due to the change in the font size property.
Conclusion
In this article, we discussed the size of the button element present in the Hypertext Markup Language. The default button has a very small size which makes it difficult to navigate on a web page. So, we used the different approaches in CSS like the style tag and inline CSS approach. The most common property used to alter the size are the width and height property of a button. We discussed this concept and implemented this on the Notepad++. We also implemented the font size approach to increase the size of a button.
About the author
Aqsa Yasin
I am a self-motivated information technology professional with a passion for writing. I am a technical writer and love to write for all Linux flavors and Windows.