- border
- Пример
- border-right
- Try it
- Constituent properties
- Syntax
- Values
- Formal definition
- Formal syntax
- Examples
- Applying a right border
- HTML
- CSS
- Results
- Specifications
- Browser compatibility
- See also
- Found a content problem with this page?
- MDN
- Support
- Our communities
- Developers
- Border Height in CSS
- How to Set Border Height in CSS?
- Step 1: Create a “div” Container
- Step 2: Insert a Heading
- Step 3: Make a List
- Все о свойстве border
- Основы
- Border-Radius
- Несколько границ
- Изменение углов
- CSS фигуры
- Создание Speech Bubble
- Итог
border
Свойство border отвечает за отрисовку видимой границы блока. Часто видимую границу блока называют рамкой.
Само свойство border является шорткатом (короткой записью) и объединяет в себе значение для нескольких полных свойств:
Пример
Скопировать ссылку «Пример» Скопировано
Украсим текстовую карточку цветной сплошной рамкой.
Повседневная практика показывает, .
div class="element"> p>Повседневная практика показывает, . p> div>
Зададим рамку толщиной 5 пикселей, сплошную, цвета #ED6742:
.element border: 5px solid #ed6742;>.element border: 5px solid #ed6742; >

🛠 Ещё немного про треугольники. А точнее, стрелки. Их тоже можно создать при помощи border , но тут понадобится подключить свойство transform , чтобы повернуть элемент с рамками на 45 градусов в нужную сторону:
div class="arrows"> div class="arrow _prev">div> div class="arrow _next">div> div> .arrows max-width: 1200px; height: 250px; margin: 0 auto; background-color: #f1f1f1;> .arrow /* Рисуем квадрат */ width: 50px; height: 50px; /* Задаём левую рамку */ border-left: 5px solid #ff0001; /* Задаём нижнюю рамку */ border-bottom: 5px solid #ff0001;> .arrow._prev /* Поворачиваем квадрат нижним левым углом влево */ transform: rotate(45deg);> .arrow._next /* Поворачиваем квадрат нижним левым углом вправо */ transform: rotate( -135deg );>.arrows max-width: 1200px; height: 250px; margin: 0 auto; background-color: #f1f1f1; > .arrow /* Рисуем квадрат */ width: 50px; height: 50px; /* Задаём левую рамку */ border-left: 5px solid #ff0001; /* Задаём нижнюю рамку */ border-bottom: 5px solid #ff0001; > .arrow._prev /* Поворачиваем квадрат нижним левым углом влево */ transform: rotate(45deg); > .arrow._next /* Поворачиваем квадрат нижним левым углом вправо */ transform: rotate( -135deg ); >
Чем не стрелки для слайдера? 🤗
🛠 Часто встречающийся дизайнерский приём — появление рамки вокруг элемента при наведении на него курсора мыши.
Если просто добавлять рамку по селектору :hover , то элемент будет дёргаться. Причина в том, что размер элемента увеличивается на ширину рамки. Чтобы подобных подёргиваний не происходило, изначально задайте рамку нужной толщины, но установите ей прозрачный цвет ( transparent ). А по наведению курсора просто меняйте цвет на нужный. Profit! Вы прекрасны 😄
border-right
The border-right shorthand CSS property sets all the properties of an element’s right border.
Try it
As with all shorthand properties, border-right always sets the values of all of the properties that it can set, even if they are not specified. It sets those that are not specified to their default values. Consider the following code:
border-right-style: dotted; border-right: thick green;
It is actually the same as this one:
border-right-style: dotted; border-right: none thick green;
The value of border-right-style given before border-right is ignored. Since the default value of border-right-style is none , not specifying the border-style part results in no border.
Constituent properties
This property is a shorthand for the following CSS properties:
Syntax
border-right: 1px; border-right: 2px dotted; border-right: medium dashed green; /* Global values */ border-right: inherit; border-right: initial; border-right: revert; border-right: revert-layer; border-right: unset;
The three values of the shorthand property can be specified in any order, and one or two of them may be omitted.
Values
Formal definition
- border-right-width : medium
- border-right-style : none
- border-right-color : currentcolor
- border-right-width : the absolute length or 0 if border-right-style is none or hidden
- border-right-style : as specified
- border-right-color : computed color
- border-right-color : a color
- border-right-style : discrete
- border-right-width : a length
Formal syntax
border-right =
||
||
=
|
thin |
medium |
thick
=
none |
hidden |
dotted |
dashed |
solid |
double |
groove |
ridge |
inset |
outset
Examples
Applying a right border
HTML
div>This box has a border on the right side.div>
CSS
div border-right: 4px dashed blue; background-color: gold; height: 100px; width: 100px; font-weight: bold; text-align: center; > Results
Specifications
Browser compatibility
BCD tables only load in the browser
See also
Found a content problem with this page?
This page was last modified on Feb 21, 2023 by MDN contributors.
Your blueprint for a better internet.
MDN
Support
Our communities
Developers
Visit Mozilla Corporation’s not-for-profit parent, the Mozilla Foundation.
Portions of this content are ©1998– 2023 by individual mozilla.org contributors. Content available under a Creative Commons license.
Border Height in CSS
![]()
In web development, the “border” property plays a significant role. They may be utilized to distinguish or highlight stuff on a website, which makes it simple and easy for visitors to perceive and act on the site. Furthermore, the user can also determine the border height. Border height in CSS actually depends on the length of the border lines.
Sometimes, the user thinks the border will always be applied horizontally according to the element’s boundary. However, this concept is wrong. You can set the border height according to their preferences.
This post will explain how to set border height in CSS.
How to Set Border Height in CSS?
To set the border height in CSS, the “line-height” property is used. This property is commonly used for setting the distance between text lines.
For this purpose, try out the mentioned instructions.
Step 1: Create a “div” Container
Initially, make a “div” container with the help of the “ ” element. Also, assign it a “class” attribute inside the opening tag of the “” element and specify a name for the class according to your choice.
Step 2: Insert a Heading
Next, insert a heading by using any heading tag “ ” to “ ”. In this example, we have utilized the “ ” tag.
Step 3: Make a List
Then, utilize the “ ” tag to make the ordered list and add the data inside the list with the help of the “ ” tag:
Все о свойстве border
Все знакомы с css параметром border, но есть ли вещи, которые мы не знаем о нем?
Основы
border-width: thick; border-style: solid; border-color: black;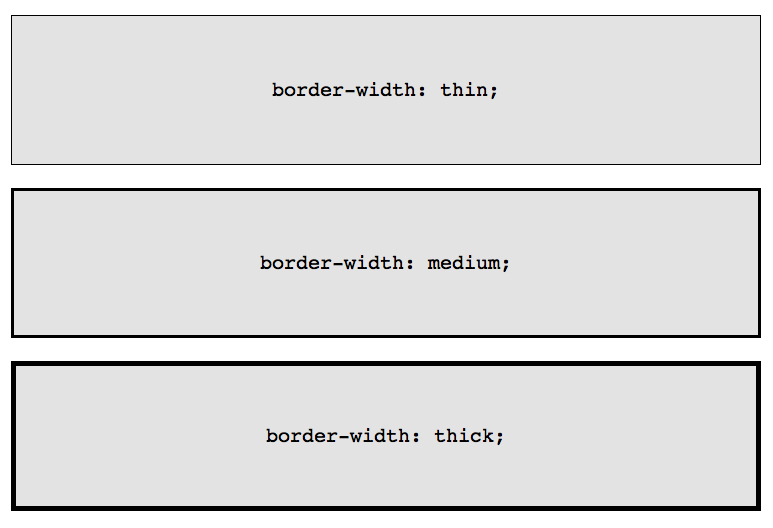
Например у параметра border-width есть три параметра: thin, medium, thick:
Если необходимо менять цвет границы при наведении на объект:
Border-Radius
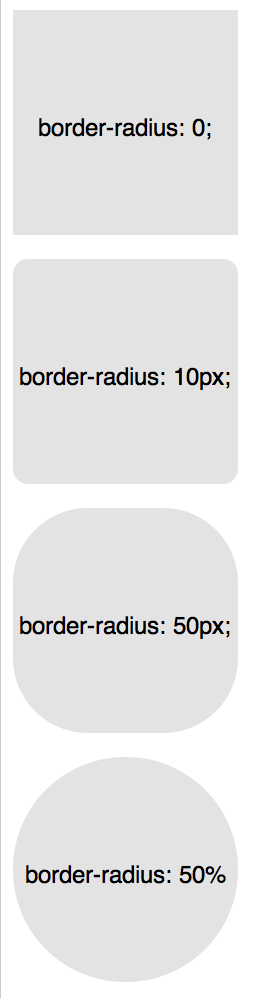
border-radius — это новый параметр CSS3 для отображения закругленных углов, который корректно работает во всех современных браузерах, за исключением Internet Explorer 8 (и более старых версий).
Для каждого угла можно назначить свое закругление:
border-top-left-radius: 20px; border-top-right-radius: 0; border-bottom-right-radius: 30px; border-bottom-left-radius: 0;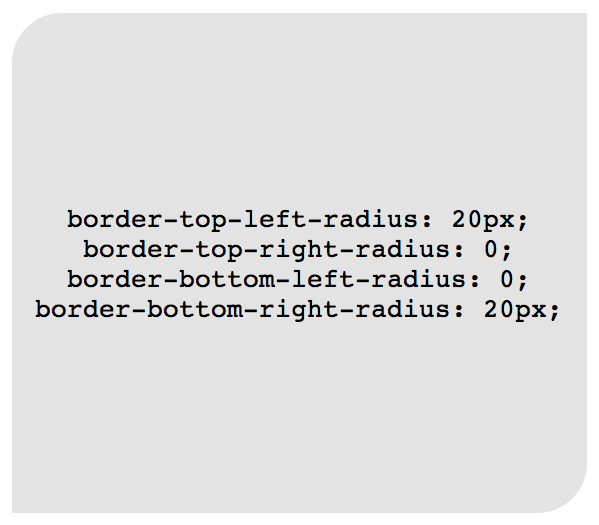
В приведенном примере необязательно назначать «0» border-top-right-radius и border-bottom-left-radius, если они не наследуют значения, которые должны быть изменены.
Всю конструкцию можно сжать в одну строку:
/* top left, top right, bottom right, bottom left */ border-radius: 20px 0 30px 0;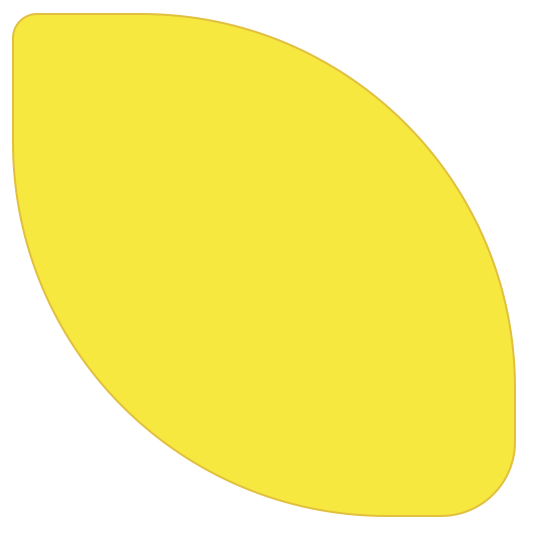
Здесь описаны самые простые и популярные примеры применения параметра border. Перейдем к более сложным.
Несколько границ
Border-Style
solid, dashed, and dotted — самые популярные значения параметра border-style, но давайте рассмотрим другие, например, groove and ridge.
border: 20px groove #e3e3e3;border-color: #e3e3e3; border-width: 20px; border-style: groove;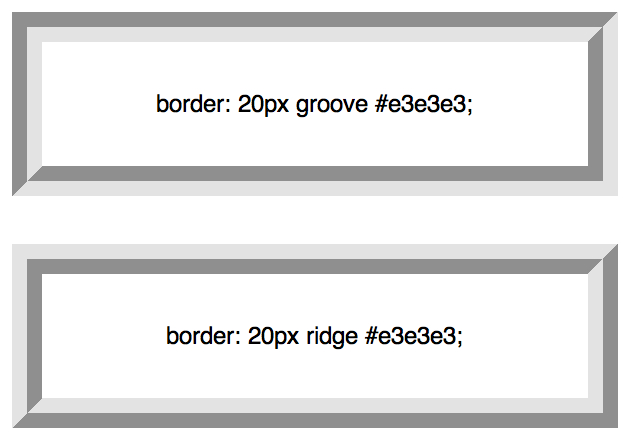
Outline

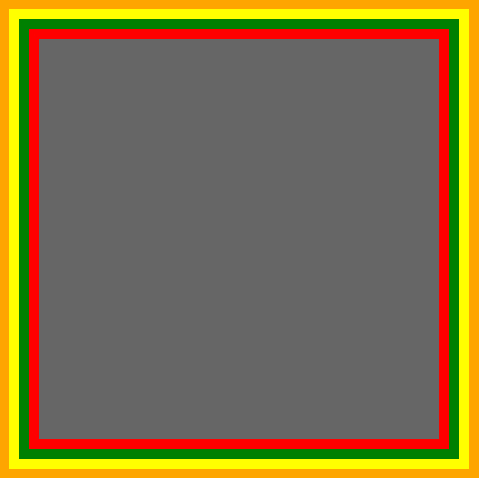
Этот способ отлично работает, но ограничен созданием двойной рамки. Если вам необходимо отобразить несколько границ элемента, то необходимо использовать другую технику.
Псевдоэлементы
.box < width: 200px; height: 200px; background: #e3e3e3; position: relative; border: 10px solid green; >/* Create two boxes with the same width of the container */ .box:after, .box:before < content: ''; position: absolute; top: 0; left: 0; bottom: 0; right: 0; >.box:after < border: 5px solid red; outline: 5px solid yellow; >.box:before

Возможно это не самое элегантное решение, однако оно работает
Box-Shadow
Изменение углов
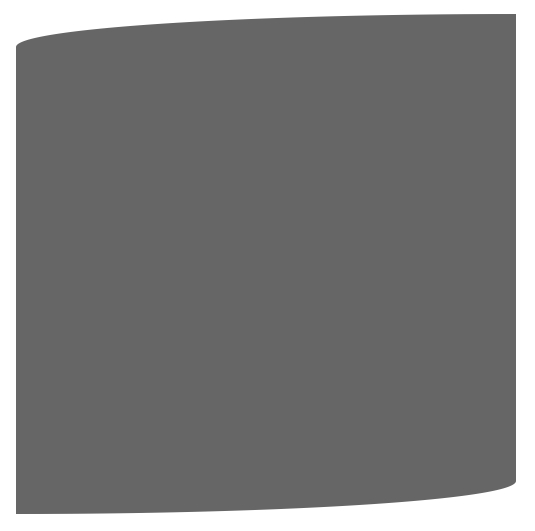
border-radius: 50px / 100px; /* horizontal radius, vertical radius */border-top-left-radius: 50px 100px; border-top-right-radius: 50px 100px; border-bottom-right-radius: 50px 100px; border-bottom-left-radius: 50px 100px;Эта техничка бывает полезна, если необходимо имитировать искривление, а не закругление. Например, так можно получить эффект скрученной бумаги:
CSS фигуры
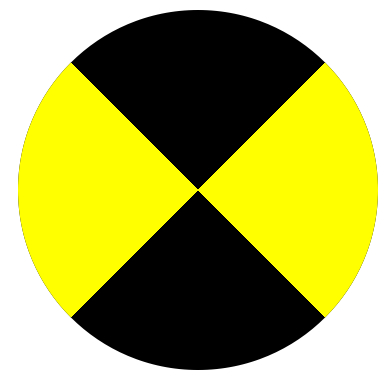
Наиболее частым примером использования CSS фигур является отображение стрелок. Чтобы понять, как это работает, необходимо разобраться с использованием отдельного border-color для каждой стороны и установкой значения «0» для width и height:
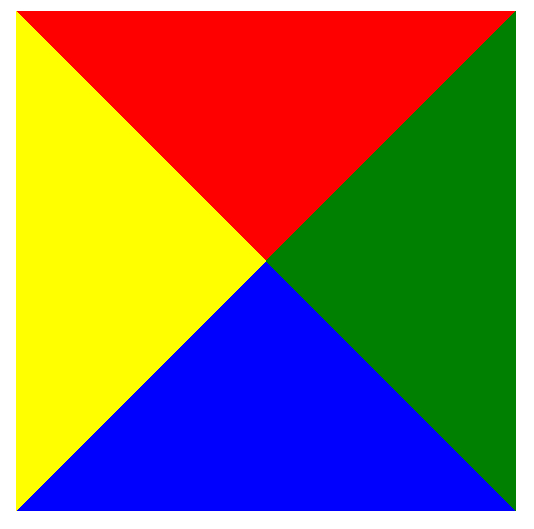
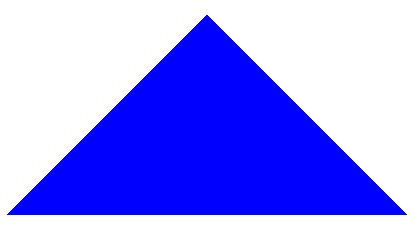
А теперь оставляем только синий треугольник:
Создание Speech Bubble
Теперь нужно расположить стрелку-треугольник в нужном месте. Вот наш цветной квадратик:
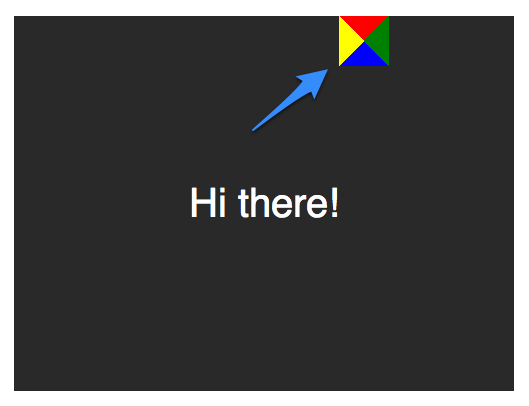
Оставляем только четверть квадратика:
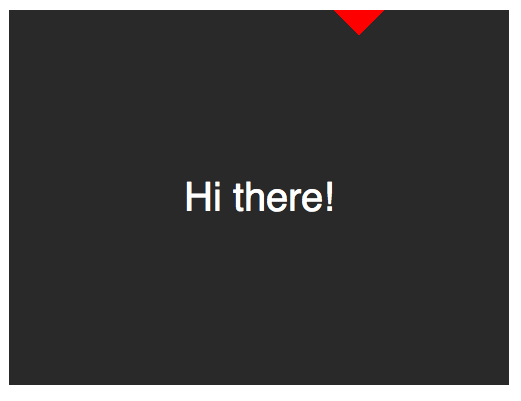
Теперь перемещаем ниже и закрашиваем:
.speech-bubble < /* … other styles */ border-radius: 10px; >.speech-bubble:after < content: ''; position: absolute; width: 0; height: 0; border: 15px solid; border-top-color: #292929; top: 100%; left: 50%; margin-left: -15px; /* adjust for border width */ >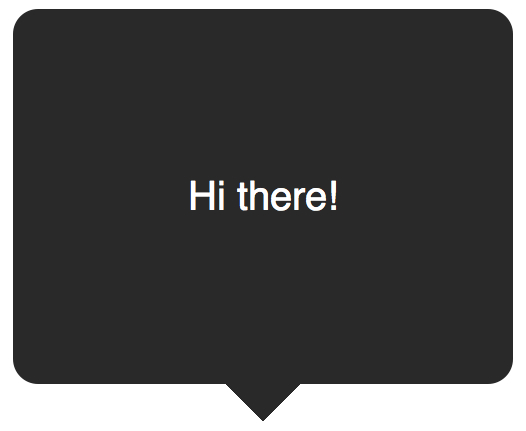
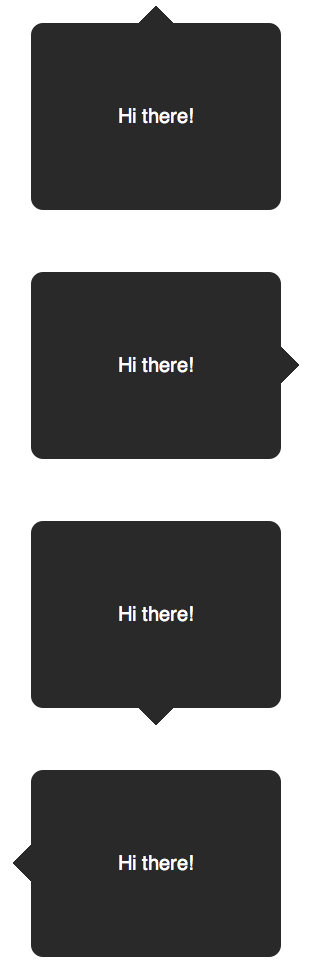
Примеры применения:
/* Speech Bubbles Usage: Apply a class of .speech-bubble and .speech-bubble-DIRECTIONHi there*/ .speech-bubble < position: relative; background-color: #292929; width: 200px; height: 150px; line-height: 150px; /* vertically center */ color: white; text-align: center; border-radius: 10px; font-family: sans-serif; >.speech-bubble:after < content: ''; position: absolute; width: 0; height: 0; border: 15px solid; >/* Position the Arrow */ .speech-bubble-top:after < border-bottom-color: #292929; left: 50%; bottom: 100%; margin-left: -15px; >.speech-bubble-right:after < border-left-color: #292929; left: 100%; top: 50%; margin-top: -15px; >.speech-bubble-bottom:after < border-top-color: #292929; top: 100%; left: 50%; margin-left: -15px; >.speech-bubble-left:after
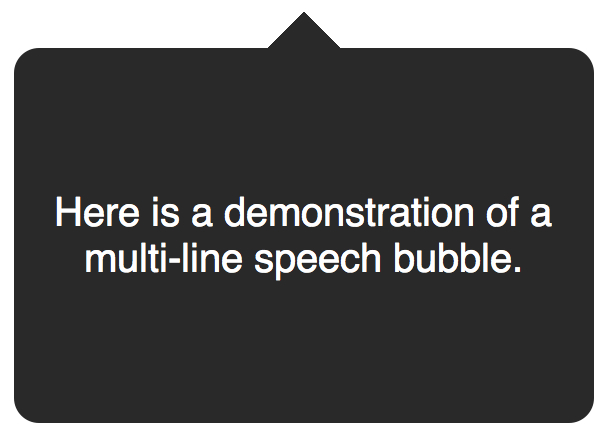
Вертикальное центрирование текста
минус использования line-height при вертикальном центрировании в ограничении текста одной строкой. Для решения этой проблемы, можно применить display: table к нашему Speech Bubble и display: table-cell к тексту:
.speech-bubble < /* other styles */ display: table; >.speech-bubble p
Еще один пример нестандартного использования границ:
Итог
Использование параметра border не ограничивается одним лишь «1px solid black», с помощью границ можно создавать различные фигуры, причем достаточно один раз написать CSS-класс и применять его к множеству элементов на странице.