- How to add left, right, bottom & top border in HTML CSS
- Using CSS border property.
- Using CSS border-style, border-width, and border-color properties.
- Add Bottom Border in HTML and CSS
- 1. Using border-bottom
- 2. Using Border Width, Style and Color
- Create Left Border in HTML and CSS
- 1. Add left border using border-bottom
- 2. Add left border using Border Width, Style and Color
- Create Right Border
- 1. Create right border using border-bottom
- 2. Add right border using Border Width, Style and Color
- Add Top Border HTML & CSS
- 1. Using border-top
- 2. Using Border Width, Style and Color
- About
- Recent Posts
- Все о свойстве border
- Основы
- Border-Radius
- Несколько границ
- Изменение углов
- CSS фигуры
- Создание Speech Bubble
- Итог
- border
- Try it
- Constituent properties
- Syntax
- Values
- Description
- Borders vs. outlines
- Formal definition
- Formal syntax
- Examples
- Setting a pink outset border
- HTML
- CSS
- Result
- Specifications
- Browser compatibility
- See also
- Found a content problem with this page?
- MDN
- Support
- Our communities
- Developers
How to add left, right, bottom & top border in HTML CSS
You can add borders to a parts of a webpage in two ways:
- Using CSS border property.
- Using CSS border-style, border-width, and border-color properties.
The border is a line that occurs between the padding and margin in HTML and CSS.
Using CSS border property.
The easiest way to create a border is by using the CSS border property. The structure of the border property is:
border: border-style border-width border-color;
.red-box < border: solid 2px red; > I have a red border around me
I have a red border around me
Using CSS border-style, border-width, and border-color properties.
An alternative method of adding borders to elements on a webpage is by using CSS border-style , border-width , and border-color properties.
.blue-box < border-style: dashed; border-width:5em; border-color:#0000ff; > I have a red border around me
I have a blue border around me
For this second method, you have to set the border-style property otherwise, borders will not appear on your webpage.
Add Bottom Border in HTML and CSS
The bottom border is usually used for underlining links or showing the active page on a navigation bar. There are two ways of setting the bottom border in CSS:
1. Using border-bottom
You can use the border-bottom to add the bottom border on text(heading, lists, paragraphs) or containers(div, section, nav, footer).
2. Using Border Width, Style and Color
You can also set the bottom border using the border-width , border-style and border-color properties.
Create Left Border in HTML and CSS
You can create the left border in CSS:
1. Add left border using border-bottom
You can use the border-left to create the left border on text(heading, lists, paragraphs) or containers(div, section, nav, footer).
2. Add left border using Border Width, Style and Color
You can also set the left border using the border-width , border-style and border-color properties.
Create Right Border
You can create the right border in CSS:
1. Create right border using border-bottom
You can use the border-right CSS property to create the right border on text on different parts of a HTML web page.
2. Add right border using Border Width, Style and Color
You can also set the right border using the border-color , border-style and border-width CSS properties.
Add Top Border HTML & CSS
There are two ways of setting the top border in CSS:
1. Using border-top
You can use the border-top to add the top border on text(heading, lists, paragraphs) or containers(div, section, nav, footer).
2. Using Border Width, Style and Color
You can also set the top border using the border-width , border-style and border-color properties.

Hi there! I am Avic Ndugu.
I have published 100+ blog posts on HTML, CSS, Javascript, React and other related topics. When I am not writing, I enjoy reading, hiking and listening to podcasts.
Front End Developer Newsletter
Receive a monthly Frontend Web Development newsletter.
Never any spam, easily unsubscribe any time.
About
If you are just starting out you can test the waters by attempting the project-based HTML tutorial for beginners that I made just for you.
Okay, you got me there, I made it because it was fun and I enjoy helping you on your learning journey as well.
You can also use the HTML and CSS projects list as a source of projects to build as you learn HTML, CSS and JavaScript.
Start understanding the whole web development field now
Stop all the confusion and start understanding how all the pieces of web development fit together.
Never any spam, easily unsubscribe any time.
Recent Posts
Copyright © 2018 — 2023 DevPractical. All rights reserved.
Все о свойстве border
Все знакомы с css параметром border, но есть ли вещи, которые мы не знаем о нем?
Основы
border-width: thick; border-style: solid; border-color: black;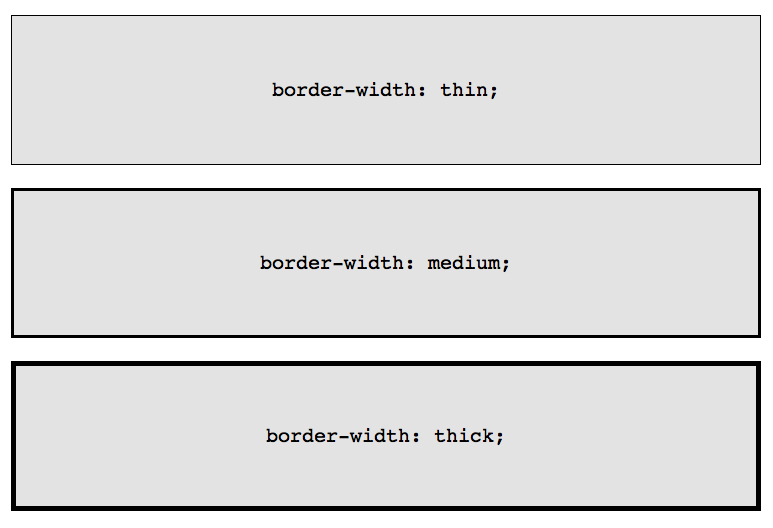
Например у параметра border-width есть три параметра: thin, medium, thick:
Если необходимо менять цвет границы при наведении на объект:
Border-Radius
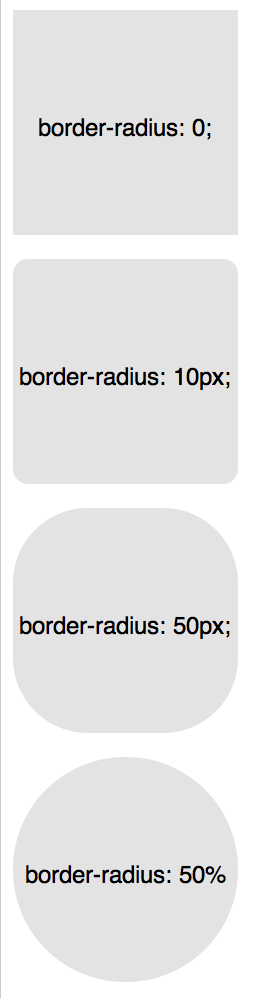
border-radius — это новый параметр CSS3 для отображения закругленных углов, который корректно работает во всех современных браузерах, за исключением Internet Explorer 8 (и более старых версий).
Для каждого угла можно назначить свое закругление:
border-top-left-radius: 20px; border-top-right-radius: 0; border-bottom-right-radius: 30px; border-bottom-left-radius: 0;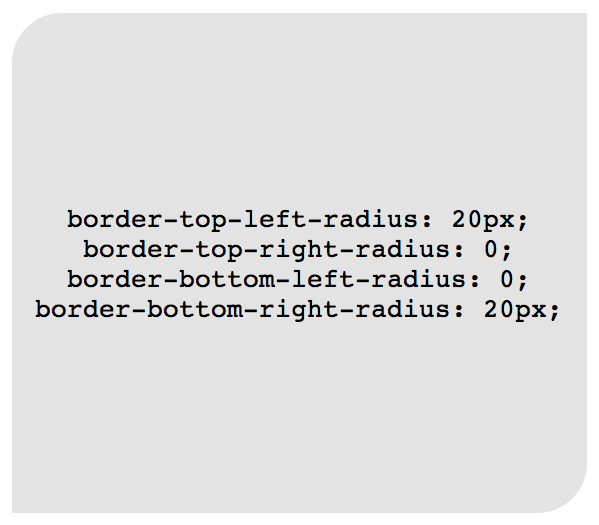
В приведенном примере необязательно назначать «0» border-top-right-radius и border-bottom-left-radius, если они не наследуют значения, которые должны быть изменены.
Всю конструкцию можно сжать в одну строку:
/* top left, top right, bottom right, bottom left */ border-radius: 20px 0 30px 0;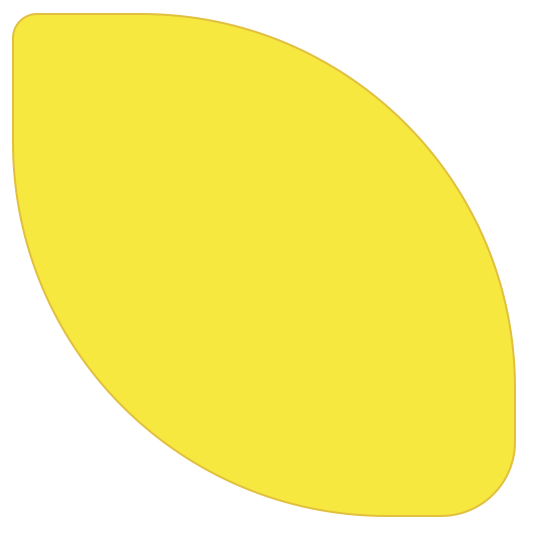
Здесь описаны самые простые и популярные примеры применения параметра border. Перейдем к более сложным.
Несколько границ
Border-Style
solid, dashed, and dotted — самые популярные значения параметра border-style, но давайте рассмотрим другие, например, groove and ridge.
border: 20px groove #e3e3e3;border-color: #e3e3e3; border-width: 20px; border-style: groove;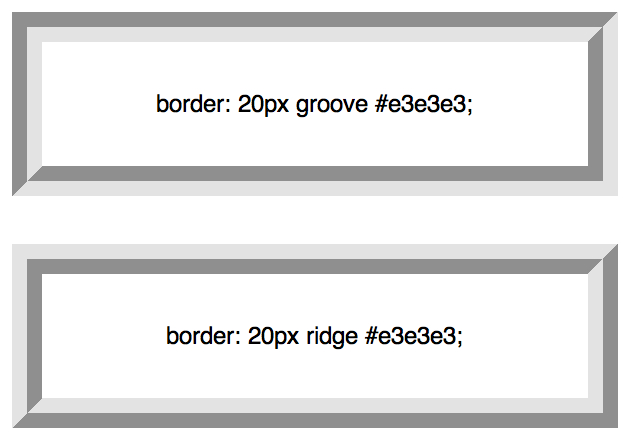
Outline

Этот способ отлично работает, но ограничен созданием двойной рамки. Если вам необходимо отобразить несколько границ элемента, то необходимо использовать другую технику.
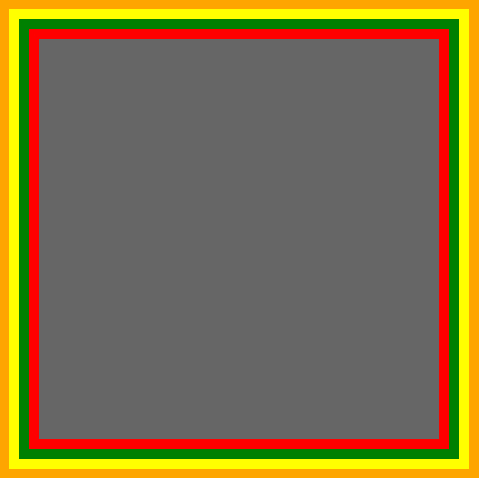
Псевдоэлементы
.box < width: 200px; height: 200px; background: #e3e3e3; position: relative; border: 10px solid green; >/* Create two boxes with the same width of the container */ .box:after, .box:before < content: ''; position: absolute; top: 0; left: 0; bottom: 0; right: 0; >.box:after < border: 5px solid red; outline: 5px solid yellow; >.box:before

Возможно это не самое элегантное решение, однако оно работает
Box-Shadow
Изменение углов
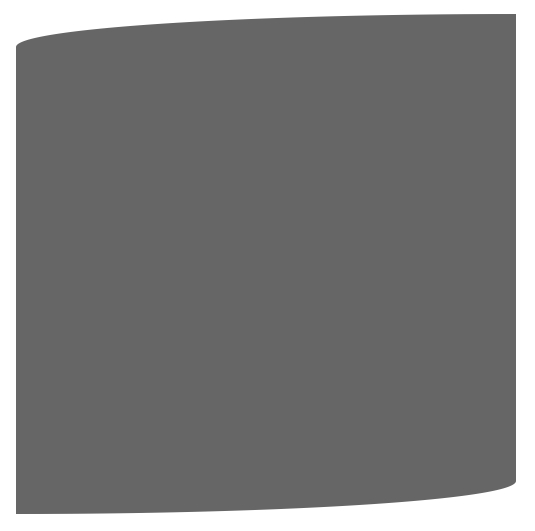
border-radius: 50px / 100px; /* horizontal radius, vertical radius */border-top-left-radius: 50px 100px; border-top-right-radius: 50px 100px; border-bottom-right-radius: 50px 100px; border-bottom-left-radius: 50px 100px;Эта техничка бывает полезна, если необходимо имитировать искривление, а не закругление. Например, так можно получить эффект скрученной бумаги:
CSS фигуры
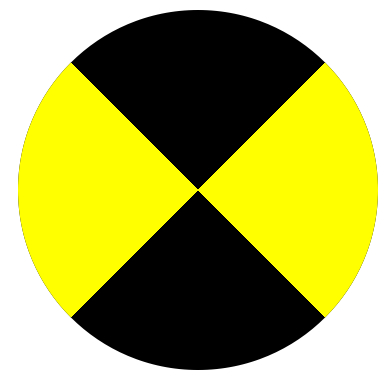
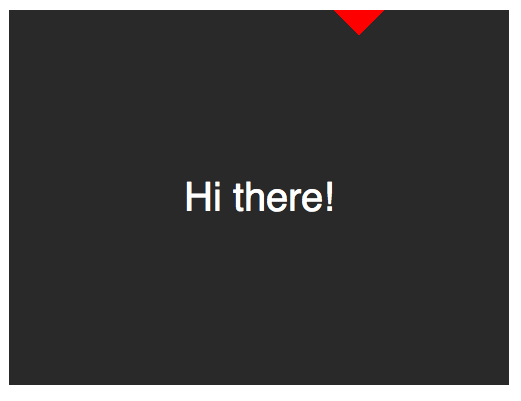
Наиболее частым примером использования CSS фигур является отображение стрелок. Чтобы понять, как это работает, необходимо разобраться с использованием отдельного border-color для каждой стороны и установкой значения «0» для width и height:
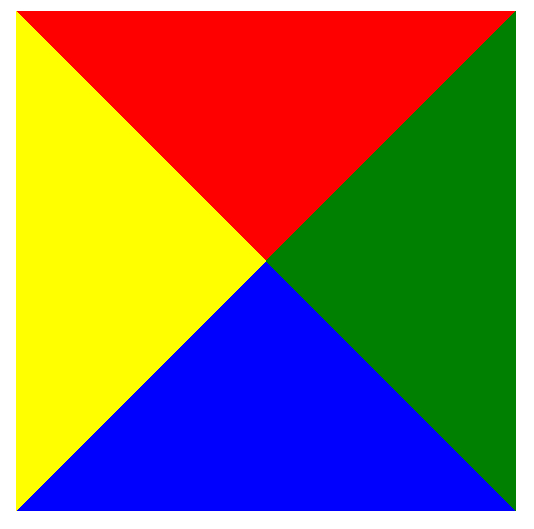
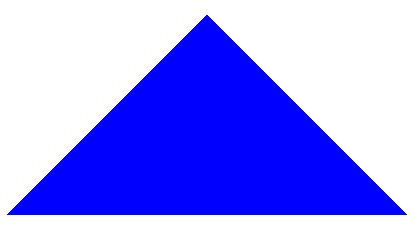
А теперь оставляем только синий треугольник:
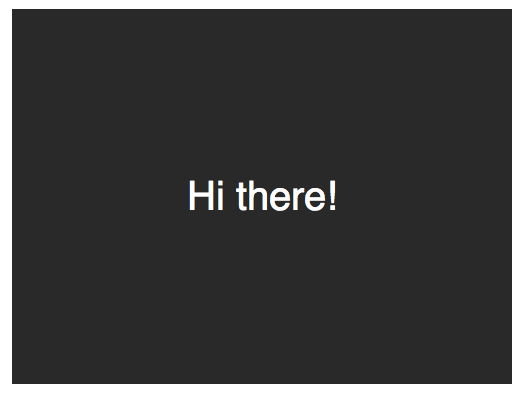
Создание Speech Bubble
Теперь нужно расположить стрелку-треугольник в нужном месте. Вот наш цветной квадратик:
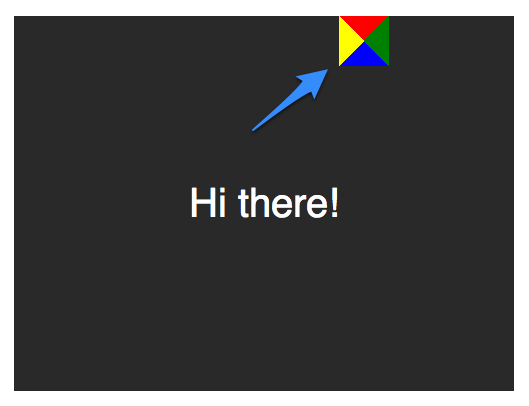
Оставляем только четверть квадратика:
Теперь перемещаем ниже и закрашиваем:
.speech-bubble < /* … other styles */ border-radius: 10px; >.speech-bubble:after < content: ''; position: absolute; width: 0; height: 0; border: 15px solid; border-top-color: #292929; top: 100%; left: 50%; margin-left: -15px; /* adjust for border width */ >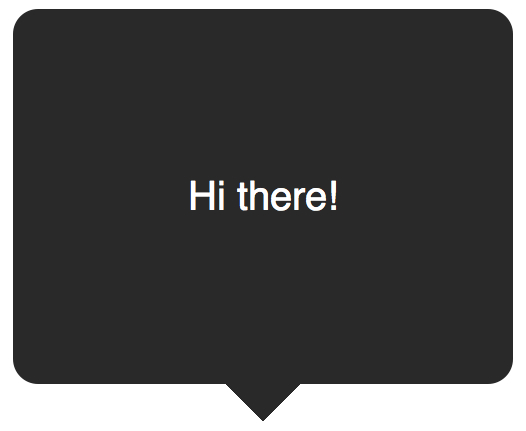
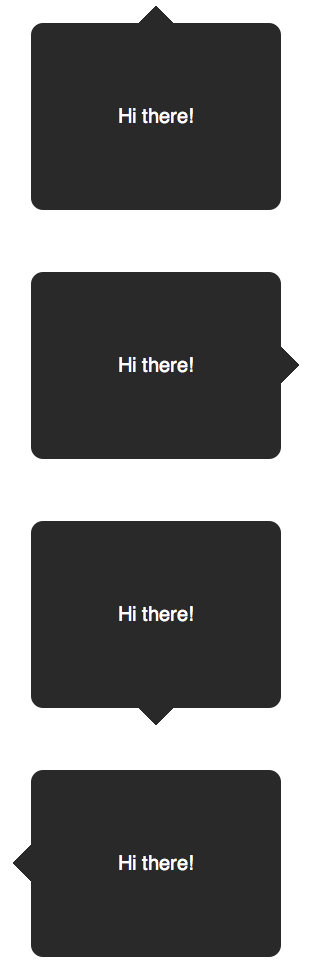
Примеры применения:
/* Speech Bubbles Usage: Apply a class of .speech-bubble and .speech-bubble-DIRECTIONHi there*/ .speech-bubble < position: relative; background-color: #292929; width: 200px; height: 150px; line-height: 150px; /* vertically center */ color: white; text-align: center; border-radius: 10px; font-family: sans-serif; >.speech-bubble:after < content: ''; position: absolute; width: 0; height: 0; border: 15px solid; >/* Position the Arrow */ .speech-bubble-top:after < border-bottom-color: #292929; left: 50%; bottom: 100%; margin-left: -15px; >.speech-bubble-right:after < border-left-color: #292929; left: 100%; top: 50%; margin-top: -15px; >.speech-bubble-bottom:after < border-top-color: #292929; top: 100%; left: 50%; margin-left: -15px; >.speech-bubble-left:after
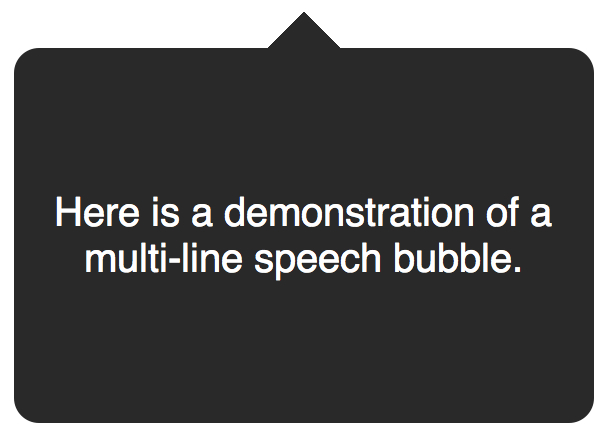
Вертикальное центрирование текста
минус использования line-height при вертикальном центрировании в ограничении текста одной строкой. Для решения этой проблемы, можно применить display: table к нашему Speech Bubble и display: table-cell к тексту:
.speech-bubble < /* other styles */ display: table; >.speech-bubble p
Еще один пример нестандартного использования границ:
Итог
Использование параметра border не ограничивается одним лишь «1px solid black», с помощью границ можно создавать различные фигуры, причем достаточно один раз написать CSS-класс и применять его к множеству элементов на странице.
border
The border shorthand CSS property sets an element’s border. It sets the values of border-width , border-style , and border-color .
Try it
Constituent properties
This property is a shorthand for the following CSS properties:
Syntax
/* style */ border: solid; /* width | style */ border: 2px dotted; /* style | color */ border: outset #f33; /* width | style | color */ border: medium dashed green; /* Global values */ border: inherit; border: initial; border: revert; border: revert-layer; border: unset;
The border property may be specified using one, two, or three of the values listed below. The order of the values does not matter.
Note: The border will be invisible if its style is not defined. This is because the style defaults to none .
Values
Sets the thickness of the border. Defaults to medium if absent. See border-width .
Sets the style of the border. Defaults to none if absent. See border-style .
Sets the color of the border. Defaults to currentcolor if absent. See border-color .
Description
As with all shorthand properties, any omitted sub-values will be set to their initial value. Importantly, border cannot be used to specify a custom value for border-image , but instead sets it to its initial value, i.e., none .
The border shorthand is especially useful when you want all four borders to be the same. To make them different from each other, however, you can use the longhand border-width , border-style , and border-color properties, which accept different values for each side. Alternatively, you can target one border at a time with the physical (e.g., border-top ) and logical (e.g., border-block-start ) border properties.
Borders vs. outlines
Borders and outlines are very similar. However, outlines differ from borders in the following ways:
- Outlines never take up space, as they are drawn outside of an element’s content.
- According to the spec, outlines don’t have to be rectangular, although they usually are.
Formal definition
- border-width : as each of the properties of the shorthand:
- border-top-width : medium
- border-right-width : medium
- border-bottom-width : medium
- border-left-width : medium
- border-top-style : none
- border-right-style : none
- border-bottom-style : none
- border-left-style : none
- border-top-color : currentcolor
- border-right-color : currentcolor
- border-bottom-color : currentcolor
- border-left-color : currentcolor
- border-width : as each of the properties of the shorthand:
- border-bottom-width : the absolute length or 0 if border-bottom-style is none or hidden
- border-left-width : the absolute length or 0 if border-left-style is none or hidden
- border-right-width : the absolute length or 0 if border-right-style is none or hidden
- border-top-width : the absolute length or 0 if border-top-style is none or hidden
- border-bottom-style : as specified
- border-left-style : as specified
- border-right-style : as specified
- border-top-style : as specified
- border-bottom-color : computed color
- border-left-color : computed color
- border-right-color : computed color
- border-top-color : computed color
- border-color : as each of the properties of the shorthand:
- border-bottom-color : a color
- border-left-color : a color
- border-right-color : a color
- border-top-color : a color
- border-bottom-width : a length
- border-left-width : a length
- border-right-width : a length
- border-top-width : a length
Formal syntax
border =
||
||=
|
thin |
medium |
thick=
none |
hidden |
dotted |
dashed |
solid |
double |
groove |
ridge |
inset |
outsetExamples
Setting a pink outset border
HTML
div>I have a border, an outline, and a box shadow! Amazing, isn't it?div>
CSS
div border: 0.5rem outset pink; outline: 0.5rem solid khaki; box-shadow: 0 0 0 2rem skyblue; border-radius: 12px; font: bold 1rem sans-serif; margin: 2rem; padding: 1rem; outline-offset: 0.5rem; >Result
Specifications
Browser compatibility
BCD tables only load in the browser
See also
Found a content problem with this page?
This page was last modified on Jul 18, 2023 by MDN contributors.
Your blueprint for a better internet.
MDN
Support
Our communities
Developers
Visit Mozilla Corporation’s not-for-profit parent, the Mozilla Foundation.
Portions of this content are ©1998– 2023 by individual mozilla.org contributors. Content available under a Creative Commons license.