Using HTML File Input for Uploading Native iOS/Android Files

In the last tutorial, we covered how to handle file uploads in Ionic using the element. This included using the file input element to grab a reference to a file and then upload that file to a Node/Express server (there is also an extension to the tutorial available where we build the backend with NestJS instead).
Those tutorials focused on a desktop/web environment, but what do we do to handle file uploads when our applications are deployed natively to iOS or Android? Can we still use ?
The answer to that question is mostly yes, but there are a few things to keep in mind.
Outline
Before we get started
If you have not already read (or watched) the previous tutorial, it would be a good idea to complete it before reading this one. The previous tutorial provides a lot of important context around how the HTML elements works when specifying the file type, and also around how those files can be uploaded to a backend server with multipart/form-data and the FormData API.
What is the difference between web and native for file uploads?
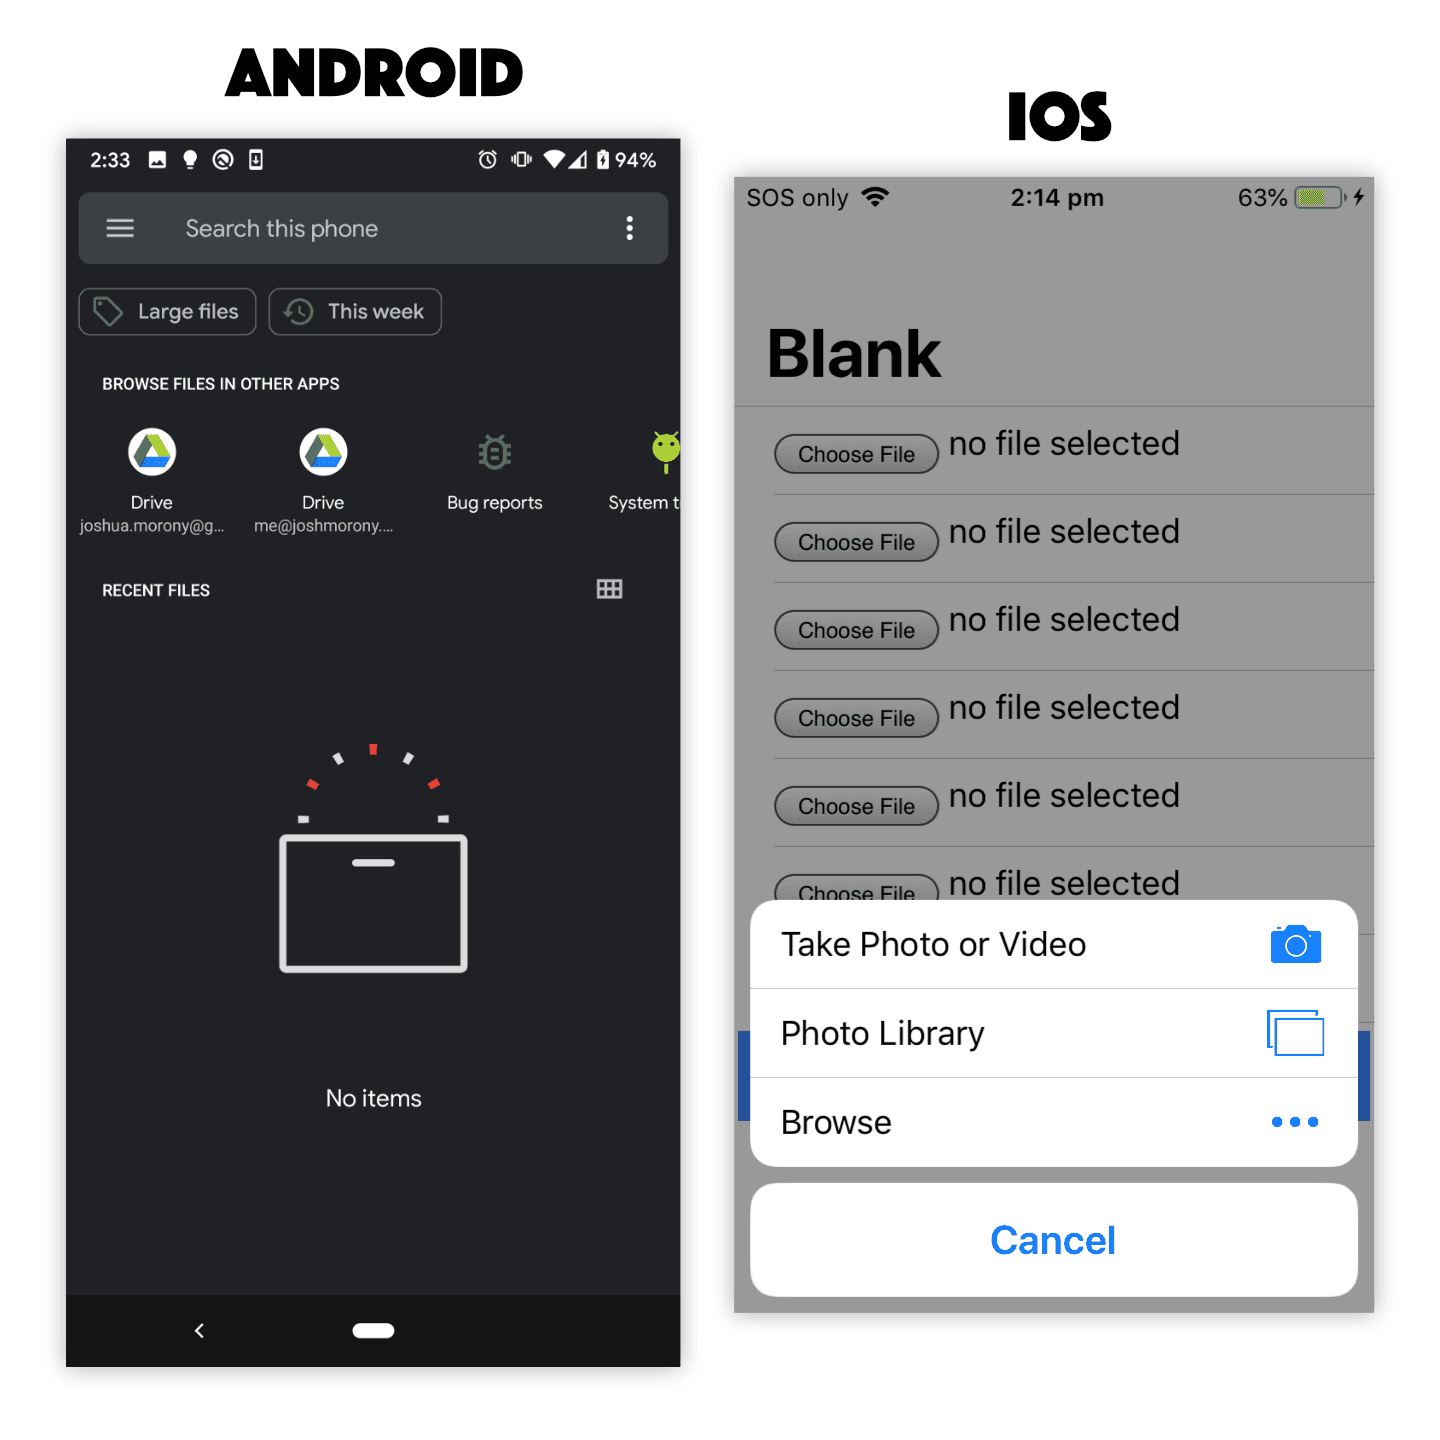
When we use the element in a standard desktop/web environment, we can be quite certain of its behaviour. We click the Choose file button and a file explorer window is launched where we can select any file on our computer.
When we try to do this on mobile the behaviour is quite different and exactly how it behaves will depend on the platform. Generally speaking, the process is still more or less the same — the user clicks the button, selects a file, and then we are able to get a reference to that file. However, we don’t have a standard «file explorer» window that pops up and allows the user to select any file on their device. Depending on the context, the camera might be launched directly, or the user might be prompted to choose a file directly from the file system, or the user might be offered a choice between browsing files, taking a photo, taking a video, and so on.
Let’s take a look at different ways to set up the file input.
Differences in file input behaviour between iOS and Android
Although the following is not an exhaustive list of ways to set up the file input element, these are a pretty good set of examples that we could default to.
NOTE: The examples below use Angular event bindings to handle the change event, but otherwise the implementation will be the same with vanilla JavaScript, StencilJS, React, Vue, or whatever else you are using.
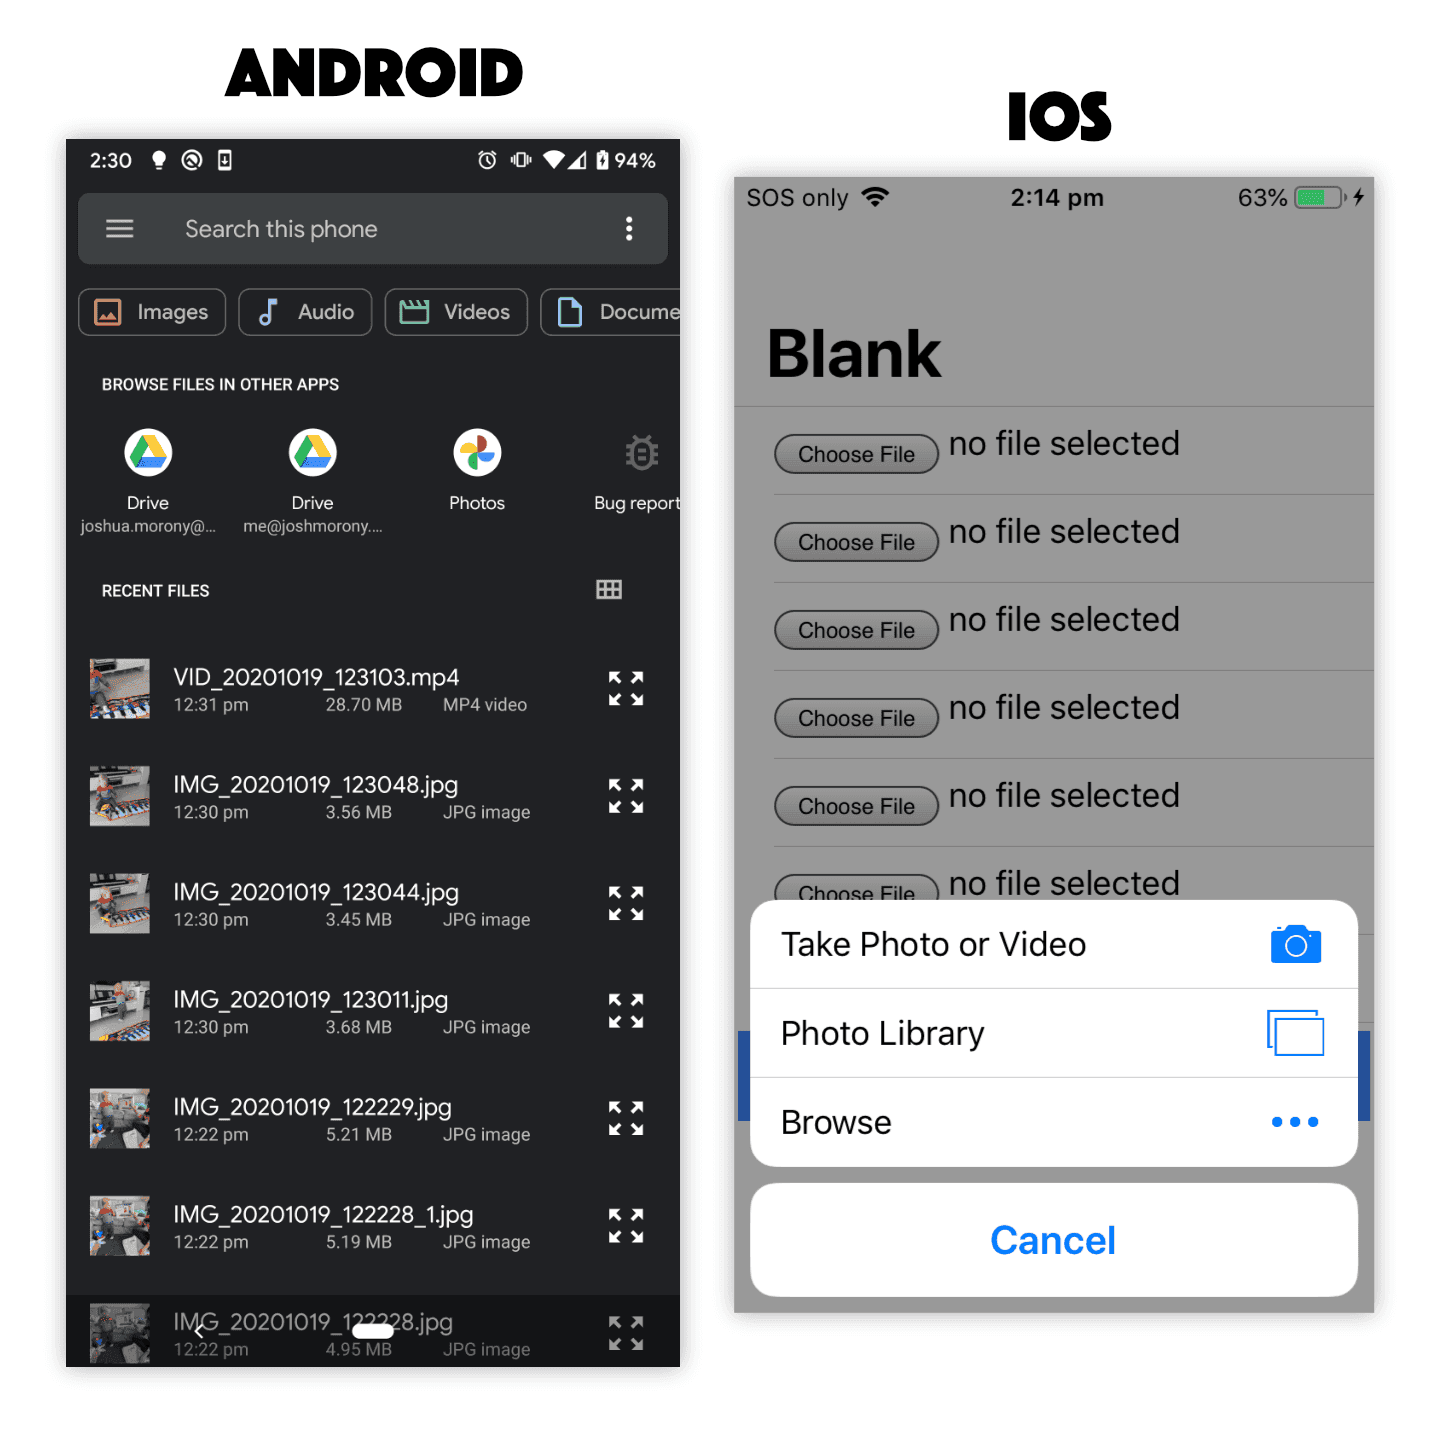
Standard File Input
input type="file" (change)="getFile($event)" />On iOS, this will prompt the user to choose between Take Photo or Video , Photo Library , or Browse in order to return the desired file.
On Android, this will directly launch the native file selection screen to select any file on the device.
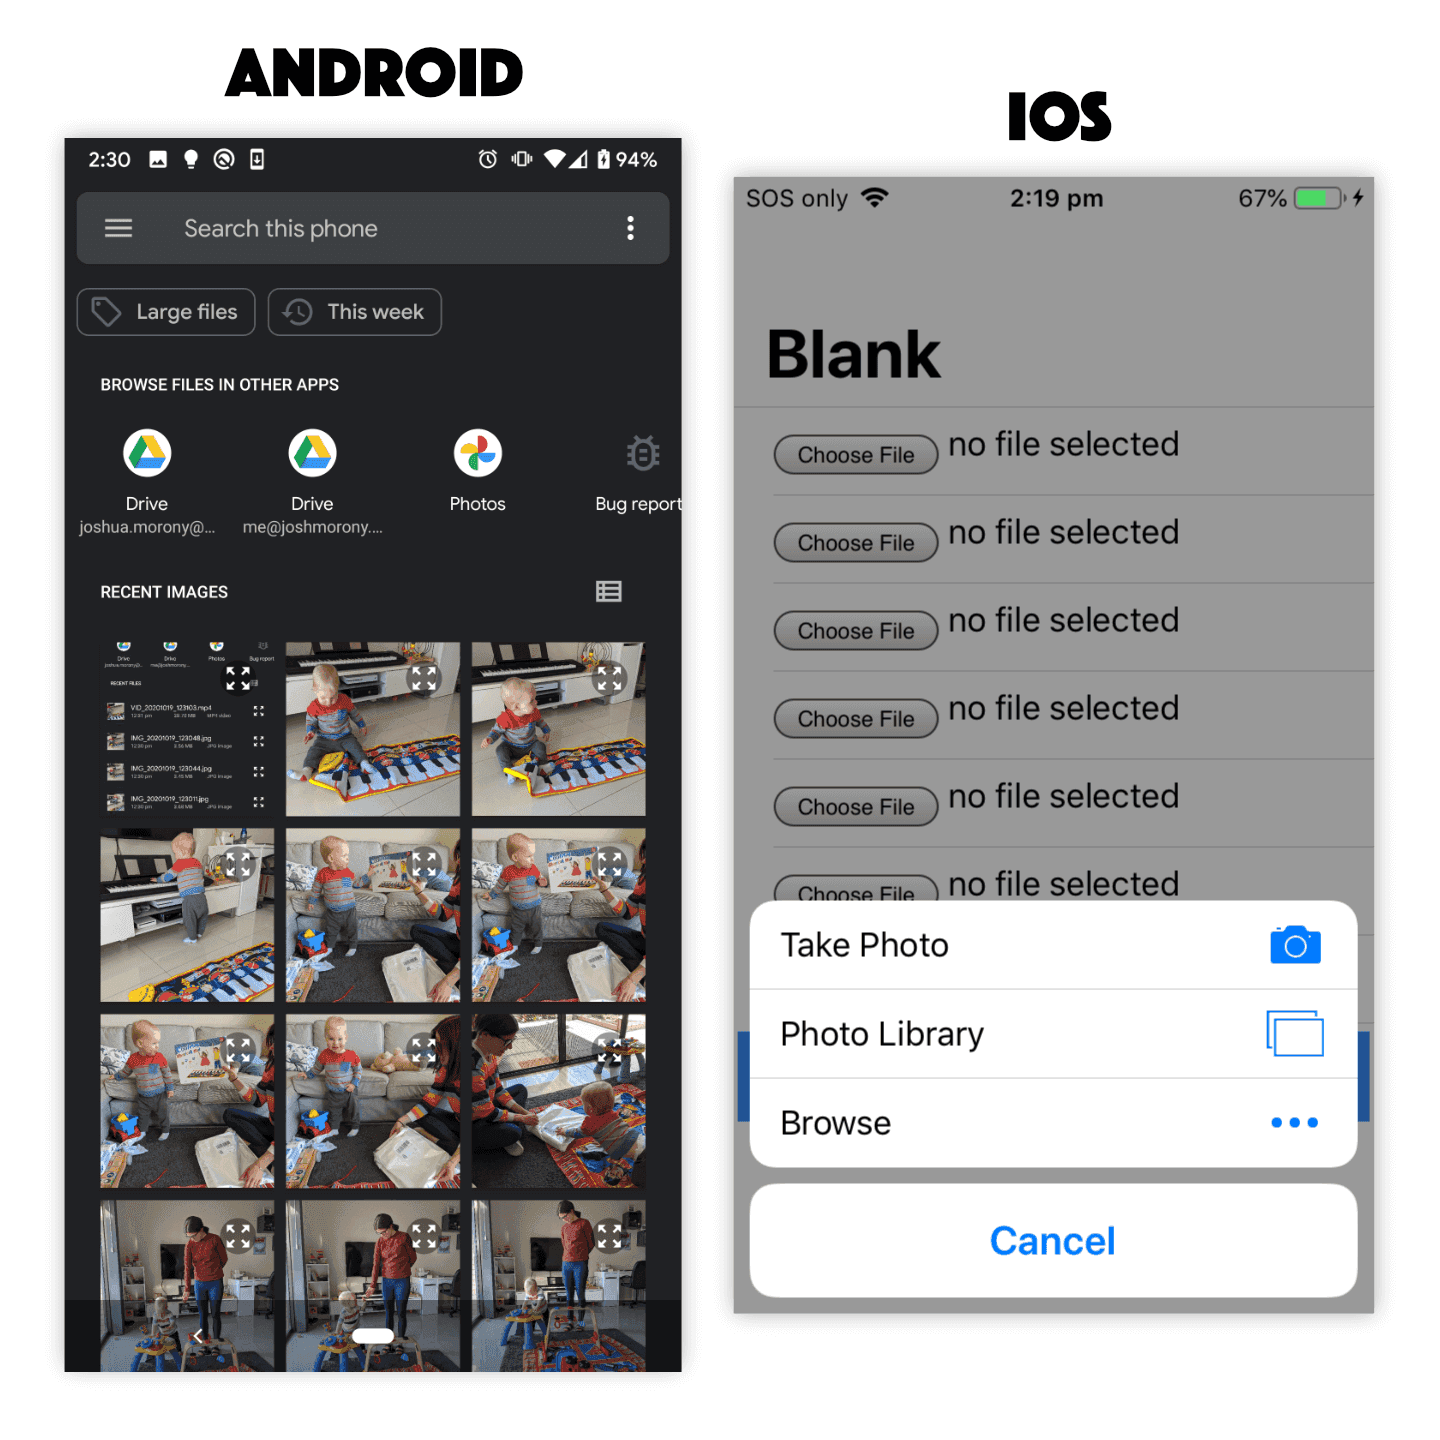
Limiting File Input to Images
input type="file" accept="image/*" (change)="getFile($event)" />On iOS, this will prompt the user to choose between Take Photo , Photo Library , or Browse in order to return the desired file. Note that Video is no longer a choice in the first option and videos (and other files) will also be excluded from being listed if the user chooses to select an existing photo.
On Android, this will launch the same native file selection screen again, but this time it will be filtered to only show images.
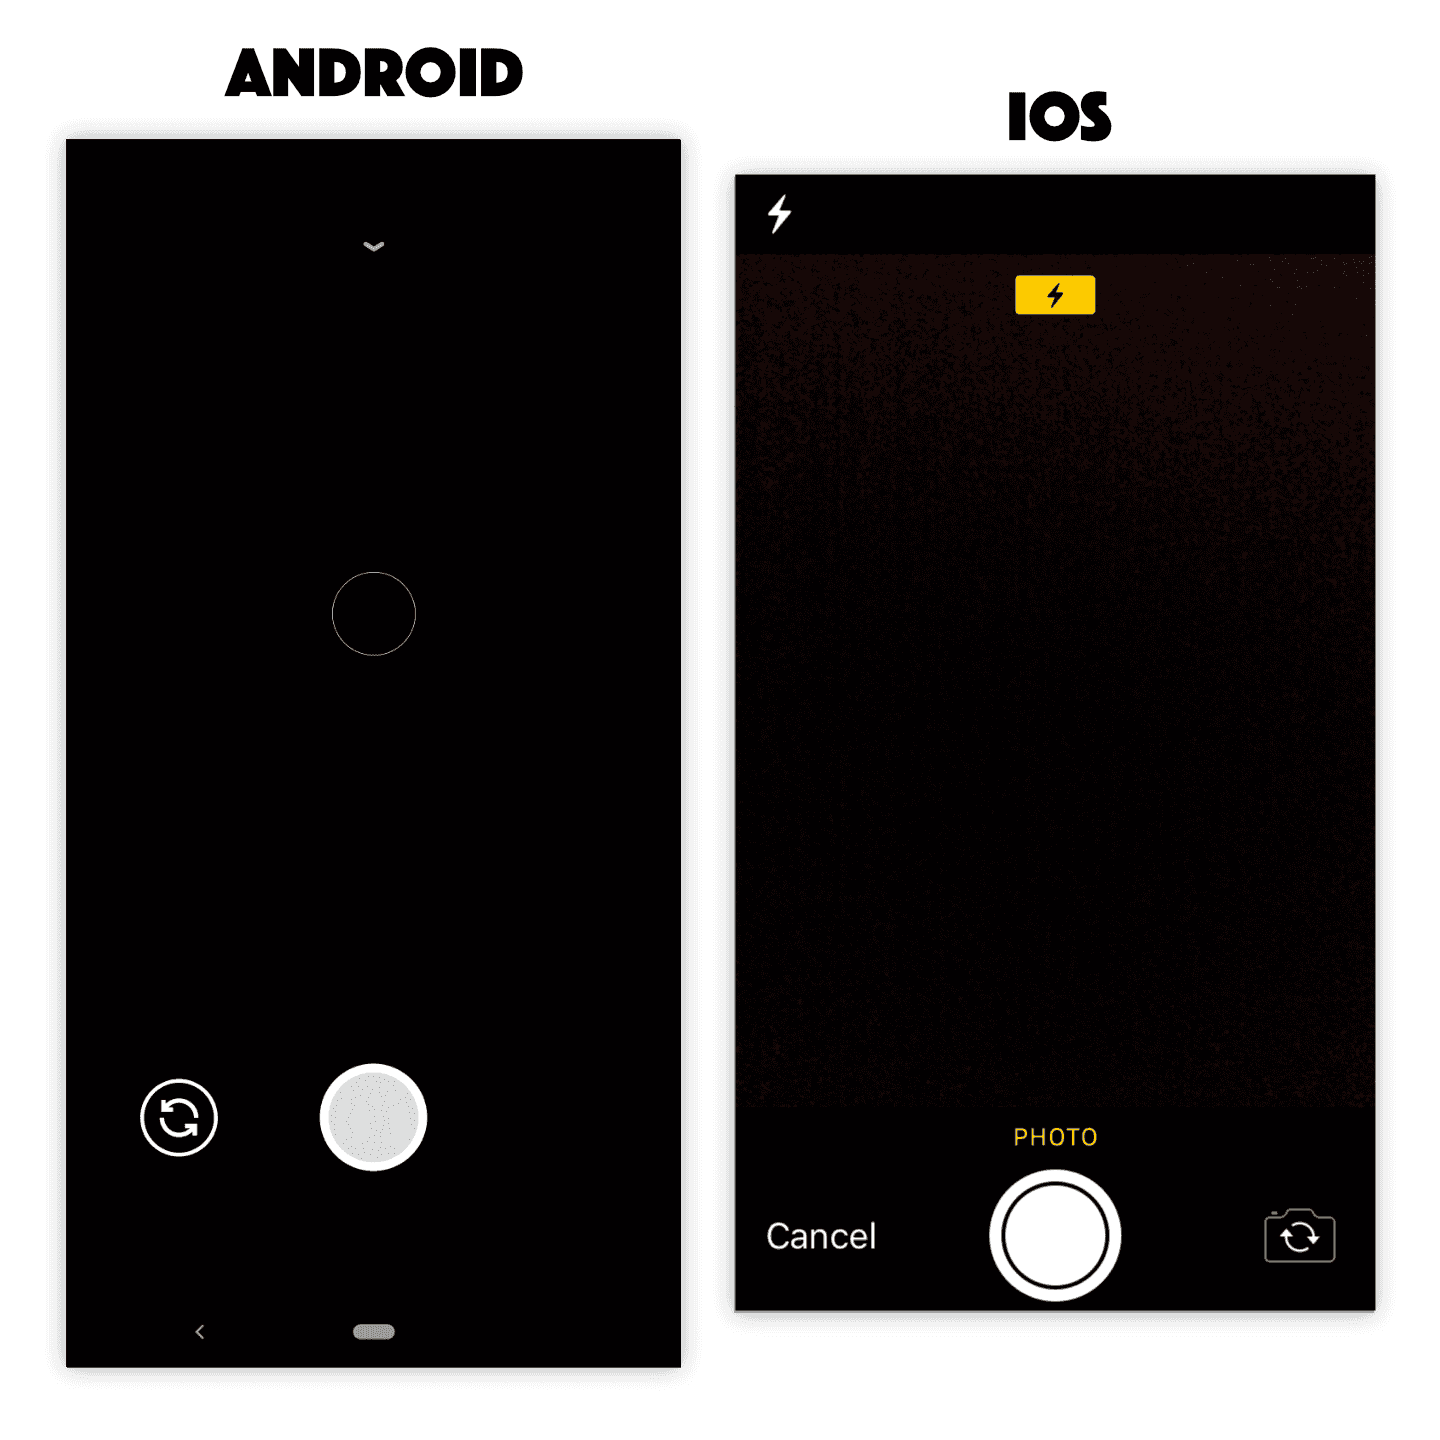
Using Camera for File Input
input type="file" accept="image/*" capture (change)="getFile($event)" />On iOS, this will directly launch the camera in Photo mode and allow the user to take a photo. Once the user takes a photo they will be able to choose whether to use that photo or if they want to retake the photo. Once the user chooses Use Photo the file will be supplied to the application.
On Android, this will directly launch the camera allowing the user to take a photo (not a video). The user can then accept the taken photo or take another.
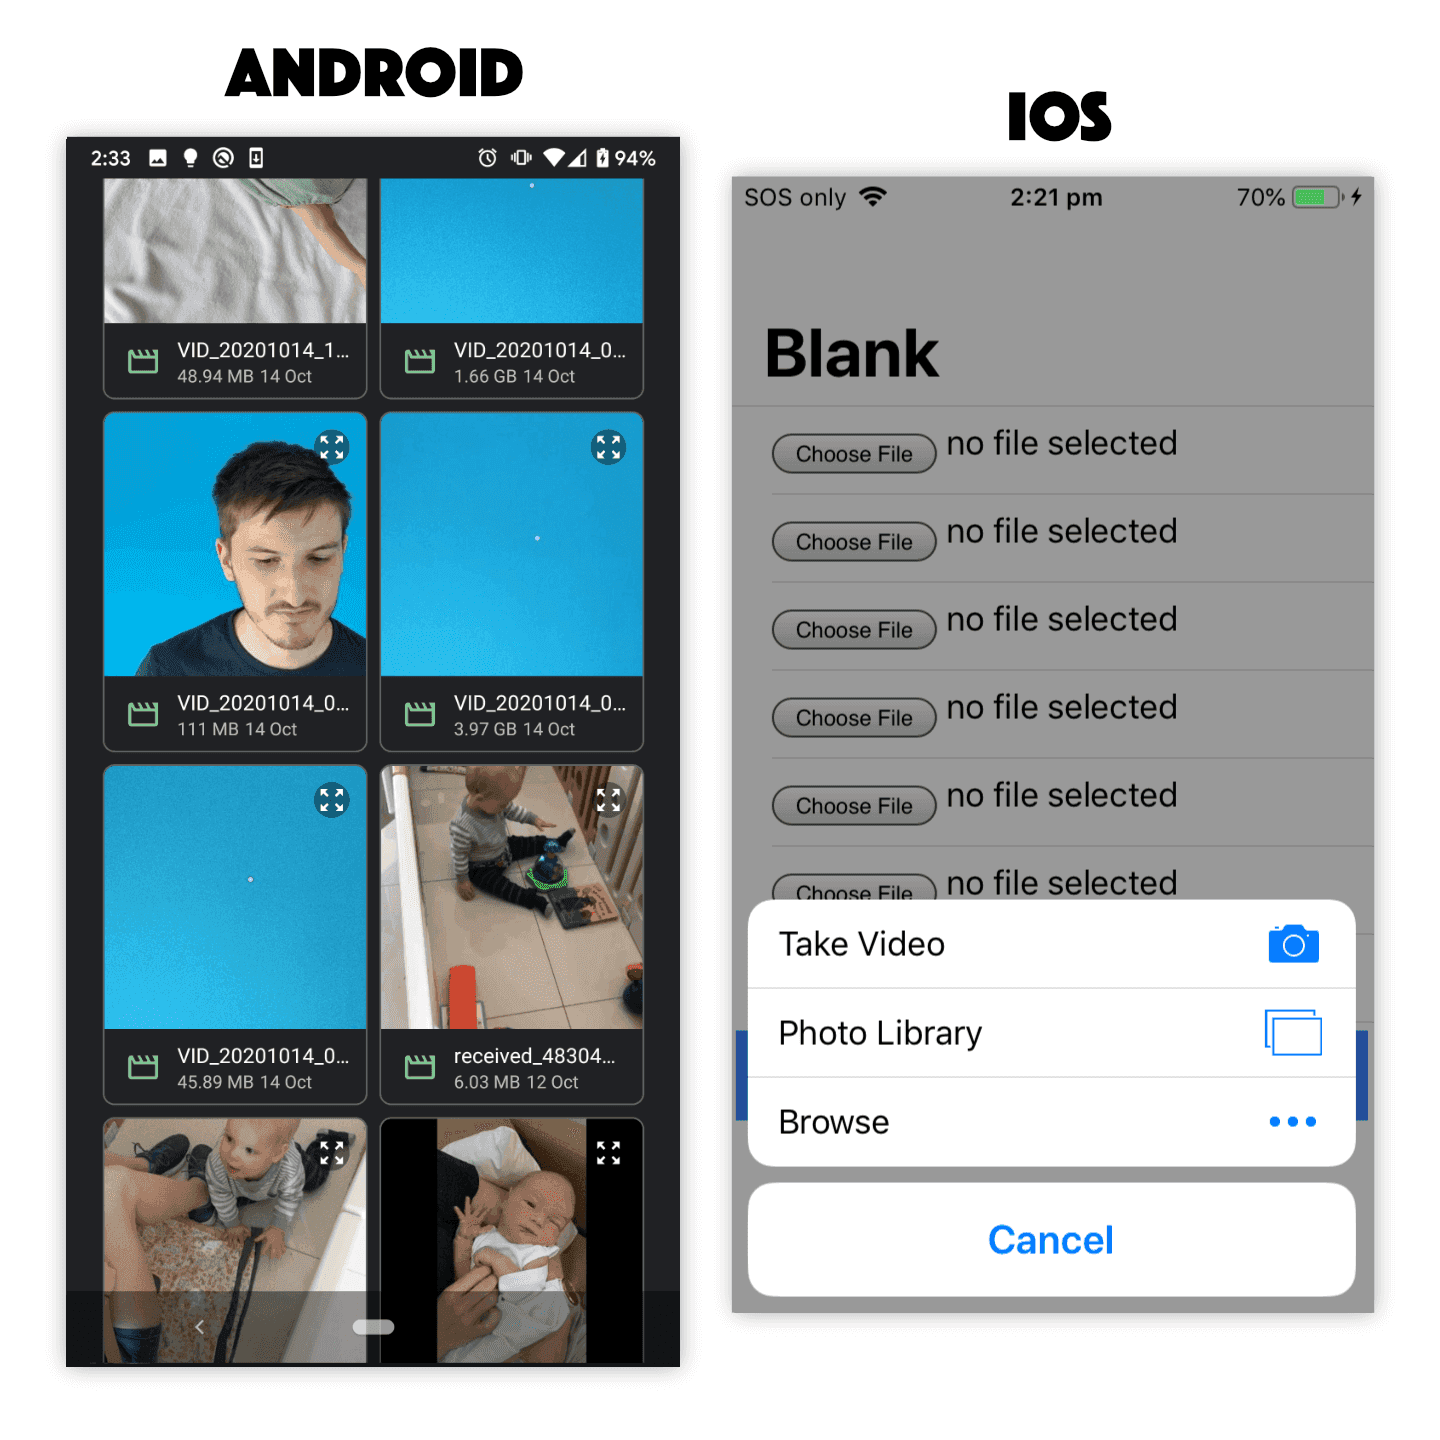
Limiting File Input to Videos
input type="file" accept="video/*" (change)="getFile($event)" />On iOS, this will prompt the user to choose between Take Video , Photo Library , or Browse in order to return the desired file. Note that Photo is no longer a choice in the first option and photos (and other files) will also be excluded from being listed if the user chooses to select an existing video.
On Android, this will launch the native file selection screen again, but this time it will be filtered to only show videos.
Limiting File Input to Audio
input type="file" accept="audio/*" (change)="getFile($event)"On iOS, this will prompt the user to choose between Take Photo or Video , Photo Library , or Browse in order to return the desired file. Note that there is no restriction to audio files only in this case.
On Android, this will launch the native file selection screen again, but this time it will be filtered to only show audio files.
Keep in mind that the specification for the file input element has changed over the years, so you might find many different examples of ways to set up this element and force certain behaviours. In general, my advice would be not to try to «game the system». Use the simplest options and focus on telling the browser what you want, then let the platform decide how best to fulfill that request. If you try to get too tricky and take over this process to enforce what you want, you will leave yourself vulnerable to different behaviours on different platforms/versions and also your solution will be more prone to breaking in the future.
If you do need more control over this process, in ways that using the file input element does not allow (or at least it does not allow it consistently across platforms), you can look into using native plugins/APIs instead. The Camera API, for example, will give you much greater control over the process of selecting/capturing a photo than the element will.
How do we upload these files to a server?
Fortunately, the resulting file reference can be uploaded in the same way as a file retrieved from a normal desktop/web file input element. You will just need to make a POST request that includes multipart/form-data that contains the file(s) you want to upload. For more details on doing that, check out the previous tutorial: Handling File Uploads in Ionic.
Summary
The standard element provides a surprisingly smooth file selection experience on native iOS and Android platforms, and these files can be easily sent as standard multipart/form-data to your backend server. This will probably be all you need a lot of the time, but for certain specialised circumstances or use cases you might need to look into using native plugins or APIs to fulfil your file selection and transferring needs.
Android WebView and File Input

While working on a web app that I wanted to embed in a WebView on Android to create a native app (hybrid), I encountered some problems with file input. The app is a simple one that allows users to upload photos, and shows a list of friends photos. (Instagram anyone?)
These days file input on mobile devices works pretty ok on iOS and Android devices. Adding will create a file input, and clicking it will let the user pick a file from your phone. At least from Chrome or Safari. However, when putting this in a WebView, it is currently not handled for you automatically.
Googling around to figure out what is going on reveals that this is something that has to be implemented by yourself by overriding a couple of functions in an instance of WebChromeClient. Unfortunately there are still a couple of issues with this. First of all, the functions that has to be overridden har undocumented. Second of all, returning the files seem to be devoid of file type, which is not necessarily a problem for everyone, but that was a problem for me.
First of all, the functions that has to be overridden are:
mWebView.setWebChromeClient(new WebChromeClient()
@SuppressWarnings(“unused”)
public void openFileChooser(ValueCallback uploadMsg, String AcceptType, String capture)
this.openFileChooser(uploadMsg);
>
@SuppressWarnings(“unused”)
public void openFileChooser(ValueCallback uploadMsg, String AcceptType)
this.openFileChooser(uploadMsg);
>
public void openFileChooser(ValueCallback uploadMsg)
mUploadMessage = uploadMsg;
pickFile();
>
>);
The three functions illustrate a progression of Android, where the last one is for early versions of android, and the last one is for Android 4.1+. Potentially then, this might change in the future.
The use of this then is to return the value in mUploadMessage by calling its callback.
Picking the file is easy enough using an intent call.
Intent chooserIntent = new Intent(Intent.ACTION_GET_CONTENT);
chooserIntent.setType(“image/*”);
startActivityForResult(chooserIntent, RESULTCODE);
And you return the file in onActivityResult:
protected void onActivityResult(int requestCode, int resultCode, Intent intent)
mUploadMessage.onReceiveValue(intent.getData());
mUploadMessage = null;
>
(Note: There’s not error handling here, so remember to include that!)
So far so good. This will cause the file input data set, so we can submit it from a form, or access it from javascript.
What I needed this image for, was to both update a picture on the web page, and also to upload this data later on. The way I solved this was to use HTML5 local file reading through a FileReader object, and then reading the data using readAsDataURL
var reader = new FileReader();
reader.readAsDataURL(file);
reader.onload = function(e)
var dataurl = e.target.result;
>
So we got dataurl as a URI object, which will be on the form “data:image/png;base64,…”. Or so is it normally. Problem is that from at least Android 4.2.2 (On my Nexus 4), the file object that is returned to javascript from Android does not have the file type set. (file.type===undefined). This makes the data URI to be invalid as it only describes binary data: “data:base64,…”. This caused major problems for me, but I managed to fix it. Fortunately the filename is set correctly, and so I can use the file ending. From that I can reform the dataurl to create a correct one
dataurl = “data:image/” + file.name.split(‘.’).slice(-1)[0] + “;base64,” + dataurl.split(‘,’)[1];
The rest of the script then works. You can use the dataurl to set the image src ($(“#theimage”).attr(‘src’,dataurl); and you can upload it as a string.
I’m guessing there might be a fix for this to get Android to pass a file with the correct type set, but without that fix, this one seems to work.