- как изменить версию php в htaccess на сервере
- Change PHP version via .htaccess
- Change PHP version via .htaccess file code
- Edit .htaccess file via cPanel
- Edit .htaccess file via FTP
- Code to place in .htaccess for changing PHP version
- How to set a php version through .htaccess in cPanel?
- How to Set Custom PHP Version per Directory
- How to Change the PHP Version for your Account
- Choosing a PHP Version for a Specific Directory
- Available PHP Handlers
- SSD Cloud Hosting
как изменить версию php в htaccess на сервере
Я использую php 5.3 на своей локальной машине. На нашем веб-сервере у нас есть php 4.8 . Наш сервер является общим сервером. Поэтому я хочу изменить версию php на нашем сервере через файл .htaccess . Можно ли это сделать? Если да, то как это сделать?
AddHandler application/x-httpd-php4 .php Чтобы переключиться на PHP 5.0:
AddHandler application/x-httpd-php5 .php Чтобы переключиться на PHP 5.1:
AddHandler application/x-httpd-php51 .php AddHandler application/x-httpd-php52 .php Чтобы переключиться на PHP 5.3:
AddHandler application/x-httpd-php53 .php Чтобы переключиться на PHP 5.4:
AddHandler application/x-httpd-php54 .php Чтобы переключиться на PHP 5.5:
AddHandler application/x-httpd-php55 .php Чтобы переключиться на PHP 5.6:
AddHandler application/x-httpd-php56 .php Чтобы переключиться на PHP 7:
AddHandler application/x-httpd-php7 .php Чтобы переключиться на PHP 7.1:
AddHandler application/x-httpd-php71 .php AddHandler application/x-httpd-php4 .php .php4 .php3
Чтобы переключиться на PHP 5.0:
AddHandler application/x-httpd-php5 .php .php5 .php4 .php3
Чтобы переключиться на PHP 5.1:
AddHandler application/x-httpd-php51 .php .php5 .php4 .php3
AddHandler application/x-httpd-php52 .php .php5 .php4 .php3
Чтобы переключиться на PHP 5.3:
AddHandler application/x-httpd-php53 .php .php5 .php4 .php3
Чтобы переключиться на PHP 5.4:
AddHandler application/x-httpd-php54 .php .php5 .php4 .php3
Чтобы переключиться на PHP 5.5:
AddHandler application/x-httpd-php55 .php .php5 .php4 .php3
Чтобы переключиться на безопасный PHP 5.2 с патчем Suhosin:
AddHandler application/x-httpd-php52s .php .php5 .php4 .php3
Попробуйте переключиться на php4:
AddHandler application/x-httpd-php4 .php Upd. Похоже, я не понял ваш вопрос правильно. Это не поможет, если у вас есть только php 4 на вашем сервере.
просто FYI в GoDaddy это так:
Вы не можете изменить версию PHP на .htaccess.
вам нужно обновить ваш сервер, для PHP 5.3 или вы можете найти другой хост, который обслуживает PHP 5.3 на общем хостинге.
Change PHP version via .htaccess


Well you can change the PHP version through cPanel easily and you can also change the PHP directory basis. For example for some directories if you want to keep PHP version 5.6 you can select those directories and set php version in cPanel.
Important Note: If your server doesn’t have the PHP version installed which you may try to change through .htaccess. In that case your website can go down. So make sure you are doing this through FTP or Hosting Panel not WordPress admin. In case any problem you can easily remove the code you insert.

So when you change the PHP version from cPanel. cPanel adds a code into .htaccess file. That code changes the PHP version for directory in which .htaccess file is. Also it changes the PHP version of all sub directories unless the inner directory have unique PHP version code.
Change PHP version via .htaccess file code
You need to edit the .htaccess file if that doesn’t exist please create new. While creating the new .htaccess file make sure there is nothing before . and after htaccess. You can say this file have the extension .htaccess but have no name. This file have instructions for Apache server to perform the tasks. For example handling the Permalinks in WordPress.
Edit .htaccess file via cPanel

Before you can view the file the hidden files should be selected to visible in cPanel file manager settings. After that edit the .htaccess file and add the code below.
Edit .htaccess file via FTP

Use your favorite FTP client we use Filezila. Download the .htaccess file and edit file in any text editor or code edit. Add the code below and you are done to re upload.
Code to place in .htaccess for changing PHP version
Let’s take a look to code which you have to place in your .htaccess file. Make sure you place it at end of the .htaccess file to avoid any type of problem. Do not include between any other code.
# Use PHP74 as default AddHandler application/x-httpd-php74 .php suPHP_ConfigPath /opt/php74/lib The PHP74 defines the PHP version 7.4 , and you can change the 74 to your desired PHP version. Remember your server or host should also support that PHP version.
If you have any web related issues you can try our WordPress maintenance service for a month.
Click on a star to rate it!
Average rating 3.3 / 5. Vote count: 22
No votes so far! Be the first to rate this post.
We are sorry that this post was not useful for you!
Tell us how we can improve this post?
How to set a php version through .htaccess in cPanel?
Here at WebHostFace we are always aiming at providing custom solutions for our clients. In order to provide a more versatile hosting environment, we have added the option to run multiple PHP versions on your shared account simultaneously. On shared hosting you can select any of the following versions: 4.4, 5.1, 5.2, 5.3, 5.4, 5.5, 5.6, 7.0, and 7.1*. The native PHP version for all shared hosting accounts is 5.6.
To do that you will need access to your shared account either via cPanel or FTP and be able to edit the .htaccess file.
Let’s start first with choosing the default version for your account. You can do that via cPanel > Software > Select PHP Version.
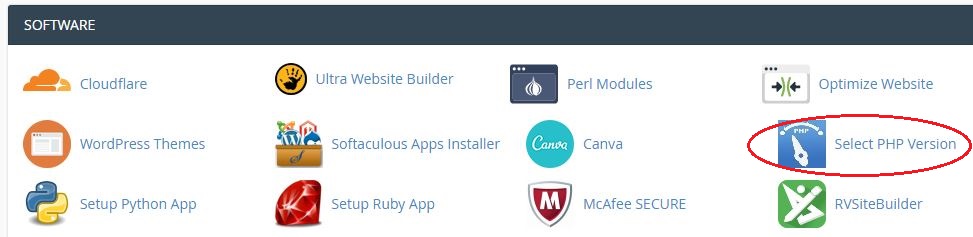
Just choose the desired version and press Set as current.
That configuration now becomes the default for your whole account.

However, you can change that for any directory on your cPanel, thus configuring different websites, subdirectories, etc to use different PHP versions. To do so you need to insert a rule into your .htaccess file. This file is hidden by default so to be able to see it, you should tick the Show Hidden Files option inside your File Manager > Settings.
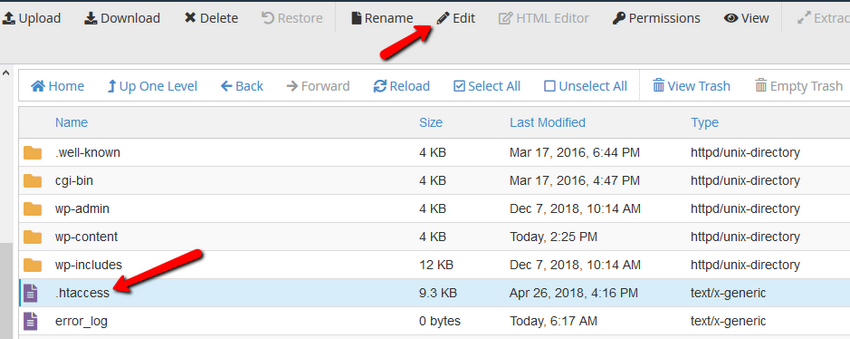
Then navigate to the desired folder and select the .htaccess file. If there isn’t one, you can go ahead and create a new one. Once it is selected, right click on it and select Code Edit.
Now paste the following lines at the top of your file as follows:
#In order to change the version to 5.5 -SetHandler application/x-httpd-alt-php55___lsphp
#In order to change the version to 7.0 -SetHandler application/x-httpd-alt-php70___lsphp
The lsphpXX on the second line determines the PHP version.
Click Save and close the Code Editor.
It is a good idea to create a phpinfo file to test the changes right away.
How to Set Custom PHP Version per Directory
The PHP version is important not only for speed and performance. There are different applications, which sometimes may require specific PHP versions. With FastComet, all shared hosting clients can set specific PHP versions for different directories. For example, if you want to run PHP 7.4 on your account, but you have to set PHP 7.2 because of your specific application requirements, you can do that by setting custom rules for each of your folders. In this post, we will explain how to run multiple PHP versions on the very same account.
How to Change the PHP Version for your Account
By default, all our Shared Hosting servers run PHP 7.2 as the native PHP version. With time, scripts may discontinue supporting this version of PHP, and thus clients need to have the option to run a newer PHP version on their accounts. If you just want to change the version of PHP site-wide you can follow the steps of our step-by-step tutorial.
Choosing a PHP Version for a Specific Directory
You can use any combination of different PHP versions running simultaneously in any directory on the account. While this is not available using the PHP Selector UI, it is fairly simple to do manually.
To set a different PHP version from the one assigned to your domain on your cPanel account, you need to add a special code to your .htaccess file. The .htaccess file is a hidden file that is read by the webserver. The web server follows any instructions contained within the file. For the purposes of this article, we will explain accessing it through the File Manager on the cPanel of your hosting account.
Navigate to the section Files → File Manager. If you wish to edit .htaccess file for your main domain, navigate to the public_html folder. In case you need to make some changes to an addon domain, go to public_html/youraddondomain.com folder.
Once you are in the File Manager, make sure that you have «Show hidden files» enabled:
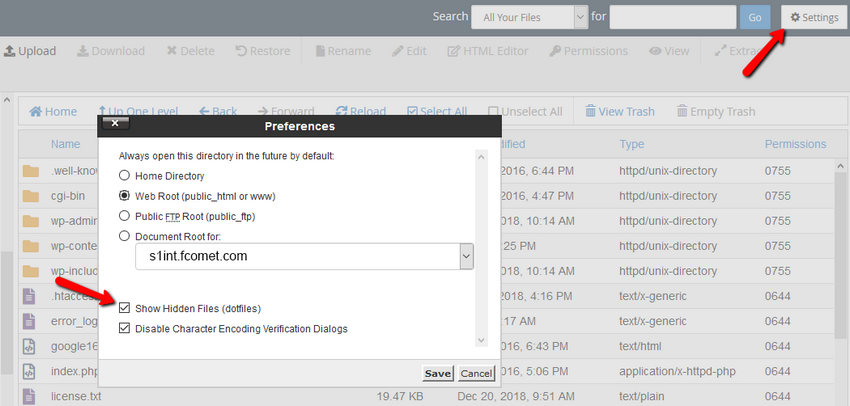
This way, you will be able to see «dot» files, which are usually hidden by default. The specific file you need in that case is the .htaccess file.
To set a custom PHP version for your desired directory, either select the .htaccess file and click on Edit from the toolbar, or right-click over it and choose the option to Edit the file:
A pop-up window will appear, where once again you need to click on Edit:
Available PHP Handlers
Now that you are inside the .htaccess file, аt the top of the file, insert the PHP handler for the version you would like to use. If there is a handler in the file already, it should be removed or replaced with your new handler. Depending on your desired PHP version for your specific application (folder), add one of the following lines:
AddHandler application/x-httpd-php56 .php .php5
AddHandler application/x-httpd-php70 .php .php5
AddHandler application/x-httpd-php71 .php .php5
AddHandler application/x-httpd-php72 .php .php5
AddHandler application/x-httpd-php73 .php .php5
AddHandler application/x-httpd-php74 .php .php5
AddHandler application/x-httpd-php80 .php .php5
AddHandler application/x-httpd-php81 .php .php5
Keep in mind that those lines are only for FastCloud and FastCloud Plus clients. If you are using our FastCloud Extra plan, your addition to the .htaccess file needs to be a bit different.
For customers using our FastCloud Extra packages, please use the following snippet in your .htaccess file:
SetHandler application/x-lsphp
The actual change is made by switching the SetHandler line with one of these depending on the version (look at the last two digits):
- SetHandler application/x-lsphp56
- SetHandler application/x-lsphp70
- SetHandler application/x-lsphp71
- SetHandler application/x-lsphp72
- SetHandler application/x-lsphp73
- SetHandler application/x-lsphp74
- SetHandler application/x-lsphp80
- SetHandler application/x-lsphp81
After you have added your own configuration rules, save your changes and close the .htaccess file. Now you should have your custom PHP version set.
If you have difficulty with the PHP settings of your hosting account, do not hesitate to contact the FastComet technical support team.
We hope you find this article useful. Discover more about FastCloud — the top-rated Hosting Solutions for personal and small business websites in four consecutive years by the HostAdvice Community!
Related articles
SSD Cloud Hosting
- Free Domain Transfer
- 24/7 Technical Support
- Fast SSD Storage
- Hack-free Protection
- Free Script Installation
- Free Website Transfer
- Free Cloudflare CDN
- Immediate Activation