- Python Packages
- Introduction to Python packages
- Importing packages
- Initializing a package
- from import *
- Subpackages
- Summary
- Installing Packages
- Requirements for Installing Packages
- Ensure you can run Python from the command line
- Ensure you can run pip from the command line
- Ensure pip, setuptools, and wheel are up to date
- Optionally, create a virtual environment
- Creating Virtual Environments
Python Packages
Summary: in this tutorial, you learn about the Python packages and how to use them to structure your application.
Introduction to Python packages
Suppose that you need to develop a large application that handles the sales process from order to cash.
The application will have many modules. When the number of modules grows, it’ll become difficult to keep all of them in one location.
And you may want to group modules into something meaningful.
This is where packages come into play.
Packages allow you to organize modules in the hierarchical structure.
The way Python organizes packages and modules like the Operating System structures the folders and files.
To create a package, you create a new folder and place the relevant modules in that folder.
To instruct Python to treat a folder containing files as a package, you need to create a __init__.py file in the folder.
Note that starting with Python 3.3, Python introduced the implicit namespace packages feature. This allows Python to treat a folder as a package without the __init__.py .
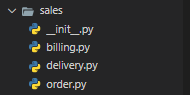
For example, the following picture shows the sales package that contains three modules including order , delivery , and billing :
Importing packages
To import a package, you use the import statement like this:
import package.moduleCode language: Python (python)And to access an object from a module that belongs to a package, you use the dot notation:
package.module.functionCode language: Python (python)The following shows how to use functions in the order , delivery , and billing modules from the sales package:
# main.py import sales.order import sales.delivery import sales.billing sales.order.create_sales_order() sales.delivery.create_delivery() sales.billing.create_billing()Code language: Python (python)To make the code more concise, you can use the following statement to import a function from a module:
from import Code language: Python (python)
# main.py from sales.order import create_sales_order from sales.delivery import create_delivery from sales.billing import create_billing create_sales_order() create_delivery() create_billing()Code language: Python (python)It’s possible to rename the object when importing it:
# main.py from sales.order import create_sales_order as create_order from sales.delivery import create_delivery as start_delivery from sales.billing import create_billing as issue_billing create_order() start_delivery() issue_billing()Code language: Python (python)In this example, we rename…
- The create_sales_order to create_order ,
- The create_delivery to start_delivery ,
- and the create_billing to issue_billing .
Initializing a package
By convention, when you import a package, Python will execute the __init__.py in that package.
Therefore, you can place the code in the __init__.py file to initialize package-level data.
The following example defines a default tax rate in the __init__.py of the sales package:
# __init__.py # default sales tax rate TAX_RATE = 0.07Code language: Python (python)From the main.py file, you can access the TAX_RATE from the sales package like this:
# main.py from sales import TAX_RATE print(TAX_RATE)Code language: Python (python)In addition to initializing package-level data, the __init__.py also allows you to automatically import modules from the package.
For example, in the __init__.py , if you place the following statement:
# __init__.py # import the order module automatically from sales.order import create_sales_order # default sales tax rate TAX_RATE = 0.07 Code language: Python (python)And import the sales package from main.py file, the create_sales_order function will be automatically available as follows:
# main.py import sales sales.order.create_sales_order() Code language: Python (python)from import *
When you use the statement to import all objects from a package:
from import * Code language: Python (python)Python will look for the __init__.py file.
If the __init__.py file exists, it’ll load all modules specified in a special list called __all__ in the file.
For example, you can place the order and delivery modules in the __all__ list like this:
# __init__.py __all__ = [ 'order', 'delivery' ] Code language: Python (python)And use the following import statement in the main.py:
# main.py from sales import * order.create_sales_order() delivery.create_delivery() # cannot access the billing module Code language: Python (python)From the main.py, you can access functions defined in the order and delivery modules. But you cannot see the billing module because it isn’t in the __all__ list.
Subpackages
Packages can contain subpackages. The subpackages allow you to further organize modules.
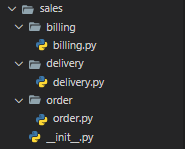
The following shows the sales package that contains three subpackages: order , delivery , and billing . Each subpackage has the corresponding module.
For example, you can place all other modules related to the order processing in the order subpackage:
Everything you’ve learned about packages is also relevant to subpackages.
For example, to import a function from the order subpackage, you use the following import statement:
# main.py from sales.order import create_sales_order create_sales_order()Code language: Python (python)Summary
- A Python package contains one or more modules. Python uses the folders and files structure to manage packages and modules.
- Use the __init__.py file if you want to initialize the package-level data.
- Use __all__ variable to specify the modules that will load automatically when importing the package.
- A package may contain subpackages.
Installing Packages
This section covers the basics of how to install Python packages .
It’s important to note that the term “package” in this context is being used to describe a bundle of software to be installed (i.e. as a synonym for a distribution ). It does not to refer to the kind of package that you import in your Python source code (i.e. a container of modules). It is common in the Python community to refer to a distribution using the term “package”. Using the term “distribution” is often not preferred, because it can easily be confused with a Linux distribution, or another larger software distribution like Python itself.
Requirements for Installing Packages
This section describes the steps to follow before installing other Python packages.
Ensure you can run Python from the command line
Before you go any further, make sure you have Python and that the expected version is available from your command line. You can check this by running:
You should get some output like Python 3.6.3 . If you do not have Python, please install the latest 3.x version from python.org or refer to the Installing Python section of the Hitchhiker’s Guide to Python.
If you’re a newcomer and you get an error like this:
>>> python3 --version Traceback (most recent call last): File "", line 1, in NameError: name 'python3' is not defined
It’s because this command and other suggested commands in this tutorial are intended to be run in a shell (also called a terminal or console). See the Python for Beginners getting started tutorial for an introduction to using your operating system’s shell and interacting with Python.
If you’re using an enhanced shell like IPython or the Jupyter notebook, you can run system commands like those in this tutorial by prefacing them with a ! character:
In [1]: import sys ! --version Python 3.6.3
It’s recommended to write rather than plain python in order to ensure that commands are run in the Python installation matching the currently running notebook (which may not be the same Python installation that the python command refers to).
Due to the way most Linux distributions are handling the Python 3 migration, Linux users using the system Python without creating a virtual environment first should replace the python command in this tutorial with python3 and the python -m pip command with python3 -m pip —user . Do not run any of the commands in this tutorial with sudo : if you get a permissions error, come back to the section on creating virtual environments, set one up, and then continue with the tutorial as written.
Ensure you can run pip from the command line
Additionally, you’ll need to make sure you have pip available. You can check this by running:
If you installed Python from source, with an installer from python.org, or via Homebrew you should already have pip. If you’re on Linux and installed using your OS package manager, you may have to install pip separately, see Installing pip/setuptools/wheel with Linux Package Managers .
If pip isn’t already installed, then first try to bootstrap it from the standard library:
python3 -m ensurepip --default-pip
py -m ensurepip --default-pip
If that still doesn’t allow you to run python -m pip :
- Securely Download get-pip.py1
- Run python get-pip.py . 2 This will install or upgrade pip. Additionally, it will install setuptools and wheel if they’re not installed already.
Warning Be cautious if you’re using a Python install that’s managed by your operating system or another package manager. get-pip.py does not coordinate with those tools, and may leave your system in an inconsistent state. You can use python get-pip.py —prefix=/usr/local/ to install in /usr/local which is designed for locally-installed software.
Ensure pip, setuptools, and wheel are up to date
While pip alone is sufficient to install from pre-built binary archives, up to date copies of the setuptools and wheel projects are useful to ensure you can also install from source archives:
python3 -m pip install --upgrade pip setuptools wheel
py -m pip install --upgrade pip setuptools wheel
Optionally, create a virtual environment
See section below for details, but here’s the basic venv 3 command to use on a typical Linux system:
python3 -m venv tutorial_env source tutorial_env/bin/activate py -m venv tutorial_env tutorial_env\Scripts\activate
This will create a new virtual environment in the tutorial_env subdirectory, and configure the current shell to use it as the default python environment.
Creating Virtual Environments
Python “Virtual Environments” allow Python packages to be installed in an isolated location for a particular application, rather than being installed globally. If you are looking to safely install global command line tools, see Installing stand alone command line tools .
Imagine you have an application that needs version 1 of LibFoo, but another application requires version 2. How can you use both these applications? If you install everything into /usr/lib/python3.6/site-packages (or whatever your platform’s standard location is), it’s easy to end up in a situation where you unintentionally upgrade an application that shouldn’t be upgraded.
Or more generally, what if you want to install an application and leave it be? If an application works, any change in its libraries or the versions of those libraries can break the application.
Also, what if you can’t install packages into the global site-packages directory? For instance, on a shared host.
In all these cases, virtual environments can help you. They have their own installation directories and they don’t share libraries with other virtual environments.
Currently, there are two common tools for creating Python virtual environments:
- venv is available by default in Python 3.3 and later, and installs pip and setuptools into created virtual environments in Python 3.4 and later.
- virtualenv needs to be installed separately, but supports Python 2.7+ and Python 3.3+, and pip , setuptools and wheel are always installed into created virtual environments by default (regardless of Python version).
The basic usage is like so:
python3 -m venv source /bin/activate