- How to Change the Color of PNG Image With CSS
- Create HTML
- Add CSS
- Example of changing a PNG image color:
- Result
- Example of changing the color of a PNG image with some filter styles:
- Example of changing the color of PNG image:
- CSS Change Image Color
- Example 1: Using the Filter Property with the Invert Function to Style an Image in an HTML File
- Example 2: Using the Filter Property with the Sepia Function to Style an Image in an HTML File
- Example 3: Using the Filter Property with the Grayscale Function to Style an Image in an HTML File
- Example 4: Using the Filter Property with the Opacity and Drop Shadow Functions to Style an Image in an HTML File
- Conclusion
- About the author
- Aqsa Yasin
How to Change the Color of PNG Image With CSS
In this tutorial, we’ll change the PNG image color with the help of CSS.
The easiest way of changing the color of png image is to use the filter property, which applies visual effects to the element (image). It has the following values:
filter: none | blur() | brightness() | contrast() | drop-shadow() | grayscale() | hue-rotate() | invert() | opacity() | saturate() | sepia() | url() | initial | inherit;With these values, we can change the color of the image.
Filters are new to browsers and are only supported in modern browsers. You can use -webkit-filter for Safari, Google Chrome, and Opera.
Let’s change an image color step by step.
Create HTML
body> img class="image-1" src="https://images.unsplash.com/photo-1480044965905-02098d419e96?ixlib=rb-1.2.1&ixid=eyJhcHBfaWQiOjEyMDd9&auto=format&fit=crop&w=1000&q=80" width="500px" height="250px" alt="filter applied" /> img class="image-2" src="https://images.unsplash.com/photo-1448227922836-6d05b3f8b663?ixlib=rb-1.2.1&ixid=eyJhcHBfaWQiOjEyMDd9&auto=format&fit=crop&w=1000&q=80" width="500px" height="250px" alt="filter applied" /> body>Add CSS
Now, we add styles to the «image-1» and «image-2» classes.
- Use the width property to set the width of both images.
- Set the filter property with its «invert» value on the «image-1″class. We set 100% to make the image fully inverted.
- Use the filter property with its «sepia» value (100%) on the «image-2» class.
img < width: 40%; float: left; > .image-1 < filter: invert(100%); -webkit-filter: invert(100%); > .image-2 < filter: sepia(100%); -webkit-filter: sepia(100%); >So, let’s see the outcome of our code.
Example of changing a PNG image color:
html> html> head> title>Convert image into different color title> style> img < width: 40%; float: left; > .image-1 < filter: invert(100%); -webkit-filter: invert(100%); > .image-2 < filter: sepia(100%); -webkit-filter: sepia(100%); > style> head> body> h2>Change PNG image color h2> img class="image-1" src="https://images.unsplash.com/photo-1480044965905-02098d419e96?ixlib=rb-1.2.1&ixid=eyJhcHBfaWQiOjEyMDd9&auto=format&fit=crop&w=1000&q=80" width="500px" height="250px" alt="filter applied" /> img class="image-2" src="https://images.unsplash.com/photo-1448227922836-6d05b3f8b663?ixlib=rb-1.2.1&ixid=eyJhcHBfaWQiOjEyMDd9&auto=format&fit=crop&w=1000&q=80" width="500px" height="250px" alt="filter applied" /> body> html>Result
Next, let’s see another example with eight values of the filter property.
Example of changing the color of a PNG image with some filter styles:
html> html> head> title>Title of the document title> style> body < background-color: #03030a; min-width: 800px; min-height: 400px > img < width: 20%; float: left; margin: 0; > /*Filter styles*/ .saturate < filter: saturate(3); -webkit-filter: saturate(3); > .grayscale < filter: grayscale(100%); -webkit-filter: grayscale(100%); > .contrast < filter: contrast(160%); -webkit-filter: contrast(160%); > .brightness < filter: brightness(0.25); -webkit-filter: brightness(0.25); > .blur < filter: blur(3px); -webkit-filter: blur(3px); > .invert < filter: invert(100%); -webkit-filter: invert(100%); > .sepia < filter: sepia(100%); -webkit-filter: sepia(100%); > .huerotate < filter: hue-rotate(180deg); -webkit-filter: hue-rotate(180deg); > .opacity < filter: opacity(50%); -webkit-filter: opacity(50%); > style> head> body> h2>Change PNG image color h2> img alt="Mona Lisa" src="http://i.stack.imgur.com/OyP0g.jpg" title="original"> img alt="Mona Lisa" src="http://i.stack.imgur.com/OyP0g.jpg" title="saturate" class="saturate"> img alt="Mona Lisa" src="http://i.stack.imgur.com/OyP0g.jpg" title="grayscale" class="grayscale"> img alt="Mona Lisa" src="http://i.stack.imgur.com/OyP0g.jpg" title="contrast" class="contrast"> img alt="Mona Lisa" src="http://i.stack.imgur.com/OyP0g.jpg" title="brightness" class="brightness"> img alt="Mona Lisa" src="http://i.stack.imgur.com/OyP0g.jpg" title="blur" class="blur"> img alt="Mona Lisa" src="http://i.stack.imgur.com/OyP0g.jpg" title="invert" class="invert"> img alt="Mona Lisa" src="http://i.stack.imgur.com/OyP0g.jpg" title="sepia" class="sepia"> img alt="Mona Lisa" src="http://i.stack.imgur.com/OyP0g.jpg" title="huerotate" class="huerotate"> img alt="Mona Lisa" src="http://i.stack.imgur.com/OyP0g.jpg" title="opacity" class="opacity"> body> html>You can also apply another technique. In the next example, we set id attributes («original» and «changed») for our elements. Then, we set filter: hue-rotate; on the «changed» id.
Example of changing the color of PNG image:
html> html> head> title>Convert image into different color title> style> #original, #changed < background: url('https://image.freepik.com/free-photo/orange-red-siamese-fighting-fish-betta-splendens-isolated-white-background_51519-539.jpg'); background-size: cover; width: 30%; margin: 0 10% 0 10%; padding-bottom: 28%; float: left; > #changed < -webkit-filter: hue-rotate(180deg); filter: hue-rotate(180deg); > style> head> body> h2>Change PNG image color h2> div id="original"> div> div id="changed"> div> body> html>CSS Change Image Color
![]()
In this article, we will focus on the methods for changing the color of an image that the CSS provides. The commonly used property in this scenario is the filter property which applies to the image tag of the Hypertext Markup Language. The filter feature allows you to apply the several functions to a picture such as “invert”, “grayscale”, “sepia”, and “drop shadow”. These distinct functions provide several variations to an image by altering the color components and the visible elements of the image.
We will implement the several examples of these functions that the CSS filter property provides in an HTML file.
Example 1: Using the Filter Property with the Invert Function to Style an Image in an HTML File
In this example, we will use the filter property’s invert function which will invert all the sample values of an image. The invert function can accept all the positive values for the degree of inversion and only the negative values are not accepted. This function of the filter property can single-handedly change the color of an image.
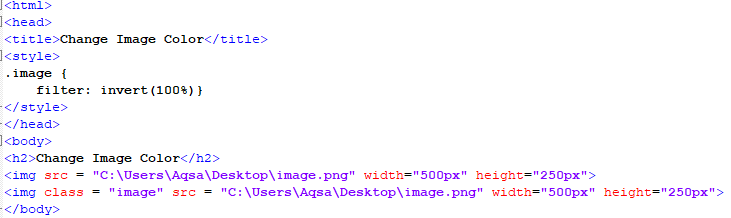
In this script, we start by opening the header of the file to create a styling class for the image element of the HTML page. In the style under the name of “image”, we create a class where we define the property along with its function which changes the color of the image. Then, we close the style tag and the header of the file. After this, we open the body tag where we give a heading by using the “h2” tag. The first image is the original colored image and have no styling properties in it while the second image is the same as the first, but with the style and class added to its tag. We add the images in the file via the file path using the “src” keyword. After closing the image tag, we end the file by closing the body and the HTML tag. We save the file in the proper format so that we can access it in our browser and receive the following results:
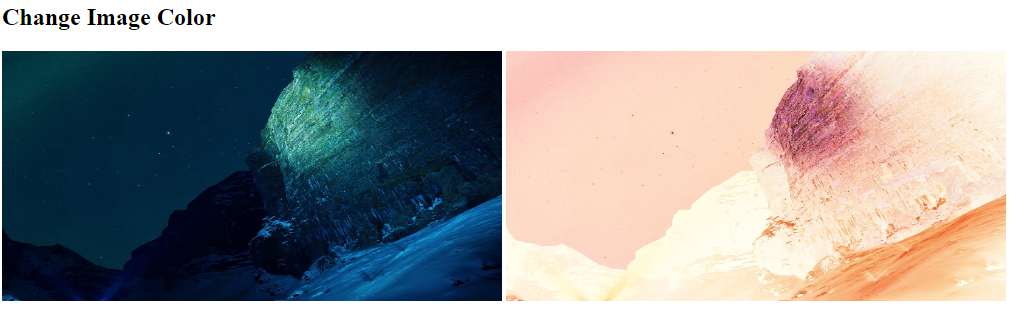
As we can see in the previous output, the image on the left has all the correct colors while the image on the right has the inverted colors and has been transformed into a different image.
Example 2: Using the Filter Property with the Sepia Function to Style an Image in an HTML File
In this example, we use the sepia function of the filter property to change all of the colors in a picture to a warm brown or light yellow color. The sepia function accepts all the positive color conversion degree values and rejects only the negative values. This filter property function has the capacity to modify the color of a picture on its own. Inside the style tag of an HTML file, we will create a unique styling class for the image element.
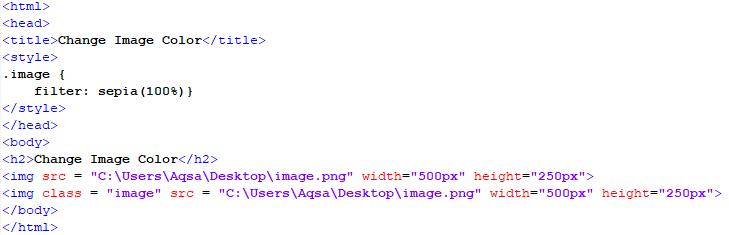
In this script, we begin by accessing the file’s header to create a style class for the image element of the HTML page. In the style tag, we construct a class where we define the property as well as its method, which alters the color of the picture. The style tag and the file’s header will thereafter be closed. Following that, we open the body tag and insert a heading using the “h2” tag. Then, using the “img” element, we place the two images on our screen. The first image is the original color image with no style characteristics, whereas the second image is the same as the first but with the styling class included in its tag. Using the “src” keyword, we insert the photos into the file through the file path.
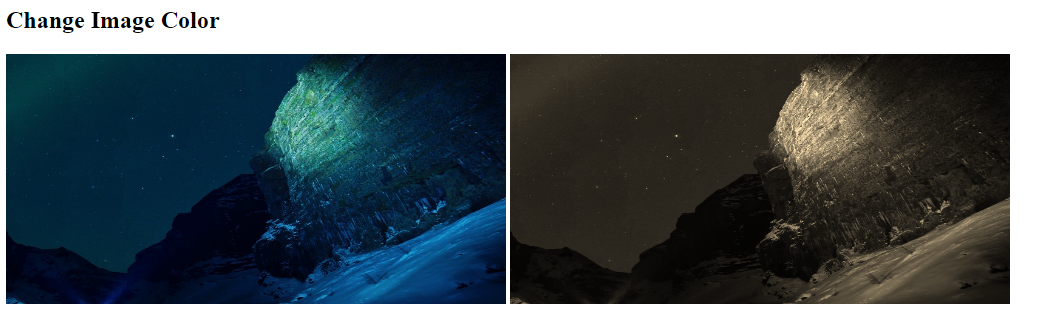
As shown in the previous output, the image on the left has all of the correct colors. However, the one on the right has the assorted colors.
Example 3: Using the Filter Property with the Grayscale Function to Style an Image in an HTML File
In this example, we will utilize the grayscale filter feature to convert all of the colors in a photo to black, white, and grey. This filter property function can alter a photograph’s color and transforms it into a grayscale picture. We will develop a unique styling class for the picture element within the style tag of an HTML file.
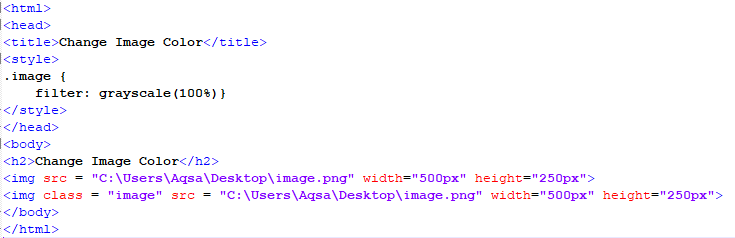
In this script, we first enter the file’s header to generate a style class for the HTML page’s image element. We define the property as well as the method to alter the color of the picture in a class. The style tag and the file’s header will thereafter be closed. Then, we open the body tag and insert a heading using the “h2” tag. Then, we use the “img” element to display the two images on our screen. The first image has no styling features, while the second image is the same as the first but with the styling class added to its tag. We insert the photographs into the file using the “src” keyword and the file path.

The picture on the left contains all of the original colors, as shown in the previous output. However, the one on the right has distinct hues.
Example 4: Using the Filter Property with the Opacity and Drop Shadow Functions to Style an Image in an HTML File
In this example, we will use the filter property’s opacity and drop shadow functions to change all of the colors in a photo. This filter property function alters the color of a photograph and converts it to a new image.
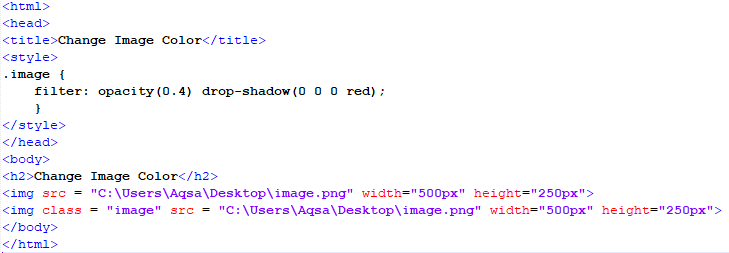
In this script, we first add the file’s header to produce a style class for the picture element on the HTML page. We define the property as well as the method to alter the color of the picture in a class. The style tag and the file’s header will thereafter be closed. Then, we open the body tag and use the “h2” tag to insert a heading. The “img” element is then used to display the two images on our screen. The first image has no styling characteristics, whereas the second image is identical to the first but with the styling class added to its tag. We insert pictures into the file by using the “src” keyword and the file path. We close the body and the HTML elements once we close the image tag.
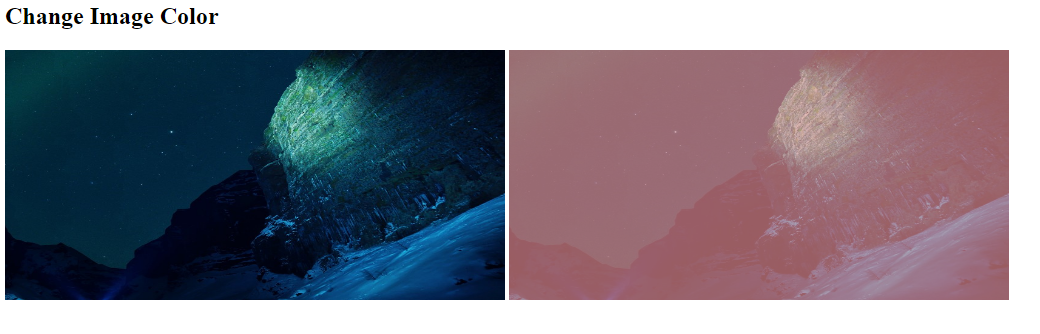
The photo on the left contains all of the original colors, while the one on the right has changed tones, as indicated in the previous output.
Conclusion
We discussed the several methods regarding the changing of the color of an image in an HTML file using CSS. The most commonly used CSS property is the filter property which has predefined distinct functions which can change the color of an image and can give it a transformed look. We implemented several of these functions in the Notepad++ environment to get a better understanding of how this property works with distinct functions.
About the author
Aqsa Yasin
I am a self-motivated information technology professional with a passion for writing. I am a technical writer and love to write for all Linux flavors and Windows.