- 4 Steps To Add Watermark To Image In PHP (Simple Examples)
- TLDR – QUICK SLIDES
- TABLE OF CONTENTS
- ADDING A WATERMARK WITH PHP
- EXAMPLE 1) ADD TEXT WATERMARK TO IMAGE
- EXAMPLE 2) ADD AN IMAGE WATERMARK
- EXAMPLE 3) CENTERED TEXT WATERMARK
- EXAMPLE 4) CENTERED IMAGE WATERMARK
- DOWNLOAD & NOTES
- SUPPORT
- EXAMPLE CODE DOWNLOAD
- EXTRA BITS & LINKS
- HOW TO SET THE OPACITY OF THE IMAGE WATERMARK?
- SUMMARY – USEFUL GD FUNCTIONS
- HOW ABOUT THE OTHER IMAGE FORMATS?
- LINKS & REFERENCES
- TUTORIAL VIDEO
- INFOGRAPHIC CHEAT SHEET
- THE END
- Leave a Comment Cancel Reply
- Search
- Breakthrough Javascript
- Socials
- About Me
- Add Text To Images In PHP (Simple Examples)
- TLDR – QUICK SLIDES
- TABLE OF CONTENTS
- PHP ADD TEXT TO IMAGE
- EXAMPLE 1) SIMPLE WRITE TEXT ON IMAGE
- EXAMPLE 2) CENTER TEXT IN IMAGE
- EXAMPLE 3) NON-ENGLISH UTF-8 ENCODING
- DOWNLOAD & NOTES
- SUPPORT
- EXAMPLE CODE DOWNLOAD
- EXTRA BITS & LINKS
- ADDING TEXT TO PICTURES IN FOLDER
- FONT COPYRIGHT
- CENTER PARAGRAPH ON IMAGE & AUTO LINE BREAK
- REFERENCES & LINKS
- TUTORIAL VIDEO
- INFOGRAPHIC CHEAT SHEET
- THE END
4 Steps To Add Watermark To Image In PHP (Simple Examples)
Welcome to a tutorial on how to add a watermark to an image in PHP. So you have an eCommerce website or gallery that accepts image uploads, but there is just one problem. Some thieves are stealing the images, and a little bit of protection will do good.
We can use the GD extension in PHP to add a watermark to images:
- Open the original image – $img = imagecreatefrompng(«IMAGE.PNG»);
- Set the text color – $red = imagecolorallocatealpha($img, 255, 0, 0, 0);
- Add the text to the image – imagettftext($img, 18, 0, 0, 24, $red, «PATH\FONT.TTF», «COPYRIGHT»);
- Save the watermarked image – imagepng($img, «WATERMARKED.PNG»);
That covers the quick basics, but how do we apply another image as the watermark? Read on for more examples!
TLDR – QUICK SLIDES

TABLE OF CONTENTS
ADDING A WATERMARK WITH PHP
All right, let us now get into the examples of applying a watermark to an image in PHP now.
EXAMPLE 1) ADD TEXT WATERMARK TO IMAGE

- Create an image object from the image file.
- Write text onto the image object.
- Save the watermarked image object to a file.
EXAMPLE 2) ADD AN IMAGE WATERMARK

This version will apply an image watermark instead, and it is a lot more straightforward. We are pretty much just “copying” the watermark image onto the source image using imagecopy() .
P.S. For the uninitiated, please use a transparent PNG WEBP GIF for the watermark image. JPEG does not support alpha channels (transparency).
EXAMPLE 3) CENTERED TEXT WATERMARK
// optional // (C) WRITE TEXT TO IMAGE & SAVE imagettftext($img, $fontSize, 0, $posX, $posY, $fontColor, $fontFile, $txt); // (D) SAVE TO FILE imagepng($img, $target); echo "Saved to $target"; 
- (B2) Use imagesx() and imagesy() to get the dimensions of the source image.
- (B3) Use $sizeT = imagettfbbox() to get an array of 8 numbers, which are the X-Y coordinates of the text box (illustration below).
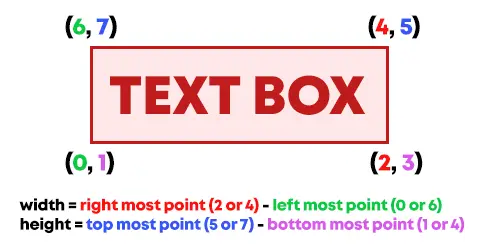
- (B3) To calculate the dimensions of the text box:
- For the width, take the rightmost point max([$sizeT[2], $sizeT[4]]) , minus the leftmost point min([$sizeT[0], $sizeT[6]]) .
- For the height, take the topmost point max([$sizeT[5], $sizeT[7]]) , minus the bottommost point min([$sizeT[1], $sizeT[3]]) .
- (B4) With that, we can finally do calculations to center the text.
- Horizontal center = (Image Width — Text Width) / 2 .
- Vertical center = (Image Height — Text Height) / 2 .
EXAMPLE 4) CENTERED IMAGE WATERMARK
// optional // (C) APPLY WATERMARK imagecopy( $imgS, $imgW, // copy watermark onto source image $posX, $posY, // place watermark at center 0, 0, $widthW, $heightW // copy watermark image without clipping ); // (D) SAVE TO FILE imagepng($imgS, $target); echo "Saved to $target"; 
- Horizontal Center = (Source Width — Watermark Width) / 2
- Vertical Center = (Source Height — Watermark Height) / 2
DOWNLOAD & NOTES
Here is the download link to the example code, so you don’t have to copy-paste everything.
SUPPORT
600+ free tutorials & projects on Code Boxx and still growing. I insist on not turning Code Boxx into a «paid scripts and courses» business, so every little bit of support helps.
EXAMPLE CODE DOWNLOAD
Click here for the source code on GitHub gist, just click on “download zip” or do a git clone. I have released it under the MIT license, so feel free to build on top of it or use it in your own project.
EXTRA BITS & LINKS
That’s all for this guide, and here is a small section on some extras and links that may be useful to you.
HOW TO SET THE OPACITY OF THE IMAGE WATERMARK?
Unfortunately, the GD library doesn’t seem to have a straightforward method to set image opacity. So, use your own image editor to set the watermark opacity.
SUMMARY – USEFUL GD FUNCTIONS
HOW ABOUT THE OTHER IMAGE FORMATS?
- imagecreatefromjpeg()
- imagecreatefrombmp()
- imagecreatefromwebp()
- imagecreatefromgif()
LINKS & REFERENCES
TUTORIAL VIDEO
INFOGRAPHIC CHEAT SHEET

THE END
Thank you for reading, and we have come to the end of this guide. I hope that it has helped you with your project, and if you want to share anything with this guide, please feel free to comment below. Good luck and happy coding!
Leave a Comment Cancel Reply
Search
Breakthrough Javascript

Take pictures with the webcam, voice commands, video calls, GPS, NFC. Yes, all possible with Javascript — Check out Breakthrough Javascript!
Socials
About Me

W.S. Toh is a senior web developer and SEO practitioner with over 20 years of experience. Graduated from the University of London. When not secretly being an evil tech ninja, he enjoys photography and working on DIY projects.
Code Boxx participates in the eBay Partner Network, an affiliate program designed for sites to earn commission fees by linking to ebay.com. We also participate in affiliate programs with Bluehost, ShareASale, Clickbank, and other sites. We are compensated for referring traffic.
Add Text To Images In PHP (Simple Examples)
Welcome to a tutorial on how to add text to images in PHP. Need to add a watermark or copyright message on uploaded images on a PHP server?
- $img = imagecreatefromjpeg(«IMG.JPG»);
- $size = 24; $x = 5; $y = 30; $angle = 0; $quality = 100;
- $color = imagecolorallocate($img, 255, 255, 255);
- imagettftext($img, $size, $x, $y, $angle, $color, «PATH/FONT.TTF», «TEXT»);
- imagejpeg($img, «SAVE.JPG», $quality);
It’s that simple. But let us walk through more examples, along with a simple tip to center the text on the image – Read on!
TLDR – QUICK SLIDES
TABLE OF CONTENTS
PHP ADD TEXT TO IMAGE
Let us now get into the examples of adding text to an image, it is actually very straightforward in PHP – We just need to load it as a new image object in PHP, add some text on top of it, then save it.
EXAMPLE 1) SIMPLE WRITE TEXT ON IMAGE

- Load the image into an object with imagecreatefromjpeg() .
- Write text using imagettftext() .
- Output the image – Directly show it in the browser, save it into a file, save into the database, email it as an attachment, do whatever is required.
EXAMPLE 2) CENTER TEXT IN IMAGE

Yikes! This looks crazy, but the main bulk of this script is calculating the position of the text box. If you want to be a happy person, just skip and use this as-it-is… If not, here’s how the calculations work:
(C1) Self-explanatory. Get the image width with imagesx() and height with imagesy() .
(C2) To calculate the dimensions of the text box, we have to use imagettfbbox() . This returns an array with 8 numbers, which are the coordinates of the text box.
(C3) Lastly, we can calculate the center X and Y positions.
- Center X = (width of image – width of text box) / 2.
- Center Y = (height of image – height of text box) / 2.
EXAMPLE 3) NON-ENGLISH UTF-8 ENCODING

If you are working with non-English languages, GD is not exactly the friendliest. But all credits go to this post on StackOverflow – Just use a font for your required language and do a bit of manual UTF-8 encoding.
DOWNLOAD & NOTES
Here is the download link to the example code, so you don’t have to copy-paste everything.
SUPPORT
600+ free tutorials & projects on Code Boxx and still growing. I insist on not turning Code Boxx into a «paid scripts and courses» business, so every little bit of support helps.
EXAMPLE CODE DOWNLOAD
Click here for the source code on GitHub gist, just click on “download zip” or do a git clone. I have released it under the MIT license, so feel free to build on top of it or use it in your own project.
EXTRA BITS & LINKS
That’s it for the scripts. But before we wrap things up, here are a few more nuggets of information that you might be interested in.
ADDING TEXT TO PICTURES IN FOLDER
", GLOB_BRACE); foreach ($files as $f) < $img = imagecreatefromjpeg($f); // SAME AS ABOVE - WRITE TEXT TO IMAGE >Just get all the images in the folder and loop through all of them.
FONT COPYRIGHT
You can specify which font to use, but please do not go on a download frenzy and start using every font you find on the Internet. There is a hidden nightmare behind fonts, and it is called copyright. Yes, some fonts are subjected to copyright, and you can get bitten by the law monster if you make money off edited images… Always check the usage license of the “free fonts”.
CENTER PARAGRAPH ON IMAGE & AUTO LINE BREAK
All I can say is – Very complicated, good luck. The best place to start is to study and modify the above “center text on image” example.
- Calculate the dimensions of the “single line text box” and image.
- Determine how many lines are required to fit the paragraph into the image. That is, break the text into multiple text boxes. Quick pseudo-code:
- $numlines = ceil(WIDTH OF TEXTBOX / (WIDTH OF IMAGE * 70%));
- if (HEIGHT OF LINES > HEIGHT OF IMAGE) < ERROR - CANNOT FIT >
- $lines = [FIND SOME SMART WAY, TO BREAK TEXT, INTO MULTIPLE LINES];
REFERENCES & LINKS
- GD & Image Functions – PHP
- AJAX Image Upload In PHP – Code Boxx
- Write Multi-Line Text On Image In PHP – Code Boxx
- If you are looking for some fonts to use – Check out Font Squirrel.
TUTORIAL VIDEO
INFOGRAPHIC CHEAT SHEET

THE END
Thank you for reading, and we have come to the end of this short tutorial. I hope it has answered your question on how to add text to an image, and if you have anything to share with this guide, please feel free to comment below. Good luck and happy coding!
