How To Switch Java Version On Mac
It provides the steps required to switch the current Java among the multiple versions installed on the Mac machine.
We might be required to install multiple versions of Java on the same Mac machine. Also, we can assign only one installation to the Java command. This tutorial provides the steps required to switch among the multiple versions of Java installed on the same Mac machine.
List Installed Java
We can check the highest version of Java installed on the system using the command as shown below.
# Show system default i.e. highest version of Java
/usr/libexec/java_home

# Output
/Library/Java/JavaVirtualMachines/jdk-11.0.7.jdk/Contents/Home
We can also check all the versions of Java installed on the system using the command as shown below.
# List installed JDKs
/usr/libexec/java_home -V

# List Output
Matching Java Virtual Machines (2):
11.0.7, x86_64: "Java SE 11.0.7" /Library/Java/JavaVirtualMachines/jdk-11.0.7.jdk/Contents/Home
1.8.0_251, x86_64: "Java SE 8" /Library/Java/JavaVirtualMachines/jdk1.8.0_251.jdk/Contents/Home

/Library/Java/JavaVirtualMachines/jdk-11.0.7.jdk/Contents/Home
The java_home command with argument -V lists all the Java versions installed on the system and shows the most recent or highest version at the top of the list. It also shows the most recent version or system default at the bottom of the list.
Switch Java (JDK)
This section provides the options to switch among the multiple versions of JDK installed on the Mac system.
# List installed JDKs
/usr/libexec/java_home -V

# List Output
Matching Java Virtual Machines (2):
11.0.7, x86_64: "Java SE 11.0.7" /Library/Java/JavaVirtualMachines/jdk-11.0.7.jdk/Contents/Home
1.8.0_251, x86_64: "Java SE 8" /Library/Java/JavaVirtualMachines/jdk1.8.0_251.jdk/Contents/Home

/Library/Java/JavaVirtualMachines/jdk-11.0.7.jdk/Contents/Home

# Switch active JDK
export JAVA_HOME=`/usr/libexec/java_home -v `

# Switch Example 1
export JAVA_HOME=`/usr/libexec/java_home -v 1.8.0_251`

# Check Active Java
java -version

# Version Check Output
java version "1.8.0_251"
Java(TM) SE Runtime Environment (build 1.8.0_251-b08)
Java HotSpot(TM) 64-Bit Server VM (build 25.251-b08, mixed mode)

# Switch Example 2
export JAVA_HOME=`/usr/libexec/java_home -v 11.0.7`

# Check Active Java
java -version

# Version Check Output
java version "11.0.7" 2020-04-14 LTS
Java(TM) SE Runtime Environment 18.9 (build 11.0.7+8-LTS)
Java HotSpot(TM) 64-Bit Server VM 18.9 (build 11.0.7+8-LTS, mixed mode)
This switches the Java version for the active shell. If you close the terminal and again check the Java version by opening a new terminal, your changes won’t be reflected since the Mac system will pick the highest version by default. You can follow the next section to preserve the Java version and switch the Java to default.
Preserve Java Version
We can save the default version of Java to the ~/.bash_profile file and execute it to switch to the default version of Java.
# Create .bash_profile if not exist
touch ~/.bash_profile

# Open .bash_profile for editing
open -a TextEdit.app ~/.bash_profile

# Specify default Java
export JAVA_HOME=/Library/Java/JavaVirtualMachines/jdk1.8.0_251.jdk/Contents/Home

# Save and close .bash_profile
This will preserve the default version of Java. Now close the terminal and open a new one.
# List Java Versions
/usr/libexec/java_home -V

# List Output
Matching Java Virtual Machines (2):
11.0.7, x86_64: "Java SE 11.0.7" /Library/Java/JavaVirtualMachines/jdk-11.0.7.jdk/Contents/Home
1.8.0_251, x86_64: "Java SE 8" /Library/Java/JavaVirtualMachines/jdk1.8.0_251.jdk/Contents/Home

/Library/Java/JavaVirtualMachines/jdk-11.0.7.jdk/Contents/Home

# Test Active Java
java -version

# Active Java
java version "11.0.7" 2020-04-14 LTS
Java(TM) SE Runtime Environment 18.9 (build 11.0.7+8-LTS)
Java HotSpot(TM) 64-Bit Server VM 18.9 (build 11.0.7+8-LTS, mixed mode)
The above-mentioned commands list all the JDKs installed on the system and defaults the active Java to the highest version installed on the system. Now we can switch to our preferred JDK by executing the .bash_profile script.
# Execute system preferences
source ~/.bash_profile

# Test Active Java
java -version

# Active Java
java version "1.8.0_251"
Java(TM) SE Runtime Environment (build 1.8.0_251-b08)
Java HotSpot(TM) 64-Bit Server VM (build 25.251-b08, mixed mode)
In this way, we can always switch to our preferred JDK by simply executing the .bash_profile script.
Notes: There is no way to set the default JDK on Mac system. It will simply pick the highest version installed on the system. Though, we can switch the active Java on the terminal using the .bash_profile script as shown above. The third-party solution jenv might be helpful in certain situations.
Disable Java
We can disable a specific version of Java by renaming its Info.plist file to Info.plist.disabled. This will prevent Mac to consider the Java version with Info.plist file renamed to Info.plist.disabled while getting the highest version installed on the system. It will still consider the highest version as the default Java.
The Info.plist location is similar to the examples shown below.
JDK 11.0.7 -> /Library/Java/JavaVirtualMachines/jdk-11.0.7.jdk/Contents/Info.plist
JDK 1.8.0_251 -> /Library/Java/JavaVirtualMachines/jdk1.8.0_251.jdk/Contents/Info.plist
If we rename Info.plist file of JDK 11.0.7 to Info.plist.disabled, Mac system will ignore it and use JDK 1.8.0_251 as the default JDK since it’s the next highest one installed on my system. It might differ on your system.
Summary
This tutorial provided the steps required to list the multiple versions of Java installed on the Mac system and switch the active Java. It also provided the steps required to persist the Java version.
Как включить Java в браузере Mozilla Firefox

Java – популярная технология, на основе которой работают многие веб-сайты и компьютерные программы. Однако пользователи, используя браузер Mozilla Firefox, начали сталкиваться с тем, что содержимое Java в веб-обозревателе просто-напросто не отображается.
Компания Mozilla отказалась в своем браузере Firefox от всех NPAPI-плагинов кроме Adobe Flash, начиная с 52 версии. Данная инструкция применима только в том случае, если вы используете браузер устаревшей версии.
Как включить плагин Java для Firefox?
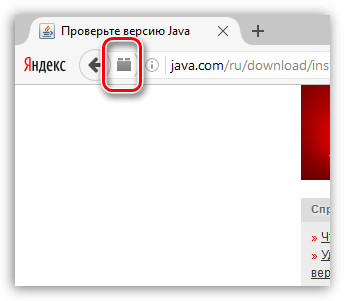
- Для того, чтобы включить JavaScript в Mozilla Firefox единожды на странице, где требуется воспроизведение интерактивного содержимого Java, щелкните по кнопке «Включить Java», после чего браузер начнет отображение содержимого на текущей веб-странице.

- Если же на веб-странице, открытой вами, нет ни единого сообщения о том, что вы можете активировать Java, или же после нажатия кнопки «Включить Java» ничего не происходит, тогда обратите внимание на левую область адресной строки, где может значиться миниатюрный значок с кубиком.

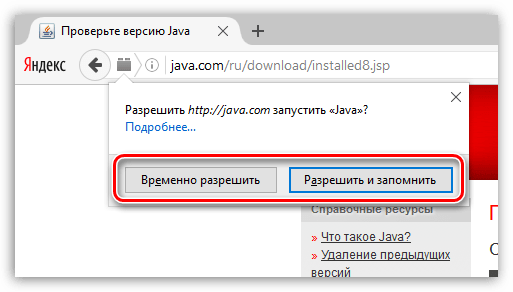
- Если подобный значок имеется, щелкните по нему один раз левой кнопкой мыши. На экране отобразится дополнительное меню, в котором имеется два пункта:
- «Временно разрешить» – активация содержимого Java только на текущей странице. Но если перезагрузить страницу, доступ для Java снова потребуется предоставлять;
- «Разрешить и запомнить» – активация Java на данной странице. После перезагрузки страницы содержимое Java будет по-прежнему доступно.


Что делать, если Java все равно не отображается?
Если вышеописанные действия так и не помогли отобразить содержимое Java, тогда можно сделать вывод, что на вашем компьютере установлена устаревшая версия Java, или данное программное обеспечение вовсе отсутствует.
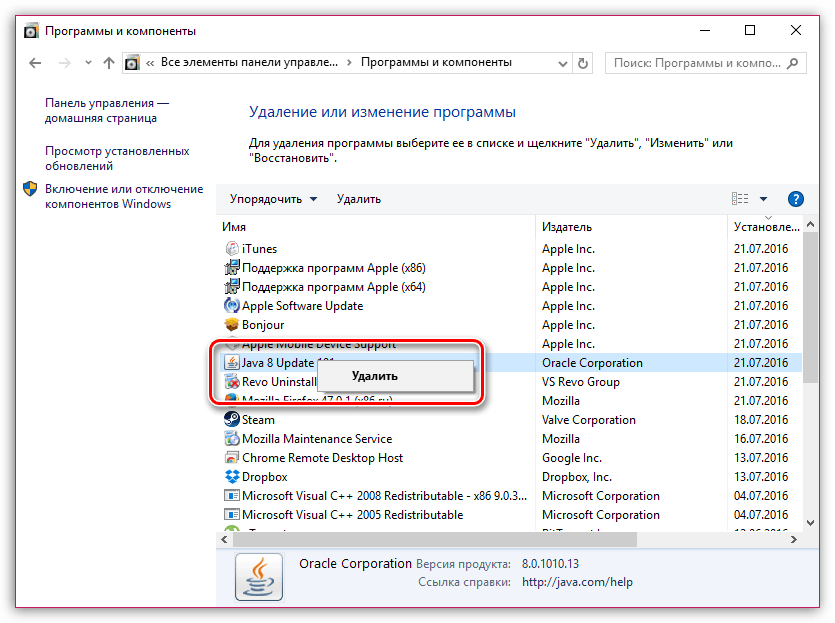
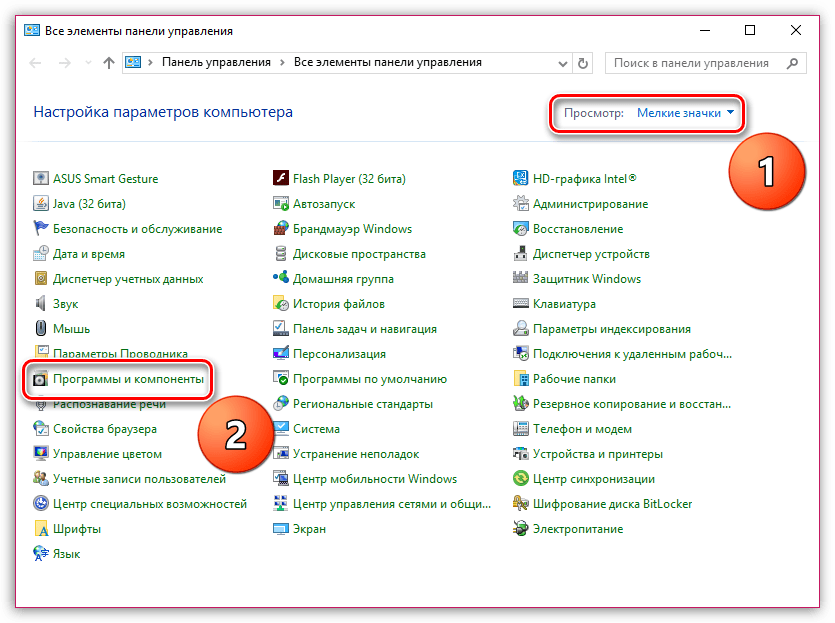
- Чтобы решить проблему, перейдите в меню «Панель управления», выставьте в верхнем правом углу режим просмотра «Мелкие значки», а затем откройте раздел «Программы и компоненты».
В списке инсталлированных программ найдите Java, щелкните по программному обеспечению правой кнопкой мыши и выберите пункт «Удалить». Если же программа отсутствует, то сразу переходите к этапу установки.