- How to Create Horizontal and Vertical Tabs using JavaScript?
- Create horizontal tabs
- Syntax
- Algorithm
- Example
- Creating the horizontal tabs using HTML, CSS, and JavaScript.
- Create the vertical tabs
- Syntax
- Example 2
- Creating the vertical tabs using HTML, CSS, and JavaScript.
- Горизонтальные табы
- Горизонтальные табы — нативный JavaScript
- Статьи из данной категории:
- Creating a Simple Horizontal Switchable Tabs Panel Using HTML, CSS & JavaScript.
- Prerequisites
- Step 1: Setting up the HTML
- Step 2: Styling the page
- Step 3: Add JavaScript
- Part 1:
- Part 2:
- Part 3:
- Part 4:
- Conclusion!
How to Create Horizontal and Vertical Tabs using JavaScript?
We can create tabs using HTML, CSS & JavaScript. There can be two types of tabs. One is horizontal tabs, and another is vertical tabs. The tabs allow us to show different contents in very less space as we can show the different content according to the different tabs.
We will learn to create horizontal and vertical tabs from scratch using HTML, CSS, and JavaScript.
Create horizontal tabs
We can show all tabs in a single row by creating horizontal tabs. Also, we can show the content of the selected tab below all tabs.
Syntax
Users can follow the syntax below to manage horizontal tabs using JavaScript.
In the above syntax, we accessed all tabs and added a click event to all tabs by iterating through the HTML collection of all tabs. We activate the clicked tab and show its content in the addEventListner() method.
Algorithm
- Step 1 − Access all the tabs in JavaScript.
- Step 2 − Use the for loop to iterate through all tabs and add a click event using the addEventListner() method.
- Step 3 − In the callback function of the addEventListner() method, first use another for loop to iterate through all children and hide them. Also, remove the active class from all tabs.
- Step 4 − The class of the tab is the same as the id of its content div element. So, we can get the first class of the clicked tab and use that as an id to get content div.
- Step 5 − After that, change the display of the content div to show it on the screen, and add the active class to the class list of the clicked tab.
Example
In the example below, we created the horizontal tabs by applying CSS. Also, we have used JavaScript, as explained in the above algorithm, to manage the clicked tab content.
In the output, users can observe that only one tab remains active.
.tabs < display: flex; flex-direction: row; cursor: pointer; >.tabs div < padding: 5px 15px; font-size: 1.2rem; border: 1px solid blue; >.active < background-color: grey; >.tab-content < margin-top: 10px; border: 3px solid blue; width: 400px; font-size: 2rem; border-radius: 12px; height: 5rem; display: flex; justify-content: center; align-items: center; >.tab-content divCreating the horizontal tabs using HTML, CSS, and JavaScript.
Tab 1Tab 2Tab 3Tab 4This is the content of the tab 1.This is the content of the tab 2.This is the content of the tab 3.This is the content of the tab 4.
Create the vertical tabs
We can show all tabs in a single column by creating vertical tabs. Also, we can show the tabs and their content side by side.
Syntax
Users can follow the syntax below to convert the horizontal tabs into vertical tabs.
// show tabs and their content side by side .container < display: flex; flex-direction: row; >// show tabs vertically .tabs
In the above syntax, we used CSS to create vertical tabs from horizontal ones. The container is the main div in which tabs and their content are located, and the ‘tabs’ contains all tabs.
Example 2
The example below is almost similar to the first example. We just changed the CSS to show all the vertically and the content and tabs side by side.
.container < display: flex; flex-direction: row; width: 700px; >.tabs < display: flex; flex-direction: column; cursor: pointer; >.tabs div < padding: 5px 15px; font-size: 1.2rem; border: 1px solid blue; >.active < background-color: grey; >.tab-content < margin-top: 10px; border: 3px solid green; width: 400px; font-size: 2rem; border-radius: 12px; margin-left: 10px; display: flex; justify-content: center; align-items: center; >.tab-content divCreating the vertical tabs using HTML, CSS, and JavaScript.
React JSNode JSJavaScriptTypeScriptIt is a JavaScript library for the front end.It is a run-time environment used to create a backend of the application.It is used for the front end and back end of the application.It is a superset of JavaScript in which we can also define the types of variables.
Горизонтальные табы
Сегодня мы сделаем адаптивные вкладки для сайта, так называемые табы. Сначала используя jQuery, затем нативный JavaScript.
В HTML-файле создадим структуру будущих табов: обёртку для табов — mywrap-tabs , сами вкладки — mytabs (активный таб и неактивный), и содержимое вкладок — mycontent (так же активное и неактивное содержимое в зависимости от выбранной вкладки).
Стилизация табов в css-файле.
.mywrap-tabs < max-width: 100%; margin: 38px auto; font-family: sans-serif; >.mywrap-tabs .mytabs < background-color: #262938; >.mywrap-tabs .mytabs:first-child < padding: 7px; >.mywrap-tabs .mytabs::after < content: ""; height: 0; display: block; clear: both; >.mywrap-tabs .mytabs .mytab < float: left; border-top: 4px solid #53798f; padding: 9px 19px; background-color: #375566; color: #fafaf1; transition: background-color .25s linear; cursor: pointer; >.mywrap-tabs .mytabs .mytab:hover < background-color: #304c5c; color: #fafaf1; >.mywrap-tabs .mytabs .mytab.active < background-color: #213c4b; color: #fafaf1; border-top: 4px solid transparent; >.mywrap-tabs .mycontent < color: #fafaf1; background-color: #213c4b; padding: 6px 11px; >.mywrap-tabs .mycontent .mytab-content < display: none; padding: 14px 9px; >.mywrap-tabs .mycontent .mytab-content.active
И главная магия в js-файле с помощью jQuery.
Горизонтальные табы — нативный JavaScript
Данный код можно использовать для множества табов. Передайте следующие аргументы в функцию tabs :
- headerSelector — класс обёртки для кнопок табов;
- tabSelector — класс кнопок табов;
- contentSelector — класс контента табов;
- activeClass — класс выделения автивного таба (без точки «.»);
- display — block, flex, span и т.п. (если не передан параметр, то block);
window.addEventListener("DOMContentLoaded", () => < const tabs = (headerSelector, tabSelector, contentSelector, activeClass, display = "block") => < const header = document.querySelector(headerSelector), tab = document.querySelectorAll(tabSelector), content = document.querySelectorAll(contentSelector); function hideTabContent() < content.forEach(item =>< item.style.display = "none"; >); tab.forEach(item => < item.classList.remove(activeClass); >); > // при запуске функции без аргументов активным будет 1 элемент function showTabContent(i = 0) < content[i].style.display = display; tab[i].classList.add(activeClass); >hideTabContent(); showTabContent(); header.addEventListener("click", (e) => < const target = e.target; if (target && (target.classList.contains(tabSelector.replace(/./, "")) || target.parentNode.classList.contains(tabSelector.replace(/./, "")))) < tab.forEach((item, i) => < if (target == item || target.parentNode == item) < hideTabContent(); showTabContent(i); >>); > >); >; tabs(".mytabs", ".mytab", ".mytab-content", "active"); >);Надеюсь, вам понравилась данная информация. Если вам интересна тема web-разработки, то можете следить за выходом новых статей в Telegram.
Статьи из данной категории:
Creating a Simple Horizontal Switchable Tabs Panel Using HTML, CSS & JavaScript.
We will define the structure of the web application using HTML. Then render the elements on the screen using CSS and finally, add the functionality using some bit of Vanilla JavaScript. That’s right, no fancy JavaScript framework is needed, just the simple Vanilla JavaScript we all know. Let’s begin!
Prerequisites
Before getting into the coding part of this project, ensure you have the following:
- Intermediate level knowledge in HTML, CSS & JavaScript.
- Text editor or a codepen account.
Step 1: Setting up the HTML
Essentially the HTML has a few levels of elements:
- The wrapper of the tabbed panel.
- The sidebar
- The tab contents
- The actual tab buttons.
Begin by constructing the tab panel wrapper. Create a div , give it a class, and call it tabs ; this will be the wrapper for the tab panel. Create a new div inside the wrapper, give it a class, and title it sidebar ; this will contain the tab buttons. Create three buttons in the sidebar , then give each one the tab-btn class. To the first button, add a tab-btn-active class. The active class will come in handy when specifying in the CSS and JavaScript what happens to the tab when the tab button is clicked. Add HTML, CSS, and JavaScript as the names of the buttons, respectively. Add a data for-tab=’ ‘ attribute to each of these buttons now. Add a tab number to the data element to specify which button corresponds to which tab. Tab 1, tab 2, and tab 3 are examples. In the JavaSript, the tab number is used to read the properties and select which tab to open.
Create a parent div underneath the sidebar and give it the class content to act as a wrapper for the tab contents. Create a new div and give it the tab-content class. Also, give the tab content div a class called tab-content-active . The active class will be used in CSS and JavaScript to indicate what happens to the tab when the tab button is clicked.
We’ll map the data-for-tab attribute within this div , so add a data-tab=’1′ property to it and give it a tab number of 1 to represent the first tab. You may now go ahead and fill the div with some content. Do the same for tab two and three, but remove the tab-content-active class and name their data-tab attribute 2 and three respectively. Finally, add some bit of content.
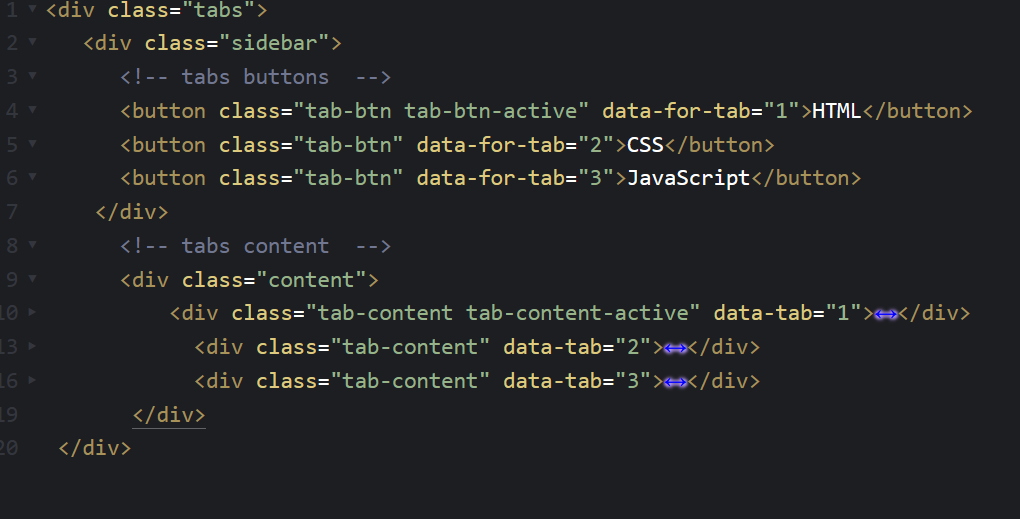
If you’re loading the page from the server, you might want to utilize loops or export the data so that the data-tab values for tabs 1, 2, and 3 matches the data-for-tab values. Make sure the data-for-tab and data-tab numbers match if you’re not using any server-side code.
Step 2: Styling the page
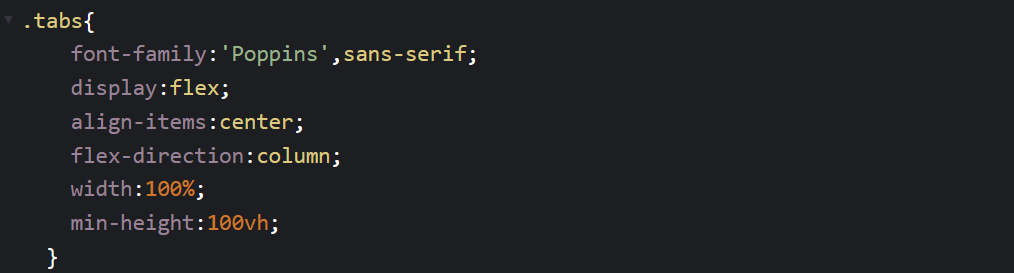
We will first style the tab wrapper. Apply the following styles to the tab wrapper:
Thereafter apply the following styles to the sidebar and tab buttons:
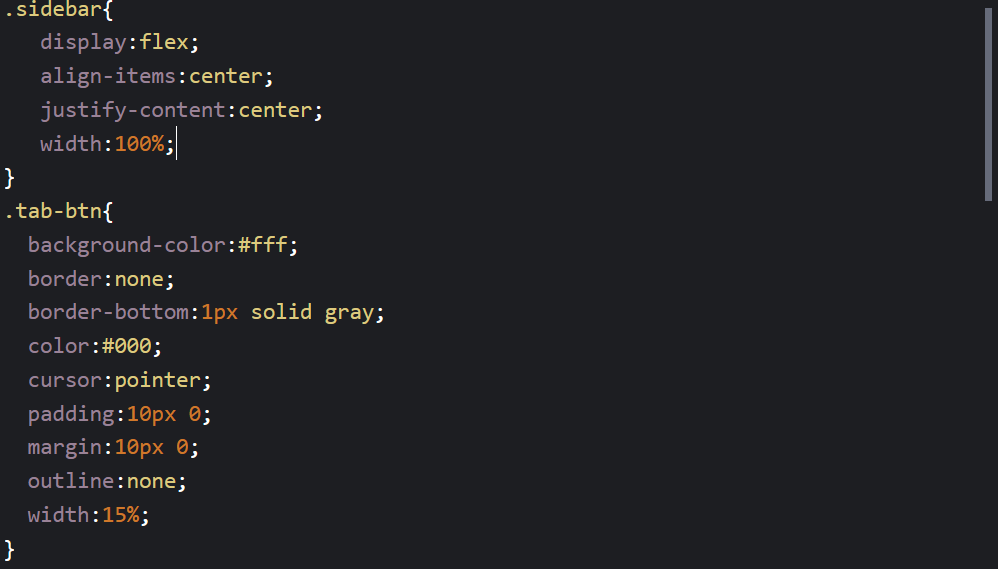
Afterwards, specify what will happen to the button once it gets clicked; that will be the tab-btn-active class. When the button is clicked, it will apply the following styles to the button element:

The following styles will be applied to the content, tab-content and tab-content classes:
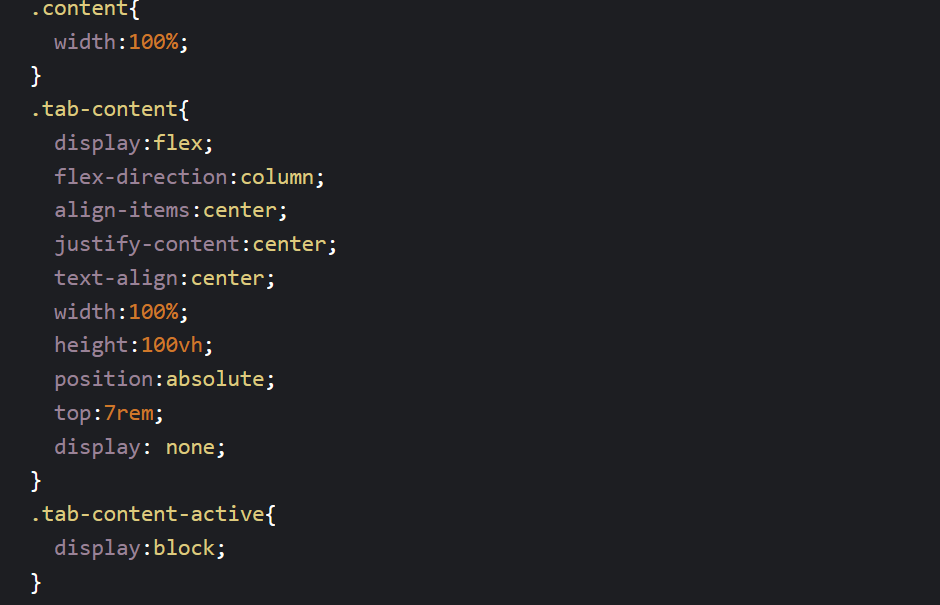
The position absolute applied in the tab-content class will stack the content the all the tabs. After that, display none the contents of all the tabs.
A display block style is applied to the tab-content-active class so as to display the content in the default tab, which is the first tab.
Step 3: Add JavaScript
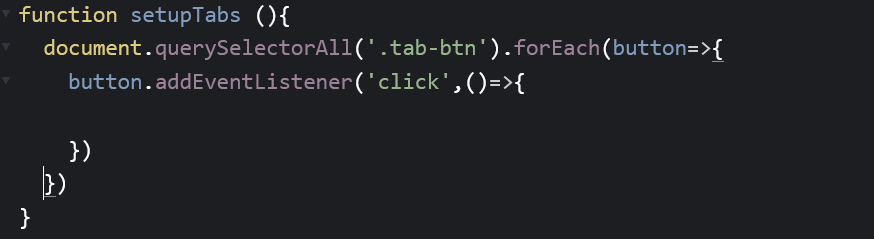
Part 1:
To begin the coding, create a method called setupTabs . Then pick all the components with the tab-btn class with a querySelectorAll . When the button is clicked, utilize the forEach method on it to fire a clickeventListener or a function. The content of the selected tab will be displayed using the button function.
Part 2:
Define the following constants to represent the tabs wrapper, sidebar, tab number and tab content to activate:
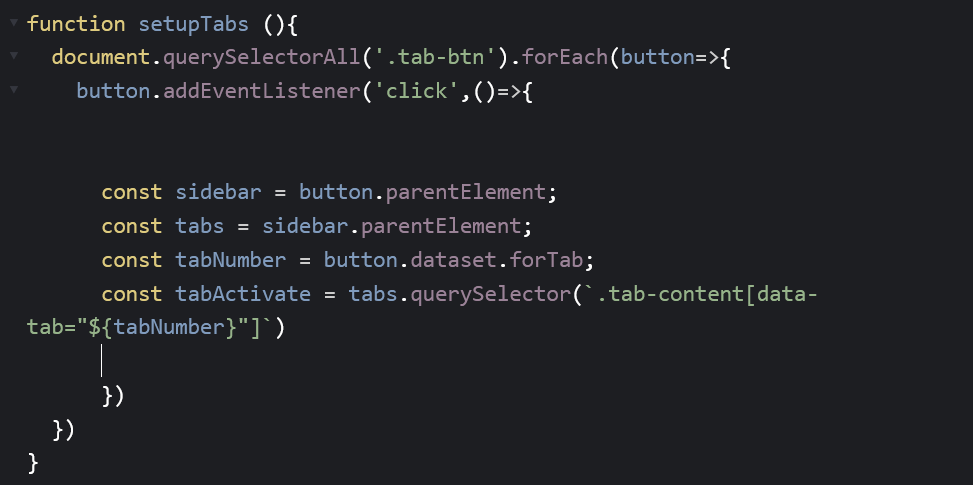
const sidebar = button.parentElement will start at the button , then go to the parent element, the sidebar . const tabs = sidebar.parentElement selects the parent element of the sidebar, which is the tab wrapper. const tabNumber = button.dataset.forTab , the dataset refers to any attributes that start with a data- attribute. The JavaScript will convert the snake-case format of the dataset into camel-case. The forTab refers to the value in the data-for-tab attribute. Now to get the actual tab content to activate, we use the const tabActivate =tabs.querySelector() then inside the querySelector we pass .tab-content[data-tab=»$»] to select the tab content element with data-tab equals to the number gotten after clicking the tab.
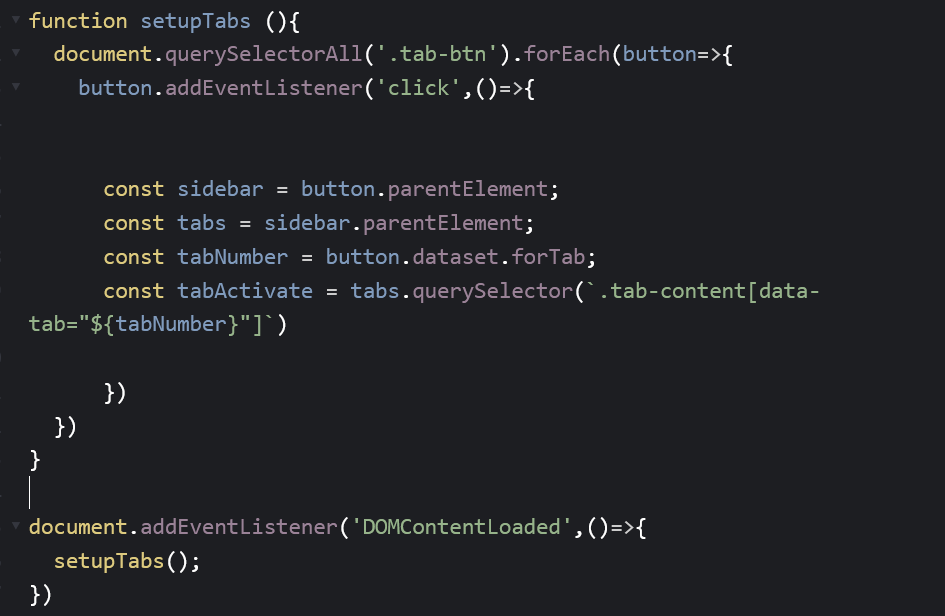
Part 3:
Add a DOMContetntLoaded eventListener and call the setupTabs function once the DOM content has been loaded.
Part 4:
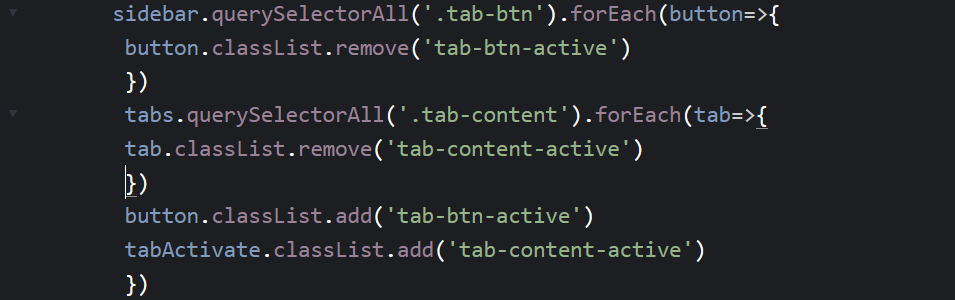
First, you will set all the buttons to be inactive, then set the active button . You will do the same for the tab content. Select all the buttons and for each button , remove the tab-btn-active class, in doing this it will reset and no button will have an active state, then set the clicked button to have the tab-btn-active class.
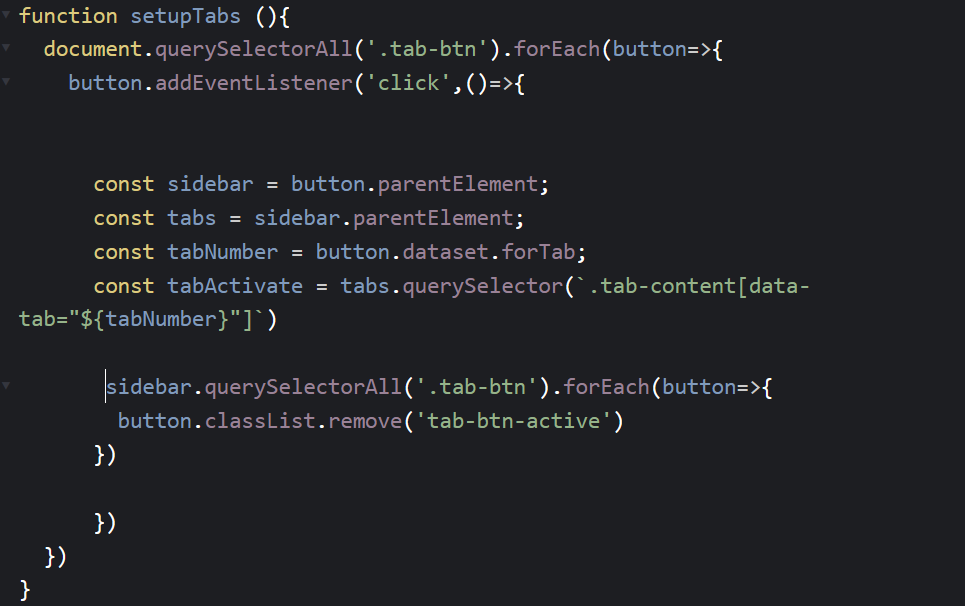
After that, select all the tab contents and for each tab, remove the tab-content-active class, in doing this it will reset and no tab will have an active state, then set the active tab to have the tab-content-active class.

Now simply add the tab-btn-active class so that whenever the button is clicked, it becomes active. We will do the same for the tab content, using the tabActivate constant add the tab-content-active class.
Conclusion!
The purpose of this tutorial was to give you the most detailed instructions on how to make a horizontal switchable tabs panel using HTML, CSS, and JavaScript. I hope this tutorial guided you through the process of creating a horizontal switchable tab panel. To reach a larger audience, please like or share the article. In the comments section, feel free to make a comment or ask a question.