PyQt QSlider
Summary: in this tutorial, you’ll learn how to use the PyQt QSlider class to create a slider widget.
Introduction to the PyQt QSlider
A slider is a widget for controlling a bounded value. A slider allows you to move a handle along a horizontal or vertical groove. A slider translates the position of the handle into an integer within a valid range.
To create a slider, you use the PyQt QSlider class:
QSlider(orientation[, parent=None])Code language: Python (python)The QSlider accepts two arguments:
- Orientation specifies the orientation of the slider. The valid values are Qt.Orientation.Vertical and Qt.Orientation.Horizontal .
- Parent is the parent widget of the slider.
For example, the following creates a horizontal slider:
slider = QSlider(Qt.Orientation.Horizontal, self)Code language: Python (python)And the following creates a vertical slider:
slider = QSlider(Qt.Orientation.Vertical, self)Code language: Python (python)Range
To set the range of values for the slider, you use the setRange() method:
slider.setRange(min,max)Code language: Python (python)Also, you can set the setMinimum() or setMaximum() methods:
slider.setMinimum(min) slider.setMaximum(max)Code language: Python (python)Single step
When you press the up/down or left/right arrow key, the handle of the slider will increment/decrement a single step.
To set the single step, you use the setSingleStep() method:
slider.setSingleStep(step)Code language: Python (python)Page step
If you press the page up / page down key, the handle of the slider will increment/decrement a page step. To set a page step, you use the setPageStep() method:
slider.setPageStep(pageStep)Code language: Python (python)Setting the current value
To set a value for the slider, you use the setValue() method:
slider.setValue(value)Code language: Python (python)The value() method returns the current value of the slider:
current_value = slider.value()Code language: Python (python)Displaying tick marks
By default, a slider doesn’t have tick marks. To show the tick marks, you use the set TickPosition () method. The setTickPosition sets the TickPosition property to a value.
The horizontal slider has two options:
The QSlider.TicksAbove – shows tick marks above the slider:
The QSlider.TicksBelow – shows tick marks below the slider.
The vertical slider also has two options:
The QSlider.TicksLeft – shows the tick marks on the left of the slider:
The QSlider.TicksRight – shows the tick marks on the right of the slider:
The QSlider.TicksBothSides shows the tick marks on both sides of the groove:
By default, the TickPosition is QSlider .NoTicks that do not display any tick marks.
Setting interval
To set the interval between tick marks, you use the setTickInteral() method. By default, the ticket interval is zero.
If the tick interval is zero, the slider will choose between singleStep and pageStep .
Signals
The QSlider has some signals but the most important one is valueChanged . The QSlider emits the valueChanged signal whenever the value of the slider changes.
PyQt QSlider example
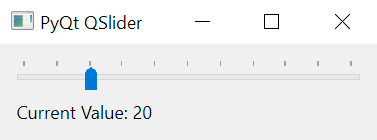
The following program uses the QSlider class to create a slider. A label displays the current value of the slider.
import sys from PyQt6.QtWidgets import QApplication, QWidget, QSlider, QLabel, QFormLayout from PyQt6.QtCore import Qt class MainWindow(QWidget): def __init__(self, *args, **kwargs): super().__init__(*args, **kwargs) self.setWindowTitle('PyQt QSlider') self.setMinimumWidth(200) # create a grid layout layout = QFormLayout() self.setLayout(layout) slider = QSlider(Qt.Orientation.Horizontal, self) slider.setRange(0, 100) slider.setValue(50) slider.setSingleStep(5) slider.setPageStep(10) slider.setTickPosition(QSlider.TickPosition.TicksAbove) slider.valueChanged.connect(self.update) self.result_label = QLabel('', self) layout.addRow(slider) layout.addRow(self.result_label) # show the window self.show() def update(self, value): self.result_label.setText(f'Current Value: ') if __name__ == '__main__': app = QApplication(sys.argv) window = MainWindow() sys.exit(app.exec())Code language: Python (python)First, create a QSlider object:
slider = QSlider(Qt.Orientation.Horizontal, self)Code language: Python (python)Next, set the range, value, single step, page step, and tick position:
slider.setRange(0, 100) slider.setValue(50) slider.setSingleStep(10) slider.setPageStep(20) slider.setTickPosition(QSlider.TickPosition.TicksAbove)Code language: Python (python)Then, connect to the valueChanged() signal to the update() method:
slider.valueChanged.connect(self.update)Code language: Python (python)After that, create a QLabel object that will display the current value of the slider whenever the slider’s value changes:
self.result_label = QLabel('', self)Code language: Python (python)Finally, define the update() method that changes the text of the QLabel to the current value of the slider:
def update(self, value): self.result_label.setText(f'Current Value: ')Code language: Python (python)Summary
- Use the PyQt QSlider widget to create a slider.
- Connect to the valueChanged signal to update the slider’s value.
QSlider
Constructs a slider with the given parent . The orientation parameter determines whether the slider is horizontal or vertical; the valid values are Vertical and Horizontal .
This enum specifies where the tick marks are to be drawn relative to the slider’s groove and the handle the user moves.
Do not draw any tick marks.
Draw tick marks on both sides of the groove.
Draw tick marks above the (horizontal) slider
Draw tick marks below the (horizontal) slider
Draw tick marks to the left of the (vertical) slider
Draw tick marks to the right of the (vertical) slider
Initialize option with the values from this QSlider . This method is useful for subclasses when they need a QStyleOptionSlider , but don’t want to fill in all the information themselves.
This property holds the interval between tickmarks.
This is a value interval, not a pixel interval. If it is 0, the slider will choose between singleStep and pageStep .
This property holds the tickmark position for this slider.
The valid values are described by the TickPosition enum.
The default value is NoTicks .
© 2022 The Qt Company Ltd. Documentation contributions included herein are the copyrights of their respective owners. The documentation provided herein is licensed under the terms of the GNU Free Documentation License version 1.3 as published by the Free Software Foundation. Qt and respective logos are trademarks of The Qt Company Ltd. in Finland and/or other countries worldwide. All other trademarks are property of their respective owners.
QSlider
PyQt comes with a slider, QSlider. You can use this slider to select a value. A slider can be a great input widget for volume.
It allows a user to quickly change the value on a widget range, in contrast to a numeric counter. The range of a QSlider is from 0 to 100, where 100 is 100%.
QSlider
Create a slider
A slider can be horizontal or vertical. You can choose a type, when creating a slider. Either Qt.Horizontal or Qt.Vertical.
First import QSlider and Qt.
from PyQt5.QtCore import Qt
from PyQt5.QtWidgets import QSlider
mySlider = QSlider(Qt.Horizontal, self)
mySlider.setGeometry(30, 40, 200, 30)
And connect a method that’s called when changing its value:
mySlider.valueChanged[int].connect(self.changeValue)
Example
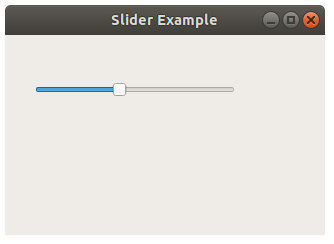
The program below creates an empty window with a horizontal slider. If you want a vertical slider, don’t forget to change the geometry.
Copy and paste the code below to try a slider:
1
2
3
4
5
6
7
8
9
10
11
12
13
14
15
16
17
18
19
20
21
22
23
24
25
import sys
from PyQt5.QtWidgets import QApplication, QMainWindow, QSlider
from PyQt5.QtCore import Qt
class Example(QMainWindow):
def __init__(self):
super().__init__()
mySlider = QSlider(Qt.Horizontal, self)
mySlider.setGeometry(30, 40, 200, 30)
mySlider.valueChanged[int].connect(self.changeValue)
self.setGeometry(50,50,320,200)
self.setWindowTitle(«Checkbox Example»)
self.show()
def changeValue(self, value):
print(value)
if __name__ == ‘__main__’:
app = QApplication(sys.argv)
ex = Example()
sys.exit(app.exec_())
QSlider
The slider is the classic widget for controlling a bounded value. It lets the user move a slider handle along a horizontal or vertical groove and translates the handle’s position into an integer value within the legal range.
QSlider has very few of its own functions; most of the functionality is in QAbstractSlider . The most useful functions are setValue() to set the slider directly to some value; triggerAction() to simulate the effects of clicking (useful for shortcut keys); setSingleStep() , setPageStep() to set the steps; and setMinimum() and setMaximum() to define the range of the scroll bar.
QSlider provides methods for controlling tickmarks. You can use setTickPosition() to indicate where you want the tickmarks to be, setTickInterval() to indicate how many of them you want. the currently set tick position and interval can be queried using the tickPosition() and tickInterval() functions, respectively.
QSlider inherits a comprehensive set of signals:
| Signal | Description |
|---|---|
| valueChanged() | Emitted when the slider’s value has changed. The tracking() determines whether this signal is emitted during user interaction. |
| sliderPressed() | Emitted when the user starts to drag the slider. |
| sliderMoved() | Emitted when the user drags the slider. |
| sliderReleased() | Emitted when the user releases the slider. |
QSlider only provides integer ranges. Note that although QSlider handles very large numbers, it becomes difficult for users to use a slider accurately for very large ranges.
A slider accepts focus on Tab and provides both a mouse wheel and a keyboard interface. The keyboard interface is the following:
- Left/Right move a horizontal slider by one single step.
- Up/Down move a vertical slider by one single step.
- PageUp moves up one page.
- PageDown moves down one page.
- Home moves to the start (minimum).
- End moves to the end (maximum).
Constructs a vertical slider with the given parent .
Constructs a slider with the given parent . The orientation parameter determines whether the slider is horizontal or vertical; the valid values are Vertical and Horizontal .
This enum specifies where the tick marks are to be drawn relative to the slider’s groove and the handle the user moves.
| Constant | Description |
|---|---|
| QSlider.NoTicks | Do not draw any tick marks. |
| QSlider.TicksBothSides | Draw tick marks on both sides of the groove. |
| QSlider.TicksAbove | Draw tick marks above the (horizontal) slider |
| QSlider.TicksBelow | Draw tick marks below the (horizontal) slider |
| QSlider.TicksLeft | Draw tick marks to the left of the (vertical) slider |
| QSlider.TicksRight | Draw tick marks to the right of the (vertical) slider |
Initialize option with the values from this QSlider . This method is useful for subclasses when they need a QStyleOptionSlider , but don’t want to fill in all the information themselves.
This property holds the interval between tickmarks.
This is a value interval, not a pixel interval. If it is 0, the slider will choose between singleStep and pageStep.
This property holds the tickmark position for this slider.
The valid values are described by the TickPosition enum.
The default value is NoTicks .
© 2022 The Qt Company Ltd. Documentation contributions included herein are the copyrights of their respective owners. The documentation provided herein is licensed under the terms of the GNU Free Documentation License version 1.3 as published by the Free Software Foundation. Qt and respective logos are trademarks of The Qt Company Ltd. in Finland and/or other countries worldwide. All other trademarks are property of their respective owners.


