- How to create horizontal navigation bar in html
- CSS Horizontal Navigation Bar
- Horizontal Navigation Bar
- Horizontal Navigation Bar Examples
- More Examples
- How to make a horizontal navigation bar?
- Update:
- Beginner at HTLM5 — How to Create Horizontal Navigation Bar
- CSS Горизонтальная панель навигации
- Встроенные элементы списка
- Пример
- Плавающие элементы списка
- Пример
- Пример
- Примеры оризонтальной панели навигации
- Пример
- Активная/Текущая навигационная ссылка
- Пример
- Выравнивание ссылок по правому краю
- Пример
- Разделители границ
- Пример
- Фиксированная панель навигации
- Фиксированная сверху
- Фиксированная снизу
- Серая горизонтальная навигационная панель
- Пример
- Липкая навигационная панель
- Пример
- Еще примеры
- Отзывчивый Topnav
- Отзывчивый Sidenav
- Выпадающая Navbar
- Сообщить об ошибке
- Ваше предложение:
- Спасибо Вам за то, что помогаете!
- CSS Horizontal Navigation Bar
- Inline List Items
- Example
- Floating List Items
- Example
- Example
- Horizontal Navigation Bar Examples
- Example
- Active/Current Navigation Link
- Example
- Right-Align Links
- Example
- Border Dividers
- Example
- Fixed Navigation Bar
- Fixed Top
- Fixed Bottom
- Gray Horizontal Navbar
- Example
- Sticky Navbar
- Example
- More Examples
- Responsive Topnav
- Responsive Sidenav
- Dropdown Navbar
How to create horizontal navigation bar in html
li is a block element; so make it inline-block and give it a width, then it can float.
nav ul nav ul li a nav ul li a nav ul li
Most of the user agents apply display: list-item to li element. You must override it it in your css. To make it inline try display inline-block or inline, or try display block with float left.
You can also use display:flex :
nav ul nav ul li a <> nav ul li a
Html — Creating a horizontal nav bar easily in a header, Adapting your current method to a more html5 approach, you can use header and nav tags do better markup your document. Absolute positioning also gives you better control over your elements. You would set the header to a relative position, and the nav to absolute, and offset it by the height of your header. Code samplenav
CSS Horizontal Navigation Bar
Horizontal Navigation Bar
There are two ways to create a Horizontal Navigation Bar. Using inline or floating list items.
Inline List Items
Example
- display: inline; — By default,
- elements are block elements. Here, we remove the line breaks before and after each list item, to display them on one line
Floating List Items
Example
a <
display: block;
padding: 8px;
background-color: #dddddd;
>
- float: left; — Use float to get block elements to float next to each other
- display: block; — Allows us to specify padding (and height, width, margins, etc. if you want)
- padding: 8px; — Specify some padding between each element, to make them look good
- background-color: #dddddd; — Add a gray background-color to each element
Example
Horizontal Navigation Bar Examples
Create a basic horizontal navigation bar with a dark background color and change the background color of the links when the user moves the mouse over them:
Example
ul <
list-style-type: none;
margin: 0;
padding: 0;
overflow: hidden;
background-color: #333;
>
li a <
display: block;
color: white;
text-align: center;
padding: 14px 16px;
text-decoration: none;
>
/* Change the link color to #111 (black) on hover */
li a:hover <
background-color: #111;
>
Active/Current Navigation Link
Add an «active» class to the current link to let the user know which page he/she is on:
Example
Right-Align Links
Right-align links by floating the list items to the right ( float:right; ):
Example
Border Dividers
Example
/* Add a gray right border to all list items, except the last item (last-child) */
li <
border-right: 1px solid #bbb;
>
li:last-child <
border-right: none;
>
Fixed Navigation Bar
Make the navigation bar stay at the top or the bottom of the page, even when the user scrolls the page:
Fixed Top
Fixed Bottom
Note: Fixed position might not work properly on mobile devices.
Gray Horizontal Navbar
An example of a gray horizontal navigation bar with a thin gray border:
Example
ul <
border: 1px solid #e7e7e7;
background-color: #f3f3f3;
>
Sticky Navbar
A sticky element toggles between relative and fixed, depending on the scroll position. It is positioned relative until a given offset position is met in the viewport — then it «sticks» in place (like position:fixed).
Example
Note: Internet Explorer do not support sticky positioning. Safari requires a -webkit- prefix (see example above). You must also specify at least one of top , right , bottom or left for sticky positioning to work.
More Examples
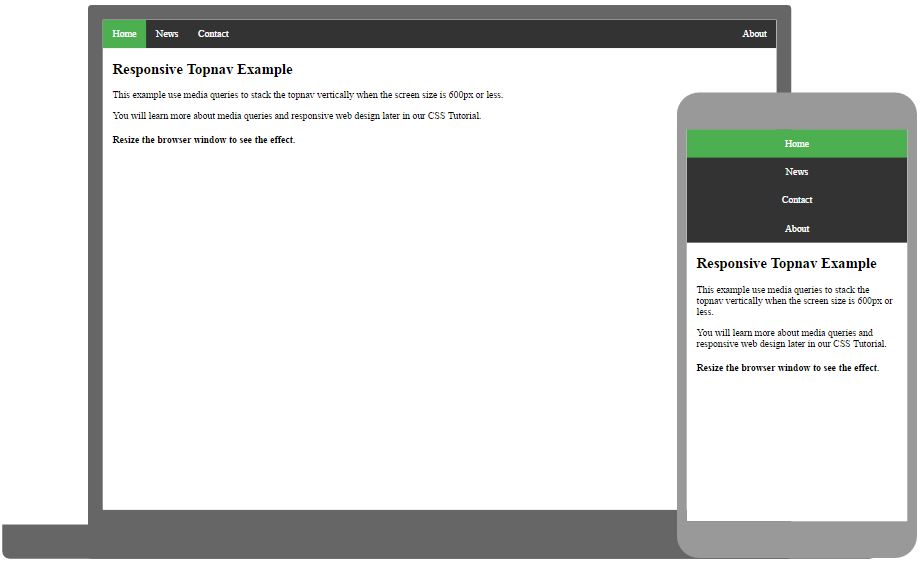
Responsive Topnav
How to use CSS media queries to create a responsive top navigation.

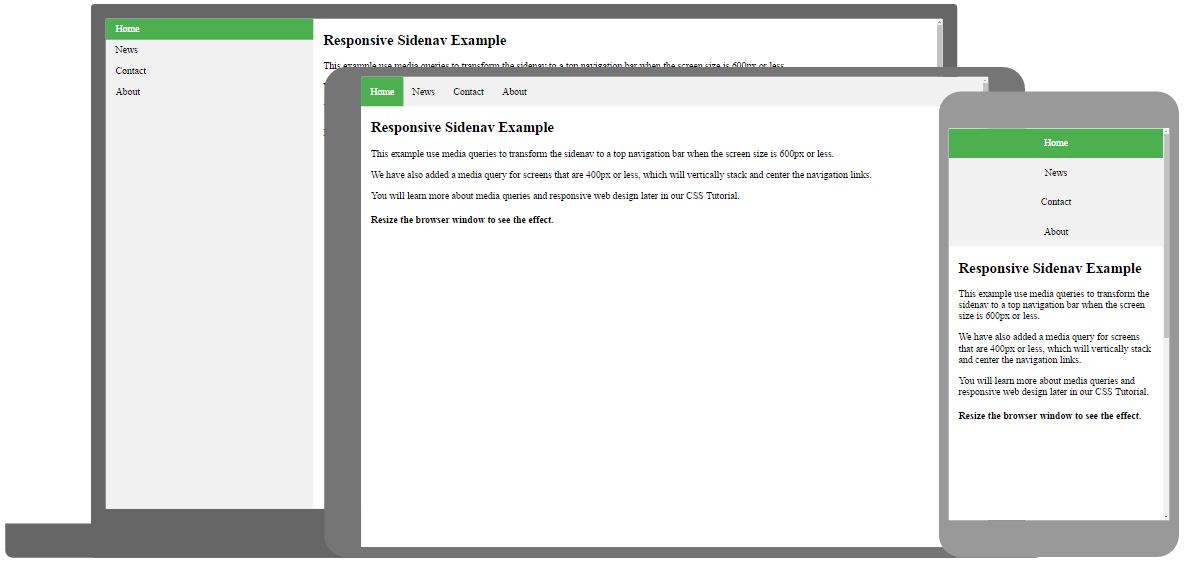
Responsive Sidenav
How to use CSS media queries to create a responsive side navigation.

Dropdown Navbar
How to add a dropdown menu inside a navigation bar.
Ever heard about W3Schools Spaces ? Here you can create your website from scratch or use a template, and host it for free.
How to make a horizontal navigation bar?
The trick to get the list elements stack horizontally is to use the attribute float:left on the list items. Try adding something like this in your css-code
By writing .sidebar-nav li you apply the style to all list-items (li) that is a child of sidebar-nav.
Update:
Now that we know you’re using bootstrap, you can make a horizontal navbar just by adding a few classes:
The following code gives you a navbar with beautiful padding and margins: Bootstrap navbar reference: https://getbootstrap.com/docs/4.3/components/navs/
The previous ‘non-bootstrap’ answer:
The goal is to align the «li» items horizontally so a simple and easy way is :
Display property reference: https://www.w3schools.com/cssref/pr_class_display.asp
EDIT: I Assume you are using the bootstrap grid system. The class col-sm-2 means your div will occupy 1/6th or 16.66% of the total container width on devices having screen width greater than 767px. If you want your menu items to occupy the entire screen width, replace col-sm-2 with col-sm-12 .
My preferred way to do this is using flex .
This will ensure all elements inside the ul are displayed in a single line and they all have the same height which is equal to the height of the ul . Hope this helps.
How to create navigation bar using tag in HTML, Approach: We will create a div section & give a class name as navbar. Then we make two more div’s under the navbar-defined div, First child div is named brand class for logo, and the other child div defined menu for navigation. We have used the display flex property in the parent div navbar to align in inline.
Beginner at HTLM5 — How to Create Horizontal Navigation Bar
You could set the li elements to float:left..
you have to put this in the:
to put it to the center you have to give the container a width, 315px for example here, but put it in % or em better
. and add a padding to a
Html — How to create a resizable horizontal navigation, So if trying to fix my current menu is too burdensome, I would be fine just to hear some tips or read some stuff on how to create better horizontal menus. .menu2 li < position: relative; float: left; width: 150px; z-index: 1000 >I’ve tried different combinations of making this inline and making other tweeks, such as …
CSS Горизонтальная панель навигации
Существует два способа создания горизонтальной панели навигации. Использование встроенных или плавающих элементов списка.
Встроенные элементы списка
Пример
- display: inline; — По умолчанию элементы
- являются блочными элементами. Здесь мы удаляем разрывы строк до и после каждого элемента списка, чтобы отобразить их в одной строке
Плавающие элементы списка
Пример
a display: block;
padding: 8px;
background-color: #dddddd;
>
- float: left; — Используйте float, чтобы заставить блочные элементы скользить рядом друг с другом
- display: block; — Позволяет указать отступы (а также высоту, ширину, поля и т.д. если хочешь)
- padding: 8px; — Поскольку блочные элементы занимают всю доступную ширину, они не могут плавать рядом друг с другом. Поэтому укажите некоторые отступы, чтобы они выглядели хорошо
- background-color: #dddddd; — Добавить серый цвет фона к каждому элементу
Пример
Примеры оризонтальной панели навигации
Создайте базовую горизонтальную панель навигации с темным фоном и измените цвет фона ссылок при наведении на них курсора мыши:
Пример
ul <
list-style-type: none;
margin: 0;
padding: 0;
overflow: hidden;
background-color: #333;
>
li a display: block;
color: white;
text-align: center;
padding: 14px 16px;
text-decoration: none;
>
/* Измените цвет ссылки на #111 (черный) при наведении курсора */
li a:hover background-color: #111;
>
Активная/Текущая навигационная ссылка
Добавьте класс «active» к текущей ссылке, чтобы пользователь знал, на какой странице он находится:
Пример
Выравнивание ссылок по правому краю
Выравнивание ссылок по правому краю путем перемещения элементов списка вправо (float:right;):
Пример
Разделители границ
Пример
/* Добавьте серую правую границу ко всем элементам списка, кроме последнего элемента (last-child) */
li border-right: 1px solid #bbb;
>
li:last-child border-right: none;
>
Фиксированная панель навигации
Сделайте так, чтобы панель навигации оставалась в верхней или нижней части страницы, даже когда пользователь прокручивает страницу:
Фиксированная сверху
Фиксированная снизу
Примечание: Фиксированное положение может неправильно работать на мобильных устройствах.
Серая горизонтальная навигационная панель
Пример серой горизонтальной панели навигации с тонкой серой границей:
Пример
ul <
border: 1px solid #e7e7e7;
background-color: #f3f3f3;
>
Липкая навигационная панель
- , чтобы создать липкую навигационную панель.
Липкий элемент переключается между относительным и фиксированным в зависимости от положения прокрутки. Он позиционируется относительно до тех пор, пока заданная позиция смещения не будет встречена в окне просмотра — тогда он «прилипает» на месте (например, position:fixed).
Пример
Примечание: Internet Explorer не поддерживает липкое позиционирование. Safari требует префикса -webkit- (см. Пример выше). Вы также должны указать хотя бы один из top , right , bottom или left для липкого позиционирования, чтобы работало.
Еще примеры
Отзывчивый Topnav
Как использовать CSS media запрос для создания адаптивной верхней навигации.

Отзывчивый Sidenav
Как использовать CSS media запрос для создания адаптивной боковой навигации.

Выпадающая Navbar
Как добавить выпадающее меню в панель навигации.
Мы только что запустили
SchoolsW3 видео
Сообщить об ошибке
Если вы хотите сообщить об ошибке или внести предложение, не стесняйтесь отправлять на электронное письмо:
Ваше предложение:
Спасибо Вам за то, что помогаете!
Ваше сообщение было отправлено в SchoolsW3.
ТОП Учебники
ТОП Справочники
ТОП Примеры
SchoolsW3 оптимизирован для бесплатного обучения, проверки и подготовки знаний. Примеры в редакторе упрощают и улучшают чтение и базовое понимание. Учебники, ссылки, примеры постоянно пересматриваются, чтобы избежать ошибок, но не возможно гарантировать полную правильность всего содержания. Некоторые страницы сайта могут быть не переведены на РУССКИЙ язык, можно отправить страницу как ошибку, так же можете самостоятельно заняться переводом. Используя данный сайт, вы соглашаетесь прочитать и принять Условия к использованию, Cookies и политика конфиденциальности.
CSS Horizontal Navigation Bar
There are two ways to create a horizontal navigation bar. Using inline or floating list items.
Inline List Items
Example
- display: inline; — By default,
- elements are block elements. Here, we remove the line breaks before and after each list item, to display them on one line
Floating List Items
Example
a display: block;
padding: 8px;
background-color: #dddddd;
>
- float: left; — Use float to get block elements to float next to each other
- display: block; — Allows us to specify padding (and height, width, margins, etc. if you want)
- padding: 8px; — Specify some padding between each element, to make them look good
- background-color: #dddddd; — Add a gray background-color to each element
Example
Horizontal Navigation Bar Examples
Create a basic horizontal navigation bar with a dark background color and change the background color of the links when the user moves the mouse over them:
Example
ul <
list-style-type: none;
margin: 0;
padding: 0;
overflow: hidden;
background-color: #333;
>
li a display: block;
color: white;
text-align: center;
padding: 14px 16px;
text-decoration: none;
>
/* Change the link color to #111 (black) on hover */
li a:hover background-color: #111;
>
Active/Current Navigation Link
Add an «active» class to the current link to let the user know which page he/she is on:
Example
Right-Align Links
Right-align links by floating the list items to the right ( float:right; ):
Example
Border Dividers
Example
/* Add a gray right border to all list items, except the last item (last-child) */
li border-right: 1px solid #bbb;
>
li:last-child border-right: none;
>
Fixed Navigation Bar
Make the navigation bar stay at the top or the bottom of the page, even when the user scrolls the page:
Fixed Top
Fixed Bottom
Note: Fixed position might not work properly on mobile devices.
Gray Horizontal Navbar
An example of a gray horizontal navigation bar with a thin gray border:
Example
ul <
border: 1px solid #e7e7e7;
background-color: #f3f3f3;
>
Sticky Navbar
- to create a sticky navbar.
A sticky element toggles between relative and fixed, depending on the scroll position. It is positioned relative until a given offset position is met in the viewport — then it «sticks» in place (like position:fixed).
Example
Note: Internet Explorer do not support sticky positioning. Safari requires a -webkit- prefix (see example above). You must also specify at least one of top , right , bottom or left for sticky positioning to work.
More Examples
Responsive Topnav
How to use CSS media queries to create a responsive top navigation.
Responsive Sidenav
How to use CSS media queries to create a responsive side navigation.
Dropdown Navbar
How to add a dropdown menu inside a navigation bar.
Ever heard about W3Schools Spaces? Here you can create your website from scratch or use a template, and host it for free.