- Loading class in javascript
- Loading. Animation in Vanilla JavaScript
- How to Create a Loader
- Create Loader Using a GIF
- Create Loader Using CSS
- How to Implement a Loading Animation With JavaScript
- Hiding the Loading. Element
- Free eBook: Git Essentials
- Removing the Loading. Element
- Implementing Loading Animation When Requesting External Content From an API
- Conclusion
Loading class in javascript
В ExtJS 4 существует возможность динамически подгружать нужные нам классы. Во-первых, выделим классы в отдельные файлы и расположим их в определенном месте на физическом диске.
Выделим следующий класс в файл Person.js (файлы должны иметь имена, соответствующие именам классов):
Ext.define('Classes.Person', < config: < name: 'Eugene', surname : 'Popov' >, constructor: function(name, surname) < this.initConfig(); if(name)< this.setName(name); >if(surname) < this.setSurname(surname); >>, getinfo: function()< alert("Полное имя : " + this.name + " " + this.surname); >, >); А класс Manager, который наследуется от класса Person, в файл Manager.js :
Ext.define('Classes.Manager', < extend: 'Classes.Person', config: < department: 'sales' >, constructor: function(name, surname, department) < this.initConfig(); if(department)< this.setDepartment(department); >this.callParent([name, surname]); >, getinfo: function() < this.callParent(); alert("Департамент : " + this.department); >>); Затем поместим их в определенном месте. Так как они находятся в пространстве имен Classes , то создадим в текущей директории, где находится наша html-страница, папку Classes и поместим в нее файлы Person.js и Manager.js:
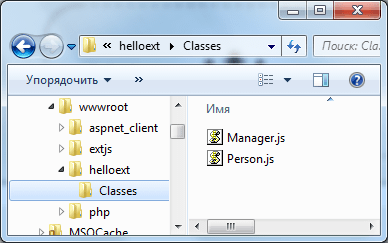
Исходя из скриншота моя html-страница находится в папке helloext , а выше упомянутые классы — в папке helloext/Classes .
Теперь изменим html-страницу следующим образом:
Таким образом, мы вынесли весь функционал классов во внешние файлы. И используя класс Ext.Loader , мы сопоставляем физический путь с пространством имен ( paths: < 'Classes' : ' Classes ' >— где жирным выделен путь, с которым сопоставляется пространство имен) и загружает все классы по указанному пути.
Затем с помощью функции Ext.require загружаются в приложение классы. В качестве второго параметра указывается функция обратного вызова, которая срабатывает при загрузке класса.
Нам необязательно выполнять некоторые действия в качестве функции обратного вызова метода Ext.require . Мы можем сначала загрузить все нужные нам классы с помощью методов Ext.require , а потом с помощью обработки события Ext.onReady выполнить всю остальную логику приложения:
Кроме того, мы можем добавлять сопоставления классов с физическими путями дополнительно с помощью метода Ext.Loader.setPath:
Ext.Loader.setPath('Classes','Classes'); Ext.Loader.setPath('MyModels','Classes/MyModels'); Loading. Animation in Vanilla JavaScript

When developing websites and web applications, including a loading animation can improve the user experience significantly by communicating what’s going on. This engages users and keeps their attention while loading the content, and it helps users understand what is going on rather than leaving them guessing.
In this guide, we’ll look at how to use Vanilla JavaScript to create a loading animation. We will work with both animated GIFs and CSS-created loaders and see how to use them in two scenarios: loading content at app/website launch or requesting content from an external API.
How to Create a Loader
There are various ways people may want to display their loader. For the purpose of this guide, we’ll build a loader that will cover the entire screen and then disappear when the page is finished loading. First of all, we need to create a placeholder HTML page:
div class="loader-container"> div class="spinner"> div> div> div class="main-content"> h1>Hello World! h1> p> This is a demo Project to show how to add animated loading with Vanilla JavaScript. p> div class="buttons"> button class="btn">a href="#">Read Article a> button> button class="btn get-quote">Generate Quote button> div> div class="quote-section"> blockquote class="quote"> If you do not express your own original ideas, if you do not listen to your own being, you will have betrayed yourself. blockquote> span class="author">- Rollo May span> div> div> For the sake of simplicity, we have only two blocks — one for the loader and one for the website’s content.
As previously stated, the loading icon can be a GIF, an animated icon created with CSS, or something else. The important thing to remember is that the same approach applies to any type of loading icon we use.
Create Loader Using a GIF
A GIF is an animated icon that plays indefinitely. Once we’ve created our GIF, we’ll style the loader-container div that will house it. There are numerous ways to style it! You can get really creative here. We’ll simply add a layer with a black background on top of our page alongside the icon, to «block out» the loading content:
.loader-container < width: 100%; height: 100vh; position: fixed; background: #000 url("https://media.giphy.com/media/8agqybiK5LW8qrG3vJ/giphy.gif") center no-repeat; z-index: 1; > When we load our web page now, we will see a black background with a GIF loading in the middle of the screen, similar to this:
At this point, we’re ready to implement loading using JavaScript. But let’s also see how we can use CSS-created animation instead of a GIF, which does not require an additional file to import.
Create Loader Using CSS
We’ll create exactly the same icon with CSS. Remember, we created an extra div ( spinner ) inside the loader-container div and that is what we’ll be using to represent the icon:
.spinner < width: 64px; height: 64px; border: 8px solid; border-color: #3d5af1 transparent #3d5af1 transparent; border-radius: 50%; animation: spin-anim 1.2s linear infinite; > @keyframes spin-anim < 0% < transform: rotate(0deg); > 100% < transform: rotate(360deg); > > The code above will help us create a CSS loader-icon of which we can now use the loader-container div to center and add the black background as we did previously:
.loader-container < width: 100%; height: 100vh; display: flex; justify-content: center; align-items: center; position: fixed; background: #000; z-index: 1; > Now that we’ve seen the two types of animated loaders available, let’s use JavaScript to control when this loading animation appears and disappears.
Note: You can check out this live CodePen demo to take a look at the loader we’ve created in action.
How to Implement a Loading Animation With JavaScript
JavaScript allows us to manipulate our HTML structure and remove or hide the loader-container that is currently displayed in front of the website’s content. There are two major approaches for accomplishing this — just hiding the loader-container , or removing it altogether.
Whichever approach you choose, the first step is to use the querySelector() or getElementById() to retrieve the loader-container so that we can manipulate it:
const loaderContainer = document.querySelector('.loader-container'); Secondly, we will be using the eventListener to listen for a load event, so that it calls the callback function when the load event occurs:
window.addEventListener('load', () => < // . >); Hiding the Loading. Element
The most common approach is to hide the loader-container with display: none so that it disappears when the content is fully loaded.
HTML DOM allows us to change the style of our HTML elements from JavaScript, and the code below indicates that we are setting the loader’s container display property to none so that it does not appear once the load is successful:
window.addEventListener('load', () => < loaderContainer.style.display = 'none'; >); Free eBook: Git Essentials
Check out our hands-on, practical guide to learning Git, with best-practices, industry-accepted standards, and included cheat sheet. Stop Googling Git commands and actually learn it!
Alternatively, you can create a separate class which holds display: none property:
.loader-container-hidden < display: none; > And then use classList.add() to add the class to the loader-container element:
window.addEventListener('load', () => < loaderContainer.classList.add('loader-container-hidden'); >); Removing the Loading. Element
So far, we’ve seen a major method that allows us to hide our loader-container , implying that the element is still present, but hidden. Another option is to remove the element entirely:
window.addEventListener('load', () => < loaderContainer.parentElement.removeChild(loaderContainer); >); At this point, when we load our page, the loading animation will be displayed until the page’s content is fully loaded.
Implementing Loading Animation When Requesting External Content From an API
Fetching content from an external API is another situation that may need the inclusion of a loader. This type of content can take some time to fetch and display, so it is best to include a loader.
In our case, let’s try to get a quote from a quotes API using the built-in Fetch API. Notice that the HTML we’ve created at the beginning of this article has a «Generate Quote» button. All we have to do is use the document.querxySelector() method to get the element and create a callback function to handle a click event that is triggered when the user clicks the button:
const getQuoteBtn = document.querySelector('.get-quote'); getQuoteBtn.addEventListener('click', () => < fetch('https://api.quotable.io/random') .then((response) => < return response.json(); >) .then((data) => < const quote = document.querySelector('.quote'); const author = document.querySelector('.author'); quote.innerHTML = data.content; author.innerHTML = data.author; >); >); This will successfully assist us in getting random quotes into our application, but we would like to have a loading animation so that the user knows we are expecting content. To accomplish this, we’ll create two methods, one to display the loader-container and the other to hide it:
const displayLoading = () => < loaderContainer.style.display = 'block'; >; const hideLoading = () => < loaderContainer.style.display = 'none'; >; Note: We are using display: none , but we can use either of the other methods we listed earlier.
At this point, we can finally incorporate the loading animation into the callback function. When the fetching begins the callback function will display the loading animation and hide it once the data is received:
getQuoteBtn.addEventListener('click', () => < displayLoading(); fetch('https://api.quotable.io/random') .then((response) => < return response.json(); >) .then((data) => < hideLoading(); const quote = document.querySelector('.quote'); const author = document.querySelector('.author'); quote.innerHTML = data.content; author.innerHTML = data.author; >); >); Conclusion
In this article, we’ve learned how to use vanilla JavaScript to create a loading animation and display it appropriately. We considered various approaches for accomplishing this and took a look at a couple of different use-cases for the loading animation. We’ve opted to use the rotating circle as a loader, but you can change it in any way you might like — feel free to create your own GIF or CSS animated loader.