- CSS Grid Layout Module
- Browser Support
- Grid Elements
- Example
- Display Property
- Example
- Example
- Grid Columns
- Grid Rows
- Grid Gaps
- Example
- Example
- Example
- Example
- Grid Lines
- Example
- Example
- All CSS Grid Properties
- Полное визуальное руководство/шпаргалка по CSS Grid
- Что такое CSS Grid ?
- Архитектура CSS Grid
- Схема CSS Grid
- Настройка проекта
- HTML
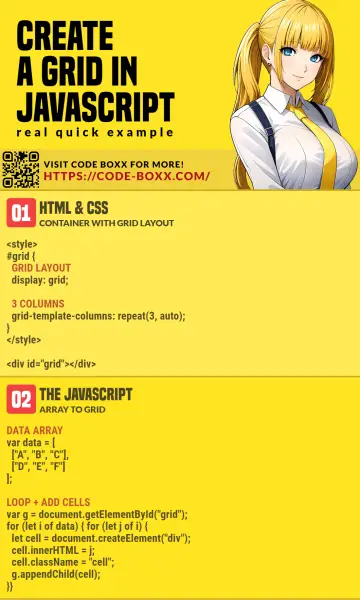
- Create A Grid In Javascript (Simple Examples)
- TLDR – QUICK SLIDES
- TABLE OF CONTENTS
- CREATE A GRID WITH JAVASCRIPT
- 1) BASIC GRID
- 1A) THE HTML
- 1B) THE CSS
- 2) JAVASCRIPT ARRAY TO GRID
- 2A) THE HTML
- 2B) THE JAVASCRIPT
- 3) JAVASCRIPT OBJECT TO GRID
- 3A) THE HTML
- 3B) THE JAVASCRIPT
- DOWNLOAD & NOTES
- SUPPORT
- EXAMPLE CODE DOWNLOAD
- EXTRA BITS & LINKS
- RESPONSIVE GRID
- LINKS & REFERENCES
- INFOGRAPHIC CHEAT SHEET
- THE END
- 10 Best Grid Layout Systems In JavaScript And CSS (2023 Update)
- The Best Grid Layout System
- Table of contents:
- jQuery Grid Layout Plugins:
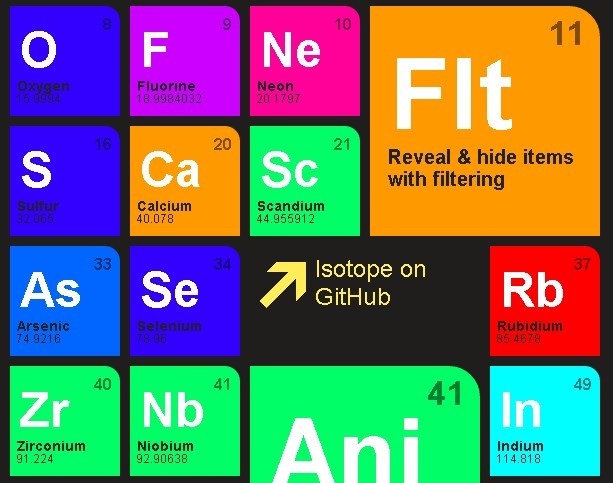
- Isotope — Magical Dynamic Layout Plugin For jQuery
- Responsive jQuery Dynamic Grid Layouts Plugin — Freewall
- Responsive & Fluid Drag-and-Drop Grid Layout with jQuery — gridstack.js
- Create A Sortable and Filterable Grid of Items — Shuffle
- Responsive & Filterable jQuery Portfolio Gallery Plugin — Elastic Grid
- Vanilla JS Grid Layout Libraries:
- Responsive, Draggable, Filterable Grid Layout – muuri
- Creating A Flickr-style Justified Layout With JavaScript
- Responsive Grid Layout Builder In Vanilla JavaScript – EasyGrid
- Pure CSS Grid Layout System:
- Responsive 12-column Grid Layout – SpaceGrid
- flexbin.css
- More Resources:
- See Also:
CSS Grid Layout Module
The CSS Grid Layout Module offers a grid-based layout system, with rows and columns, making it easier to design web pages without having to use floats and positioning.
Browser Support
The grid properties are supported in all modern browsers.
Grid Elements
A grid layout consists of a parent element, with one or more child elements.
Example
Display Property
An HTML element becomes a grid container when its display property is set to grid or inline-grid .
Example
Example
All direct children of the grid container automatically become grid items.
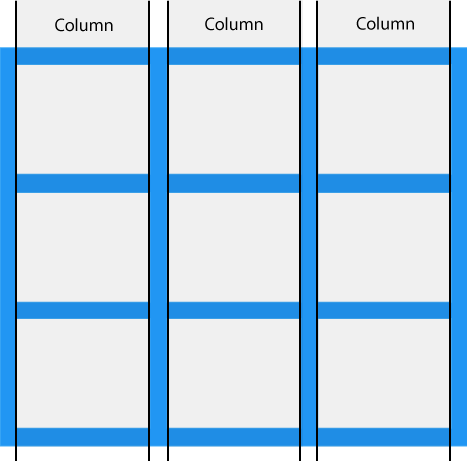
Grid Columns
The vertical lines of grid items are called columns.
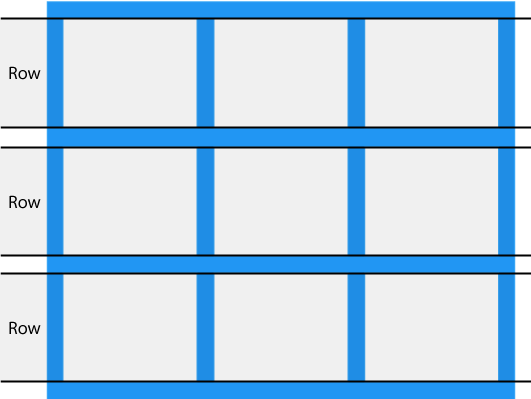
Grid Rows
The horizontal lines of grid items are called rows.
Grid Gaps
The spaces between each column/row are called gaps.
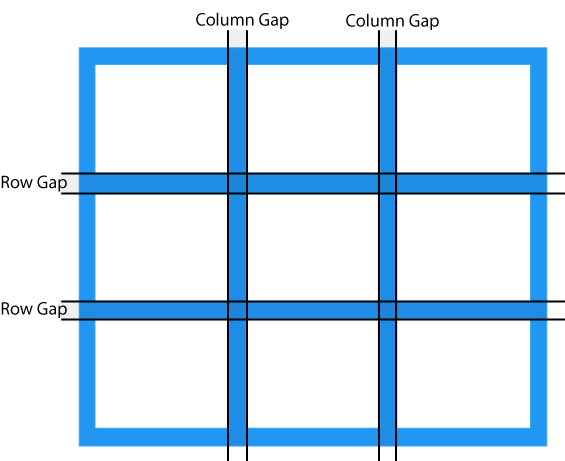
You can adjust the gap size by using one of the following properties:
Example
The column-gap property sets the gap between the columns:
Example
The row-gap property sets the gap between the rows:
Example
The gap property is a shorthand property for the row-gap and the column-gap properties:
Example
The gap property can also be used to set both the row gap and the column gap in one value:
Grid Lines
The lines between columns are called column lines.
The lines between rows are called row lines.
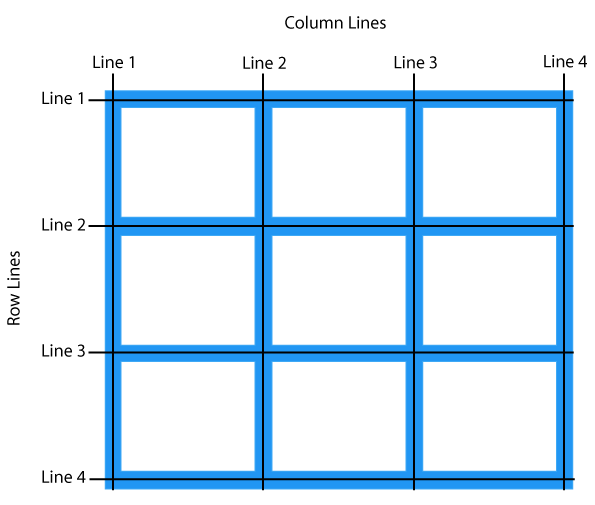
Refer to line numbers when placing a grid item in a grid container:
Example
Place a grid item at column line 1, and let it end on column line 3:
Example
Place a grid item at row line 1, and let it end on row line 3:
All CSS Grid Properties
| Property | Description |
|---|---|
| column-gap | Specifies the gap between the columns |
| gap | A shorthand property for the row-gap and the column-gap properties |
| grid | A shorthand property for the grid-template-rows, grid-template-columns, grid-template-areas, grid-auto-rows, grid-auto-columns, and the grid-auto-flow properties |
| grid-area | Either specifies a name for the grid item, or this property is a shorthand property for the grid-row-start, grid-column-start, grid-row-end, and grid-column-end properties |
| grid-auto-columns | Specifies a default column size |
| grid-auto-flow | Specifies how auto-placed items are inserted in the grid |
| grid-auto-rows | Specifies a default row size |
| grid-column | A shorthand property for the grid-column-start and the grid-column-end properties |
| grid-column-end | Specifies where to end the grid item |
| grid-column-gap | Specifies the size of the gap between columns |
| grid-column-start | Specifies where to start the grid item |
| grid-gap | A shorthand property for the grid-row-gap and grid-column-gap properties |
| grid-row | A shorthand property for the grid-row-start and the grid-row-end properties |
| grid-row-end | Specifies where to end the grid item |
| grid-row-gap | Specifies the size of the gap between rows |
| grid-row-start | Specifies where to start the grid item |
| grid-template | A shorthand property for the grid-template-rows, grid-template-columns and grid-areas properties |
| grid-template-areas | Specifies how to display columns and rows, using named grid items |
| grid-template-columns | Specifies the size of the columns, and how many columns in a grid layout |
| grid-template-rows | Specifies the size of the rows in a grid layout |
| row-gap | Specifies the gap between the grid rows |
Полное визуальное руководство/шпаргалка по CSS Grid

Сегодня мы с вами рассмотрим свойства CSS Grid (далее также — Грид), позволяющие создавать адаптивные или отзывчивые макеты веб-страниц. Я постараюсь кратко, но полно объяснить, как работает каждое свойство.
Что такое CSS Grid ?
Грид — это макет для сайта (его схема, проект).
Грид-модель позволяет размещать контент сайта (располагать его определенным образом, позиционировать). Она позволяет создавать структуры, необходимые для обеспечения отзывчивости сайтов на различных устройствах. Это означает, что сайт будет одинаково хорошо смотреться на компьютере, телефоне и планшете.
Вот простой пример макета сайта, созданного с помощью Грида.


Архитектура CSS Grid
Как же Грид работает? Элементы Грида (grid items) располагаются вдоль главной или основной (main) и поперечной (cross) оси (axis). При помощи различных свойств мы можем манипулировать элементами для создания макетов.

Помимо прочего, у нас имеется возможность объединять строки и колонки подобно тому, как мы это делаем в Excel , что предоставляет нам большую гибкость, чем Флекс ( Flexbox ).
К слову, если вас интересует Флекс, вот соответствующая статья.
Схема CSS Grid

Схема содержит все возможные свойства, предоставляемые Гридом. Эти свойства делятся на:
Обратите внимание: красным цветом отмечены сокращения для свойств:


К концу настоящей статьи у вас будет полное понимание того, как работает каждое из них.
Настройка проекта
Для данного проекта требуются начальные знания HTML , CSS и умение работать с VSCode (или другим редактором по вашему вкусу). Делаем следующее:
- Создаем директорию для проекта, например, Project1 и открываем ее в редакторе ( cd Project1 , code . )
- Создаем файлы index.html и style.css
- Устанавливаем в VSCode сервер для разработки ( Live Server , расширение) и запускаем его
Или вы можете просто открыть Codepen (или любую другую песочницу) и начать писать код.
Все готово, можно приступать к делу.

HTML
Создаем 3 контейнера внутри body :
Create A Grid In Javascript (Simple Examples)
Welcome to a quick tutorial on how to create a grid in Javascript. Need to display some data in a nice grid? Gone are the days when we have to use crazy tables and CSS hacks.
- Define a grid container and specify the number of columns in HTML CSS first.
- #grid
- Use Javascript to add cells to the grid container.
- var grid = document.getElementById(«grid»);
- var cell = document.createElement(«div»);
- cell.innerHTML = «TEXT»;
- grid.appendChild(cell);
- Create cell as many cells as required and append them to the grid.
Yep, it’s that simple. Let us walk through a few more examples in this guide – Read on!
TLDR – QUICK SLIDES

TABLE OF CONTENTS
CREATE A GRID WITH JAVASCRIPT
All right, let us now get started with creating grids with HTML, CSS, and Javascript.
1) BASIC GRID
1A) THE HTML
- (B) All we need in the HTML is a container, add as many inside as required.
- (A) The “grid magic” happens in the CSS.
1B) THE CSS
/* (A) GRID LAYOUT */ .grid < display: grid; grid-gap: 10px; >/* (B) OPTIONAL - CELLS */ .head, .cell < padding: 10px; >.head < font-weight: 700; border: 1px solid #f18e8e; background: #ffbfbf; >.cell
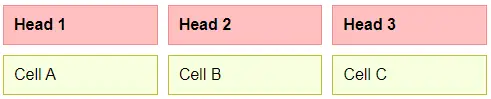
- display: grid Is all it takes to turn an HTML container into a grid layout.
- grid-template-columns: repeat(3, minmax(0, 1fr)) Specifies “3 columns per row”.
- Lastly, grid-gap: 10px is optional – The spacing between the cells.
That’s all. The rest is pretty much cosmetics.
P.S. repeat(3, minmax(0, 1fr)) will create 3 equal columns, while repeat(3, auto) allows the browser to resize as required. You can also specify exact widths like 20% 50% 30% .
2) JAVASCRIPT ARRAY TO GRID
2A) THE HTML
That’s right. All we need is an empty and CSS “grid preset” layout – Take note, this only sets the container to grid layout, not define the number of columns grid-template-columns .
2B) THE JAVASCRIPT
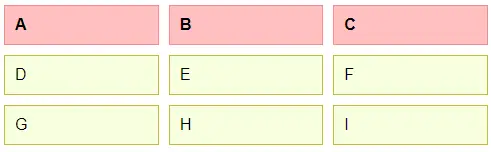
- (C1) There are endless ways to nest an array. For this example, we will just assume it is in this exact order, with the first row being the header.
- (C2) Remember that the number of columns is set yet? Yep, we count the number of columns the array has, and set it here.
- (C3) Loop through the first row of the array, and append header cells.
- (C4) Loop through the following rows of the array, and append “normal cells”.
3) JAVASCRIPT OBJECT TO GRID
3A) THE HTML
Once again, an empty HTML that is preset to display:grid .
3B) THE JAVASCRIPT
// (C1) DATA OBJECT var data = < "Name" : ["Joe", "Jon", "Joy"], "Gender" : ["M", "M", "F"] >; // (C2) SET NUMBER OF COLUMNS var grid = document.getElementById("demoC"), keys = Object.keys(data); grid.style.cssText = `grid-template-columns:repeat($, minmax(0, 1fr))`; // (C3) FIRST ROW - HEADER for (let i of keys) < let cell = document.createElement("div"); cell.innerHTML = i; cell.className = "head"; grid.appendChild(cell); >// (C4) FOLLOWING ROWS - CELLS for (let i=0; i >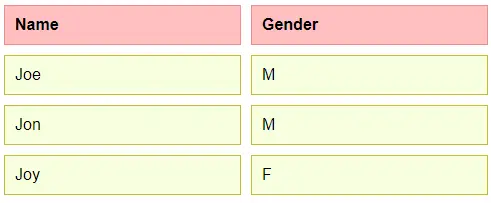
- (C1) Yet again, there are endless ways an object can be structured. Let’s just assume it is in the order of KEY : [DATA], KEY : [DATA], etc.
- (C2) Extract all the keys (headers), calculate and set the number of columns.
- (C3) Loop through the keys. Create the first row, the headers.
- (C4) Loop through all the data entries, and append them to the grid.
DOWNLOAD & NOTES
Firstly, here is the download link to the example code as promised.
SUPPORT
600+ free tutorials & projects on Code Boxx and still growing. I insist on not turning Code Boxx into a «paid scripts and courses» business, so every little bit of support helps.
EXAMPLE CODE DOWNLOAD
Click here for the source code on GitHub gist, just click on “download zip” or do a git clone. I have released it under the MIT license, so feel free to build on top of it or use it in your own project.
EXTRA BITS & LINKS
That’s all for the tutorial, and here is a small section on some extras and links that may be useful to you.
RESPONSIVE GRID
@media screen AND (max-width: 768px) < .grid < grid-template-columns: 100% >>If you don’t have a “fixed header” and “it must be N columns” to deal with, you can consider reducing the number of columns on small screens. The above snippet will collapse into a single column on small screens.
LINKS & REFERENCES
INFOGRAPHIC CHEAT SHEET
THE END
Thank you for reading, and we have come to the end. I hope that it has helped you to better understand, and if you want to share anything with this guide, please feel free to comment below. Good luck and happy coding!
10 Best Grid Layout Systems In JavaScript And CSS (2023 Update)
Grid layout is one of the most popular cross-platform layout design concepts in modern web & mobile design.
The grid layout dynamically resizes and arranges grid items in a responsive, multi-column, card-style UI depending on the screen size.
The Best Grid Layout System
In this blog post you will find the 10 best responsive grid layout systems implemented in jQuery, Vanilla JavaScript, or even Pure CSS/CSS3. I hope you like it.
Originally Published Nov 22 2017, updated Jan 04 2022
Table of contents:
jQuery Grid Layout Plugins:
Isotope — Magical Dynamic Layout Plugin For jQuery
A Magical Dynamic Layout Plugin features Layout modes(Intelligent, dynamic layouts that can’t be achieved with CSS alone.), Filtering (Hide and reveal item elements easily with jQuery selectors) and Sorting (Re-order item elements with sorting.
Responsive jQuery Dynamic Grid Layouts Plugin — Freewall
Freewall is a responsive and cross-browser jQuery plugin for creating dynamic grid layouts for desktop, mobile and tablet.
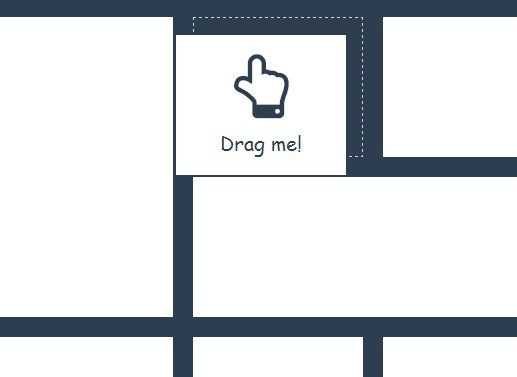
Responsive & Fluid Drag-and-Drop Grid Layout with jQuery — gridstack.js
Gridstack.js is a vanilla JavaScript widget/grid layout plugin inspired by Gridster that allows you to dynamically and responsively rearrange grid items through drag and drop.
Create A Sortable and Filterable Grid of Items — Shuffle
Shuffle is a responsive jQuery plugin for categorizing your grid of items to make them sortable, searchable and filterable.
Responsive & Filterable jQuery Portfolio Gallery Plugin — Elastic Grid
Elastic Grid is a powerful, responsive, interactive, filterable jQuery & CSS3 image gallery plugin designed for portfolio websites.

Vanilla JS Grid Layout Libraries:
Responsive, Draggable, Filterable Grid Layout – muuri
A versatile JavaScript library that helps you create responsive, draggable, filterable, searchable grid layout with smooth animations based on Velocity.js.

Creating A Flickr-style Justified Layout With JavaScript
A versatile JavaScript library that helps you create responsive, draggable, filterable, searchable grid layout with smooth animations based on Velocity.js.

Responsive Grid Layout Builder In Vanilla JavaScript – EasyGrid
An easy, framework-agnostic JavaScript grid library helps developers quickly build a responsive, customizable, and animated grid layout on their sites or web apps.

Pure CSS Grid Layout System:
Responsive 12-column Grid Layout – SpaceGrid
A lightweight CSS library used to render a responsive, 12-column grid layout for your modern web design.

flexbin.css
a lightweight, flexible CSS library which lets you create responsive, neat, justified grid layout for showcasing your photos as you seen on Google Image Search and Flickr. Heavily based on CSS3 flexbox and fully customizable via SCSS.

More Resources:
Looking for more jQuery plugins or JavaScript libraries to create awesome Grid Layouts on the web & mobile? See jQuery Grid Layout and JavaScript/CSS Grid Layout sections for more details.