- How Gradle Works Part 3 — Build Script
- Kotlin & Groovy DSL
- Implicit Rule 1: Lambda/Closure
- Implicit Rule 2: Chained Method Invocation
- Build Script Execution
- External Dependencies in Build Script
- What’s Next
- Related Posts
- Get started with Kotlin custom scripting – tutorial
- Project structure
- Before you start
- Create a project
- Add scripting modules
- Create a script definition
- Create a scripting host
- Run scripts
- Hello, World!
- What’s next?
- Gradle Kotlin DSL Reference
- Gradle Kotlin DSL Reference
How Gradle Works Part 3 — Build Script
This is the third blog of the series How Gradle Works. In this blog we’ll explain what happens during build script execution.
Kotlin & Groovy DSL
If you are a Java developer, when you open any Gradle build script (for example build.gradle.kts or build.gradle ), the first thing that might confuse you is the special syntax of curly braces:
// Kotlin DSL: plugins < id("some.plugin") version "0.0.1" >// or Groovy DSL: plugins What’s this? What happens when Gradle executes these kinds of scripts?
The short answer is: they are DSLs (Domain Specific Language) on top of the Kotlin programming language for .gradle.kts files, or on top of the Groovy programming language for .gradle files. These DSLs have some implicit rules, making them appear very confusing.
Implicit Rule 1: Lambda/Closure
First of all, < . >is a special object in both Groovy and Kotlin. This object is called a lambda in Kotlin, or a closure in Groovy. They’re similar to function objects in other programming language, like Java’s lambda, or JavaScript’s function object.
You can think of plugins < . >as a method invocation in which a Kotlin lambda object or Groovy closure object is passed as the argument, because both Groovy and Kotlin allow you to omit parentheses:
Also, there is one noteworthy DSL: in Kotlin/Groovy, if the last parameter of a function is a lambda/closure, it’s allowed to be put outside of parentheses. For example, the following code snippet:
tasks.register("myTask", function() < . doLast(function() < . >) >) The code inside the function may be executed immediately or later, depending on the implementation of the specific method.
Implicit Rule 2: Chained Method Invocation
In the plugins < >example above, the Kotlin version: id(«some.plugin») version «0.0.1» and the Groovy version: id «some.plugin» version «0.0.1» are both equivalent to the chained method invocation id(«some.plugin»).version(«0.0.1») .
Because the version in id(«some.plugin») version «0.0.1» is actually an infix function in Kotlin, which is defined here, and id «some.plugin» version «0.0.1» is “command chains” in Groovy.
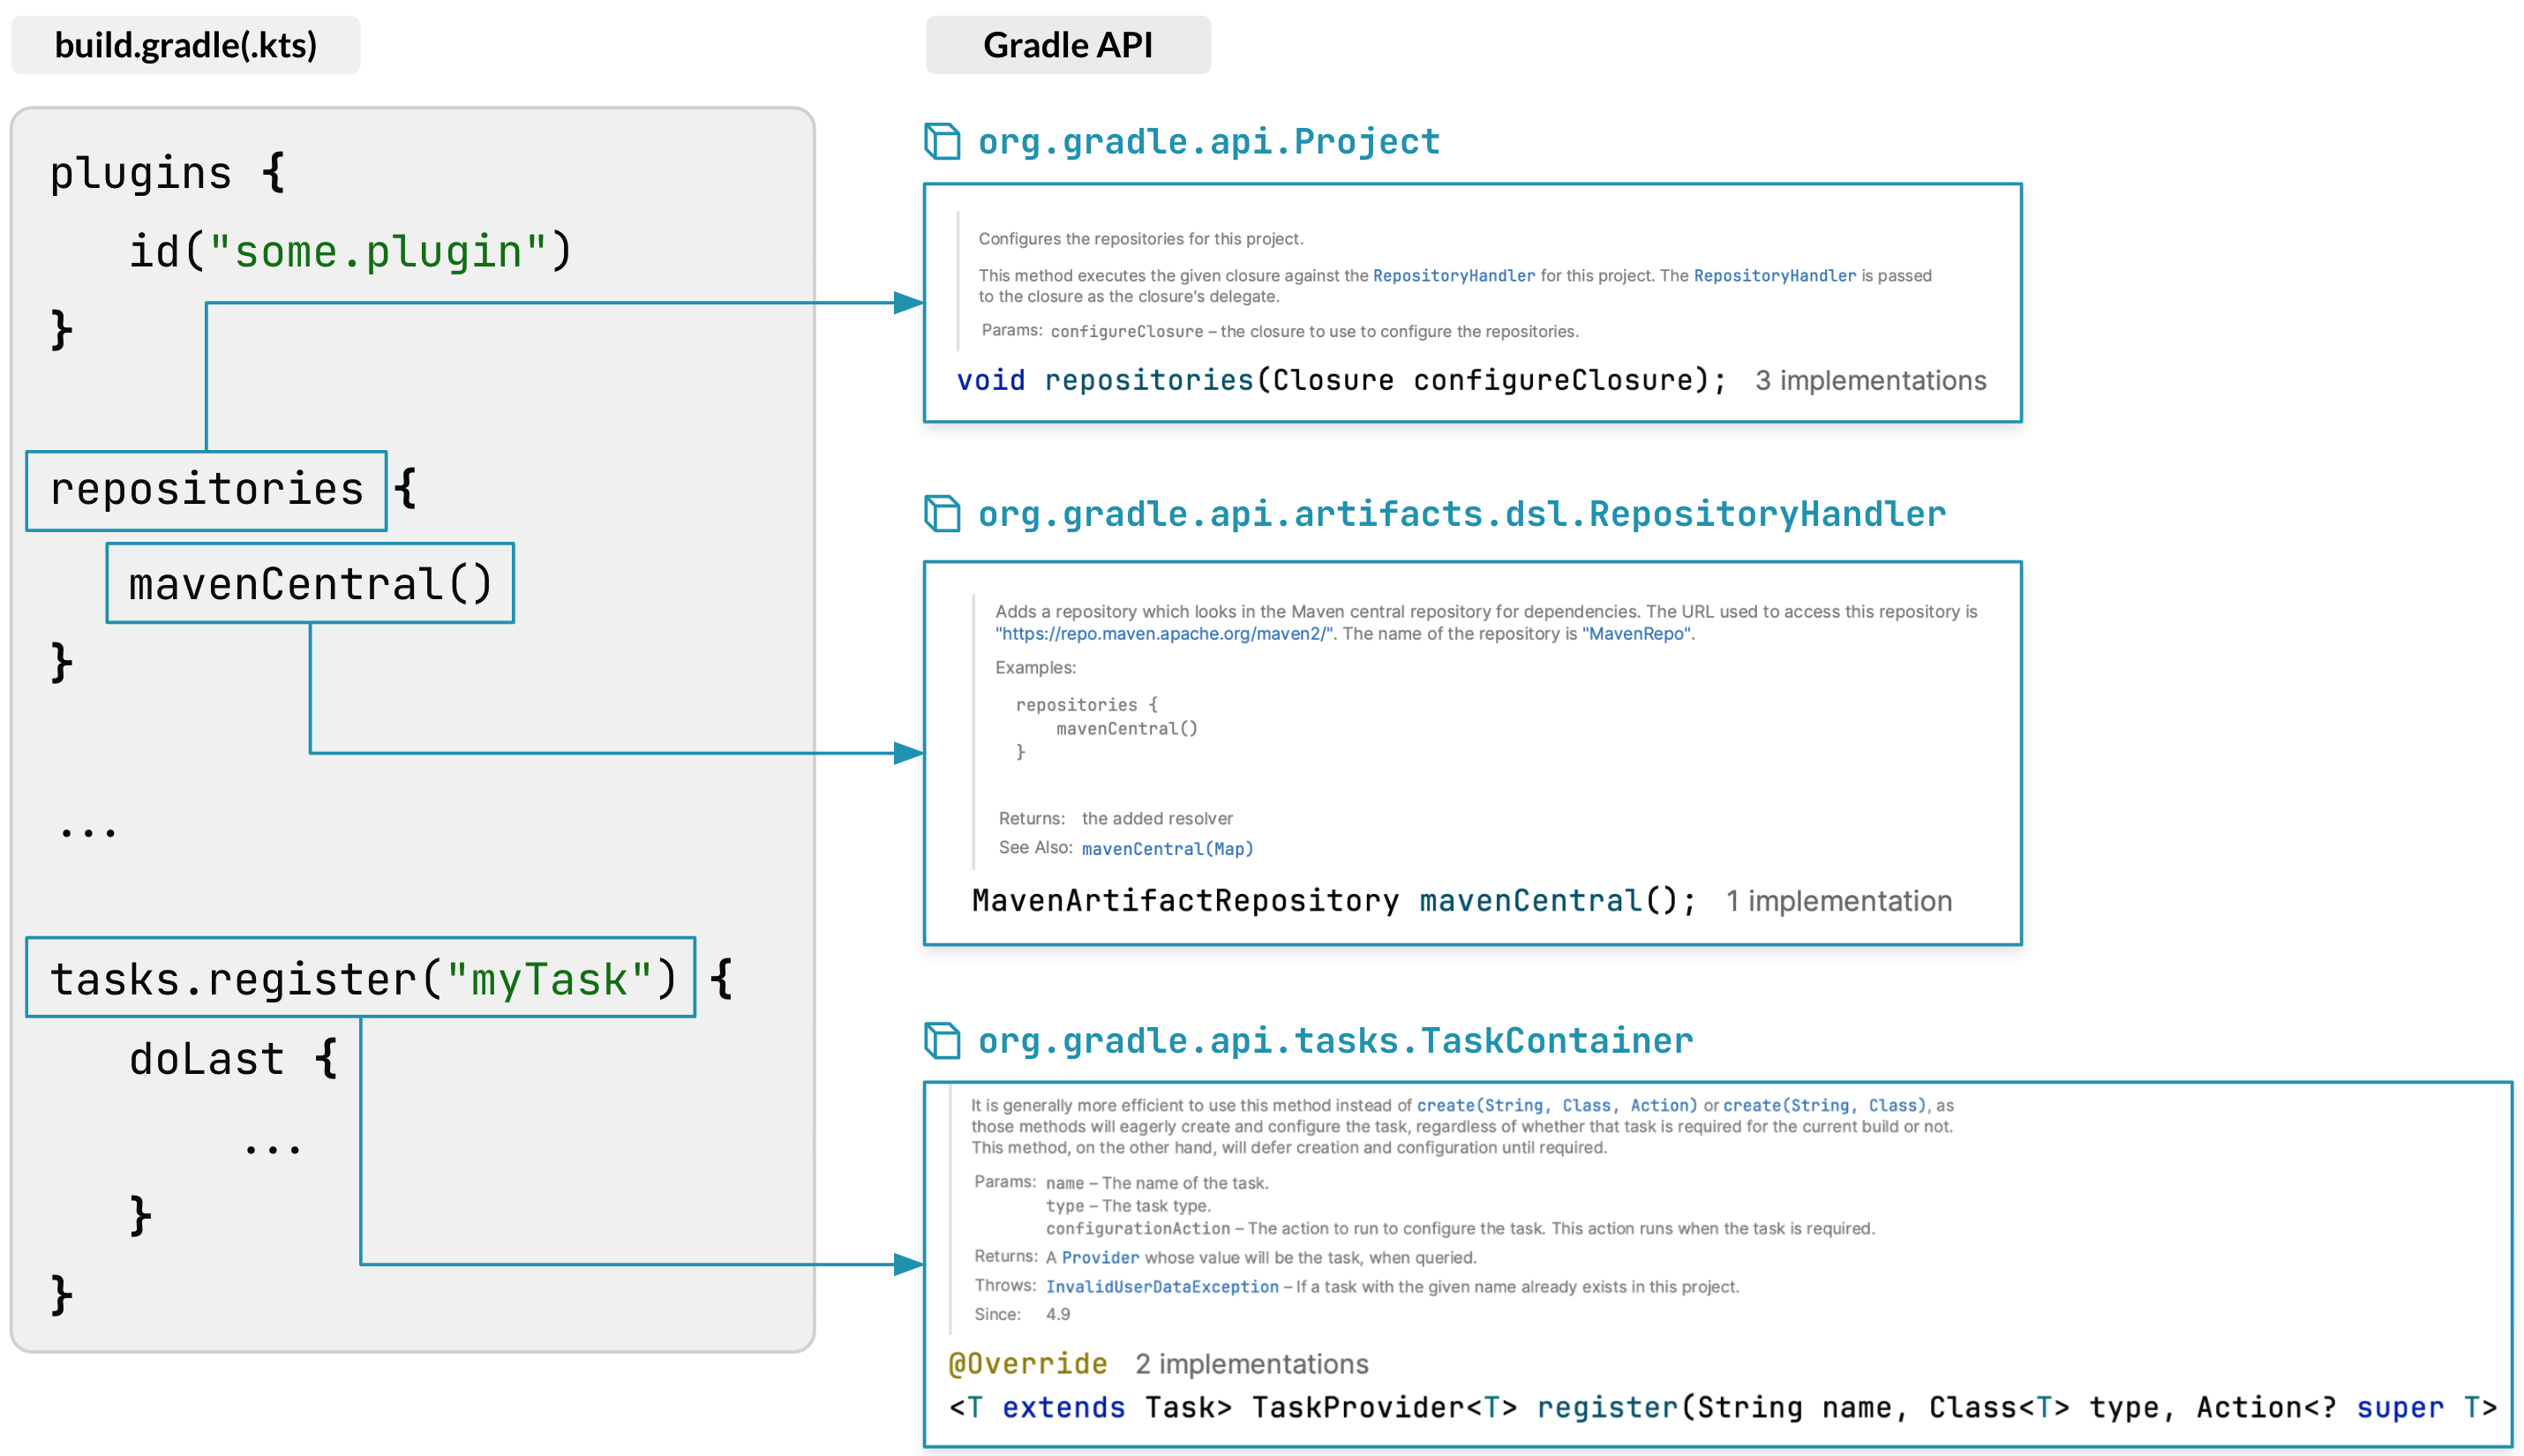
We won’t explain all the implicit rules in Groovy and Kotlin DSLs (as that would require another full blog series :-P), you should simply understand that they are mapped to Gradle API methods in some ways. See Kotlin DSL Primer and Groovy DSL Primer.
But what is this of the method invocation id(«some.plugin») ?
The code inside the function is executed against a this object, which is called a “receiver” in Kotlin lambda, or a “delegate” in Groovy closure. Gradle determines the correct this object and invokes the method against that this object. In this example, the this object is of type PluginDependenciesSpec .
Build Script Execution
Once we have unveiled all the mechanics of the DSL, a Gradle build script is simply a few Gradle API calls built on top of the DSLs. Like almost all other programming languages, Gradle executes the build script line by line, top to bottom.
Of course, the build script must be compiled into bytecode before being executed in the JVM. Gradle does this transparently, giving the impression that the build script is being interpreted and executed.
External Dependencies in Build Script
Consider the following build script:
// build.gradle.kts import com.android.build.gradle.tasks.LintGlobalTask plugins < id("com.android.application") version "7.4.0" >tasks.withType().configureEach How can this build script be compiled without specifying the dependency of com.android.build.gradle.tasks.LintGlobalTask ? You may say, “doesn’t it come from the plugins < >block below?”
But remember, to execute the plugins < >block, the build script must be compiled first. Now it’s a chicken-and-egg issue: to get the dependency of LintGlobalTask , we must compile and run the build script, but to compile the build script, we must get the dependency of LintGlobalTask .
Gradle handles plugins < >specially as follows:
- The plugins block is extracted and executed first;
- The resolved dependencies are added to the whole build script’s classpath;
- The build script is compiled and executed.
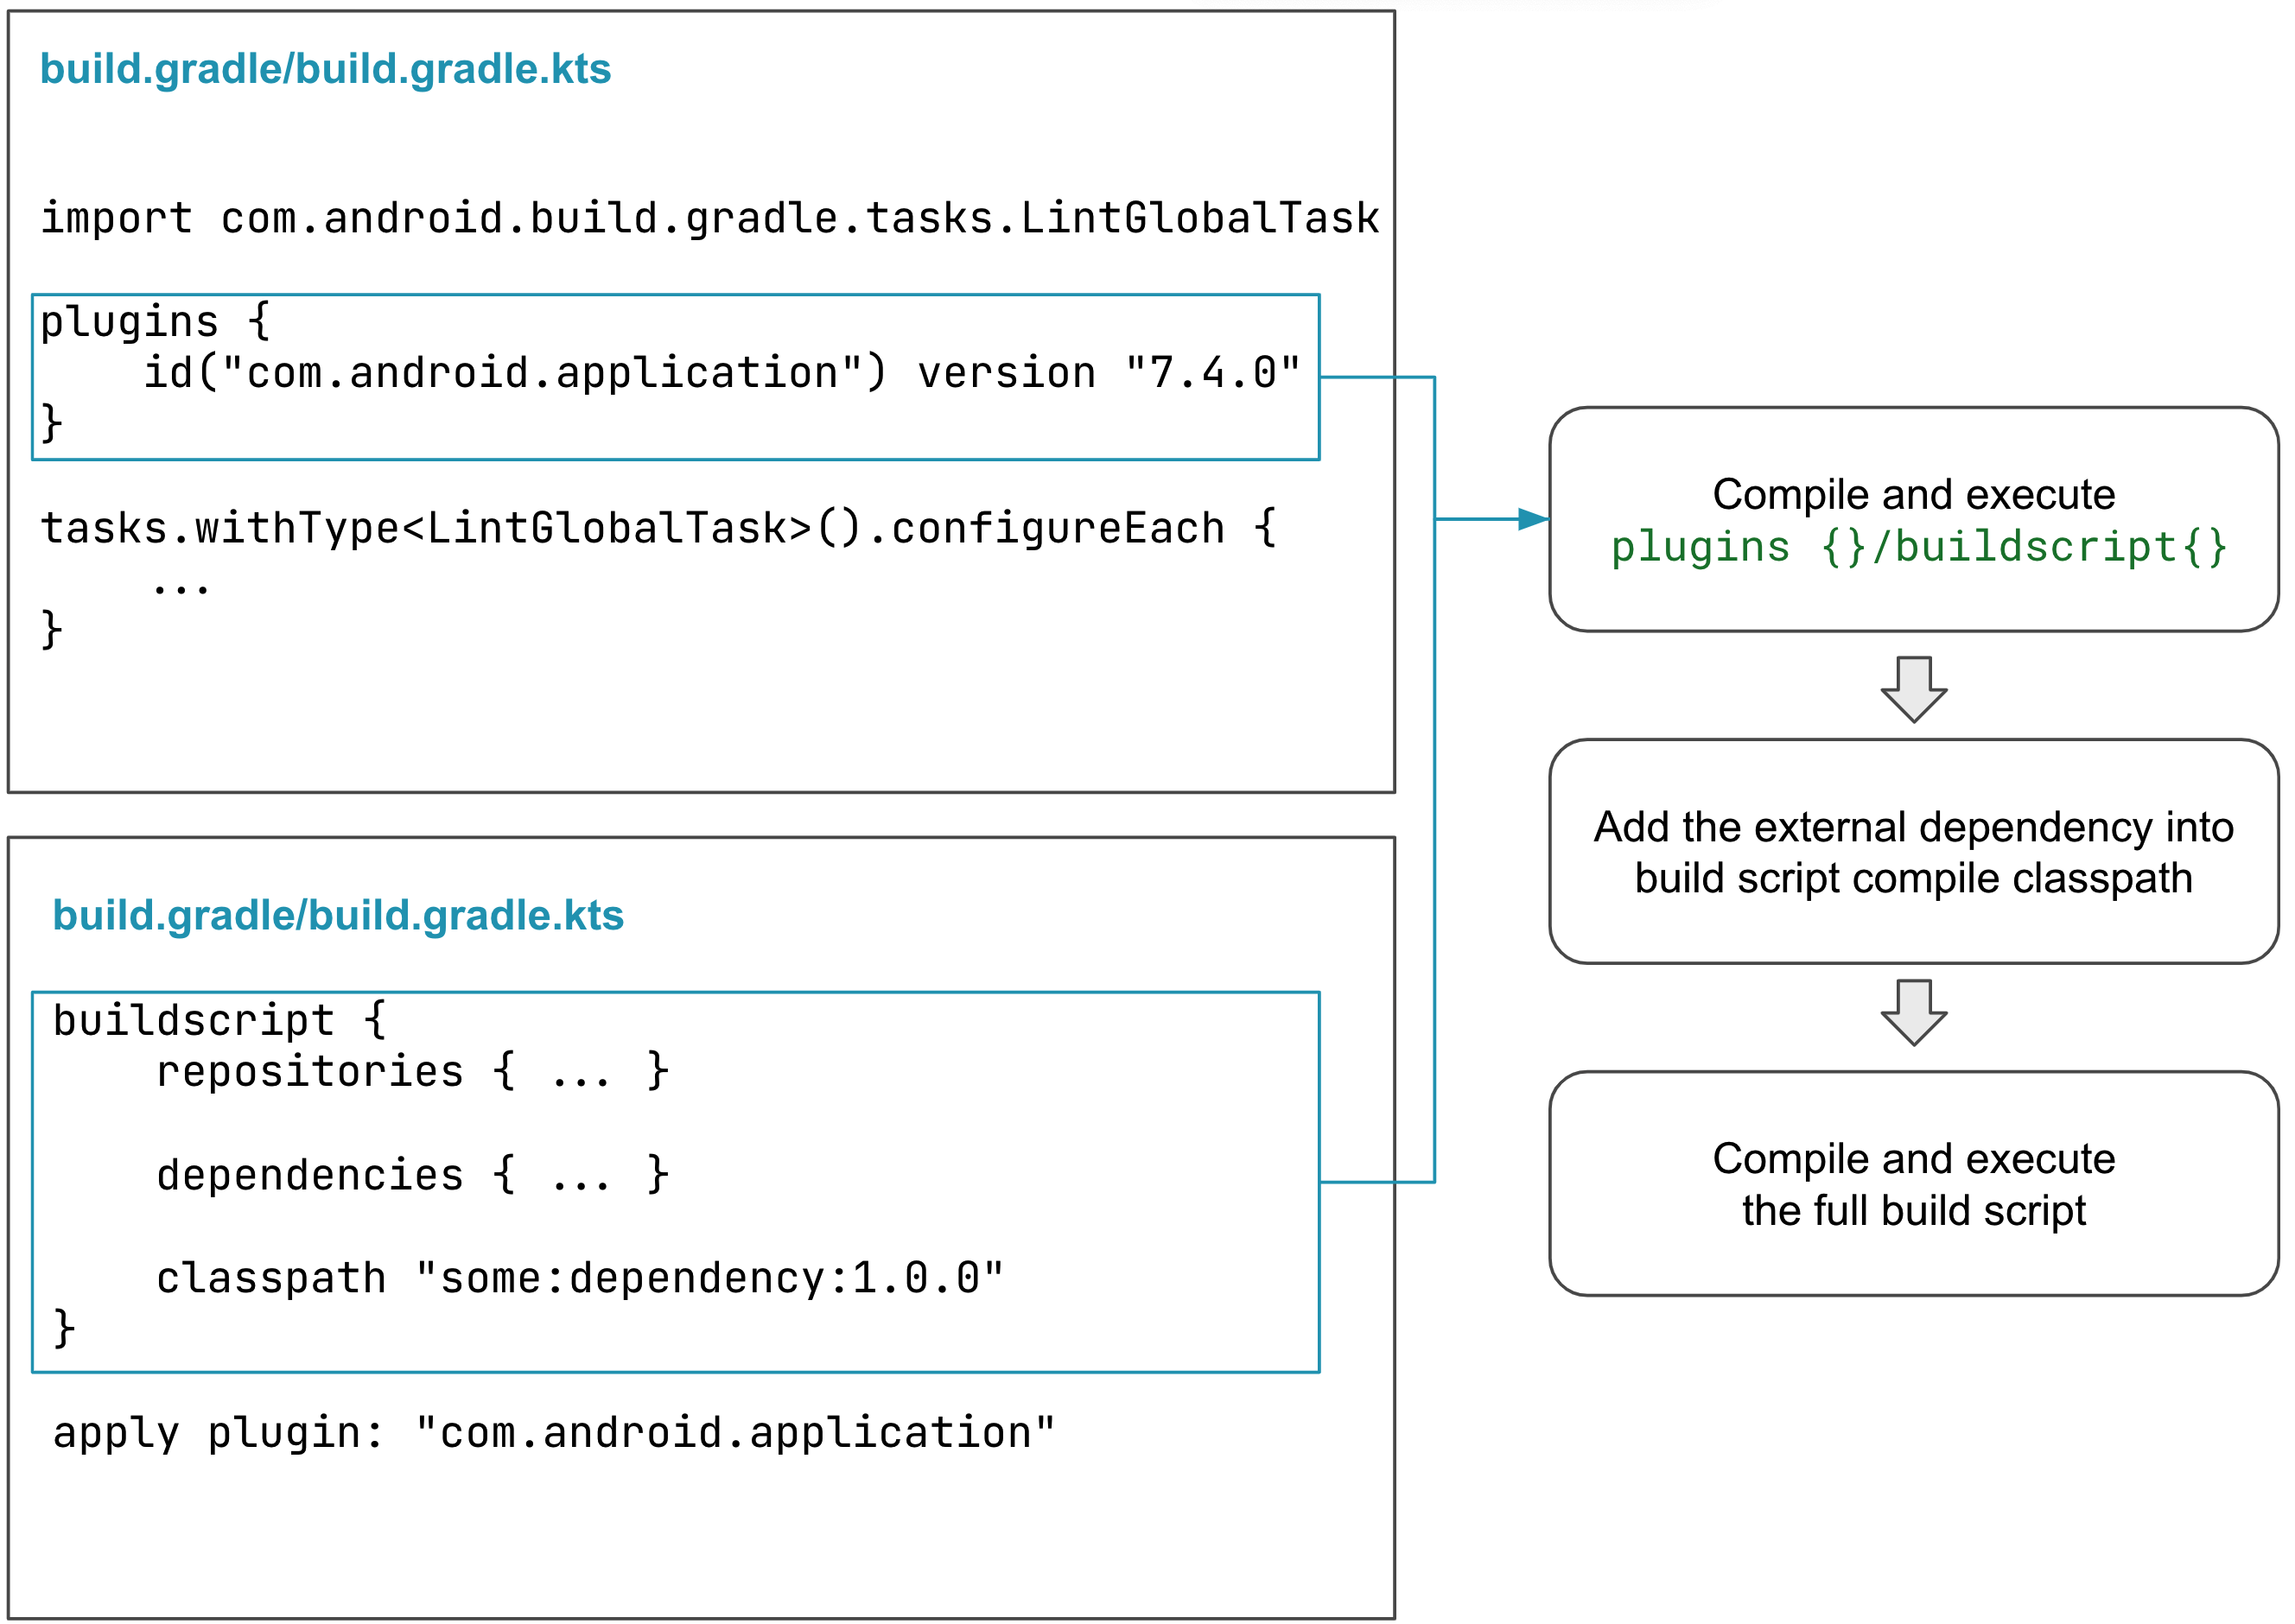
A similar thing happens to buildscript < >block, too: you can explicitly specify the dependencies for build script compilation and execution. In this way, you can leverage the many available libraries in the JVM ecosystem to empower your build script.
What’s Next
The build script invokes Gradle APIs to configure the build, where amazing things happen. It’s possible to pack the build script into a Gradle plugin for better reusability and performance.
In the next blog of the series, we’ll explain what happens under the hood of Gradle plugins.
Related Posts
Get started with Kotlin custom scripting – tutorial
Kotlin scripting is Experimental. It may be dropped or changed at any time. Use it only for evaluation purposes. We appreciate your feedback on it in YouTrack.
Kotlin scripting is the technology that enables executing Kotlin code as scripts without prior compilation or packaging into executables.
For an overview of Kotlin scripting with examples, check out the talk Implementing the Gradle Kotlin DSL by Rodrigo Oliveira from KotlinConf’19.
In this tutorial, you’ll create a Kotlin scripting project that executes arbitrary Kotlin code with Maven dependencies. You’ll be able to execute scripts like this:
@file:Repository(«https://maven.pkg.jetbrains.space/public/p/kotlinx-html/maven») @file:DependsOn(«org.jetbrains.kotlinx:kotlinx-html-jvm:0.7.3») import kotlinx.html.* import kotlinx.html.stream.* import kotlinx.html.attributes.* val addressee = «World» print( createHTML().html < body < h1 < +"Hello, $addressee!" >> > )
The specified Maven dependency ( kotlinx-html-jvm for this example) will be resolved from the specified Maven repository or local cache during execution and used for the rest of the script.
Project structure
A minimal Kotlin custom scripting project contains two parts:
- Script definition – a set of parameters and configurations that define how this script type should be recognized, handled, compiled, and executed.
- Scripting host – an application or component that handles script compilation and execution – actually running scripts of this type.
With all of this in mind, it’s best to split the project into two modules.
Before you start
Download and install the latest version of IntelliJ IDEA.
Create a project
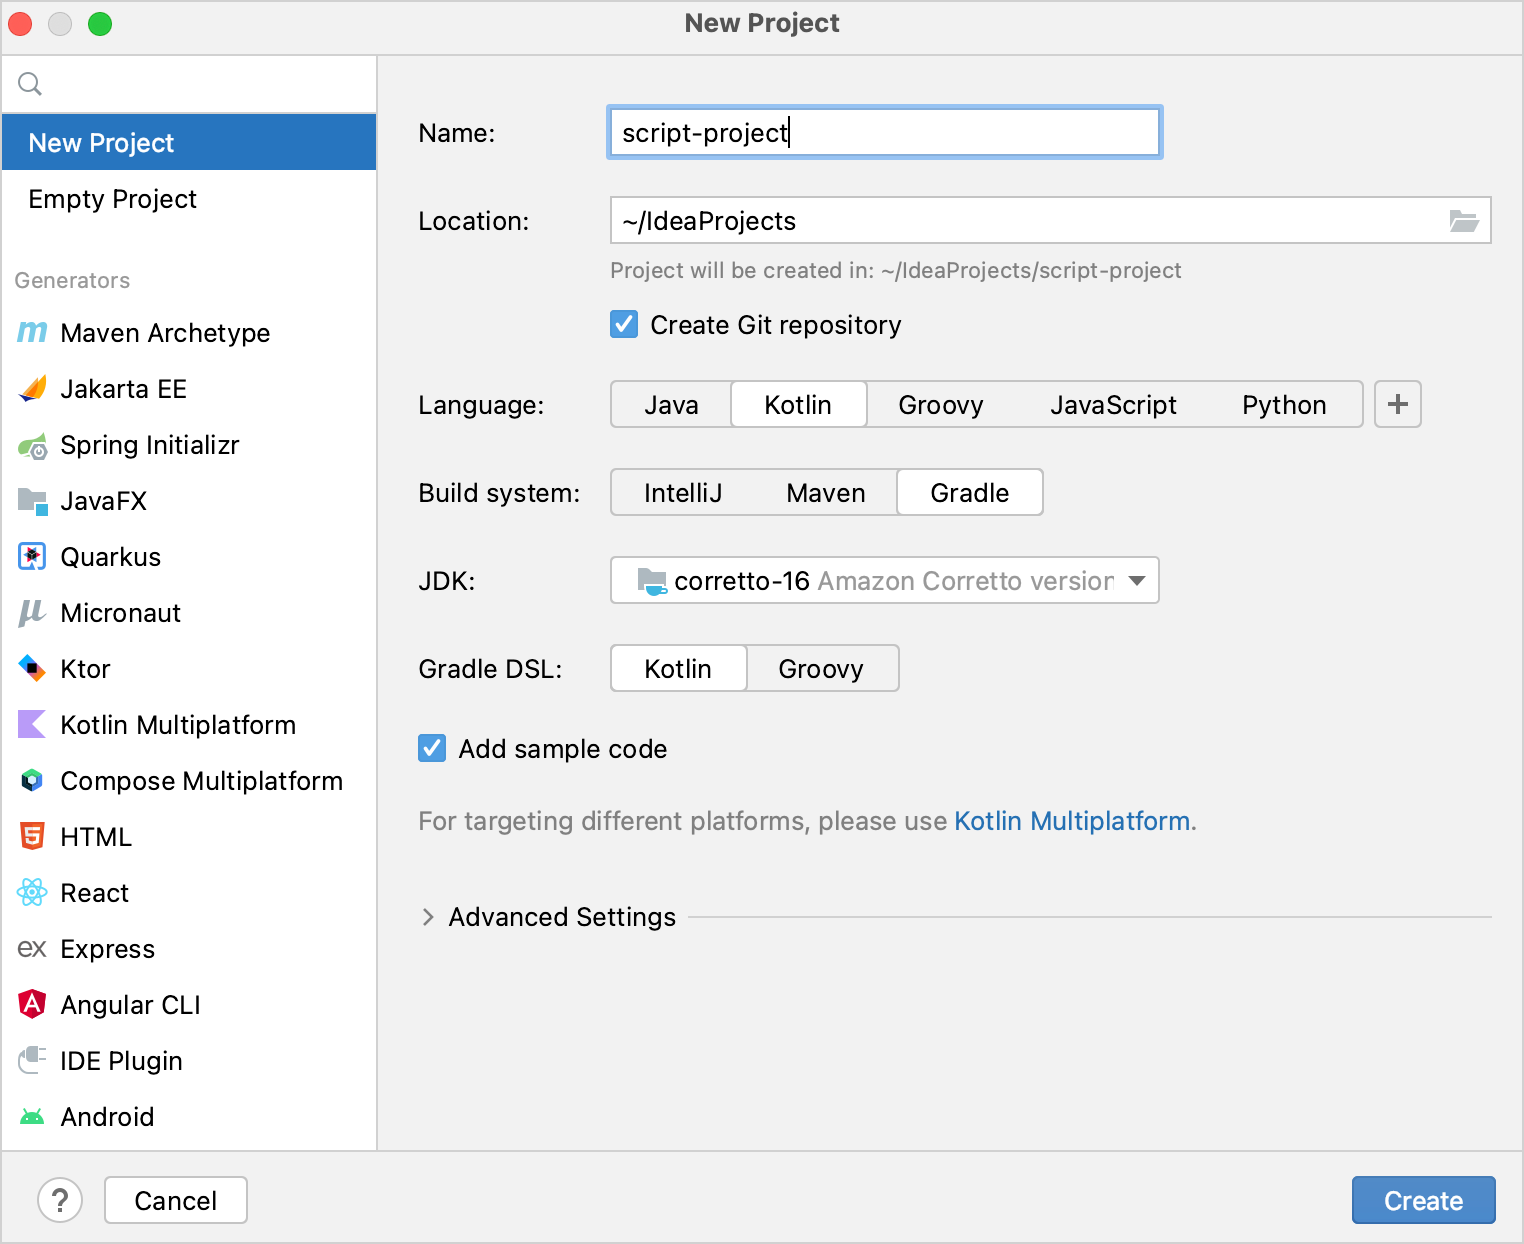
- In IntelliJ IDEA, select File | New | Project.
- In the panel on the left, select New Project.
- Name the new project and change its location if necessary. Select the Create Git repository checkbox to place the new project under version control. You will be able to do it later at any time.
- From the Language list, select Kotlin.
- Select the Gradle build system.
- From the JDK list, select the JDK that you want to use in your project.
- If the JDK is installed on your computer, but not defined in the IDE, select Add JDK and specify the path to the JDK home directory.
- If you don’t have the necessary JDK on your computer, select Download JDK.
- Select the Kotlin or Gradle language for the Gradle DSL.
- Click Create.
Add scripting modules
Now you have an empty Kotlin/JVM Gradle project. Add the required modules, script definition and scripting host:
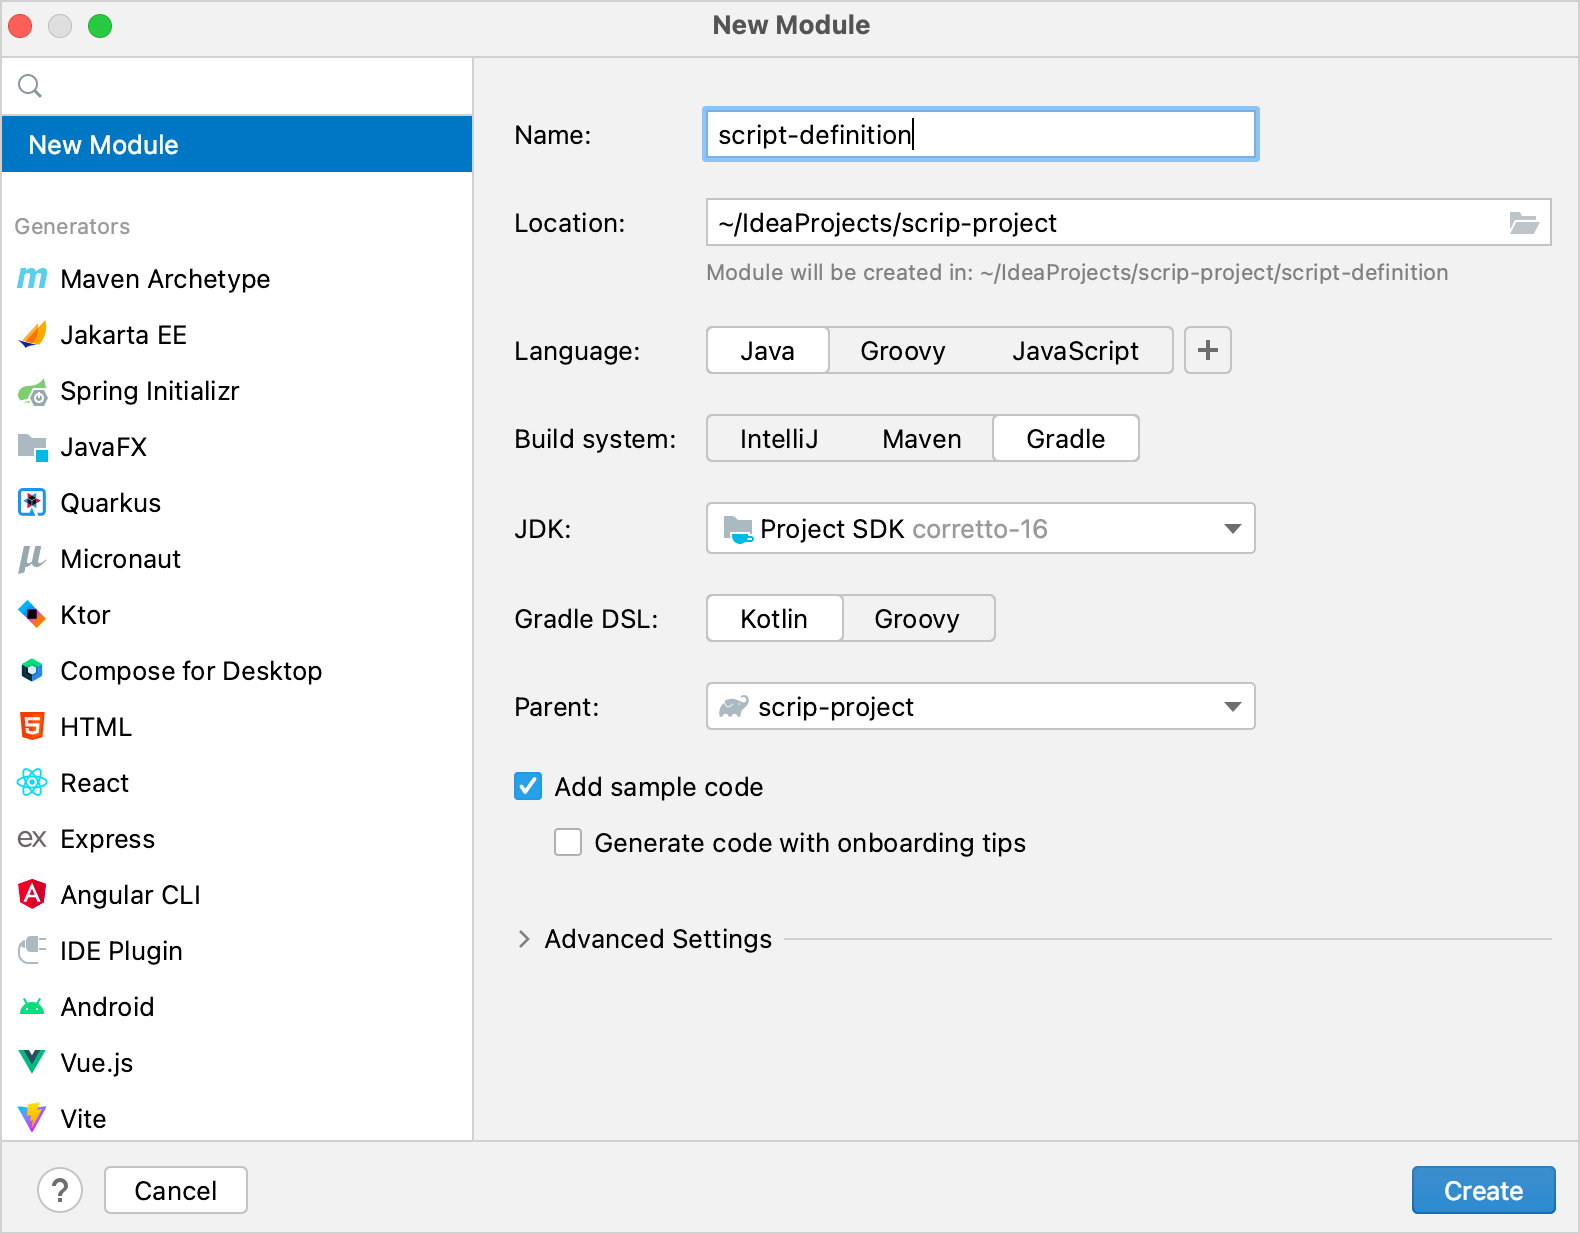
- In IntelliJ IDEA, select File | New | Module.
- In the panel on the left, select New Module. This module will be the script definition.
- Name the new module and change its location if necessary.
- From the Language list, select Java.
- Select the Gradle build system and Kotlin for the Gradle DSL if you want to write the build script in Kotlin.
- As a module’s parent, select the root module.
- Click Create.
- In the module’s build.gradle(.kts) file, remove the version of the Kotlin Gradle plugin. It is already in the root project’s build script.
- Repeat previous steps one more time to create a module for the scripting host.
The project should have the following structure:
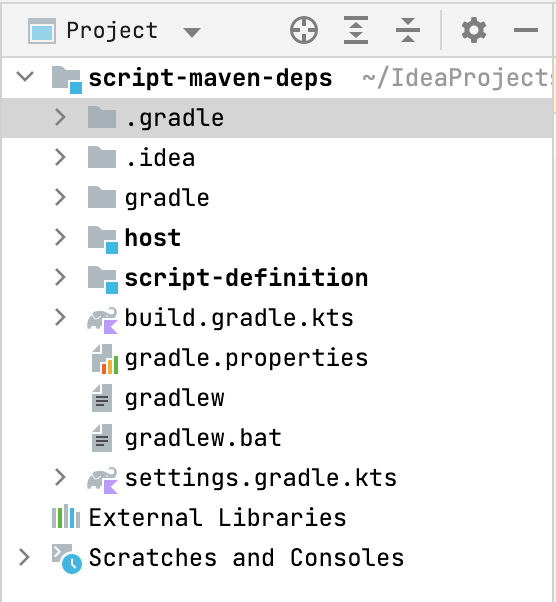
You can find an example of such a project and more Kotlin scripting examples in the kotlin-script-examples GitHub repository.
Create a script definition
First, define the script type: what developers can write in scripts of this type and how it will be handled. In this tutorial, this includes support for the @Repository and @DependsOn annotations in the scripts.
- In the script definition module, add the dependencies on the Kotlin scripting components in the dependencies block of build.gradle(.kts) . These dependencies provide the APIs you will need for the script definition:
- fileExtension – a string ending with .kts that defines a file extension for scripts of this type.
- compilationConfiguration – a Kotlin class that extends ScriptCompilationConfiguration and defines the compilation specifics for this script definition. You’ll create it in the next step.
// @KotlinScript annotation marks a script definition class @KotlinScript( // File extension for the script type fileExtension = «scriptwithdeps.kts», // Compilation configuration for the script type compilationConfiguration = ScriptWithMavenDepsConfiguration::class ) abstract class ScriptWithMavenDeps object ScriptWithMavenDepsConfiguration: ScriptCompilationConfiguration()
In this tutorial, we provide only the working code without explaining Kotlin scripting API. You can find the same code with a detailed explanation on GitHub.
// Handler that reconfigures the compilation on the fly fun configureMavenDepsOnAnnotations(context: ScriptConfigurationRefinementContext): ResultWithDiagnostics
Create a scripting host
The next step is creating the scripting host – the component that handles the script execution.
- In the scripting host module, add the dependencies in the dependencies block of build.gradle(.kts) :
- Kotlin scripting components that provide the APIs you need for the scripting host
- The script definition module you created previously
You can find the full code here
Run scripts
To check how your scripting host works, prepare a script to execute and a run configuration.
-
Create the file html.scriptwithdeps.kts with the following content in the project root directory:
@file:Repository(«https://maven.pkg.jetbrains.space/public/p/kotlinx-html/maven») @file:DependsOn(«org.jetbrains.kotlinx:kotlinx-html-jvm:0.7.3») import kotlinx.html.*; import kotlinx.html.stream.*; import kotlinx.html.attributes.* val addressee = «World» print( createHTML().html < body < h1 < +"Hello, $addressee!" >> > )
It uses functions from the kotlinx-html-jvm library which is referenced in the @DependsOn annotation argument.
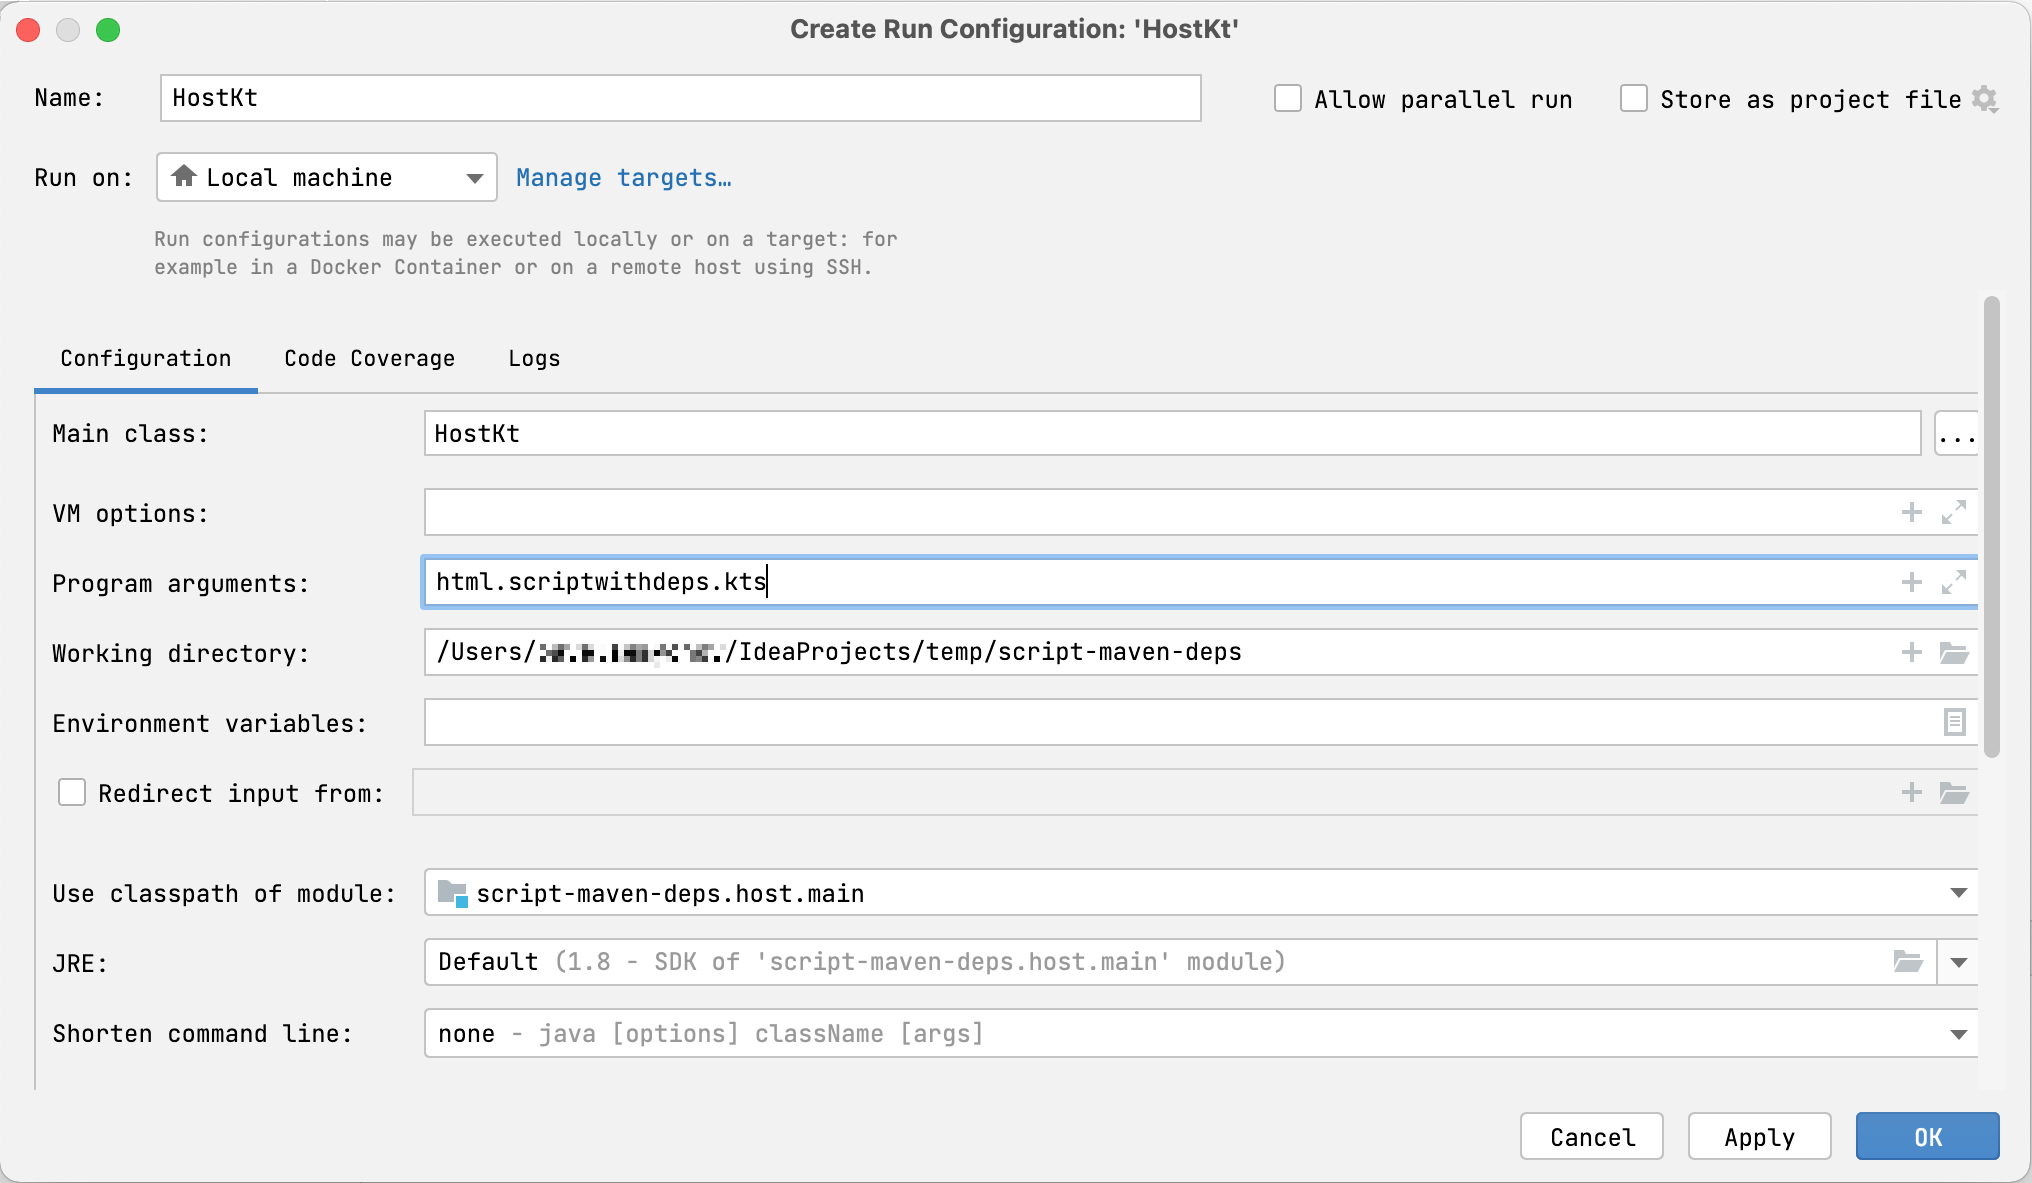
- Open host.kt and navigate to the main function. It has a Run gutter icon on the left.
- Right-click the gutter icon and select Modify Run Configuration.
- In the Create Run Configuration dialog, add the script file name to Program arguments and click OK.
You’ll see how the script is executed, resolving the dependency on kotlinx-html-jvm in the specified repository and printing the results of calling its functions:
Hello, World!
Resolving dependencies may take some time on the first run. Subsequent runs will complete much faster because they use downloaded dependencies from the local Maven repository.
What’s next?
Once you’ve created a simple Kotlin scripting project, find more information on this topic:
Gradle Kotlin DSL Reference
Gradle’s Kotlin DSL provides an enhanced editing experience in supported IDEs, with superior content assist, refactoring, documentation, and more. For an introduction see the Kotlin DSL Primer.
The Kotlin DSL is implemented on top of Gradle’s Java API. Many of the objects, functions and properties you use in your build scripts come from the Gradle API and the APIs of the applied plugins. This reference covers both the Kotlin DSL and the Java API, but it doesn’t include functionality provided by external plugins.
The main package of the Kotlin DSL is org.gradle.kotlin.dsl. All members of this package are implicitly imported and readily available in .gradle.kts scripts in addition to the Java API default imports.