- Google Sheets Macros
- Creating macros in Apps Script
- Editing macros
- Importing functions as macros
- Manifest structure for macros
- Best practices
- Things you can’t do
- Use macros outside bound scripts
- Define macros in Sheets add-ons
- Distribute macros in script libraries
- Use macros outside of Google Sheets
- Как создать макрос в Google Таблицах и назначить для него кнопку
- Пример задачи для макроса
- Запись макроса в Google Таблицах
- Назначение кнопки для запуска макроса
Google Sheets Macros
Google Sheets lets you record macros that duplicate a specific series of UI interactions that you define. Once you’ve recorded a macro, you can link it to a keyboard shortcut in the form Ctrl+Alt+Shift+Number . You can use that shortcut to quickly execute the exact macro steps again, typically in a different place or on different data. You can also activate the macro from the Google Sheets Extensions > Macros menu.
When you record a macro, Google Sheets automatically creates an Apps Script function (the macro function) that replicates the macro steps. The macro function is added to an Apps Script project bound to the sheet, in a file titled macros.gs . In the event that there is already a project file bound to the sheet with that name, the macro function is appended to it. Google Sheets also automatically updates the script project manifest, recording the name and keyboard shortcut assigned to the macro.
Since every recorded macro is defined entirely within Apps Script, you can edit them directly within the Apps Script editor. You can even write macros from scratch in Apps Script, or take functions you’ve already written and turn them into macros.
Creating macros in Apps Script
You can take functions written in Apps Script and use them as macro functions. The easiest way to do this is by importing an existing function from the Google Sheets editor.
Alternatively, you can create macros within the Apps Script editor by following these steps:
- In the GGoogle Sheets UI, select Extensions >Apps Script to open the script bound to the sheet in the AApps Script editor.
- Write the macro function. Macro functions should take no arguments and return no values.
- Edit your script manifest to create the macro and link it to the macro function. Assign it a unique keyboard shortcut and name.
- Save the script project. The macro is then available for use in the sheet.
- Test the macro function in the sheet to verify that functions as intended.
Editing macros
You can edit macros attached to a sheet by doing the following:
- In the Google Sheets UI, select Extensions >Macros >Manage macros.
- Find the macro you want to edit and select more_vert > Edit macro. This opens the Apps Script editor to the project file containing the macro function.
- Edit the macro function to change the macro behavior.
- Save the script project. The macro is then available for use in the sheet.
- Test the macro function in the sheet to verify that functions as intended.
Importing functions as macros
If there is already a script bound to a sheet, you can import a function in the script as a new macro and then assign it a keyboard shortcut. You can do this by editing the manifest file and adding another element to the sheets.macros[] property.
Alternatively, follow these steps to import a function as a macro from the Sheets UI:
- In the Google Sheets UI, select Extensions >Macros >Import.
- Select a function from the list presented and then click Add function.
- Select clear to close the dialog.
- Select Extensions >Macros >Manage macros.
- Locate the function you just imported in the list. Assign a unique keyboard shortcut to the macro. You can also change the macro name here; the name defaults to the name of the function.
- Click Update to save the macro configuration.
Manifest structure for macros
The following manifest file example snippet shows the section of a manifest that defines Google Sheets macros. The sheets section of the manifest defines the name and keyboard shortcut assigned to the macro and the name of the macro function.
Note: Manifests include other components that relate to Apps Script properties. The fields under the sheets relate directly to Sheets functionality. This example is just a portion of a full manifest file and is not a fully functional manifest.
See the Sheets macro manifest resource for more details on how Sheets macro manifests are constructed.
Best practices
When creating or managing macros in Apps Script, it is recommended that you adhere to the following guidelines.
- Macros are more performant when they are light-weight. Where possible, limit the number of actions a macro takes.
- Macros are best suited for rote operations that need to be repeated frequently with little or no configuation. For other operations, consider using a custom menu item instead.
- Always remember that macro keyboard shortcuts must be unique, and a given sheet can only have ten macros with shortcuts at any one time. Any additional macros can only be executed from the Extensions >Macros menu.
- Macros that make changes to a single cell can be applied to a range of cells by first selecting the full range and then activating the macro. This means it is often unnecessary to create macros that duplicate the same operation across a predefined range of cells.
Things you can’t do
There are a few restrictions on what you can do with macros:
Use macros outside bound scripts
Macros are defined in scripts bound to specific Google Sheets. Macro definitions are ignored if defined in a standalone script or web app.
Define macros in Sheets add-ons
You cannot distribute macro definitions using a Sheets add-on. Any macro definitions in a Sheets add-on project are ignored by users of that add-on.
Distribute macros in script libraries
You cannot distribute macro definitions using Apps Script libraries.
Use macros outside of Google Sheets
Macros are only a feature in Google Sheets, and do not exist for Google Docs, Forms, or Slides.
Except as otherwise noted, the content of this page is licensed under the Creative Commons Attribution 4.0 License, and code samples are licensed under the Apache 2.0 License. For details, see the Google Developers Site Policies. Java is a registered trademark of Oracle and/or its affiliates.
Last updated 2023-07-05 UTC.
Как создать макрос в Google Таблицах и назначить для него кнопку
Макрос – небольшая программа, выполняющая действия, заранее записанные пользователем. Google Таблицы поддерживают создание таких программ, что значительно упрощает рутинные действия, с которыми приходится сталкиваться каждый день. Я покажу, как можно записать макрос и запускать его выполнение при помощи графической кнопки, расположенной прямо в таблице.
Пример задачи для макроса
Сначала предлагаю вкратце остановиться на том, что именно будет делать макрос, который я взял в качестве примера для данной статьи. Его задача – перенести записанные данные из одного листа таблицы на другой, формируя тем самым базу данных в автоматическом режиме. Это упростит процесс заполнения информации и избавит юзера от необходимости следить за строками. Разберу все составляющие таблицы для реализации поставленной цели.
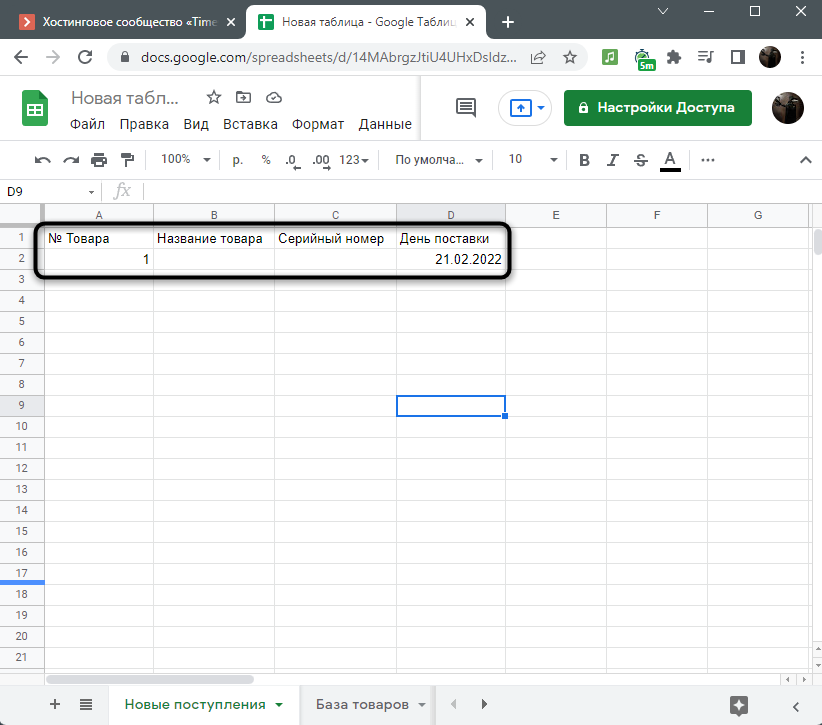
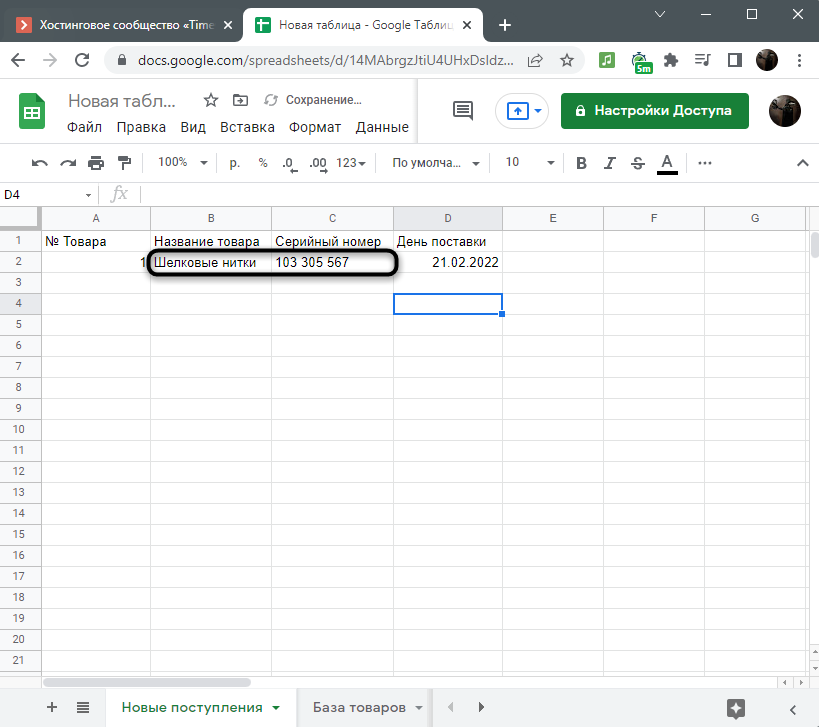
- У меня есть небольшая форма для заполнения с номерами товаров, их названием, серийным номером, датой.
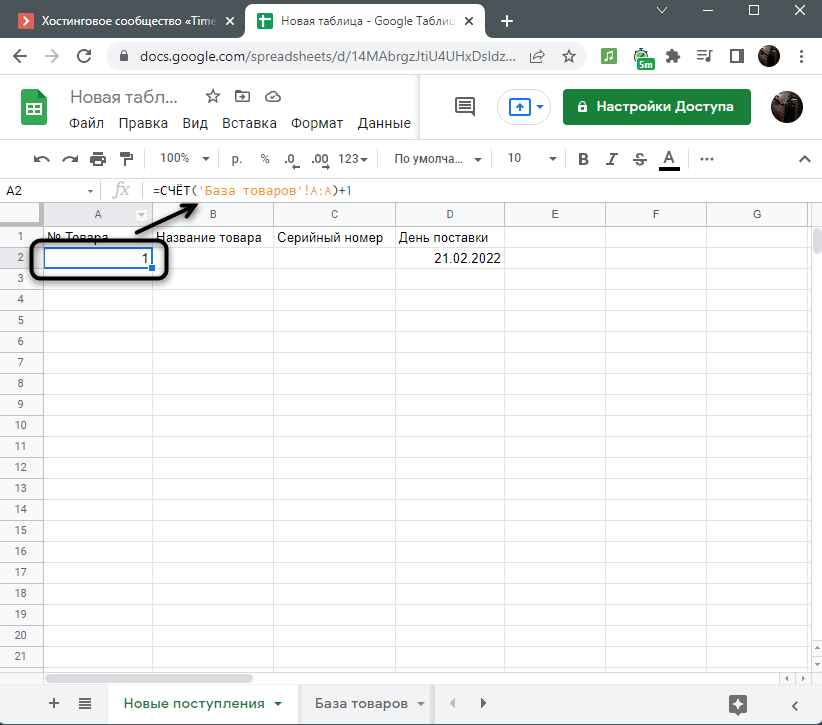
- На следующем изображении вы видите простую формулу для счета номера каждого товара, чтобы не вводить его каждый раз. Ссылка в функции ведет на лист с базой данных.
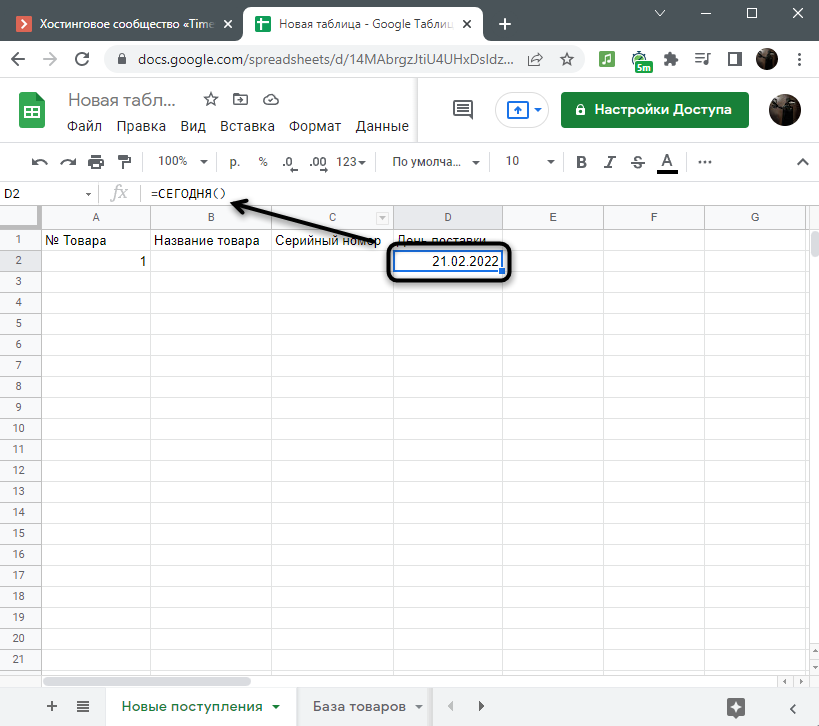
- Дата тоже проставляется автоматически.
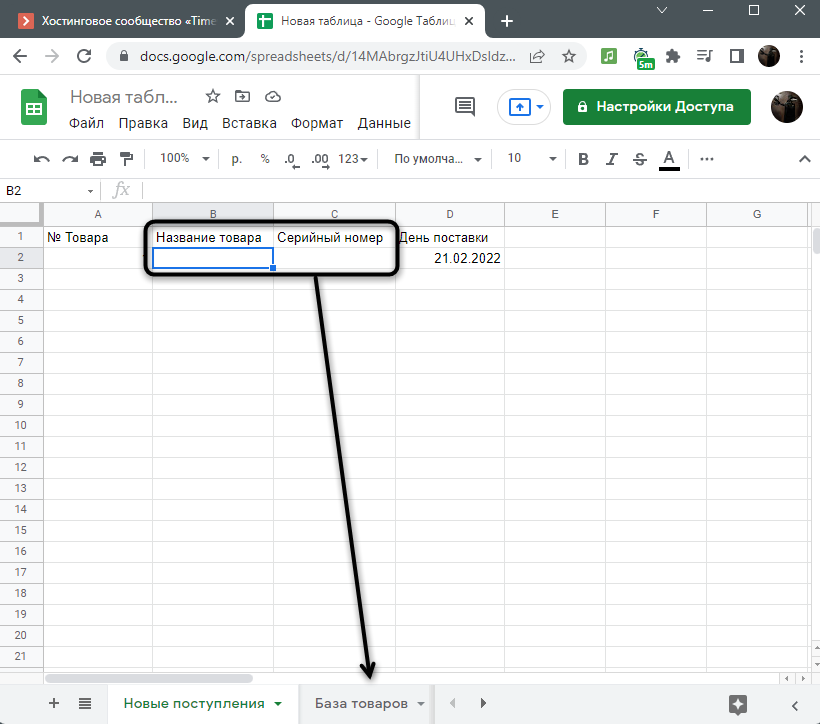
- Вручную будут заполняться только названия для товаров и их серийные номера, после чего все это переносится на лист базы данных.
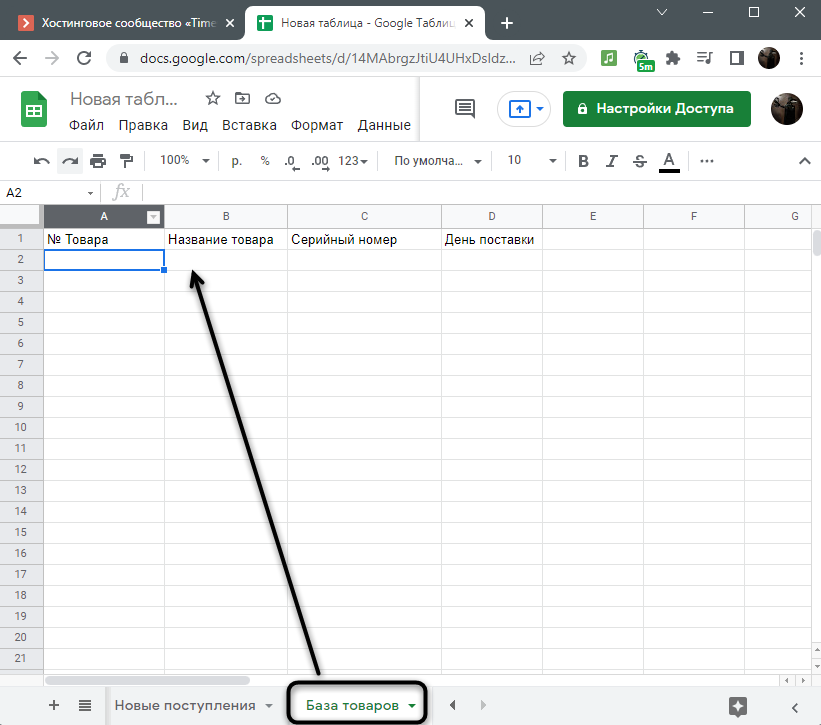
- На этом листе вся таблица повторяется по структуре, но пока она пустая, поскольку все будет переноситься автоматически при помощи макроса, о котором пойдет речь далее.
У вас может быть совершенно другая таблица со своими задачами, которые вы выполняете постоянно, но хотите оптимизировать при помощи макроса. При помощи инструкции ниже вы разберетесь с тем, как организовать такую программу, если ранее не сталкивались с подобной задачей.
Запись макроса в Google Таблицах
Макрос в Гугл Таблицах запоминает выполненные пользователем действия, а затем повторяет их каждый раз при повторном запуске. Это и позволит нам осуществить что-либо всего один раз, а затем доверить реализацию небольшой программе. Кстати, таких макросов можно записать практически неограниченное количество.
- Для начала я заполню динамические данные в своей таблице. Сделайте это и вы, если в этом возникнет необходимость.
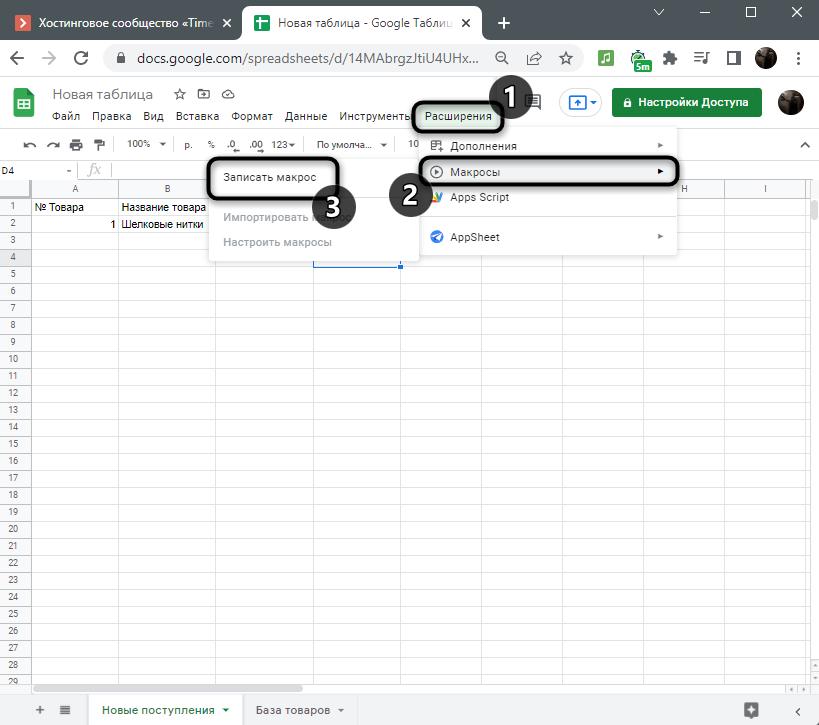
- После этого откройте меню «Расширения», наведите курсор на пункт «Макросы» и нажмите кнопку «Записать макрос».
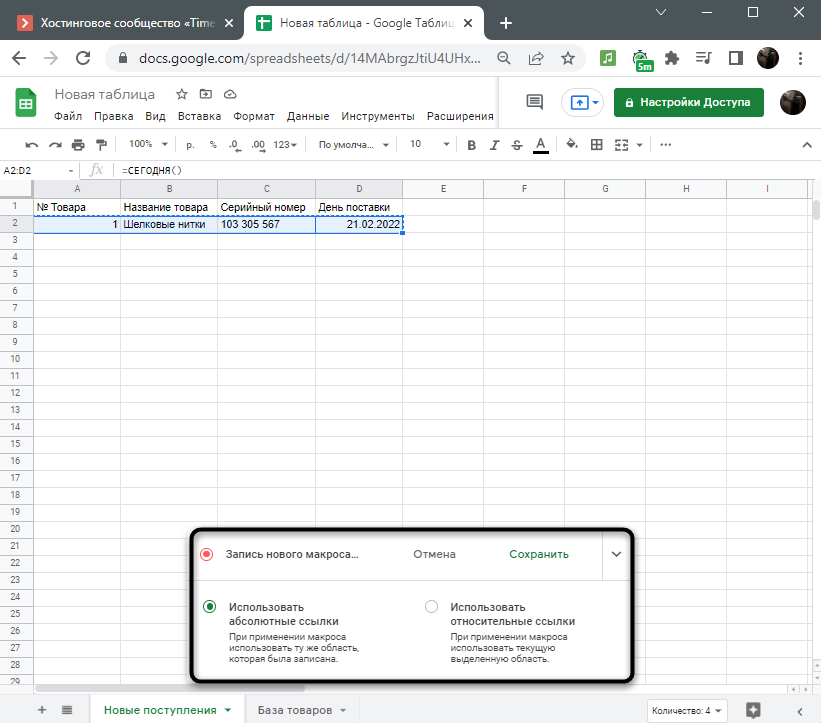
- Появится окно записи, значит, вы можете приступать к выполнению рутинных действий. Учитывайте, что макрос записывает абсолютно все изменения, поэтому старайтесь не делать лишних нажатий и редактирований ячеек.
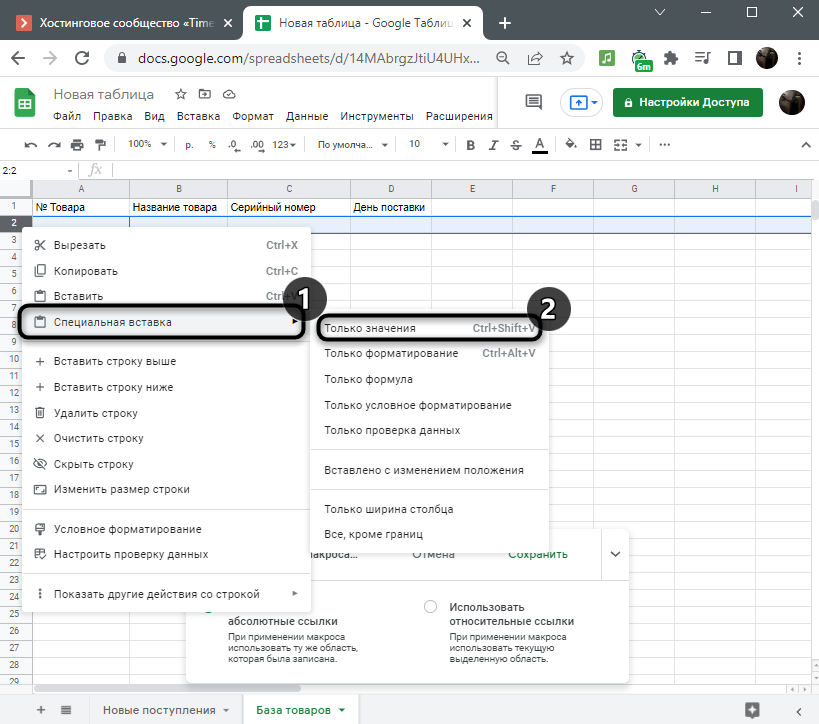
- Я скопировал всю строку для переноса в базу данных и использую специальную вставку «Только значения», чтобы избежать вставки функций, которые тут не нужны.
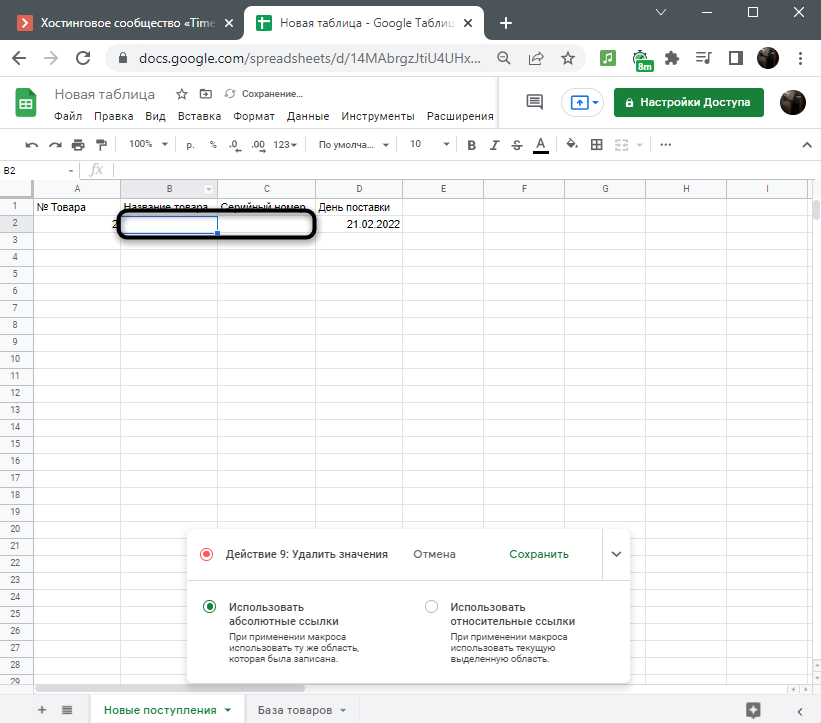
- Далее удаляю динамические значения, чтобы форма была готова для заполнения другими товарами.
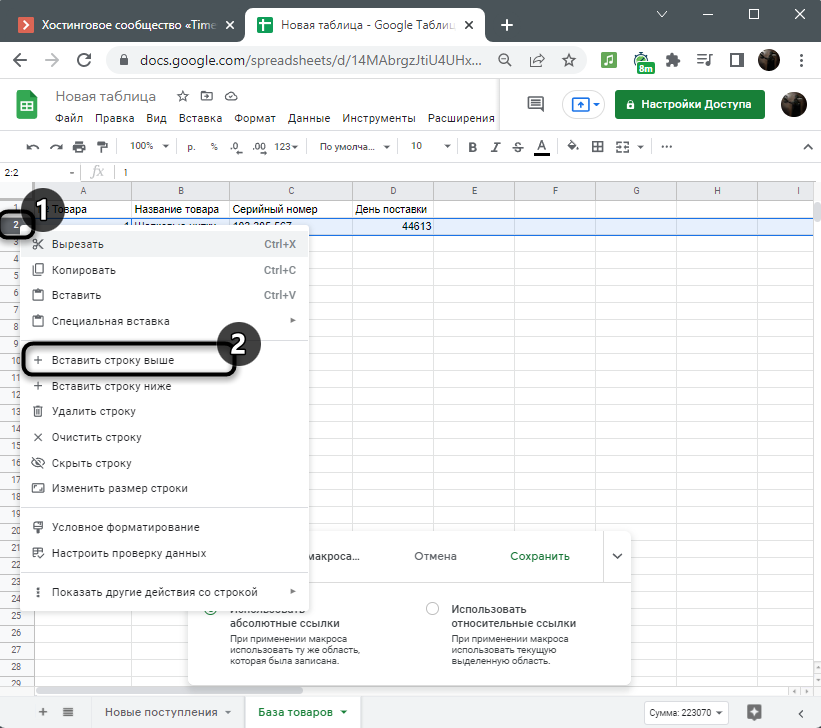
- В завершение на листе, куда была перенесена строка, создаю новую строку выше, чтобы обеспечить место для дальнейшего копирования.
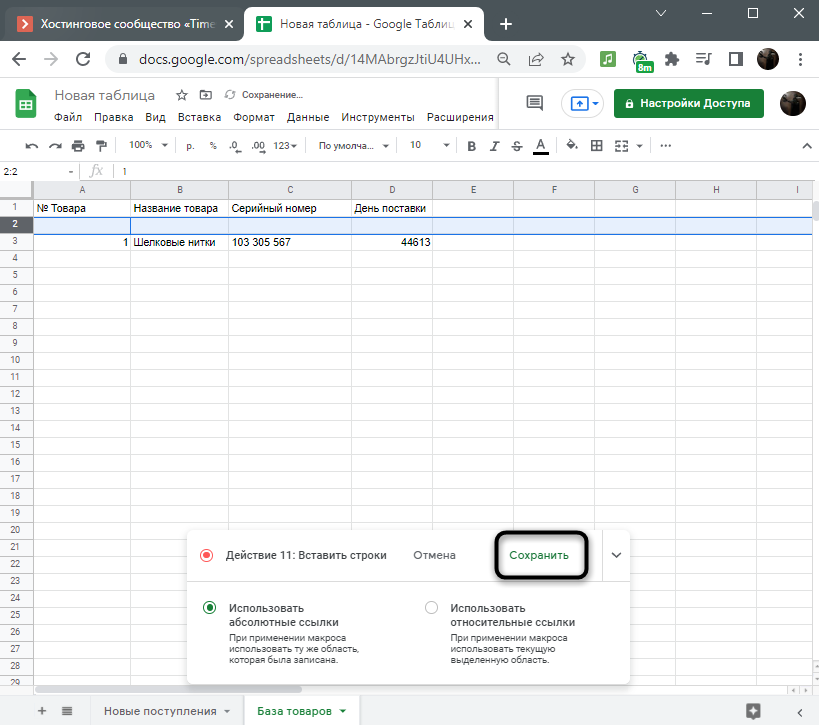
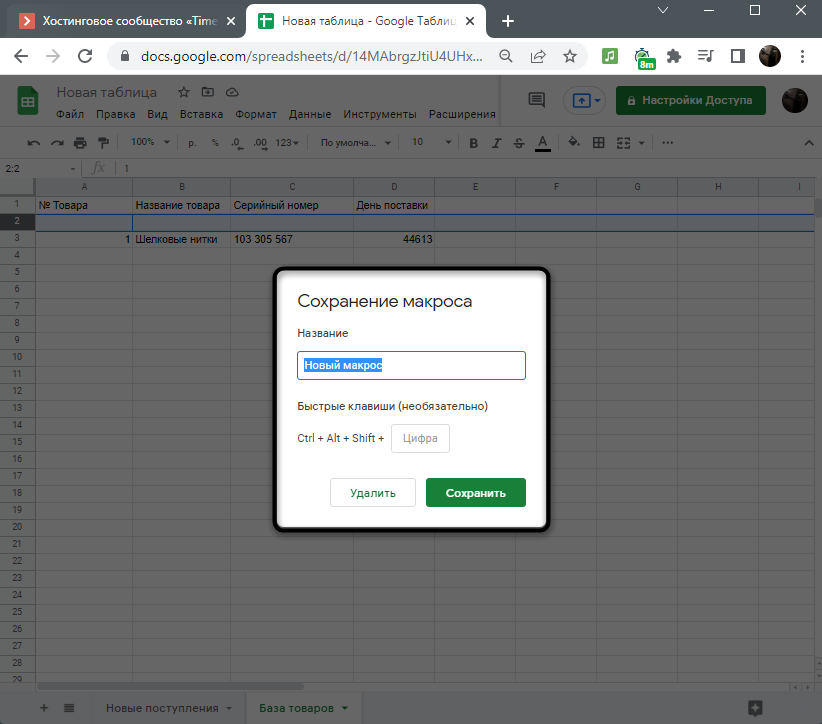
- Остается только нажать на «Сохранить», завершая тем самым запись макроса. Если вы не уверены, что все сделали правильно, щелкните на «Отмена», снова запустите запись и повторите действия.
- Задайте для макроса любое название на английском языке. Быстрые клавиши можно не задавать, поскольку далее разберемся с тем, как запускать скрипт при помощи графической кнопки.
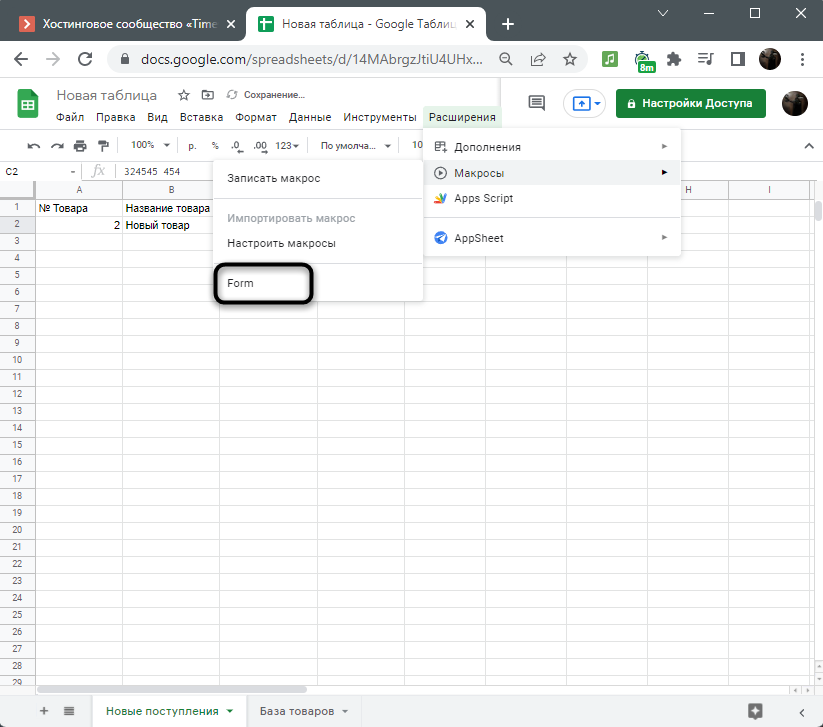
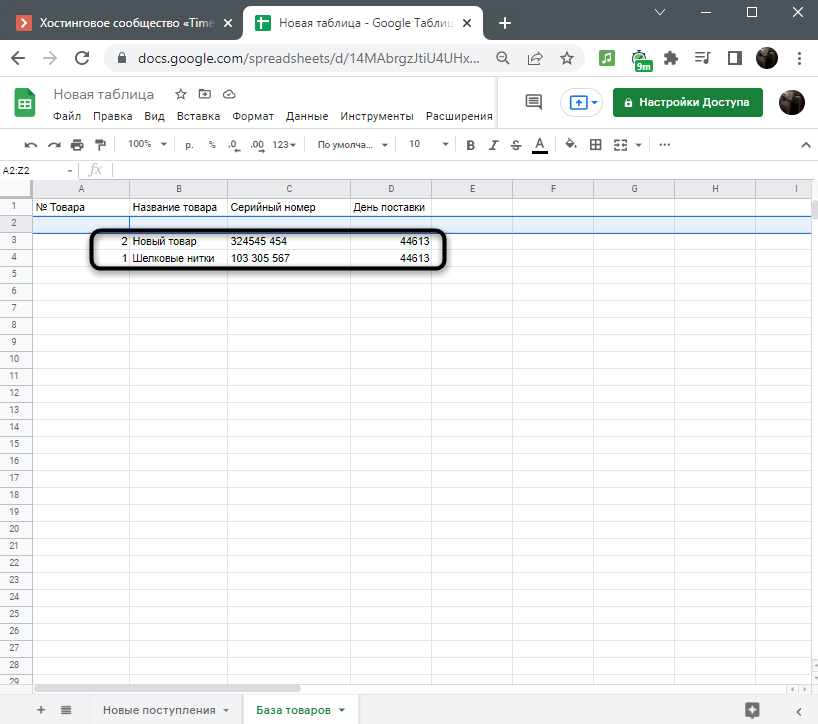
- Проверьте макрос через то же самое меню «Макросы», отыскав его по названию.
- Если результат вас устраивает, переходите к следующему шагу. В противном случае удалите текущую программу и создайте новую.
Назначение кнопки для запуска макроса
Как вы уже увидели выше, для запуска макроса приходится искать его через меню или запоминать горячую клавишу. Куда проще создать графическую кнопку, одно нажатие по которой быстро запустит выполнение программы. Благо в Google Таблицах это реализуемо при помощи вставки простого рисунка, что осуществляется так:
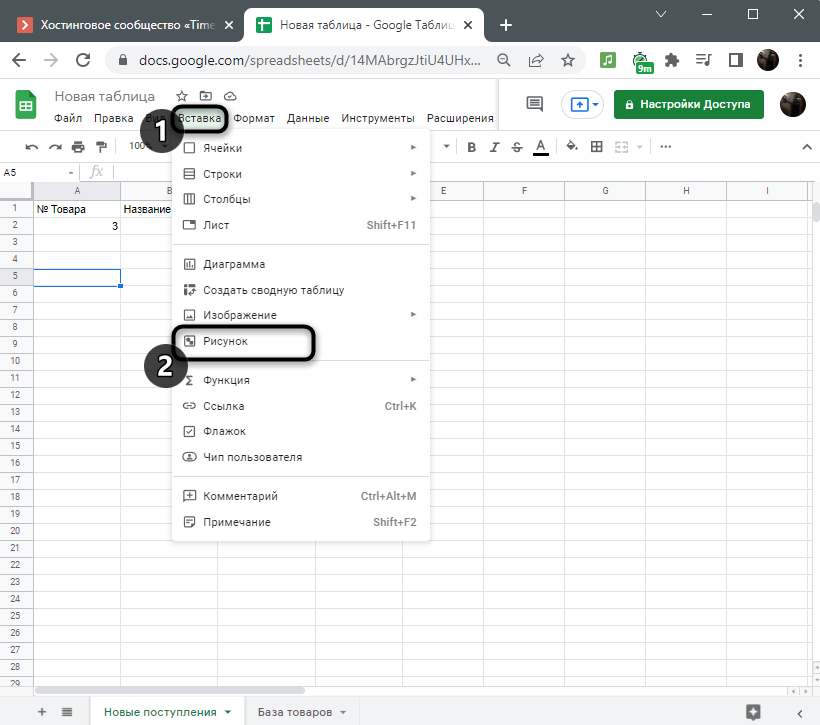
- Разверните меню «Вставка» и нажмите по пункту «Рисунок».
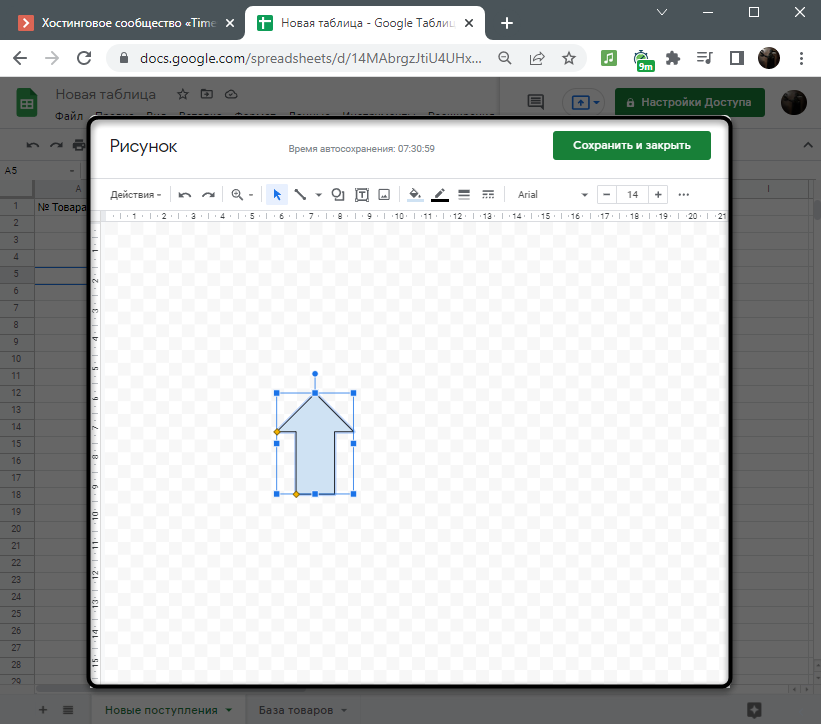
- Создайте любой рисунок или вставьте геометрическую фигуру, выбрав для нее подходящий размер. Можно даже использовать любой текст.
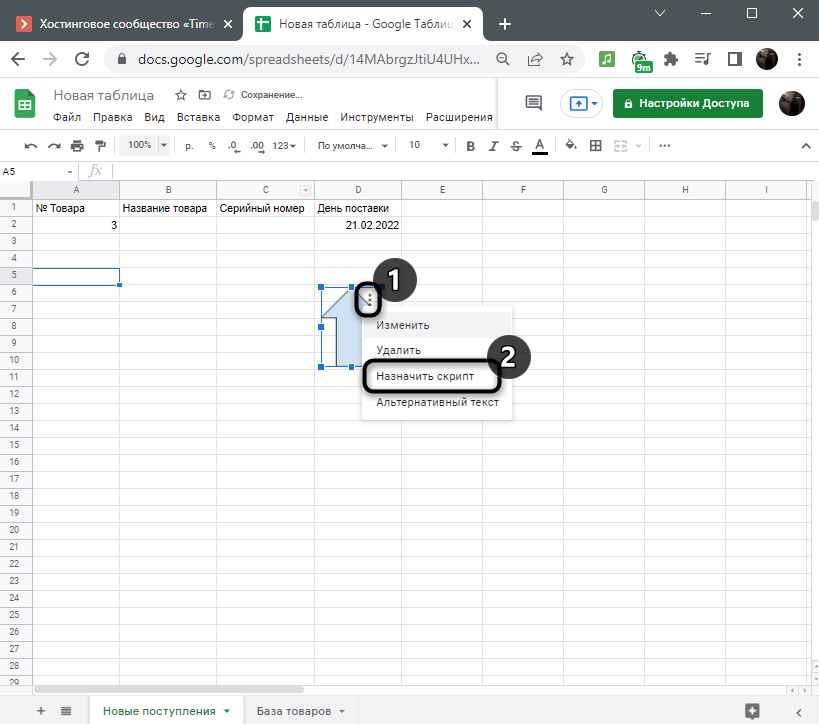
- Расположите рисунок на листе, щелкните по трем точкам справа от него и выберите «Назначить скрипт».
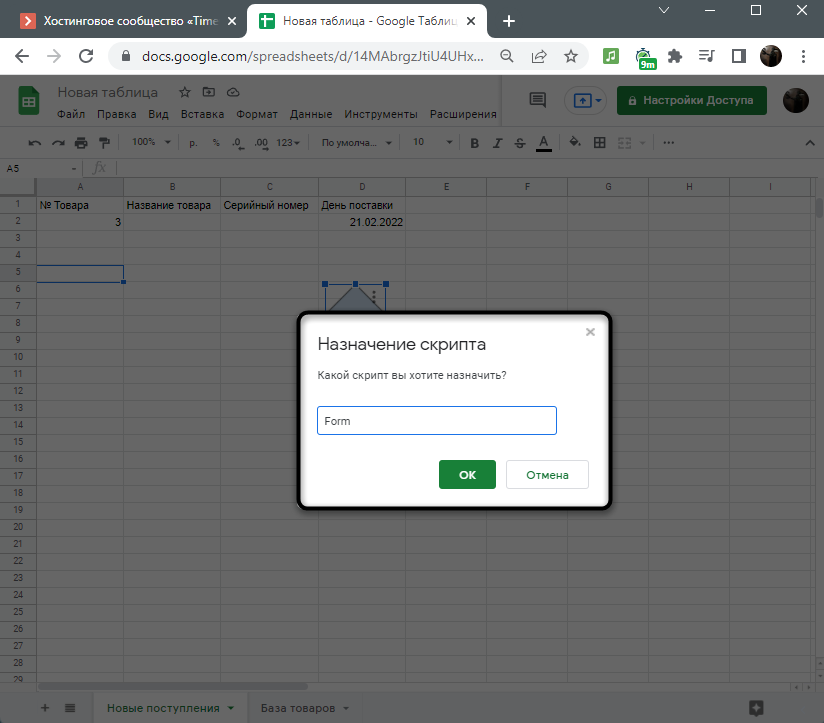
- В качестве скрипта укажите точное название макроса, который создали ранее.
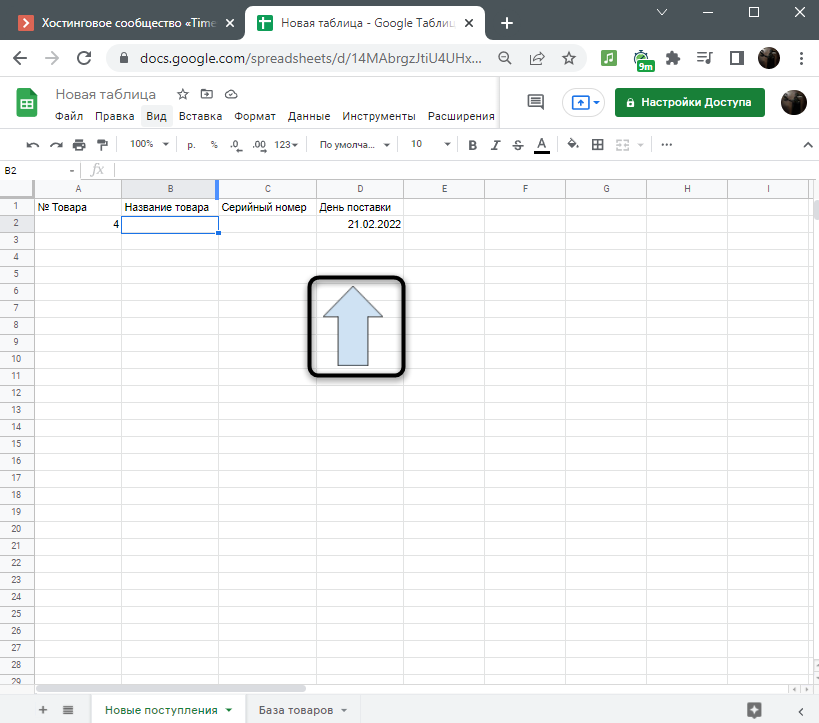
- Теперь кликните по картинке ЛКМ и убедитесь в том, что скрипт был успешно выполнен (на экране появится соответствующее уведомление).
К сожалению, я не могу рассказать обо всех возможных вариациях макросов, поскольку все зависит исключительно от того, какие действия хочет выполнить пользователь. Я показал лишь пример записи программы и рассмотрел интересную функцию с его запуском через графическую кнопку. Вам остается лишь понять, какие рутинные задачи вы желаете автоматизировать, и сделать это при помощи макросов в Гугл Таблицах.
