- Building XML using Python
- Prerequisites
- Example with Source Code
- Preparing Workspace
- Project Directory
- Creating Python Script
- Testing the Script
- py.xml: simple pythonic xml/html file generation
- a pythonic object model , please
- generating arbitrary xml structures
- basic example for generating html
- CSS-styling your html Tags
- More to come …
Building XML using Python
Building XML using Python programming language means creating an XML file or XML string using Python. We have seen how to parse or read an existing XML file or string using Python in my previous tutorial. Here we will see how to create an XML file or string using Python from scratch. We will not only create the XML file but also do pretty print the XML data. We have defined one method for pretty printing the XML elements.
Extensible Markup Language (XML) are the most widely used formats for data, because this format is very well supported by modern applications, and is very well suited for further data manipulation and customization. Therefore it is sometimes required to generate XML data using Python or other programming languages.
Prerequisites
Have Python installed in Windows (or Unix)
Pyhton version and Packages
Here I am using Python 3.6.6 version
Example with Source Code
Preparing Workspace
Preparing your workspace is one of the first things that you can do to make sure that you start off well. The first step is to check your working directory.
When you are working in the Python terminal, you need first navigate to the directory, where your file is located and then start up Python, i.e., you have to make sure that your file is located in the directory where you want to work from.
Let’s move on to the example…
Project Directory
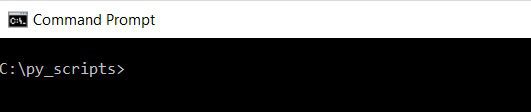
In the below image you see I have opened a cmd prompt and navigated to the directory where I have to create Python script for building XML using Python.
Creating Python Script
Now we will create a python script that will read the attached XML file in the above link and display the content in the console.
XML is an inherently hierarchical data format, and the most natural way to represent it is with a tree. We will be parsing the XML data using xml.etree.ElementTree. ElementTree represents the whole XML document as a tree, and Element represents a single node in this tree. Interactions with the whole document (reading and writing to/from files) are usually done on the ElementTree level. Interactions with a single XML element and its sub-elements are done on the Element level.
Here in the below Python XML builder script we import the required module. Then we define a method that does the task of pretty printing of the XML structure otherwise all will be written in one line and it would a bi difficult to read the XMl file.
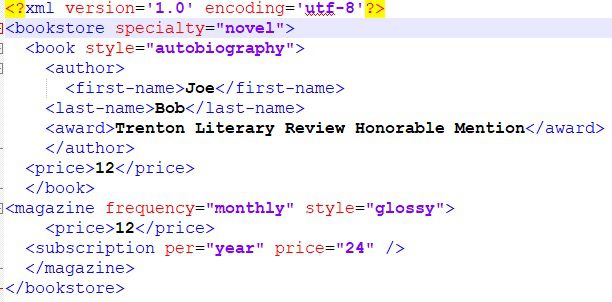
Next we create the root element called bookstore with attribute speciality that has value novel. Then we create sub-element of the root element called book with attribute style that has value autobiography and so on.
Finally we write the whole XML document into a file under the current directory where the Python script resides. We also include XML declaration and encoding as the first line of the XML structure.
import xml.etree.ElementTree as ET #pretty print method def indent(elem, level=0): i = "\n" + level*" " j = "\n" + (level-1)*" " if len(elem): if not elem.text or not elem.text.strip(): elem.text = i + " " if not elem.tail or not elem.tail.strip(): elem.tail = i for subelem in elem: indent(subelem, level+1) if not elem.tail or not elem.tail.strip(): elem.tail = j else: if level and (not elem.tail or not elem.tail.strip()): elem.tail = j return elem #root element root = ET.Element('bookstore', ) #book sub-element book = ET.SubElement(root, 'book', ) author = ET.SubElement(book, 'author') firstName = ET.SubElement(author, 'first-name') firstName.text = 'Joe' lastName = ET.SubElement(author, 'last-name') lastName.text = 'Bob' award = ET.SubElement(author, 'award') award.text = 'Trenton Literary Review Honorable Mention' price = ET.SubElement(book, 'price') price.text = str(12) #magazine sub-element magazine = ET.SubElement(root, 'magazine', ) price = ET.SubElement(magazine, 'price') price.text = str(12) subscription = ET.SubElement(magazine, 'subscription', ) #write to file tree = ET.ElementTree(indent(root)) tree.write('bookstore2.xml', xml_declaration=True, encoding='utf-8')Testing the Script
Now it’s time to test for the example on building XML using Python.
Simply run the above script you should see the generated bookstore2.xml file in the current directory. here is the below screen-shot of the output XML file.
That’s all. Hope, you got idea on building XML using Python.
py.xml: simple pythonic xml/html file generation
There are a plethora of frameworks and libraries to generate xml and html trees. However, many of them are large, have a steep learning curve and are often hard to debug. Not to speak of the fact that they are frameworks to begin with.
a pythonic object model , please
The py lib offers a pythonic way to generate xml/html, based on ideas from xist which uses python class objects to build xml trees. However, xist’s implementation is somewhat heavy because it has additional goals like transformations and supporting many namespaces. But its basic idea is very easy.
generating arbitrary xml structures
With py.xml.Namespace you have the basis to generate custom xml-fragments on the fly:
class ns(py.xml.Namespace): "my custom xml namespace" doc = ns.books( ns.book( ns.author("May Day"), ns.title("python for java programmers"),), ns.book( ns.author("why"), ns.title("Java for Python programmers"),), publisher="N.N", ) print doc.unicode(indent=2).encode('utf8')
will give you this representation:
books publisher="N.N"> book> author>May Dayauthor> title>python for java programmerstitle>book> book> author>whyauthor> title>Java for Python programmerstitle>book>books> In a sentence: positional arguments are child-tags and keyword-arguments are attributes.
On a side note, you’ll see that the unicode-serializer supports a nice indentation style which keeps your generated html readable, basically through emulating python’s white space significance by putting closing-tags rightmost and almost invisible at first glance 🙂
basic example for generating html
from py.xml import html # html namespace paras = "First Para", "Second para" doc = html.html( html.head( html.meta(name="Content-Type", value="text/html; charset=latin1")), html.body( [html.p(p) for p in paras])) print unicode(doc).encode('latin1')
Again, tags are objects which contain tags and have attributes. More exactly, Tags inherit from the list type and thus can be manipulated as list objects. They additionally support a default way to represent themselves as a serialized unicode object.
If you happen to look at the py.xml implementation you’ll note that the tag/namespace implementation consumes some 50 lines with another 50 lines for the unicode serialization code.
CSS-styling your html Tags
One aspect where many of the huge python xml/html generation frameworks utterly fail is a clean and convenient integration of CSS styling. Often, developers are left alone with keeping CSS style definitions in sync with some style files represented as strings (often in a separate .css file). Not only is this hard to debug but the missing abstractions make it hard to modify the styling of your tags or to choose custom style representations (inline, html.head or external). Add the Browers usual tolerance of messyness and errors in Style references and welcome to hell, known as the domain of developing web applications 🙂
By contrast, consider this CSS styling example:
class my(html): "my initial custom style" class body(html.body): style = html.Style(font_size = "120%") class h2(html.h2): style = html.Style(background = "grey") class p(html.p): style = html.Style(font_weight="bold") doc = my.html( my.head(), my.body( my.h2("hello world"), my.p("bold as bold can") ) ) print doc.unicode(indent=2)
This will give you a small’n mean self contained represenation by default:
html> head/> body style="font-size: 120%"> h2 style="background: grey">hello worldh2> p style="font-weight: bold">bold as bold canp>body>html> Most importantly, note that the inline-styling is just an implementation detail of the unicode serialization code. You can easily modify the serialization to put your styling into the html.head or in a separate file and autogenerate CSS-class names or ids.
Hey, you could even write tests that you are using correct styles suitable for specific browser requirements. Did i mention that the ability to easily write tests for your generated html and its serialization could help to develop _stable_ user interfaces?
More to come …
For now, i don’t think we should strive to offer much more than the above. However, it is probably not hard to offer partial serialization to allow generating maybe hundreds of complex html documents per second. Basically we would allow putting callables both as Tag content and as values of attributes. A slightly more advanced Serialization would then produce a list of unicode objects intermingled with callables. At HTTP-Request time the callables would get called to complete the probably request-specific serialization of your Tags. Hum, it’s probably harder to explain this than to actually code it 🙂
© Copyright 2010, holger krekel et. al. Revision 6b219734 .
Versions master latest stable Downloads pdf html epub On Read the Docs Project Home Builds Free document hosting provided by Read the Docs.