- Free web server python
- Deploy your Python app
- Conclusion
- 4 Free hosting platforms for python web app with step-by-step process
- What is a hosting platform and why do I need one?
- Как хостить телеграм-бота (и другие скрипты на Python) на Repl.it бесплатно 24/7
- Шаг 0 — регистрация бота
- Шаг 1 — регистрируемся на Repl.it
- Шаг 2 — Пишем код бота
- Шаг 3 — Создаем Flask-сервер
- Шаг 4 — настраиваем службу мониторинга
- Host, run, and code Python in the cloud!
- Start hosting quickly
- Develop anywhere
- Teach and learn
- Amazing support
- Get a Python website in minutes
- Your choice
- Your website
- Easy scaling
- Python coding on the web: 29,582,896 consoles served!
- Batteries included
- Powerful servers
- Coding on the go
- Your files, everywhere
- Simple automation
- A Python learning environment with everything ready to go
- Distributing assignments and monitoring progress is easy
- All your students have the same environment
- . and they can work together
Free web server python
Hosting Python applications is easy, finding a completely free Python hosting service that is reliable is not. This post will show you how you can host your Python app on Qovery — A 100% free hosting platform (no credit card required!!) used by 1800+ developers in 102 countries 🌎.
With Qovery you can deploy your Python app with PostgreSQL, MySQL, and MongoDB databases for free.
Disclaimer: I am the co-founder of Qovery.
I am pleased to announce that Qovery supports individual developers / open source and non profit projects to host up to 3 applications (database included) for free. Our business model is based on Enterprise hosting, which gives us the possibility to offer generous free plans. Read more — In exchange we ask for product feedback — join our Discord
You can read more about Qovery vs. Heroku .
Deploy your Python app
⚠️ You need to have a Python project on Github or Gitlab that you want to deploy.
Given you have registered on to Qovery and you are logged into Qovery, follow the steps below:
- Go to Qovery, click the button “Create a new project” button in the middle of Qovery
- Give a name to your project — in my case «Quotes»
- Add an application
- After that, click “I have an application”.
Then select «Github» or «Gitlab» and pick your repository — mine is «python-postgresql». Give a name to your app Select PostgreSQL Select the version of your DB and give it a friendly name Deploy and TADA
Conclusion
Hosting a project with Python should not be a hassle. Qovery got your back and provide everything that you need like free SSL, database, CDN to deploy your Python apps.
Give it a try now and leave me your feedback in the comments👇.
⚠️ Important Note ⚠️
If your deployment failed, don’t forget to:
- Provide a valid Dockerfile.
- Declare your Python app port in your .qovery.yml . Read this doc
4 Free hosting platforms for python web app with step-by-step process

Hi developers, I am Yash Makan and in today’s post, we are going to discuss 4 platforms where you can host your flask or Django app. If you’ve completed a website or API using python or planning to create one then this post is so right for you. Also, read till the end as in the end, I am going to explain step by step the complete process of uploading your web app to the internet. So without any further ado let’s start!
What is a hosting platform and why do I need one?
- One is to connect your localhost with a tunnel using ngrok. Ngrok exposes your localhost to the internet so that everyone can access it by a specific URL provided by it. I don’t recommend this way if you want your website 24×7 as you have to run your program 24×7 which is quite not the case but if you just want to share your localhost for some time and you don’t want the connection to be connected then you can choose this method. For more info, you can read it here by Abayomi Ogunnusi.
- The second way is to host your code to someone else’s server. This someone else server is what we call the hosting platform. Here these servers run your code 24×7 at some specific domain. So if you want to host then below are your best options according to me.

We’re a place where coders share, stay up-to-date and grow their careers.
Как хостить телеграм-бота (и другие скрипты на Python) на Repl.it бесплатно 24/7
Очень часто возникающий вопрос: где можно разместить скрипты на Python, Flask-приложение, телеграм или дискорд ботов?
Один из вариантов — на своем компьютере при наличии внешнего IP-адреса и опыта в настройке проброса портов на роутере. Или другие сервисы, как правило, требующие платной подписки.
Цель этот статьи — подробная инструкция, как сделать хостинг Python-скриптов бесплатно и доступным 24/7 на примере телеграм-бота
Шаг 0 — регистрация бота
Существует огромное количество туториалов, как получить токен, поэтому все по-простому. Находим в телеграм BotFather, регистрируем нового бота, выбираем ему имя, получаем токен вида: 127466748171:HJfwijfw88jf32lc9FHjwpfkfgwerhjf
Он нам понадобится в дальнейшем

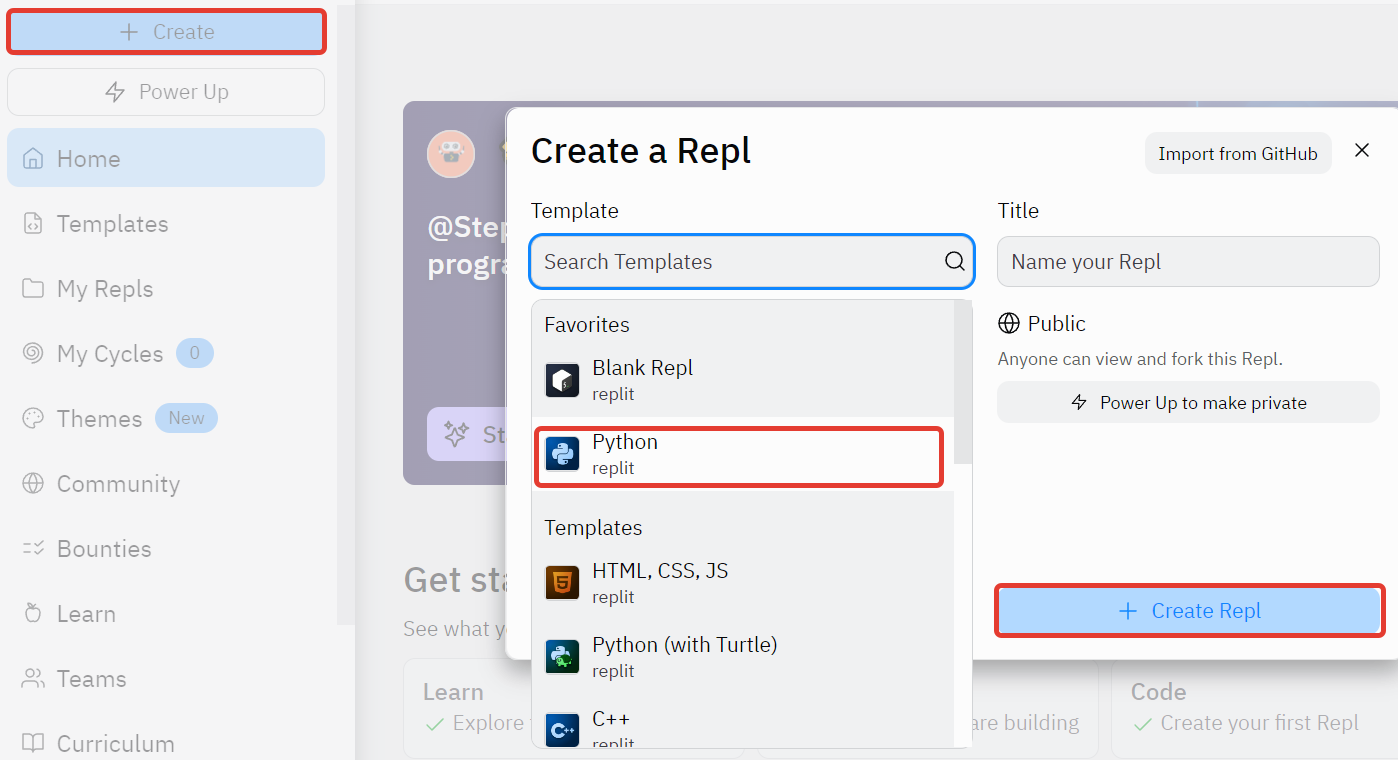
Шаг 1 — регистрируемся на Repl.it
Создаем новый проект на Python
Шаг 2 — Пишем код бота
В проекте будет создан файл main.py. В нем размещаем код бота:

Тут стоит обратить на установку модуля pytelegrambotapi: импортируем сначала pip и потом выполняем его через: pip.main([‘install’, ‘pytelegrambotapi’]).
В этом случае при запуске никаких дополнительных действий для установки не потребуется
import os from background import keep_alive #импорт функции для поддержки работоспособности import pip pip.main(['install', 'pytelegrambotapi']) import telebot import time bot = telebot.TeleBot('СЮДА ВСТАВЬТЕ ВАШ ТОКЕН') @bot.message_handler(content_types=['text']) def get_text_message(message): bot.send_message(message.from_user.id,message.text) # echo-функция, которая отвечает на любое текстовое сообщение таким же текстом keep_alive()#запускаем flask-сервер в отдельном потоке. Подробнее ниже. bot.polling(non_stop=True, interval=0) #запуск ботаШаг 3 — Создаем Flask-сервер
Создаем в проекте еще один файл background.py В нем будет запущен Flask-сервер, который будет принимать запросы от сервиса мониторинга и использоваться для поддержания работоспособности скрипта на ReplIt.
Flask — модуль на python для разработки веб-приложений. Мы создадим «шаблон» сервера, в котором только одна страница, необходимая для нашей задачи.
Все дело в том, что в бесплатном режиме запущенный скрипт на Replit будет остановлен спустя некоторое время (10-30 мин) после закрытия вкладки браузера.
Однако, если к веб-серверу был сделан запрос, таймер сбрасывается и скрипт продолжает работать.
from flask import Flask from flask import request from threading import Thread import time import requests app = Flask('') @app.route('/') def home(): return "I'm alive" def run(): app.run(host='0.0.0.0', port=80) def keep_alive(): t = Thread(target=run) t.start() Важно, что сервер запускается в файле не напрямую, а в отдельном потоке t = Thread(target=run). Это обеспечит возможность одновременной работы Flask-сервера и телеграм-бота.

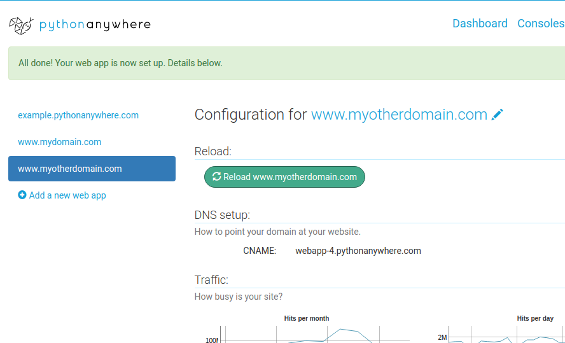
После запуска в верхнем правом углу появилась ссылка (она потребуется чуть позже) по которой можно увидеть результат работы Flask-сервера (в нашем случае сообщение I’m alive).
На этом этапе у нас работает эхо-телеграм-бот и веб-сервер, доступный из вне по адресу вида: YOUR_REPL.your_nickname.repl.co
Однако, спустя 10-30 минут после закрытия вкладки браузера скрипт будет остановлен. Вся хитрость в том, что если «кто-то» будет периодически открывать ссылку, ведущую на страницу нашего веб сервера скрипты будут продолжать работать бесконечно долго.
Шаг 4 — настраиваем службу мониторинга
Для того, чтобы скрипт работал постоянно, воспользуемся сервисом UpTimerRobot. Он будет раз в 5 минут создавать запрос к нашему web-серверу и продлевать время его работы. Регистрация не представляет трудности, поэтому перейдем к следующему этапу.
После входа в личный кабинет, создаем новый монитор

В настройках нового монитора нужно указать название и ссылку, которую мы получили при запуске скрипта выше. Время опросы указываем — каждые 5 минут.

Сохраняем монитор и возвращаемся в ReplIt. В консоле сервера видим входящие обращения от службы мониторинга

Это значит, что все получилось и наш скрипт будет работать 24/7. Можно работать над ним и развивать проект!
Host, run, and code Python in the cloud!
Get started for free. Our basic plan gives you access to machines with a full Python environment already installed. You can develop and host your website or any other code directly from your browser without having to install software or manage your own server.
Need more power? Upgraded plans start at $5/month.

Start hosting quickly
Just write your application. No need to configure or maintain a web server — everything is set up and ready to go.

Develop anywhere
Take your development environment with you! If you have a browser and an Internet connection, you’ve got everything you need.

Teach and learn
PythonAnywhere is a fully-fledged Python environment, ready to go, for students and teachers — concentrate on teaching, not on installation hassles.

Amazing support
Need help with PythonAnywhere? If you get in touch, you can talk directly with the development team. Help for developers, from developers.
Get a Python website in minutes
We make a normally complicated process very simple, letting you focus on creating exciting applications for your users. Launching a new Django project is a simple process taking just a couple of minutes. No need to manage a web server or maintain a Linux machine. No need to install security patches. It just works.
Your choice
We have quickstart installers for Django, web2py, Flask, and Bottle — we can also handle any other WSGI web framework that you want to use, and it’s probably already installed.
Your website
Want to host your own domain at PythonAnywhere? Our paid accounts do that for you. And free users don’t get left out — http://yourusername.pythonanywhere.com/ works for everyone.
Easy scaling
A $5 Hacker account at PythonAnywhere can easily support a 10,000 hit/day website. But when your site grows and you need to support 100 times that traffic, we’re still there — you just need to upgrade your account.
Python coding on the web: 29,582,896 consoles served!
PythonAnywhere makes it easy to create and run Python programs in the cloud. You can write your programs in a web-based editor or just run a console session from any modern web browser. There’s storage space on our servers, and you can preserve your session state and access it from anywhere, with no need to pay for, or configure, your own server. Start work on your work desktop, then later pick up from where you left off by accessing exactly the same session from your laptop.
Batteries included
With Python versions 2.7, 3.6, 3.7, 3.8, 3.9 and 3.10, and all the goodies you normally find in a Python installation, PythonAnywhere is also preconfigured with loads of useful libraries, like NumPy, SciPy, Mechanize, BeautifulSoup, pycrypto, and many others. Check out our full list of batteries included.
Powerful servers
PythonAnywhere runs on super-powerful servers hosted by Amazon EC2, and you can take full advantage of that. Without paying a penny, you can run simple Python programs to help you explore your ideas. For heavy-duty processing, you only pay for what you use, so you can get access to teraflops of power without needing to explain yourself to the electricity company.
Coding on the go

It’s hard to write programs or play with ideas on the go. Because PythonAnywhere runs on our servers and displays in your web browser, you can write Python applications from your iPad, phone, or smart TV just as easily as you can from your computer. It works on the iPad, and we are in beta for Android devices.
Your files, everywhere
It’s easy to get your stuff into and out of PythonAnywhere — you can upload and download files from our web UI, or bring up a command line to work with your git, mercurial or subversion projects from GitHub, Bitbucket, or from any public source code repository. With 512Mb of free disk space, you don’t need to worry about running out of space. And paying users can get more space, and use scp and SFTP.
Simple automation
Use PythonAnywhere’s scheduled tasks to run your Python scripts periodically. Scrape websites, archive tweets, connect back to your home automation system to turn the toaster on. the choice is yours!
A Python learning environment with everything ready to go
Python is a great language for teaching, but getting it installed and set up on all your students’ computers can be less than easy. PythonAnywhere provides an environment that’s ready to go — including a syntax-highlighting, error-checking editor, Python 2 and 3 consoles, and a full set of batteries included. Avoid all the hassles of getting Python installed on everyone’s laptop, and making sure everyone can pip install all the right packages.

Distributing assignments and monitoring progress is easy
Once a student has nominated you as their teacher, you can see their files and Python consoles, so you can help them more easily. You can copy files into their accounts so that you can give them a starting point for their assignments, and you can see their solutions.
We can even create student accounts in bulk for you, and pre-populate them with files that you provide — just let us know!
All your students have the same environment
The same operating system, the same console, the same text editor — save yourself from having to customise your lessons and instructions for Windows/Mac/Linux, and from having to debug issues in different shells and editors.
. and they can work together
Your students can choose to share their consoles with each other, too — so they can work on group projects remotely, or help each other in-class.