Работа с формами
Одно из главнейших достоинств PHP — то, как он работает с формами HTML. Здесь основным является то, что каждый элемент формы автоматически становится доступным вашим программам на PHP. Для подробной информации об использовании форм в PHP читайте раздел Переменные из внешних источников. Вот пример формы HTML:
Пример #1 Простейшая форма HTML
В этой форме нет ничего особенного. Это обычная форма HTML без каких-либо специальных тегов. Когда пользователь заполнит форму и нажмёт кнопку отправки, будет вызвана страница action.php . В этом файле может быть что-то вроде:
Пример #2 Выводим данные формы
Пример вывода данной программы:
Здравствуйте, Сергей. Вам 30 лет.
Если не принимать во внимание куски кода с htmlspecialchars() и (int) , принцип работы данного кода должен быть прост и понятен. htmlspecialchars() обеспечивает правильную кодировку «особых» HTML-символов так, чтобы вредоносный HTML или Javascript не был вставлен на вашу страницу. Поле age, о котором нам известно, что оно должно быть число, мы можем просто преобразовать в int , что автоматически избавит нас от нежелательных символов. PHP также может сделать это автоматически с помощью модуля filter. Переменные $_POST[‘name’] и $_POST[‘age’] автоматически установлены для вас средствами PHP. Ранее мы использовали суперглобальную переменную $_SERVER , здесь же мы точно так же используем суперглобальную переменную $_POST , которая содержит все POST-данные. Заметим, что метод отправки (method) нашей формы — POST. Если бы мы использовали метод GET, то информация нашей формы была бы в суперглобальной переменной $_GET . Кроме этого, можно использовать переменную $_REQUEST , если источник данных не имеет значения. Эта переменная содержит смесь данных GET, POST, COOKIE.
В PHP можно также работать и с XForms, хотя вы найдёте работу с обычными HTML-формами довольно комфортной уже через некоторое время. Несмотря на то, что работа с XForms не для новичков, они могут показаться вам интересными. В разделе возможностей PHP у нас также есть короткое введение в обработку данных из XForms.
User Contributed Notes 3 notes
According to the HTTP specification, you should use the POST method when you’re using the form to change the state of something on the server end. For example, if a page has a form to allow users to add their own comments, like this page here, the form should use POST. If you click «Reload» or «Refresh» on a page that you reached through a POST, it’s almost always an error — you shouldn’t be posting the same comment twice — which is why these pages aren’t bookmarked or cached.
You should use the GET method when your form is, well, getting something off the server and not actually changing anything. For example, the form for a search engine should use GET, since searching a Web site should not be changing anything that the client might care about, and bookmarking or caching the results of a search-engine query is just as useful as bookmarking or caching a static HTML page.
Also, don’t ever use GET method in a form that capture passwords and other things that are meant to be hidden.
How to Create a Simple HTML and PHP Form
David Clinton
If you have a website, it’s only a matter of time before you feel the irrepressible urge to gather information about your site’s users.
The most direct way to do that is to ask them some questions. And, in the HTML world, the best tool for recording the answers to those questions is the simple HTML form.
In this guide, I’m going to show you how that’s done using basic HTML and just a dash of PHP.
As you’ll soon see, the HTML you’ll need to present a form is, in fact, pretty straightforward. But that’ll only solve half of your problem.
A form will prompt users to enter whatever information you’re asking for. But, if we leave it there, nothing will actually happen when they hit the Submit button. And that’s because we don’t have anything running on our server to collect and process that information.
Building the back end that’ll integrate your form with a database engine or an associated application can get really complicated and is way beyond our scope here. But, once we understand the HTML form here, I will show you how you can add some PHP code to handle the code in a basic way.
This article comes from my Complete LPI Web Development Essentials Study Guide course. If you’d like, you can follow the video version here:
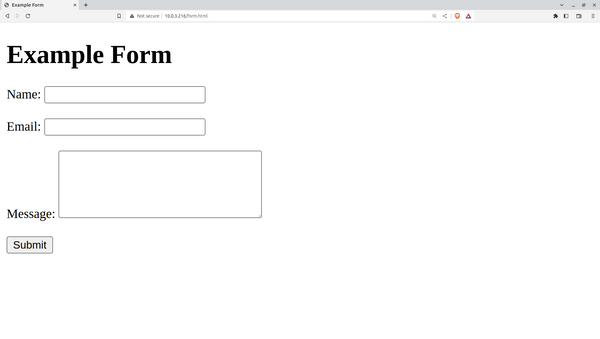
Feel free to type something into the Name, Email, and Message fields, but there’s no point hitting the Submit button just yet. That’s because, without some PHP magic, nothing will happen. And I haven’t shown you that PHP yet.
How to Write a PHP Script to Capture User Inputs
PHP, by the way, is a web-friendly scripting language that’s a popular choice for adding programmed functionality to web pages. In fact, you can even incorporate PHP code directly into your HTML code. But here’s how it’ll look on its own, in a file called submit.php :
"; echo "Email: " . $email . "
"; echo "Message: " . $message . "
"; > ?>
Remember how our HTML post method sent the form data to this file? Well here’s what PHP is going to do with it. The if block looks for posted data and then organizes it by field: name, email, and message. Normally, you’d probably send that data along to a database but, for simplicity, this code will just print it back to the page to prove that we actually had it.
Let’s see what that’ll look like. I click the Submit button and the form is replaced by the text I’d entered. Nothing spectacular, but it does nicely illustrate how forms work with PHP.
With this simple code, you’re now able to create your own HTML forms that collect and process user input.
Your next step will be to connect with a back end database so you can save and manipulate that data. For for now, enjoy this accomplishment!


