- Saved searches
- Use saved searches to filter your results more quickly
- jhund/js-finite-state-machine
- Name already in use
- Sign In Required
- Launching GitHub Desktop
- Launching GitHub Desktop
- Launching Xcode
- Launching Visual Studio Code
- Latest commit
- Git stats
- Files
- README.md
- About
- Finite state machine javascript
- # Super quick start
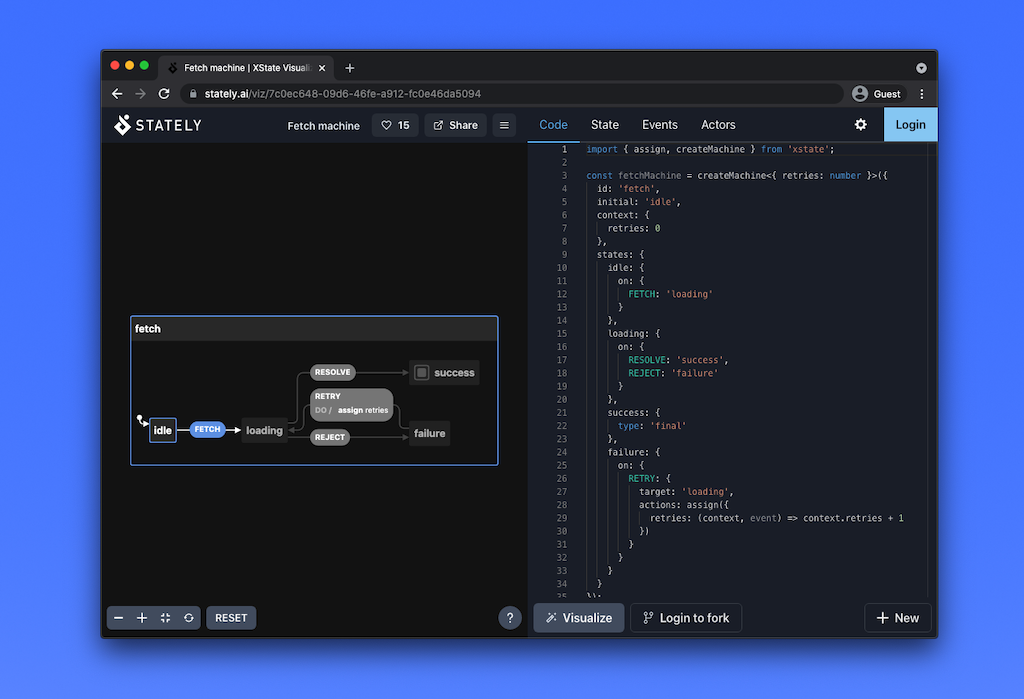
- # Visualizer
- # Why?
- # Finite State Machines
- # Hierarchical (Nested) State Machines
- # Parallel State Machines
- # History States
- # Sponsors
- # SemVer Policy
- # Breaking changes
- # TypeScript changes
- # Packages
Saved searches
Use saved searches to filter your results more quickly
You signed in with another tab or window. Reload to refresh your session. You signed out in another tab or window. Reload to refresh your session. You switched accounts on another tab or window. Reload to refresh your session.
A simple Javascript statemachine. Great for managing UI state.
jhund/js-finite-state-machine
This commit does not belong to any branch on this repository, and may belong to a fork outside of the repository.
Name already in use
A tag already exists with the provided branch name. Many Git commands accept both tag and branch names, so creating this branch may cause unexpected behavior. Are you sure you want to create this branch?
Sign In Required
Please sign in to use Codespaces.
Launching GitHub Desktop
If nothing happens, download GitHub Desktop and try again.
Launching GitHub Desktop
If nothing happens, download GitHub Desktop and try again.
Launching Xcode
If nothing happens, download Xcode and try again.
Launching Visual Studio Code
Your codespace will open once ready.
There was a problem preparing your codespace, please try again.
Latest commit
Git stats
Files
Failed to load latest commit information.
README.md
This library implements a simple Javascript Finite State Machine. I use it e.g. to manage a fairly complex HTML form with a number of view states.
- 3 types of transitions: «specific», «from any state», «default»
- transition callbacks
- event/context specific data (passed to transition callback)
- debug mode
- no runtime dependencies
- works great with jQuery, etc.
- complete unit test coverage (using qunit)
This finite state machine implements a simple stop watch that can be powered on/off, reset, started and stopped.
// Initialize FSM with initial state and instance specific data var fsm = new FSM("Power Off", < name: "Jo's Stop Watch", display: "blank" >); // "specific" transitions // API: fsm.addTransition(events, currentStates, callback, nextState) // This is a transitional state. As soon as fsm enters "Power On", it sends itself the // "Press Reset Button" event and transitions to the "Reset state" fsm.addTransition( "Press Power Button", "Power Off", function() < this.sendEvent("Press Reset Button"); >, "Power On" ); // This transition handles the same event for two different current states fsm.addTransition( "Press Reset Button", ["Power On", "Stopped"], function() < this.data.display = "00:00:00"; >, "Reset" ); fsm.addTransition( "Press Start/Stop Button", ["Reset", "Stopped"], function()< this.data.display = "00:01:RR"; >, "Running" ); fsm.addTransition( "Press Start/Stop Button", "Running", function()< this.data.display = "00:03:34"; >, "Stopped" ); // "from any state" transitions // We already specified a transition for "Press Power Button" event on "Power Off" current // state above. This specification here handles the same event for all other current states. fsm.addTransitionFromAnyState( "Press Power Button", function() < this.data.display = "blank"; >, "Power Off" ); // Handles two different events on any state. We specify these only to avoid the // "Transition is undefined" error. // Don't provide next state, so that nothing changes (loopback) fsm.addTransitionFromAnyState( ["Press Start/Stop Button", "Press Reset Button"], null ); Once the fsm is initialized, you can start using it:
fsm.sendEvent("Press Power Button"); // Power it on fsm.currentState // "Reset" fsm.data.display // "00:00:00" fsm.sendEvent("Press Start/Stop Button"); // Start timer fsm.currentState // "Running" fsm.data.display // "00:01:RR" fsm.sendEvent("Press Start/Stop Button"); // Stop timer fsm.currentState // "Stopped" fsm.data.display // "00:03:34" fsm.sendEvent("Press Start/Stop Button"); // Restart timer fsm.currentState // "Running" fsm.data.display // "00:01:RR" fsm.sendEvent("Press Start/Stop Button"); // Stop timer fsm.currentState // "Stopped" fsm.data.display // "00:03:34" fsm.sendEvent("Press Reset Button"); // Reset timer fsm.currentState // "Reset" fsm.data.display // "00:00:00" fsm.sendEvent("Press Power Button"); // Power it off fsm.currentState // "Power Off" fsm.data.display // "blank" - Include the «js-finite-state-machine.js» library in your HTML page.
- Initialize as many state machines as you need.
- Send events to the state machine, e.g. based on user actions (via event observers).
- Let the state machine handle your view states: Show and hide form elements, reset elements, etc.
- FSM: a finite state machine. You can have multiple FMSs at the same time. Just instantiate each one with var f = new FSM(. ).
- State: The FSM is in one state at a time. You get it via f.currentState as string.
- Event: You can send an event to your FSM to trigger a state transition: f.sendEvent(«Event Name»). If you have specified a transition for the given event and current state, the FSM will perform a successful transition. Otherwise it will throw a «Transition is undefined» error.
- Transition: Given a currentState and an event, your FSM will transition according to the specified transitions.
- Callback: For each transition, you can specify a callback that is executed during a transition (after currentState was changed to new state).
- Current State: The state before a transition.
- New State: The state after a transition.
- Initial State: The FSM’s start state when it comes into existence.
There are three types of transitions:
- «specific» — for specific currentStates and events
- «from any state» — for specific events, applicable to any currentState
- «default» — one transition that is applied if no matching «specific» or «from any state» transitions are found
When you send an event to the FSM, it tries to find a matching transition. It looks in the following order:
And it will apply the first transition it finds. If it cannot find a matching transition, it throws a «Transition is undefined» error.
JS Finite State Machine is Copyright (c) 2011 by Jo Hund, ClearCove Software Inc.
JS Finite State Machine is licensed under the MIT license.
About
A simple Javascript statemachine. Great for managing UI state.
Finite state machine javascript
Get started by forking one of these templates on CodeSandbox:
# Super quick start
import createMachine, interpret > from 'xstate'; // State machine definition // machine.transition(. ) is a pure function used by the interpreter. const toggleMachine = createMachine( id: 'toggle', initial: 'inactive', states: inactive: on: TOGGLE: 'active' > >, active: on: TOGGLE: 'inactive' > > > >); // Machine instance with internal state const toggleActor = interpret(toggleMachine); toggleActor.subscribe((state) => console.log(state.value)) toggleActor.start(); // => logs 'inactive' toggleActor.send( type: 'TOGGLE' >); // => logs 'active' toggleActor.send( type: 'TOGGLE' >); // => logs 'inactive' # Visualizer
# Why?
Statecharts are a formalism for modeling stateful, reactive systems. This is useful for declaratively describing the behavior of your application, from the individual components to the overall application logic.
(opens new window) ) or check out these resources for learning about the importance of finite state machines and statecharts in user interfaces:
(opens new window) (For XState specific questions, please use the GitHub Discussions
# Finite State Machines
import createMachine > from 'xstate'; const lightMachine = createMachine( id: 'light', initial: 'green', states: green: on: TIMER: 'yellow' > >, yellow: on: TIMER: 'red' > >, red: on: TIMER: 'green' > > > >); const currentState = 'green'; const nextState = lightMachine.transition(currentState, type: 'TIMER' >).value; // => 'yellow' # Hierarchical (Nested) State Machines
import createMachine > from 'xstate'; const pedestrianStates = initial: 'walk', states: walk: on: PED_TIMER: 'wait' > >, wait: on: PED_TIMER: 'stop' > >, stop: > > >; const lightMachine = createMachine( id: 'light', initial: 'green', states: green: on: TIMER: 'yellow' > >, yellow: on: TIMER: 'red' > >, red: on: TIMER: 'green' >, . pedestrianStates > > >); const currentState = 'yellow'; const nextState = lightMachine.transition(currentState, type: 'TIMER' >).value; // => // red: 'walk' // > lightMachine.transition('red.walk', type: 'PED_TIMER' >).value; // => // red: 'wait' // > Object notation for hierarchical states:
// . const waitState = lightMachine.transition( red: 'walk' >, type: 'PED_TIMER' >).value; // => lightMachine.transition(waitState, type: 'PED_TIMER' >).value; // => lightMachine.transition( red: 'stop' >, type: 'TIMER' >).value; // => 'green' # Parallel State Machines
const wordMachine = createMachine( id: 'word', type: 'parallel', states: bold: initial: 'off', states: on: on: TOGGLE_BOLD: 'off' > >, off: on: TOGGLE_BOLD: 'on' > > > >, underline: initial: 'off', states: on: on: TOGGLE_UNDERLINE: 'off' > >, off: on: TOGGLE_UNDERLINE: 'on' > > > >, italics: initial: 'off', states: on: on: TOGGLE_ITALICS: 'off' > >, off: on: TOGGLE_ITALICS: 'on' > > > >, list: initial: 'none', states: none: on: BULLETS: 'bullets', NUMBERS: 'numbers' > >, bullets: on: NONE: 'none', NUMBERS: 'numbers' > >, numbers: on: BULLETS: 'bullets', NONE: 'none' > > > > > >); const boldState = wordMachine.transition('bold.off', type: 'TOGGLE_BOLD' >).value; // // bold: 'on', // italics: 'off', // underline: 'off', // list: 'none' // > const nextState = wordMachine.transition( bold: 'off', italics: 'off', underline: 'on', list: 'bullets' >, type: 'TOGGLE_ITALICS' > ).value; // // bold: 'off', // italics: 'on', // underline: 'on', // list: 'bullets' // > # History States
const paymentMachine = createMachine( id: 'payment', initial: 'method', states: method: initial: 'cash', states: cash: on: SWITCH_CHECK: 'check' > >, check: on: SWITCH_CASH: 'cash' > >, hist: type: 'history' > >, on: NEXT: 'review' > >, review: on: PREVIOUS: 'method.hist' > > > >); const checkState = paymentMachine.transition('method.cash', type: 'SWITCH_CHECK' >); // => State // value: < method: 'check' >, // history: State // > const reviewState = paymentMachine.transition(checkState, type: 'NEXT' >); // => State // value: 'review', // history: State // > const previousState = paymentMachine.transition(reviewState, type: 'PREVIOUS' >).value; // => # Sponsors
Special thanks to the sponsors who support this open-source project:
# SemVer Policy
We understand the importance of the public contract and do not intend to release any breaking changes to the runtime API in a minor or patch release. We consider this with any changes we make to the XState libraries and aim to minimize their effects on existing users.
# Breaking changes
XState executes much of the user logic itself. Therefore, almost any change to its behavior might be considered a breaking change. We recognize this as a potential problem but believe that treating every change as a breaking change is not practical. We do our best to implement new features thoughtfully to enable our users to implement their logic in a better, safer way.
Any change could affect how existing XState machines behave if those machines are using particular configurations. We do not introduce behavior changes on a whim and aim to avoid making changes that affect most existing machines. But we reserve the right to make some behavior changes in minor releases. Our best judgment of the situation will always dictate such changes. Please always read our release notes before deciding to upgrade.
# TypeScript changes
We also reserve a similar right to adjust declared TypeScript definitions or drop support for older versions of TypeScript in a minor release. The TypeScript language itself evolves quickly and often introduces breaking changes in its minor releases. Our team is also continuously learning how to leverage TypeScript more effectively — and the types improve as a result.
For these reasons, it is impractical for our team to be bound by decisions taken when an older version of TypeScript was its latest version or when we didn’t know how to declare our types in a better way. We won’t introduce declaration changes often — but we are more likely to do so than with runtime changes.
# Packages
Most of the packages in the XState family declare a peer dependency on XState itself. We’ll be cautious about maintaining compatibility with already-released packages when releasing a new version of XState, but each release of packages depending on XState will always adjust the declared peer dependency range to include the latest version of XState. For example, you should always be able to update xstate without @xstate/react . But when you update @xstate/react , we highly recommend updating xstate too.