- Find by class selenium java
- Nested Class Summary
- Constructor Summary
- Method Summary
- Methods inherited from class java.lang.Object
- Constructor Detail
- By
- Method Detail
- id
- linkText
- partialLinkText
- name
- tagName
- xpath
- className
- cssSelector
- findElement
- findElements
- getWebDriver
- getJavascriptExecutor
- equals
- hashCode
- toString
- How To Find Elements by Class in Selenium: A Practical Guide
- Selenium By.class() Method
- Prerequisites
- Steps
- 1. Create Script File
- 2. Create Webpage for Test
- 3. Add Code for Selenium
- 4. Running the Script
- Conclusion
- Selenium Java Tutorial – Class Name Locator In Selenium
- Getting Started With Class Name Locator In Selenium With Example
Find by class selenium java
Mechanism used to locate elements within a document. In order to create your own locating mechanisms, it is possible to subclass this class and override the protected methods as required, though it is expected that all subclasses rely on the basic finding mechanisms provided through static methods of this class:
public WebElement findElement(WebDriver driver)
Nested Class Summary
Constructor Summary
Method Summary
Methods inherited from class java.lang.Object
Constructor Detail
By
Method Detail
id
linkText
public static By linkText(java.lang.String linkText)
partialLinkText
public static By partialLinkText(java.lang.String partialLinkText)
name
tagName
public static By tagName(java.lang.String tagName)
xpath
public static By xpath(java.lang.String xpathExpression)
className
public static By className(java.lang.String className)
Find elements based on the value of the «class» attribute. Only one class name should be used. If an element has multiple classes, please use cssSelector(String) .
cssSelector
public static By cssSelector(java.lang.String cssSelector)
Find elements via the driver’s underlying W3C Selector engine. If the browser does not implement the Selector API, the best effort is made to emulate the API. In this case, we strive for at least CSS2 support, but offer no guarantees.
findElement
public WebElement findElement(SearchContext context)
findElements
public abstract java.util.ListWebElement> findElements(SearchContext context)
getWebDriver
protected WebDriver getWebDriver(SearchContext context)
getJavascriptExecutor
protected JavascriptExecutor getJavascriptExecutor(SearchContext context)
equals
public boolean equals(java.lang.Object o)
hashCode
toString
public java.lang.String toString()
How To Find Elements by Class in Selenium: A Practical Guide

Selenium is a popular browser automation tool. Using Selenium, you can automate almost every action a regular user can perform on a web browser. For example, with Selenium, you can write a small script that can open a webpage and then complete a form on the page.
However, to carry out an operation like this, Selenium will first need a way to locate each element on the form. Selenium needs to find each input field first before it can enter text in them.
Luckily, Selenium offers a few methods you can use to find elements.
One of the options the Selenium WebDriver library provides for locating HTML elements is the use of the class property.
The HTML class property is used for setting a class to an HTML element. One use of the class property is applying styles to elements via CSS. You can also use classes to interact with specific elements in your JavaScript code.
It is common practice for multiple elements to have the same value for the class. As such, any style you define for the class applies to all the elements. This is also the same for JavaScript code that refers to the class.
In this post, you’ll learn how to find elements by class in Selenium by walking through a practical example.
Selenium By.class() Method
This method makes it possible to locate an element by referencing its class name. The class() method is found inside the By class of the Selenium WebDriver JavaScript library. The class also contains other alternative methods for locating elements.
The Selenium WebDriver library for other programming languages has a similar method for locating elements. For example, the Python library finds elements by class name using the CLASS_NAME constant from its By class. The following code snippets show the Selenium element locator method for Python, Java, and JavaScript:
loginBtn = driver.find_element(By.CLASS_NAME, "login")
WebElement loginBtn = driver.findElement(By.class("login")); let loginBtn = await driver.findElement(By.class('login')); In later sections, we’ll look at a more detailed example of this selector in action.
Prerequisites
Before we continue, make sure to have the following so you can follow along better:
- a working setup of Selenium and WebDriver on your machine
- basic knowledge of JavaScript (or any other language that WebDriver supports)
For this post, we assume that you are already familiar with setting up Selenium, and you can write code in your preferred language to control the browser using Selenium. As a result, we won’t be including steps for setting up Selenium.
Steps
For this post, we’ll write a small script that finds hyperlinks on a webpage. We’ll be finding the element associated with a specific link using its class property. After that, we’ll perform a click action on the link.
We’ll be using JavaScript throughout our example. So, let’s dive into the actual steps.
1. Create Script File
First, we need to create a new file where we’ll be writing the code for our script. To do that, create a new file inside the directory where you wish to run Selenium from and save the file as example.js.
Note: Make sure you already have the Selenium Node package installed in the directory. If you’re starting with a new, empty directory, you can install the package by running the following code in terminal or command prompt:
npm install selenium-webdriver
The above step will be different if you use Selenium with another programming language that isn’t JavaScript. You can find more specific instructions for other languages on the official documentation page for the language.
2. Create Webpage for Test
Before writing the code for finding elements by class in Selenium, let’s create the HTML page we’ll be loading.
Create a new file in the same directory as the first step and save the file as testpage.html. Then, add the following code to the file:
From the above code, we have a basic HTML document that includes a hyperlink. The hyperlink has the value for class property set to “link.” In the next step, we’ll learn how to find this hyperlink in Selenium using its class property.
3. Add Code for Selenium
Now we’re set to start writing some JavaScript code. We’ll be creating a script that finds elements using their class property.
Open the example.js file you created earlier in step one, then add the following code to it:
const = require('selenium-webdriver'); (async ()=> < let driver = await new Builder().forBrowser('chrome').build(); const URI = 'file:///Users/ea/Development/tutorial-examples/selenium-by-class/testpage.html'; await driver.get(URI); await driver.wait(until.elementLocated(By.className('link')), 1000); const footerLink = await driver.findElement(By.className('link')); footerLink.click(); >)(); The above code will initialize a new instance of WebDriver using Google Chrome. You can change the default browser to your preferred browser by changing the parameter for the forBrowser() method. For example, using forBrowser(“firefox”) will run the same tasks using Firefox.
Next, we’ll set a URI for the webpage we wish to open with Selenium.
Note: Make sure to replace the value for URI with the full path to testpage.html on your computer.
After launching the browser, Selenium will wait until the element with class “link” is found. We achieve this by using until.elementLocated() and the By.className() methods.
Next, using findElement() and the By.className() method again, Selenium finds the element with class “link.” And finally, Selenium performs a click operation on the element using the click() action.
4. Running the Script
Now that we’ve set up the test webpage and our Selenium script, let’s run the script.
To do that, run the following code in terminal or command prompt:
If you followed all the steps without any issue, the above command would open a new Chrome window that loads testpage.html. Once the page is loaded, Selenium will locate the link with class “link” and then perform a click on the link. You can see the result in the following image:
Remember, we mentioned earlier that multiple elements could have the same class name, and any style we define for the class applies to all the elements.
By default, Selenium’s actions do not behave similarly. That’s to say, if we have a webpage with multiple input fields with the same class name and we find an element using class and then perform an action, the action will only apply to the first element.
Conclusion
Selenium is a popular tool for browser automation. It supports many browsers and programming languages, thus offering more flexibility for developers and testers.
We used Selenium to automate opening a web page and using JavaScript and Chrome in this post. You can do much more and use your favorite languages. However, for the scope of this post, our focus was on finding HTML elements using the class property.
Though Selenium is beneficial and flexible, the initial setup can be stressful. In addition, performing complex tasks will require writing more complex code. Also, because the primary method for using Selenium involves writing code, you may spend extra time debugging extra code to test your app.
Testim offers an alternative to reduce the stress associated with setup and complexity in writing browser automation code. You can try Testim for free here.
Selenium Java Tutorial – Class Name Locator In Selenium

This article is a part of our Content Hub. For more in-depth resources, check out our content hub on Selenium Locators Tutorial.
CSS Locator in Selenium is one of the most important aspects of writing a script. If you cannot locate an element by using any CSS locator in Selenium, then being proficient at Selenium automation will be a tough task. Selenium provides multiple ways of locating an element.
You can check out other articles around different CSS locator in Selenium that helps in locating elements through various ways:
If you are an advanced or medium Selenium Java practitioner, then you can chuck on dedicated articles mentioned above. I have written a complete guide to help you illustrate the practical demonstration of CSS locator in Selenium.
In this Selenium Java tutorial, I will be referencing on Class name locator in Selenium to demonstrate how to locate an element on a webpage via class name.
Getting Started With Class Name Locator In Selenium With Example
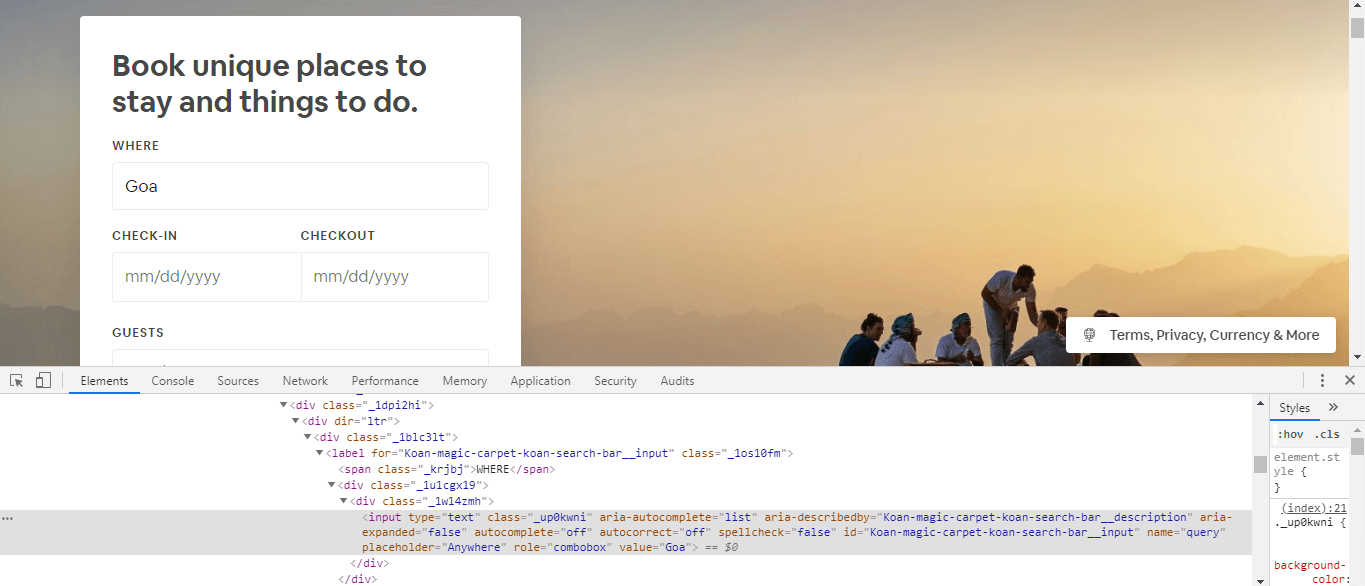
Next, in this Selenium Java tutorial, we will consider the scenario of Airbnb, where we intend to locate the ‘Where’ field in the search form of Airbnb homepage via class name. Below is a screenshot of Airbnb page where we inspect the ‘Where’ field in the form.
image:
In-order to use Class name locator in Selenium we need to use the below syntax:
findElement(By.className(«_up0kwni «))
Now, let’s look into the code for finding elements by Class name in locators: