- HTML Links «file not found»
- 3 Answers 3
- File index html not found
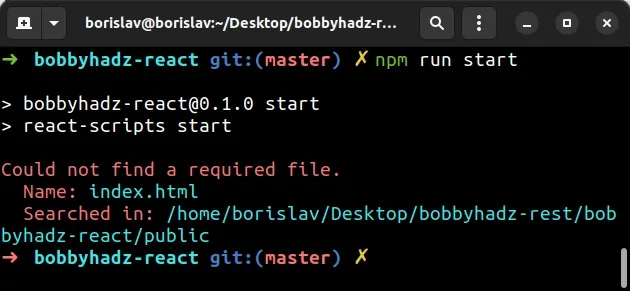
- # React: Could not find a required file. Name: index.html
- # Make sure the index.html file is in your public/ directory
- # Creating a new React App project and copying the missing files
- # Check your Git history or status
- # Make sure the package.json file is present in your root folder
- # Make sure you haven’t added index.html to .gitignore
- Ошибка 404 not found Nginx
- Почему возникает ошибка 404 в Nginx
- Как включить режим отладки Nginx?
HTML Links «file not found»
I am having a problem with my html code when it comes to adding links to a webpage. I am trying to add 2 links to my homepage to get from Home to page 2 and page 3 of the webpage. Every time I click on the page 2 and page 3 links on the webpage in Google chrome I get «Your file was not found» message appear. Driving me crazy hope somebody out there can advise me.
I have done this to my knowledge I have saved index.html page2.html and page3.html to the same folder on my desktop and used a href with page2.html but I get file not found
3 Answers 3
When linking in HTML it’s often handy to begin the link with «./», this ensures you’re starting in the directory that the link exists in. If you already have that, make sure you’ve included the file extension in the link, and that everything is spelt correctly.
@SLaks I have had a lack of ./ be the problem before with links. Logically, yes, it does sound like it would do nothing. I also do believe it helps to ensure you’re starting in the right directory, if for no other reason than readability. ./page2.html reads as «this directory, page 2». If someone is going crazy trying to figure out an error link this, an added ./ may help to cross a possibility off the list.
I tried adding ./ still no luck. I’m completely stuck here now. Still have file not found error message on Google chrome
This happened to me and drove me mad until I realized I needed to go back and change the file names.
If it’s the same issue, check that you didn’t save your actual file name icon as page2.html in the folder, because the .html part is hidden anyway when you save it as an html document.
That means the computer thinks it is actually called page2.html.html with html written twice!! So it won’t understand unless you tell it to link to href=»page2.html.html» or change the file name back to just page2
File index html not found
Last updated: Apr 19, 2023
Reading time · 5 min

# React: Could not find a required file. Name: index.html
The React.js error «Could not find a required file. Name: index.html» occurs for multiple reasons:
- Renaming, deleting or moving the index.html file from your public/ directory.
- Not having the package.json and package-lock.json files in the root directory of your project.
- Adding the index.html file or the public directory to your .gitignore file.
- Not opening your terminal in your project’s root directory when issuing the npm start command.
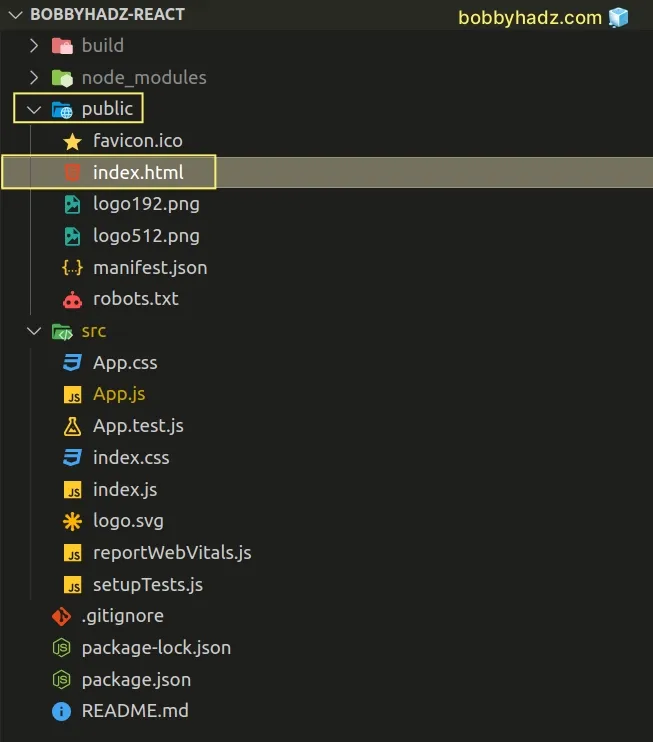
# Make sure the index.html file is in your public/ directory
The first thing you need to verify is that you have an index.html file in your public/ directory.
In a simple Create React App project, your folder structure will look similar to the following.
Copied!my-project/ └── public/ └── index.html └── src └── App.js └── index.js └── package.json
You might have deleted, renamed or moved your index.html file.
The public/ directory should be located at the root of your project, right next to your src/ directory.
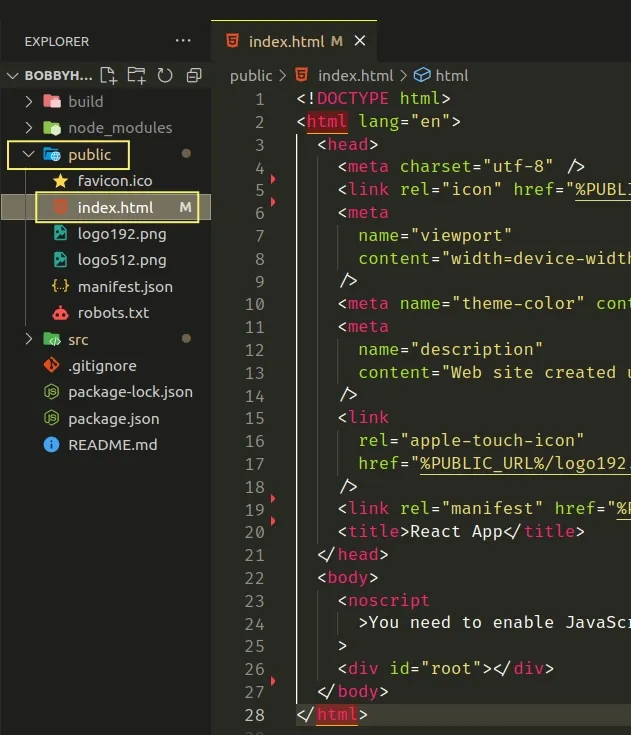
If you can’t find your index.html file in the public/ directory, create a new public/index.html file using the following template.
Copied!DOCTYPE html> html lang="en"> head> meta charset="utf-8" /> link rel="icon" href="%PUBLIC_URL%/favicon.ico" /> meta name="viewport" content="width=device-width, initial-scale=1" /> meta name="theme-color" content="#000000" /> meta name="description" content="Website created using create-react-app" /> link rel="apple-touch-icon" href="%PUBLIC_URL%/logo192.png" /> link rel="manifest" href="%PUBLIC_URL%/manifest.json" /> title>React Apptitle> head> body> noscript>You need to enable JavaScript to run this app.noscript> div id="root">div> body> html>
You can also find the default Create React app index.html file in the project’s GitHub repository.
You can view the entire public/ folder of a Create React app by clicking on the following link.
Once you create the index.html file in the public/ folder and paste the content, try to restart your server with the npm start command.
# Creating a new React App project and copying the missing files
If the error persists, you can also create a new Create React App project and copy over the missing files/folders.
Open your terminal in a different directory and issue the following command to create a new project.
Copied!# Create a new JavaScript project npx create-react-app my-app # or a TypeScript project npx create-react-app my-ts-app --template typescript
The first command generates a new Create React App JavaScript project.
If you need to generate a TypeScript project, use the second command.
Once you generate the new project, you can copy over any missing files or directories.
Your project’s folder structure should look similar to the following.
Copied!my-project/ └── public/ └── index.html └── src └── App.js └── index.js └── package.json
# Check your Git history or status
If the issue persists or you don’t want to use the template index.html file, check if you’ve moved, renamed or deleted your index.html file.
You can use the git status command to print any changes you’ve made since the last commit.
If you’ve already committed the changes, open your repository on GitHub and click on commits
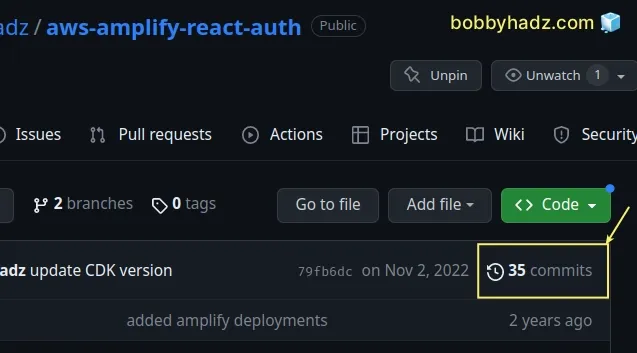
Once you open the commits page, you can click on the < >icon to browse the repository at the time of each commit.
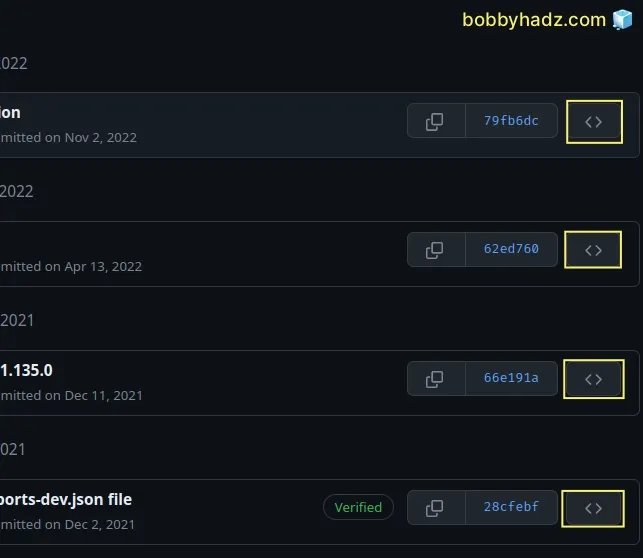
You can view the contents of your public/ directory for a previous commit and copy over the files that are missing.
# Make sure the package.json file is present in your root folder
Another common cause of the error is deleting or renaming your package.json or package-lock.json files.
Make sure the two files are present in the root directory of your project.
Copied!my-project/ └── public/ └── index.html └── src └── App.js └── index.js └── package.json └── package-lock.json
If your package-lock.json file is missing, you can run the npm install command to regenerate it.
Copied!# with NPM npm install # or with YARN yarn install
However, if your package.json file is missing you have to either figure out where it went or use a boilerplate one.
Here is an example boilerplate package.json file.
Copied!"version": "0.1.0", "private": true, "dependencies": "@testing-library/jest-dom": "^5.16.5", "@testing-library/react": "^13.4.0", "@testing-library/user-event": "^13.5.0", "react": "^18.2.0", "react-dom": "^18.2.0", "react-scripts": "5.0.1", "web-vitals": "^2.1.4" >, "scripts": "start": "react-scripts start", "build": "react-scripts build", "test": "react-scripts test", "eject": "react-scripts eject" >, "eslintConfig": "extends": [ "react-app", "react-app/jest" ] >, "browserslist": "production": [ ">0.2%", "not dead", "not op_mini all" ], "development": [ "last 1 chrome version", "last 1 firefox version", "last 1 safari version" ] > >
You can also generate a new Create React App project and copy over the default package.json file.
Copied!# Create a new JavaScript project npx create-react-app my-app # or a TypeScript project npx create-react-app my-ts-app --template typescript
Make sure your package.json file is located in the root directory of your project, right next to the src/ and public/ folders.
# Make sure you haven’t added index.html to .gitignore
Another common cause of the error is adding your index.html file or your entire public/ directory to your .gitignore file.
If you deploy your project to Heroku, GitHub pages or any other hosting service and your public/ folder or your index.html file is missing, the error is raised.
Your .gitignore file should be located in the root directory of your project, right next to your package.json file.
Ошибка 404 not found Nginx
Веб-серверы Nginx и Apache мало похожи друг на друга, и их отличия касаются не только особенностей подключения пользователей, но и обработки URL на сервере. Очень часто новые пользователи Nginx получают ошибку 404 для URL, которые, по сути, должны были бы работать.
В этой статье рассмотрим, почему возникает ошибка «404 not found Nginx», а также способы её устранения и отладки.Мы не будем разбираться с ситуацией, когда файла действительно нет на сервере — это решение, не требующее пояснений. Мы рассмотрим проблему обработки location в Nginx.
Почему возникает ошибка 404 в Nginx
Давайте сначала разберёмся, как обрабатываются URL в Nginx. Когда веб-сервер определил, к какому блоку server (сайту) нужно передать запрос пользователя, просматриваются все префиксные блоки location и выбирается тот, который подходит лучше всего. Например, рассмотрим стандартную конфигурацию для WordPress. Здесь префиксные location отмечены зелёным, а с регулярным выражением — оранжевым:
location /
index index.html index.php;
>
location /favicon.ico
access_log off;
>
location ~* \.(gif|jpg|png)$ expires 30d;
>
location ~ \.php$
fastcgi_pass localhost:9000;
fastcgi_param SCRIPT_FILENAME
$document_root$fastcgi_script_name;
include fastcgi_params;
>
Префиксные локейшены всегда начинаются с символа /. Регулярные же содержат символы регулярных выражений: ~ $ ^ * и так далее. Если пользователь запрашивает favicon.ico, то будет выбран второй location, так как он лучше всего соответствует запросу, при любом другом запросе будет выбран location /, так как он соответствует всем запросам, а других префиксных location у нас нет. Это просто, а дальше начинается магия. После того, как был найден нужный location, Nginx начинает проверять все регулярные выражения в порядке их следования в конфигурационном файле.
При первом же совпадении Nginx останавливает поиск и передаёт управление этому location. Или, если совпадений не было найдено, используется ранее обнаруженный префиксный location. Например, если запрос заканчивается на .php, то первый location будет проигнорирован, а управление передастся четвёртому (~ \.php$)
Таким образом, любое неверно составленное регулярное выражение в любой части конфигурационного файла может полностью всё сломать. Поэтому разработчики рекомендуют по минимум использовать регулярные выражения. Что касается вложенных location, то обрабатываются они так же как и основные, только уже после передачи управления в нужный location. Путём чтения конфигурационного файла понять, какой location вызывает 404 сложно, поэтому, чтобы исправить ошибку, нам понадобиться режим отладки Nginx.
Как включить режим отладки Nginx?
Сначала нам необходимо установить версию Nginx с поддержкой отладки. Чтобы проверить, поддерживает ли ваша текущая версия этот режим, наберите:
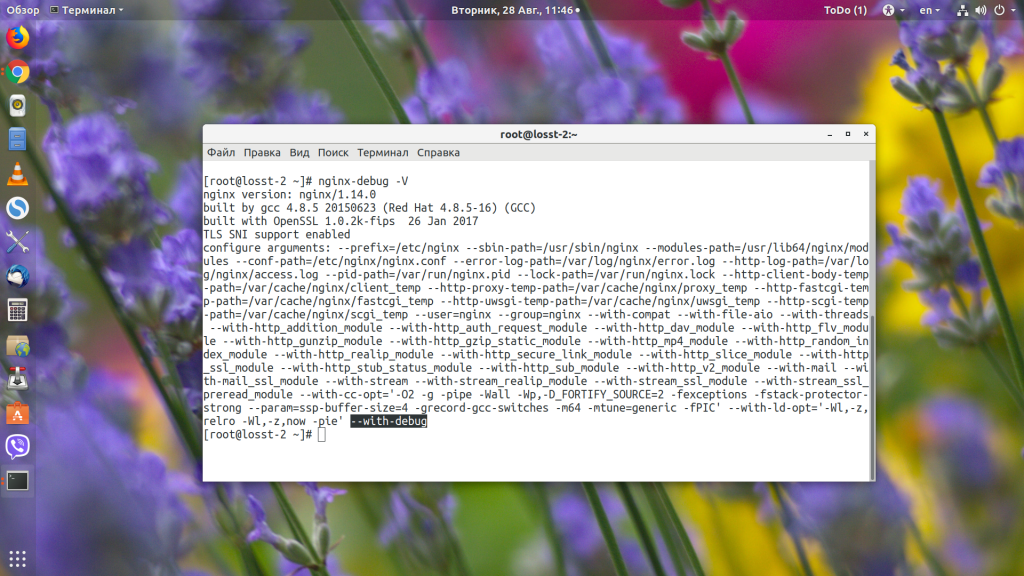
В выводе должна быть строчка «—with-debug». Если её нет, значит отладка не поддерживается, и надо установить версию с поддержкой. В CentOS такой пакет называется nginx-debug. Для его установки наберите:
sudo yum install nginx-debug
Теперь появился ещё один исполняемый файл, и он собран уже с поддержкой отладки:
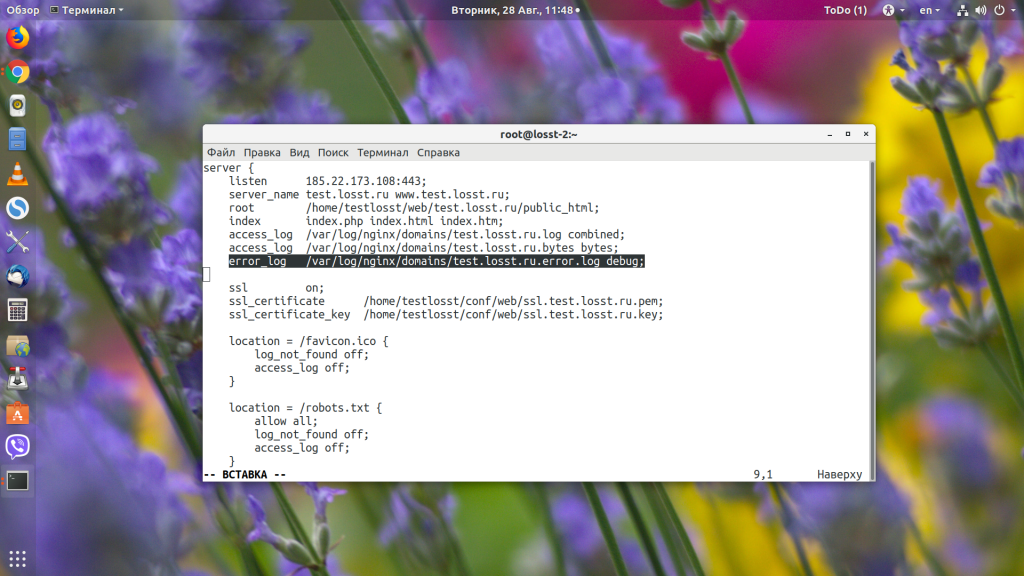
Откройте конфигурационный файл вашего сайта или глобальный конфигурационный файл, если вы не задавали настройки логов отдельно для каждого сайта, и в конце стоки error_log замените error на debug:
error_log /var/log/nginx/domains/test.losst.pro.error.log debug
Останавливаем обычную версию и запускаем версию с отладкой: