- Talking to Python from Javascript: Flask and the fetch API
- Using Python to process data required for a dynamic web interface or visualisation.
- Creating a Flask app
- App.py
- Index.html
- Python Fetch Example
- How to send JSON from JavaScript to Flask using Fetch API
- Let’s start our journey
- Step 1 : Create a virtual environment
- Step 2 : Activate your virtual environment
- Step 3 : Install the flask Package
- Step 4 : Create templates & static folder inside myapp.
- Step 5 : Create required files
- Step 6 : Let’s do our basic flask app setup
- Step 7 : Populate index.html file
- Step 8 : Populate the script.js file
- Step 9 : Add more code in app.py
- Step 10 : Run the Server
- Conclusion :
Talking to Python from Javascript: Flask and the fetch API
Using Python to process data required for a dynamic web interface or visualisation.
Within the field of data science, it is common to be required to use a selection of tools, each specific to their job. A role requiring visualisation using a web interface, but processing of a Python script, it is often better to build a bespoke visualisation in d3 or THREE.js to display it and then fetch data as required. This article covers the creation of a simple flask app that can serve data to a web interface using the Fetch API.
Creating a Flask app
We start by building a repository containing an empty templates folder and an app.py file.
App.py
Our app.py file contains the data required to create a web interface. To do this we use the flask ( pip install flask ) python library. For this we can use the following template:
######## imports ##########
from flask import Flask, jsonify, request, render_template
app = Flask(__name__)#############################
# Additional code goes here #
###################################### run app #########
app.run(debug=True)
Here we start by importing the required functions, the app structure and the run command to start the app.
Index.html
Having defined our flask app, we now need to create a template webpage. This can be done by placing the file index.html within the templates directory.
Python Fetch Example
>
Since we are using this as a template we can use a react-style replacement syntax for certain keywords. In this instance > is to be replaced by the embed_example string in the snippet below.
@app.route('/')
def home_page():
example_embed='This string is from python'
return render_template('index.html', embed=example_embed)
This defines the code which runs when the home page of the flask app is reached and needs to be added between the imports and the…
How to send JSON from JavaScript to Flask using Fetch API
Hi Folks 👋, Hope you all are doing well. This article📝 is based on my experience while working on a flask application where I will show how you can use Fetch API to send JSON from front-end (JavaScript) to Flask (backend).
First of all, This is going to be a long article, so be patient and I promise you will not regret.
In the article, I will take step by step 🚶♀️ approach and where along with Fetch API, I will also talk about things like virtual environment , routes , __name__ etc.
Let’s start our journey
Step 1 : Create a virtual environment
Virtual environment is a separate Python environment which is created to work on a new project. If you want to know about its benefits then read it here.
Now create a folder of name myapp in your local computer and open it in cli(command line interface) and write the following code to create a virtual environment :-
Here virtual is the name of virtual environment (you can choose other name) and venv is the package which is used to create the environment.
Step 2 : Activate your virtual environment
To activate the virtual environment write the following code in your corresponding operating system :-
In mac/linux
virtual/Scripts/activate.bat Step 3 : Install the flask Package
Install the flask package using pip .
(virtual)$ pip install flask If you want to explore about Flask then I would recommend its docs.
Step 4 : Create templates & static folder inside myapp.
(virtual)$ mkdir templates static Step 5 : Create required files
Now we will create index.html , app.py & script.js files in templates folder, myapp folder (root) & static folder respectively.
In mac/linux
(virtual)$ touch app.py templates/index.html static/script.js If you are a windows user then I would recommend to create these files directly in corresponding folders.
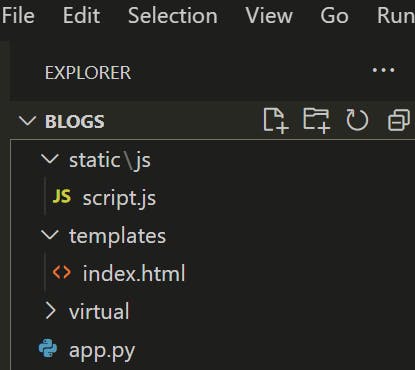
Here is the folder structure after creating all these files and folder
Step 6 : Let’s do our basic flask app setup
In the app.py file create the flask app instance, also create a view function of name index and decorate it with app.route as shown below :-
from flask import Flask, render_template app = Flask(__name__) @app.route('/index', methods=["GET", "POST"]) @app.route('/index', methods=["GET", "POST"]) def index(): return render_template('index.html') if __name__ == "__main__": app.run(debug=True, port=5000) Here __name__ variable is used by the flask to locate application file (In this case it is app.py ).
Step 7 : Populate index.html file
In the index.html , I have created a button which will be used to initialize the Fetch API.
"en"> "UTF-8"> "X-UA-Compatible" content="IE=edge"> "viewport" content="width=device-width, initial-scale=1.0"> Here, I have used the url_for() method to link script.js file with index.html .
Step 8 : Populate the script.js file
Now, we have reached to the game changer moment where we will see the magic of Fetch API. Before showing you its use, Let’s first talk some basics about it.
It is a modern browser API which is used for sending data to server (backend) or requesting data from server (backend) asynchronously. It supports in all the modern browsers.
fetch(url, < headers : < 'Content-Type' : '' >, method : '', body : JSON.stringify( < 'key' : 'value' >) >) .then(function (response)< if(response.ok) < response.json() .then(function(response) < console.log(response) >); > else < throw Error('Something went wrong'); > >) .catch(function(error) < console.log(error); >); Now let’s talk about terms mentioned in the syntax one by one.
- url — url from where we are requesting data or sending data.
- headers — Here we mention the type of data (Content type) we send to backend.
- body — It takes the data (as JavaScript object) we want to send & before sending it we have to convert it into JSON string using JSON.stringify().
- .then() — Returned response is automatically passed in callback function inside .then() & before working with the response we first check for the response status using ok property which returns true if status code is in range 200 to 300. If response is not the one (status code in range of 400 to 500) we are expecting then browser throw an error.
- json() — To convert the response returned from the server (backend) as JSON.
- catch() This method is used when some errors like internal server error or network error etc occurred while making the request (for sending data/receiving response).
🚩 Fetch API is based on PROMISE that’s why response returned from the server is called a promise object.
🚩 Making a request (Http request) using Fetch API is also known as AJAX Call.
Now let’s populate our script.js file
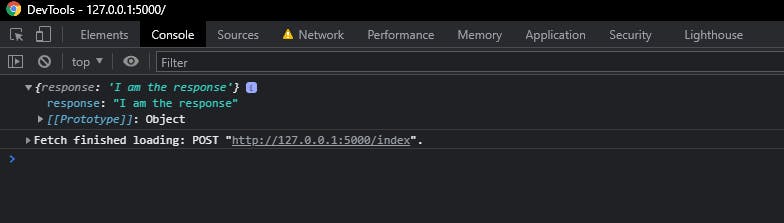
const btn = document.querySelector('.send__data__btn'); btn.addEventListener('click', function () < fetch('/index', < headers : < 'Content-Type' : 'application/json' >, method : 'POST', body : JSON.stringify( < 'name' : 'Rahul Kumar', 'country' : 'India' >) >) .then(function (response)< if(response.ok) < response.json() .then(function(response) < console.log(response); >); > else < throw Error('Something went wrong'); > >) .catch(function(error) < console.log(error); >); >); In the above code, I have selected the reference of button which has been created in html page & an event handler has been attached with it so when user click on the button then fetch() will make the request to send data. Also I have changed the Content-Type to application/json & method to POST.
Step 9 : Add more code in app.py
Now in the app.py , we will use request imported from flask to check for the POST method & request.get_json() we will be used to grab the data coming from frontend.
from flask import Flask, render_template, request app = Flask(__name__) @app.route('/', methods=["GET", "POST"]) @app.route('/index', methods=["GET", "POST"]) def index(): if request.method == "POST": jsonData = request.get_json() print(jsonData) return < 'response' : 'I am the response' > return render_template('index.html') I have also returned a dictionary from Flask to show you the response in the frontend side.
Step 10 : Run the Server
Now, it’s time to see the magic✨. Run your flask server & paste the url from terminal to browser.
(virtual)$ export FLASK_APP=app (virtual)$ export FLASK_ENV=development (virtual)$ flask run Click on the button in the browser and see the magic in console & terminal both.
In Terminal
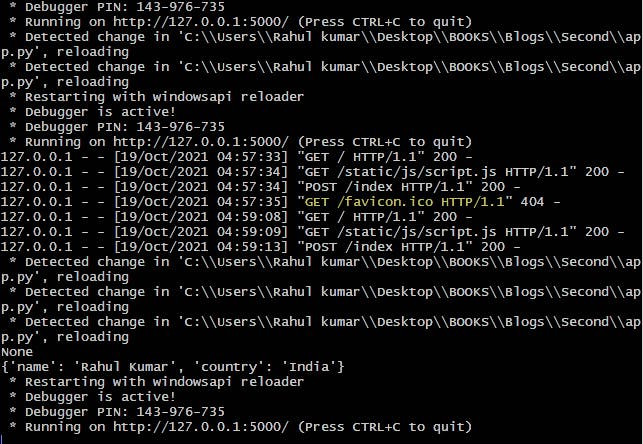
Congratulation🎊🎉 you made your first AJAX call to send data to Flask.
Conclusion :
In the article you saw the magic✨ of Fetch API. It is a vast topic so you should explore more about it to unleash its real power.
If you have any query regarding the topic then leave a comment, I would love to answer also if you find any error in the article then notify me.
Stay tune, I will be posting more articles in future.