- Automate Excel with Python xlwings
- Part 1. Installing xlwings
- Part 2. Automating Excel
- Write data to Excel
- Reading data from Excel
- Python Script
- Excel VBA & linking to the Python script
- Part 3. Write a user-defined function in Python and call it within Excel
- Python script
- Excel setup
- Debugging
- How to Automate an Excel Sheet in Python?
- Intro of The Task
- Let’s Get Into The Coding Zone
Automate Excel with Python xlwings
In this tutorial, I will show you how to automate Excel with Python xlwings library. Excel is an awesome software with a simple and intuitive user interface, and Python is a powerful programming language that is very efficient at data analysis. xlwings is the glue that allows us to have the best of both worlds.
- Automate Excel with Python, such as producing reports
- Write macros in Python, and run from Excel by clicking on a button
- Write user-defined functions in Python, and call those function from Excel just like any Excel function
Sounds exciting? Let’s get started!
Part 1. Installing xlwings
There are two parts to install xlwings: Python library and Excel add-in. Let’s start with getting the Python library first:
Then download the Excel add-in from xlwings’ official Github repository. It’s the xlwings.xlam file on the page, and feel free to grab the latest version. The link here is to v0.18.0.
Put the xlwings.xlam file into your Excel add-in folder, which is:
C:\Users\xxxx\AppData\Roaming\Microsoft\AddIns
The xxxx is your own user name on your computer.
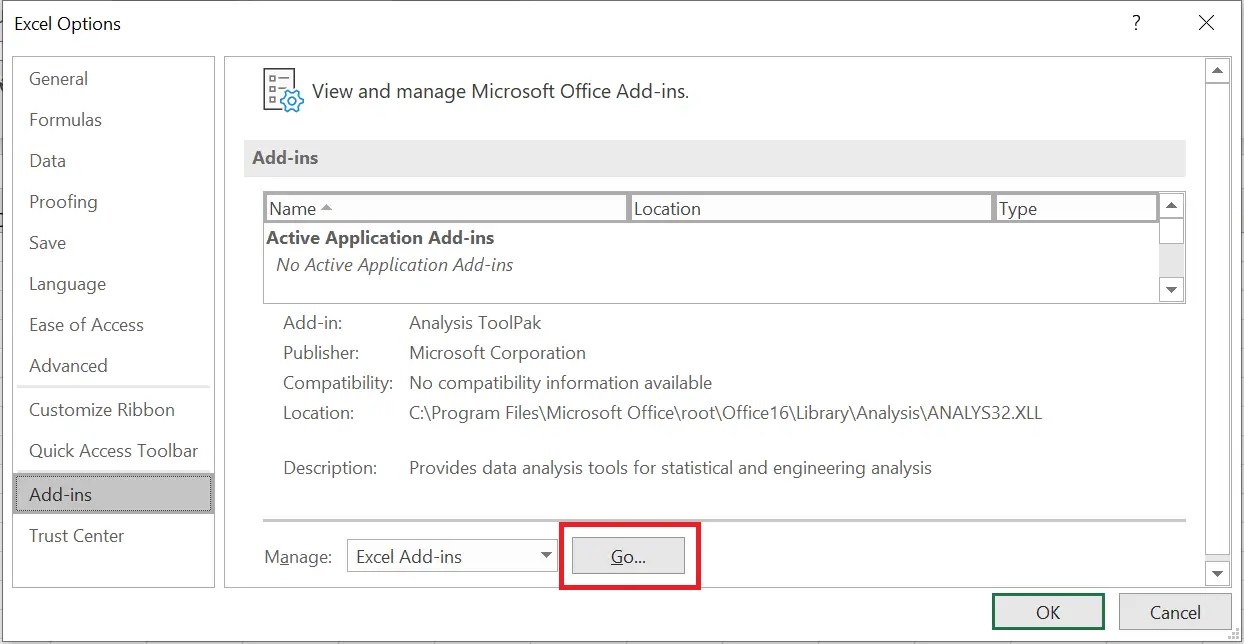
Then, open Excel, File -> Options -> Add-ins. Click on the “Go” button besides Manage: Excel Add-ins.
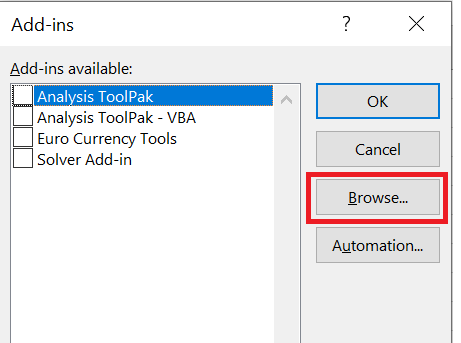
When the Add-ins window pops up, click on “Browse”.
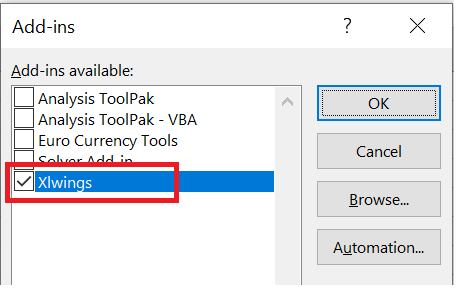
This will take you directly to the Addins folder, simply select the xlwings.xlam file from the folder, and hit “OK”. xlwings addin is now added to your Excel, this add-in will be automatically enabled whenever you launch the Excel app.

Now, the xlwings tab should appear on your Excel ribbon.
The set up is done at this point, and now let’s have fun with automating Excel with Python!
Part 2. Automating Excel
Run the following Python script, which will open a new Excel instance.
Write data to Excel
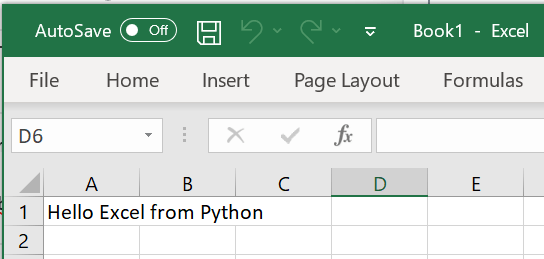
Here, wb refers to the new (and open) Excel file, and it’s also a Python object at the same time, which means we can manipulate it (the Excel file) in Python! Try the following code, which will allow you to input values from Python into Excel.
We can also use the .range((x,y)) notation to refer to individual cells in Excel. x refers to row, and y refers to column. So .range((3, 2)) means cell B3 .
It’s also possible to write formulas in Excel using Python. Basically we are writing a string into the cell. Here, we want to calculate the exponential values of the x-axis in another column. In the below code, we are using an “f-string”, which is an improved string formatting syntax starting from Python 3.6.
Reading data from Excel
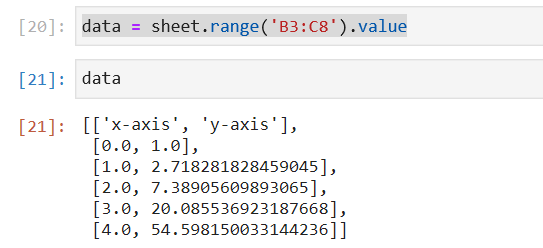
Reading data from Excel is as easy, the following code reads Excel data into Python as a list.
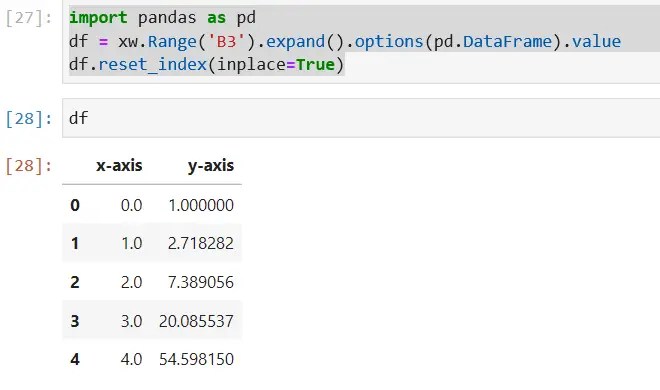
Check out the following short code if you want to read Excel data into Python as a pandas Dataframe. .expand() automatically detects the dimension of the data, and .options() specifies that we want a pandas Dataframe. We reset the index at the end so the x-axis will be treated as a column instead of a dataframe index.
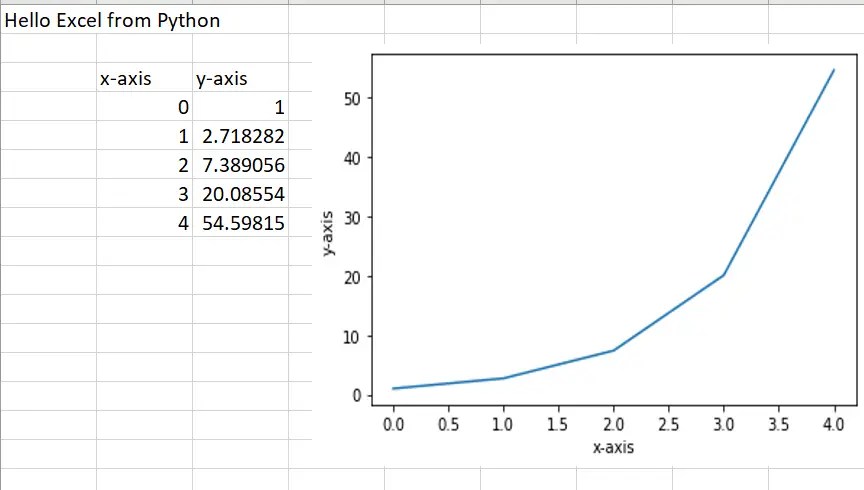
Now we have a table, what are we missing?… Yes, a graph! Since the data is already read into Python, we can generate a graph then put it into Excel file. For plotting the graph, we’ll use the matplotlib library.
Finally, as we do for every Excel spreadsheet, we gotta save our work and close the file! wb refers to the workbook here.
Let me just clarify, the “macro” isn’t referring to the VBA Excel macros. These are Python programs, which can be executed from Excel. However, it requires a tiny bit of VBA to allow Excel to call a Python function.
Python Script
Let’s first write a simple Python function to generate 10 random numbers, and then place them in an Excel sheet cell A1. Note the xw.Book.caller() refers to the current workbook. Save the following script as “rand_10.py”.
Excel VBA & linking to the Python script
Once we have the Python script, open up the VBA Editor, you can do this by pressing Alt + F11 inside the Excel app.
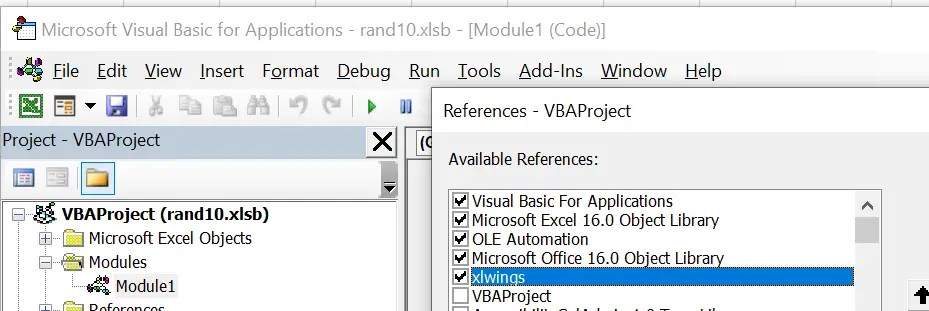
In the VBA editor, go to Tools -> Reference, and check the “xlwings” checkbox. OK and save.
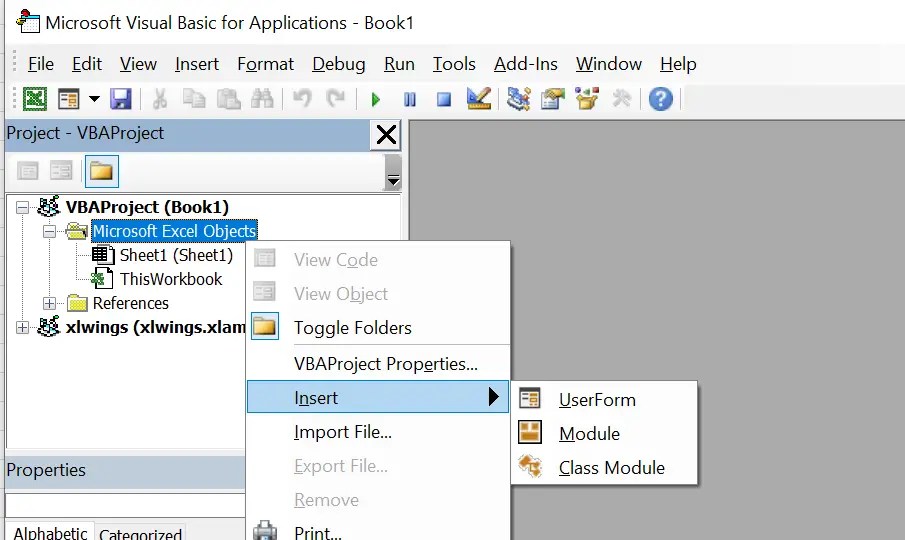
Next, in the VBAProject window, right click on your Excel file, and insert a module. In the new module window appears on the right-hand side, you can type the following VBA code.
Some notes here: rand_10 is the Python script file name. i.e. we just saved the script as “rand_10.py”. The VBA code RunPython(«import rand_10; rand_10.generate()») basically says: import the Python script called “rand_10”, then run the function generate() using Python.
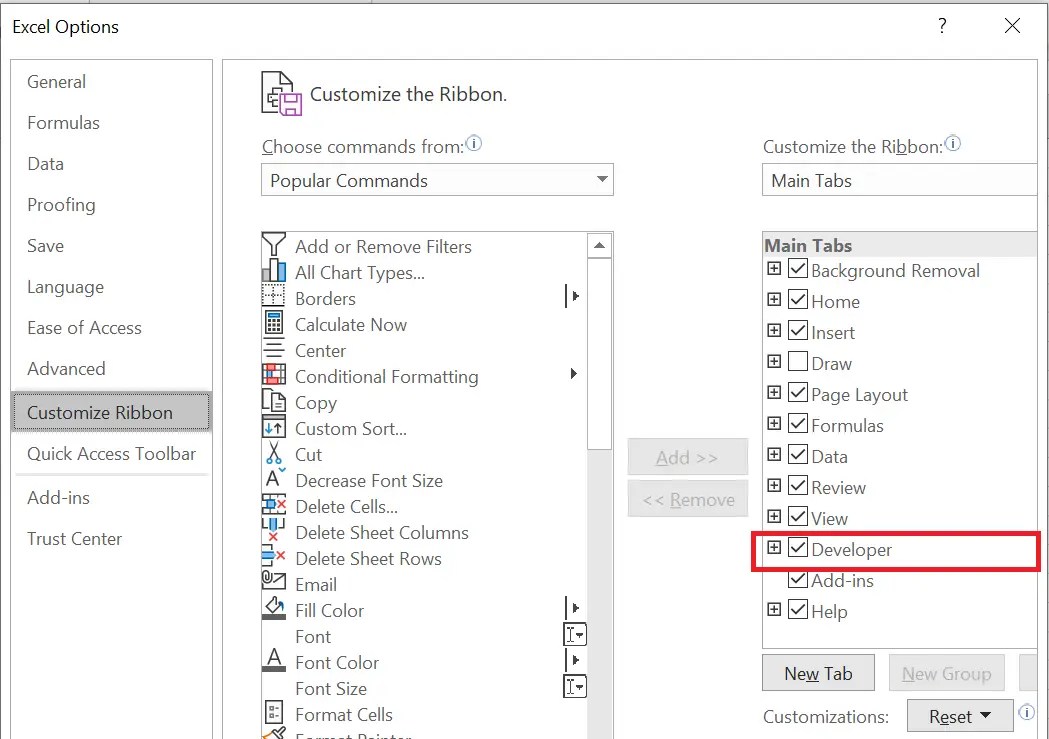
Next, save the VBA code, and now we want to create a button in Excel sheet. Going back into Excel, under the “Developer” tab. Insert -> Button. If you don’t have the Developer tab. Right click on your Excel ribbon, and “Customize the Ribbon”. Check the Developer checkbox, and then OK to save the change.
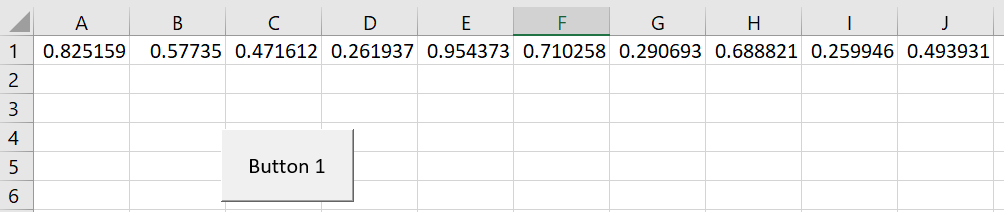
Once you have a button, right click on it, then Assign Macro to assign the button to the VBA macro named Rand_10() . Click on the button, and 10 random numbers will be populated from cells A1 to J1.
Part 3. Write a user-defined function in Python and call it within Excel
Advanced Excel users know that we can create user-defined functions in VBA. This feature is great, as not all built-in Excel functions fit our needs. However, VBA is 1) hard to use/learn, and 2) has very limited functionality. With xlwings, we can create our own user-defined functions in Python. All we need is a Python script, and a little bit setup in Excel to achieve this.
Python script
Let’s write a simple Python function that calculates the square of a number.
- @xw.func is a decorator. It must be added right before the def to let xlwings know this is a user-defined function.
- The function must return something so the returned value can be passed into Excel.
Excel setup
- in the same directory
- with the same name, but Python file ends with .py and the Excel file ends with .xlsm (or .xlsb )
To illustrate, I’m going to name my files as “square.py” and “square.xlsb”. Open up square.xlsb in Excel, go to the xlwings tab, then click on Import Functions.
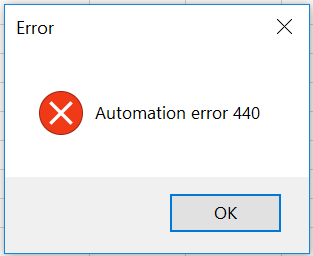
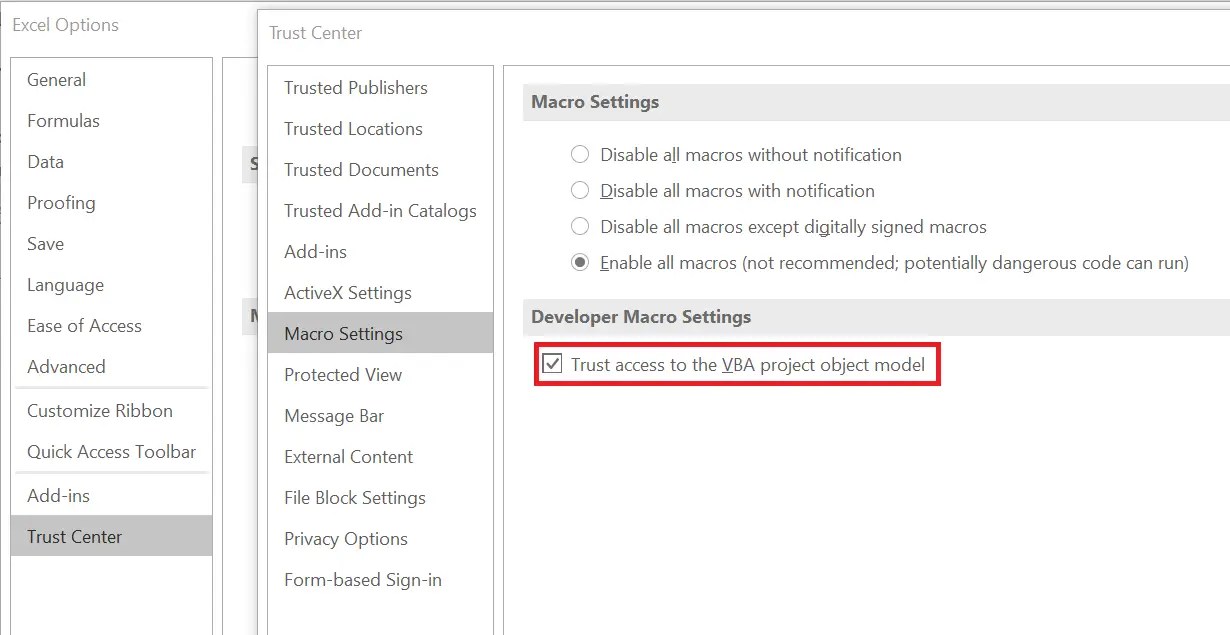
In some cases, you might get an “Automation error 440” pop up.
We can fix this by taking the below steps:
- In Excel, click on File -> Options -> Trust Center -> Trust Center Settings… -> Macro Settings. Check “Trust access to the VBA project object model” box, and enable macros. OK to save changes.

- Go to VBA editor (press Alt + F11 ). Tools -> References, then check “xlwings” box. OK to save change.
Once you complete the above 2 steps, go back to Excel the xlwings tab, click on the Import Functions again. After a brief pause, if no error message pops up, it means the Python function was imported successfully, and we can start using the Python function sqaure() inside Excel sheets. Let’s now test it!
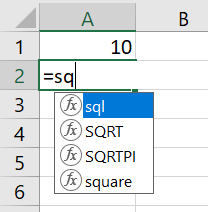
You can type =square(A1) inside any cell, and notice that as you type out the function, square actually shows up in the function list! That’s a neat feature. Yep, you saw that – we can use this Python function just like an Excel function, and we can pass cell references into the function. Make no mistake here – it appears we are using an Excel function, but under the hood, Python is doing all the calculation, then only the result is displayed to the user via Excel. This means that, we can create really complex functions thanks to Python’s power. For example, a dynamic function that extract financial data from a website and display data in Excel.
Debugging
- Automation error 404. We talked about how to fix this error, make sure the Excel Macro setting is correct.
- When you type the user defined function, “Object Require” shows up in the cell. Make sure xlwings is checked in VBA Editor -> Tools -> References, and the change is saved for the appropriate Excel file. Sometimes, when we have multiple Excel sheets open, we might end up applying this change to another file unintentionally.
How to Automate an Excel Sheet in Python?
Before you read this article and learn automation in Python….let’s watch a video of Christian Genco (a talented programmer and an entrepreneur) explaining the importance of coding by taking the example of automation.
You might have laughed loudly after watching this video and you surely, you might have understood the importance of automation in real life as well. Let’s come to the topic now…
We all know that Python is ruling all over the world, and we also know that Python is beginner’s friendly and it’s easy to learn in comparison to other languages. One of the best things you can do with Python is Automation.
Consider a scenario that you’re asked to create an account on a website for 30,000 employees. How would you feel? Surely you will be frustrated doing this task manually and repeatedly. Also, this is going to take too much time which is not a smart decision.
Now just imagine the life of employees who are into the data entry jobs. Their job is to take the data from tables such as Excel or Google Sheet and insert it somewhere else. They browse different websites and magazine, they collect the data from there, and then they insert it into the database. They also need to do the calculations for the entries.
Generally, the income is based on the performance in this job. More entries, higher salary (of course everyone wants a higher salary in their job).
But don’t you think that it’s boring to do the same kind of stuff repeatedly?
Now the question is….“How can I do it fast?”, “How can I automate my work?”
Instead of doing these kinds of tasks manually, just spend an hour coding and automate these kinds of stuff to make your life easier. You can automate your tedious task by just writing fewer lines of code in Python.
In this blog, we will create a small project to learn automation in Python. If you’re a beginner then you may prefer to watch some videos to learn the automation in Python and reading this blog might be a boring task for you but here we will go through step by step to explain everything in detail and to make things easier for you.
It will be great if you already know the core concept of Python. We will take an example of an Excel sheet with some entries, and we will learn the automation process. We are going to write a Python program that can process thousands of spreadsheets in under a second. Excited. Let’s get started…
Intro of The Task
Processing or updating thousands of spreadsheets manually will take too much time. It may take hours, days, or even months. We will write a Python program to automate this task. We will work on a spreadsheet given in the below picture.

In this spreadsheet, we have the record for all kinds of transactions, but let’s say due to an error (human error or system error), the price for the product listed in the third column is wrong. Let’s say we need to decrease the price by 10% (multiply the price by 0.9 and recalculate the value). You can do this task manually by using a mathematical formula in the fourth column but it will take too much time (maybe 1 week or two weeks) if there are thousands of records.
We will write a python program to automate this process. Also, we will add a chart to it. Our python program will do this task for us in a matter of seconds.
Let’s Get Into The Coding Zone
To work on this Excel sheet we are going to use a library openpyxl. Create a folder in your directory, give it a name and install the openpyxl package by executing the following command in your terminal.
Now we can import this package to work on our spreadsheet. Before that add the spreadsheet in your project folder. Now create a file app.py in your folder and write down the code given below.