- Easily Add CSS, Javascript And PHP Code Snippets To Elementor Pages
- Why using Code Snippets is better
- The basics of using the Code Snippets plugin
- Dealing with mistakes in custom PHP Code
- How to manage custom code snippets
- How to use the Code Snippets plugin with specific examples
- What you need to know
- Here is the PHP code needed to filter out pages
- Here is a specific example for adding HotJar
- Example to add some custom Javascript to the footer of your page
- Example to import a Javascript library
- CSS Examples
- Elementor optimization code snippets examples
- Conclusion
- Как добавить php код в Elementor и убрать ссылку из логотипа
- Как вставить php в Elementor
- Как убрать ссылку из лого на главной
- Как в Elementor добавить php код и убрать циклическую ссылку из логотипа на главной странице
- Как вставить код php в Elementor
- Как убрать циклическую ссылку из логотипа на главной странице
Easily Add CSS, Javascript And PHP Code Snippets To Elementor Pages
In WordPress and Elementor tutorials, it is not uncommon for you to be asked to add custom code snippets, frequently directly in your theme’s functions.php file.
But how do you carefully go about it when even the slightest error can break your site?
And how do you easily manage multiple code snippets that you added left and right?
Why using Code Snippets is better
So, why is writing Javascript in a Code Snippet is better than, say, Easy CSS & Javascript plugin?
- You can place the Javascript exactly where you want (head, body, footer).
- You can separate different snippets, and activate and deactivate them individually, when needed.
- You can filter the snippets to apply by pages, posts, categories, tags, etc.
- HTML is also accepted, allowing for the creation of shortcodes, preloaders, popups, etc.
- You write every snippet in PHP, giving much greater flexibility.
- It’s FREE!
The main disadvantage is that it is somewhat less beginner friendly, and you need to learn at least a little bit of PHP to fully take advantage of the plugin. The examples given below should get you started though.
What about all my articles on this website? Why don’t they recommend using this plugin to insert Javascript and CSS?
For CSS, it is most often better to place it only on the page where it is needed. So using Advanced > Custom CSS field is a good place. For the free version, see How to add Custom CSS with Elementor free.
For JavaScript, when it is short, placing it inline (in between tags) is a good option, and very user friendly. That’s why I use this method in my articles.
The basics of using the Code Snippets plugin
Well, here’s an easy way to add and organize custom code snippets:
Install and activate the Code Snippets plugin.
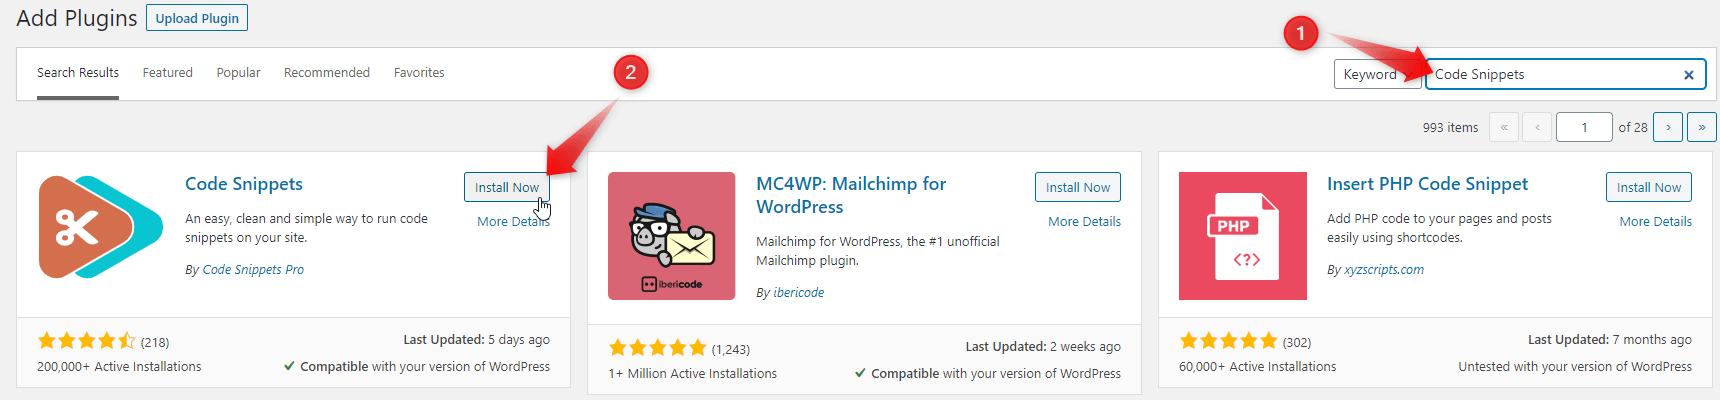
- It will add a new menu item “Snippet” in your WordPress admin bar. When you click this tab, you will see a list of all custom code snippets you have on your site. There will be a few demo snippets there.
- Click on “Add New” to add your first custom code snippet.
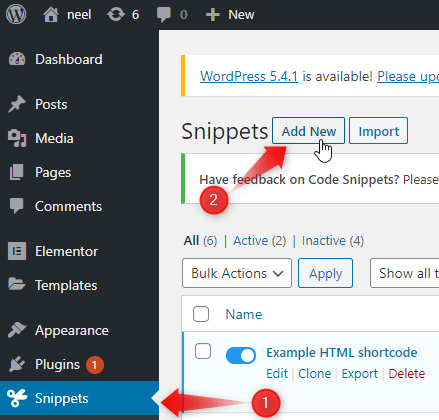
This takes you to the “Add New Snippet” page.
- Enter a title for your custom code snippet. (basically anything that will help you locate the code)
- Copy and paste your code snippet into the box.
- (If Needed) Adjust the code for your own requirements.
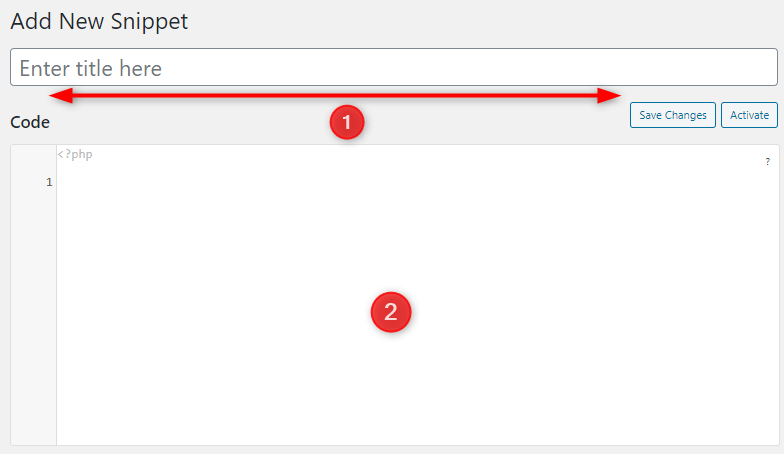
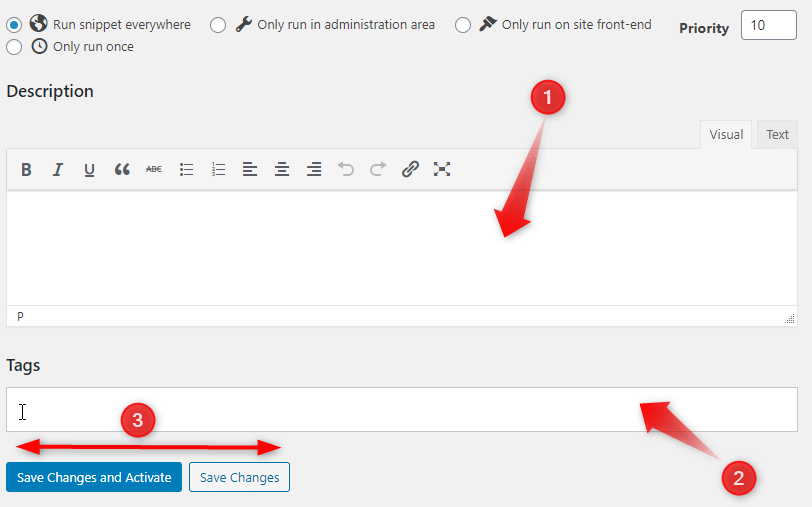
- You will find a text area to input a description of your code just below the code box. Add any details that help you understand the code.
- You can sort your code snippets by function and topic by allocating tags to them.
- “Save Changes” and “Activate”(If you want)
NOTE that you can run your code snippet on the front-end of your site, in WordPress Admin area or everywhere!
If you are in doubt just keep the default option “Run Snippet everywhere” checked.
See the specific examples below to learn how to run your code exactly where you want it.
Dealing with mistakes in custom PHP Code
An error in your theme file or site-specific plugin automatically renders your site inaccessible. What you will see instead is a syntax error or a 500 internal error which can be fixed manually by resetting your code with an FTP client.
Good news is, the Code Snippets plugin will automatically identify a syntax error in your code and deactivate it at once.
This is the main advantage of using this plugin. It makes it really safe to inject PHP code into your website, without risking breaking it.
It is a total necessity if you are working on a client website for which you don’t have FTP access.
How to manage custom code snippets
The Code Snippets plugin gives you a simple graphical user interface so you can easily coordinate your code snippets in WordPress.
Code Snippets can be exported individually or in bulk, can be saved without activation and if activated, can be deactivated anytime.
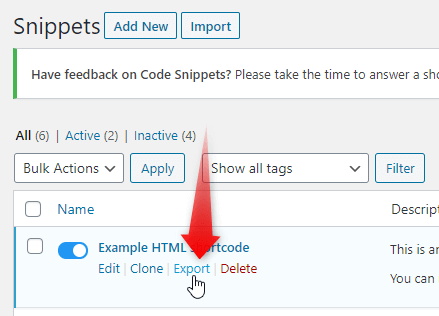
The import/export feature, particularly, makes it very useful to reuse similar snippets on different websites.
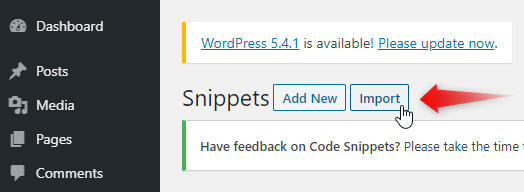
You can move your code snippets when moving your site in another server by going to Snippets>Import in your plugin.
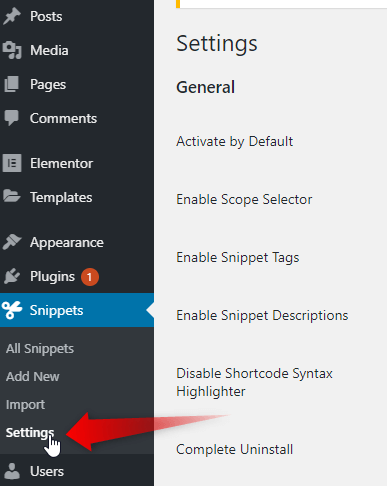
The plugin functions out of the box but can be adjusted from the Snippets > Settings page.
How to use the Code Snippets plugin with specific examples
So now, you might be asking, well that’s great, but how exactly do I use this plugin? What do I write in there? Here are a few examples.
What you need to know
Writing code in a Snippet is exactly the same as writing in the functions.php file.
Therefore, you need to write everything in PHP.
You can’t just copy paste Javascript or CSS in there, it will not work.
You will first need to format it properly, and below are several examples that will help you with this.
Here is the PHP code needed to filter out pages
With a bit of PHP knowledge, you can specify exactly what pages will load the code, and which won’t. So that you don’t have to have useless code loading on pages where it is not required.
To load only on a few post: (it will load ONLY in post 874 and post 14513) :
if (is_single (874) OR is_single(14513) ) < // content of function here >
Example in a snippet for enqueuing a script :
function wpb_hook_javascript() < if (is_single(874) OR is_single(14513) ) < wp_enqueue_script('mark','https://cdn.element.how/wp-content/uploads/markmin.js',array(),false, false); >> add_action( 'wp_enqueue_scripts', 'wpb_hook_javascript'); To get the opposite, and have it load everywhere EXCEPT these two posts, it would be:
if ( ! is_single (874) && ! is_single(14513) ) < // content of function here >
You can also filter out Pages AND Posts, as follow (this will load the function when NOT on post 2772 or on page 2483)
if (! is_single (2772) && ! is_page (2483)) < //content of function here >
Remove both ‘ ! ‘ to get the opposite, and load ONLY on page 2483 and post 2772.
Example in a function. The code will load when NOT on posts 2772, 5247, 3243, 4346, 5408, 3896, 2497, 7814 and not on page 2483.
function greatheader_javascript() < if (! is_single (2772) && ! is_single (5247) && ! is_single (3243) && ! is_single (4346) && ! is_single (5408) && ! is_single (3896) && ! is_single (2497) && ! is_single (7814) && ! is_page (2483)) < wp_enqueue_script('greatheader','https://cdn.element.how/wp-content/uploads/greatheader.js',array(), '1', true); >> add_action( 'wp_enqueue_scripts', 'greatheader_javascript'); Here is a specific example for adding HotJar
It will add it to the footer of your Elementor site, on all pages:
function wp_hotjar() < ?> add_action( 'wp_footer', 'wp_hotjar');
Example to add some custom Javascript to the footer of your page
function wp_customjs() < ?> add_action( 'wp_footer', 'wp_customjs');
Recommended only if it is a short JS snippet.
Example to import a Javascript library
For a lot of Javascript, it would be better to import a .JS file, and enqueue it. That’s also how you would import a Javascript library in your Elementor website.
Learn more about properly adding JS and CSS files to your WordPress installation here.
function wpb_hook_javascript() < wp_enqueue_script('mark','https://cdn.element.how/wp-content/uploads/markmin.js',array(),false, false); >> add_action( 'wp_enqueue_scripts', 'wpb_hook_javascript'); CSS Examples
Same goes for CSS. Here it an example for only a bit of CSS, loaded in the header:
add_action( 'wp_head', function () < ?> );
And here is for an example for enqueuing a custom CSS file:
wp_enqueue_style( 'customcss', get_template_directory_uri() . '../wp-content/uploads/customcss.css' );
Elementor optimization code snippets examples
Here is how to remove jQuery Migrate
function dequeue_jquery_migrate( $scripts ) < if ( ! is_admin() && ! empty( $scripts->registered['jquery'] ) ) < $scripts->registered['jquery']->deps = array_diff( $scripts->registered['jquery']->deps, [ 'jquery-migrate' ] ); > > add_action( 'wp_default_scripts', 'dequeue_jquery_migrate' );
Removing the e icons (only for users that are not logged in) ( be careful with this, they need to be replaced with other icons!) :
add_action( 'wp_enqueue_scripts', 'remove_default_stylesheet', 20 ); function remove_default_stylesheet() < if( !is_user_logged_in()) < wp_deregister_style( 'elementor-icons' ); >>
Here is how to remove the comment-reply.min.js , if you are not using the native WordPress comment system.
function clean_header_hook() < wp_deregister_script( 'comment-reply' ); >add_action('init','clean_header_hook'); Here is how to remove the Google Fonts from loading from Elementor. You will need to either host them locally or import only those you need through the Elementor Custom Fonts option.
You might be thinking ‘but why stop Elementor from loading them, to load them again from elsewhere?’ Because Elementor, by defaults, imports all the different variations available of any font used on a page. Example: you use roboto, font weight:400 only. It still imports all the other font weights, and the italic version for all of these.
add_filter( 'elementor/frontend/print_google_fonts', '__return_false' );
Conclusion
Congratulations! You just learned the most secure and convenient way to add CSS, Javascript and PHP to your Elementor Website! You will probably find this quite useful in your future projects.
I personally use that plugin extensively, on every website I work with.
Element.how also provides premium tutorials showing awesome advanced designs, check them out here.
Как добавить php код в Elementor и убрать ссылку из логотипа

В этом уроке мы научимся делать сразу две вещи. Вы узнаете, как вставить php код в любой блок или контейнер в Elementor и как с этой помощью можно убрать циклическую ссылку на главной странице из логотипа.
Как вставить php в Elementor
Для этого мы не будем использовать сторонние плагины и виджеты. Для вставки php кода в Elementor блоки мы создадим свой шорткод.
Для этого переходим в раздел «внешний вид / редактор тем» и открываем файл functions.php

В конце файла прописываем следующий код.
// Вставка php кода с помощью шорткода function wpc_elementor_shortcode( $atts ) < . ВАШ PHP КОД. >add_shortcode( 'code_php_output', 'wpc_elementor_shortcode');
Вместо «…ВАШ PHP КОД…» прописываете свой php код, который должен срабатывать на странице.
‘code_php_output’ — а это название шорткода, которое можно поменять по своему усмотрению.
Сам шорткод будет выглядеть так [code_php_output]
Ну и чтобы вывести наш шорткод, вставляем его в стандартный виджет Elementor’а для шорткодов.

Как убрать ссылку из лого на главной
Чтобы сделать логотип без циклической ссылки на главной странице нам нужно написать условие, при котором на главной будет выводиться один код, а на остальных страницах другой. Далее запихиваем всё это в шорткод и получаем следующее.
// Убираем ссылку из логотипа на главной function wpc_elementor_shortcode( $atts ) < if(!is_front_page() || is_paged()) echo ' '; else echo ' '; > add_shortcode( 'logo_php_output', 'wpc_elementor_shortcode');
В конце нам останется вставить виджет с шорткодом [logo_php_output] вместо стандартного Elementor виджета с лого.
Как в Elementor добавить php код и убрать циклическую ссылку из логотипа на главной странице

Сегодня у нас будет небольшая и полезная статья. Вы узнаете, как вставить php код в любой блок или контейнер в Elementor и как с этой помощью можно убрать циклическую ссылку на главной странице из логотипа.
Как вставить код php в Elementor
Для этого мы не будем использовать сторонние плагины и виджеты. Для вставки php кода в Elementor блоки мы создадим свой шорткод.
Для этого переходим в раздел «внешний вид / редактор тем» и открываем файл functions.php
В конце файла прописываем следующий код.
// Вставка php кода с помощью шорткода function wpc_elementor_shortcode( $atts ) < . ВАШ PHP КОД. >add_shortcode( 'code_php_output', 'wpc_elementor_shortcode');Вместо «…ВАШ PHP КОД…» прописываете свой php код, который должен срабатывать на странице.
‘code_php_output’ — а это название шорткода, которое можно поменять по своему усмотрению.
Сам шорткод будет выглядеть так [code_php_output]
Чтобы вывести наш шорткод, вставляем его в стандартный виджет Elementor’а для шорткодов.
Как убрать циклическую ссылку из логотипа на главной странице
Чтобы сделать логотип без циклической ссылки на главной странице нам нужно написать условие, при котором на главной будет выводиться один код, а на остальных страницах другой. Далее запихиваем всё это в шорткод и получаем следующее.
// Убираем ссылку из логотипа на главной function wpc_elementor_shortcode( $atts ) < if(!is_front_page() || is_paged()) echo ' '; else echo ' '; > add_shortcode( 'logo_php_output', 'wpc_elementor_shortcode');В конце нам останется вставить виджет с шорткодом [logo_php_output] вместо стандартного Elementor виджета с лого.
Надеюсь вам понравилась данная статья, удачи в web-разработке! 🙂