- HTML Form Elements
- The HTML Elements
- The Element
- Example
- The Element
- The Element
- Example
- Example
- Visible Values:
- Example
- Allow Multiple Selections:
- Example
- The Element
- Example
- Example
- The Element
- Example
- The and Elements
- Example
- The Element
- Example
- The Element
- Example
- HTML Exercises
- HTML Form Elements
- Option value and id html
- Кратко
- Пример
- Подробно
- Атрибуты
- disabled
- label
- selected
- value
- На практике
- Денис Ежков советует
- How to get and set the value of a select menu using an ID
- The selectedIndex property
- Getting the selected ID using the selectedIndex and options properties
- Setting the selected option by ID
- Browser compatibility
- Option value and id html
HTML Form Elements
This chapter describes all the different HTML form elements.
The HTML Elements
The HTML element can contain one or more of the following form elements:
The Element
One of the most used form element is the element.
The element can be displayed in several ways, depending on the type attribute.
Example
All the different values of the type attribute are covered in the next chapter: HTML Input Types.
The Element
The element defines a label for several form elements.
The element is useful for screen-reader users, because the screen-reader will read out loud the label when the user focus on the input element.
The element also help users who have difficulty clicking on very small regions (such as radio buttons or checkboxes) — because when the user clicks the text within the element, it toggles the radio button/checkbox.
The for attribute of the tag should be equal to the id attribute of the element to bind them together.
The Element
The element defines a drop-down list:
Example
The elements defines an option that can be selected.
By default, the first item in the drop-down list is selected.
To define a pre-selected option, add the selected attribute to the option:
Example
Visible Values:
Use the size attribute to specify the number of visible values:
Example
Allow Multiple Selections:
Use the multiple attribute to allow the user to select more than one value:
Example
The Element
The element defines a multi-line input field (a text area):
Example
The rows attribute specifies the visible number of lines in a text area.
The cols attribute specifies the visible width of a text area.
This is how the HTML code above will be displayed in a browser:
You can also define the size of the text area by using CSS:
Example
The Element
The element defines a clickable button:
Example
This is how the HTML code above will be displayed in a browser:
Note: Always specify the type attribute for the button element. Different browsers may use different default types for the button element.
The and Elements
The element is used to group related data in a form.
The element defines a caption for the element.
Example
This is how the HTML code above will be displayed in a browser:
The Element
The element specifies a list of pre-defined options for an element.
Users will see a drop-down list of the pre-defined options as they input data.
The list attribute of the element, must refer to the id attribute of the element.
Example
The Element
The element represents the result of a calculation (like one performed by a script).
Example
Perform a calculation and show the result in an element:
HTML Exercises
HTML Form Elements
| Tag | Description |
|---|---|
| Defines an HTML form for user input | |
| Defines an input control | |
| Defines a multiline input control (text area) | |
| Defines a label for an element | |
| Groups related elements in a form | |
| Defines a caption for a element | |
| Defines a drop-down list | |
| Defines a group of related options in a drop-down list | |
| Defines an option in a drop-down list | |
| Defines a clickable button | |
| Specifies a list of pre-defined options for input controls | |
| Defines the result of a calculation |
For a complete list of all available HTML tags, visit our HTML Tag Reference.
Option value and id html
Один пункт в раскрывающемся списке .
Время чтения: меньше 5 мин
Кратко
Скопировать ссылку «Кратко» Скопировано
Тег используется в интерактивных элементах управления для вёрстки одиночного пункта списка.
Пример
Скопировать ссылку «Пример» Скопировано
form> label for="city-select">Ваш городlabel> select name="city" id="city-select"> option value="">-- Выберите город --option> option value="petersburg">Санкт-Петербургoption> option value="moscow">Москваoption> option value="kazan">Казаньoption> option value="samara">Самараoption> option value="perm">Пермьoption> option value="novosibirsk">Новосибирскoption> select> form>
Подробно
Скопировать ссылку «Подробно» Скопировано
Тегом размечается каждый элемент выпадающего списка , группы опций или перечня .
Атрибуты
Скопировать ссылку «Атрибуты» Скопировано
disabled
Скопировать ссылку «disabled» Скопировано
Атрибут булевого типа. Если задан, то пункт списка нельзя выбрать. Часто браузеры выделяют такой элемент управления серым цветом, и на нём не срабатывают события клика или фокуса. Даже если атрибут не задан, элемент всё равно может быть отключён, если находится внутри тега с заданным атрибутом disabled .
select name="city1"> option value="">-- Выберите город --option> option value="petersburg">Санкт-Петербургoption> option value="moscow">Москваoption> option value="kazan">Казаньoption> option value="samara" disabled>Самараoption> option value="perm">Пермьoption> option value="novosibirsk">Новосибирскoption> select>
label
Скопировать ссылку «label» Скопировано
Значение этого атрибута задаёт текст пункта в списке. Если атрибут не задан, то в качестве значения берётся текстовое содержимое тега .
select name="city2"> option value="petersburg" selected label="Ленинград">Санкт-Петербургoption> option value="samara" label="Куйбышев">Самараoption> option value="volgograd" label="Сталинград">Волгоградoption> option value="ekaterinburg" label="Свердловск">Екатеринбургoption> select>
Несмотря на то, что задано текстовое содержимое тега , в выпадающем списке отображаются значения из атрибутов label :
selected
Скопировать ссылку «selected» Скопировано
select name="city3"> option value="">-- Выберите город --option> option value="petersburg">Санкт-Петербургoption> option value="moscow">Москваoption> option value="kazan" selected>Казаньoption> option value="samara">Самараoption> option value="perm">Пермьoption> option value="novosibirsk">Новосибирскoption> select>
select name="city4" multiple size="6"> option value="petersburg">Санкт-Петербургoption> option value="moscow" selected>Москваoption> option value="kazan" >Казаньoption> option value="samara" selected>Самараoption> option value="perm">Пермьoption> option value="novosibirsk">Новосибирскoption> select>
value
Скопировать ссылку «value» Скопировано
Если выбран какой-то пункт списка, то при отправке формы на сервер будет передано значение атрибута value этого пункта. Если атрибут не задан, то при отправке будет использоваться текстовое содержимое тега .
На практике
Скопировать ссылку «На практике» Скопировано
Денис Ежков советует
Скопировать ссылку «Денис Ежков советует» Скопировано
🛠 Раньше браузеры не предоставляли никаких средств для нормальной стилизации элемента , и это доставляло очень много головной боли фронтенд-разработчикам 🙁 Стиль элементов можно было поменять, только если тегу был задан атрибут multiple . Тогда список целиком становился частью потока страницы, и мы имели возможность применять стили к его элементам. Вот как выглядело решение:
select name="city" id="city-select" multiple> option value="petersburg">Санкт-Петербургoption> option value="moscow">Москваoption> option value="kazan">Казаньoption> option value="samara">Самараoption> option value="perm">Пермьoption> option value="novosibirsk">Новосибирскoption> select>
select counter-reset: cnt;> option:nth-child(2n) background-color: #282a2e;> option counter-increment: cnt;> option::before content: counter(cnt) ". ";>select counter-reset: cnt; > option:nth-child(2n) background-color: #282a2e; > option counter-increment: cnt; > option::before content: counter(cnt) ". "; >
Теперь практически все браузеры умеют стилизовать даже без атрибута multiple .
В Safari стилизация для доступна не полностью, даже если тег имеет атрибут multiple .
How to get and set the value of a select menu using an ID
On Friday, we looked at how to get and set the value of a select menu with vanilla JS. But the approach we used only works if the option elements have a value property on them.
What if you have something like this instead?
label for="dnd">What's the best class in D&D?label> select id="dnd"> option id="bard">Bardoption> option id="fighter">Fighteroption> option id="druid">Druidoption> option id="paladin">Paladinoption> option id="rogue">Rogueoption> option id="wizard">Wizardoption> select>Today, let’s look at how to get and set the value of a select menu using IDs.
The selectedIndex property
The HTMLSelectElement.selectedIndex property returns an integer representing the index of the selected option for a select element. If no item is selected, it returns -1 .
Using the example above, this would return 0 , since the first item is the one selected by default.
var dnd = document.querySelector('#dnd'); // Returns 0 dnd.selectedIndex; If you selected Druid from the list, it would return 2 .
Getting the selected ID using the selectedIndex and options properties
The options property returns an HTMLOptionsCollection , an array-like collection of options for a select element. You can pair it with the selectedIndex property to get the selected option . Then, you can use the id property to get its ID.
This would return «bard» with the default first item selected.
// Returns "bard" dnd.options[dnd.selectedIndex].id; Setting the selected option by ID
The selectedIndex property isn’t just readable. You can use it to set the selected item as well.
Let’s say you wanted to select the option with an ID of #rogue .
First, let’s convert the HTMLOptionsCollection that dnd.options returns into an array using the Array.from() method.
// Convert the HTMLOptionsCollection into an array Array.from(dnd.options); Next, we can loop through each option using the Array.forEach() method.
// Convert the HTMLOptionsCollection into an array // Then, loop through each option in the array Array.from(dnd.options).forEach(function (option, index) // Do something. >); Finally, we’ll check each option to see if it’s id is rogue . if it is, we’ll set it’s index to the dnd.selectedIndex property.
// Convert the HTMLOptionsCollection into an array // Then, loop through each option in the array Array.from(dnd.options).forEach(function (option, index) // If the ID is "rogue", set this items index as the selectedIndex if (option.id === 'rogue') dnd.selectedIndex = index; > >); Browser compatibility
The selectedIndex and options properties work back to at least IE9.
The limiting factor here is the Array.from() method, which works in all modern browsers but has no IE support. You can add support with a polyfill.
Hate the complexity of modern front‑end web development? I send out a short email each weekday on how to build a simpler, more resilient web. Join over 14k others.
Made with ❤️ in Massachusetts. Unless otherwise noted, all code is free to use under the MIT License. I also very irregularly share non-coding thoughts.
Option value and id html

Элемент select создает список. В зависимости от настроек это может быть выпадающий список для выбора одного элемента, либо раскрытый список, в котором можно выбрать сразу несколько элементов.
Создадим выпадающий список:
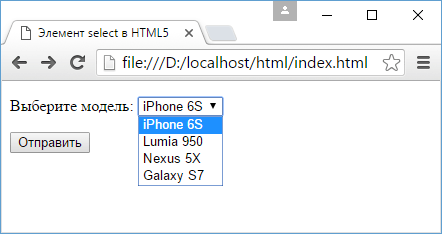
Внутрь элемента select помещаются элементы option — элементы списка. Каждый элемент option содержит атрибут value , который хранит значение элемента. При этом значение элемента option не обязательно должно совпадать с отображаемым им текстом. Например:
С помощью атрибута selected мы можем установить выбранный по умолчанию элемент — это необязательно должен быть первый элемент в списке:
С помощью другого атрибута disabled можно запретить выбор определенного элемента. Как правило, элементы с этим атрибутом служат для создания заголовков:
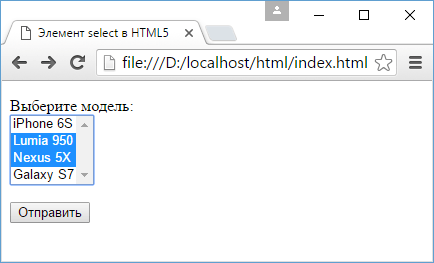
Для создания списка с множественным выбором к элементу select надо добавить атрибут multiple :
Зажав клавишу Ctrl, мы можем выбрать в таком списке несколько элементов:
Select также позволяет группировать элементы с помощью тега :
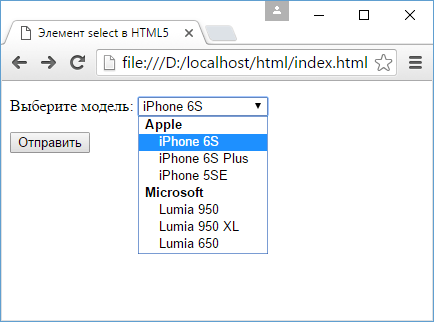
Использование групп элементов применимо как к выпадающему списку, так и к списку со множественным выбором.