- How to make active tab in navigation menu using HTML CSS & JavaScript?
- HTML
- CSS
- JavaScript
- Example
- W3.CSS Navigation Tabs
- Paris
- Tokyo
- Tabbed Navigation
- Example
- London
- Paris
- Tokyo
- Example
- Example
- JavaScript Explained
- Closable Tabs
- London
- Paris
- Tokyo
- Example
- London
- Active/Current Tab
- Example
- Vertical Tabs
- Example
- Animated Tab Content
- Example
- Tabbed Image Gallery
- Example
- Tabs in a Grid
- How TO — Tabs
- London
- Paris
- Tokyo
- Create Toggleable Tabs
- Example
- London
- Paris
- Tokyo
- Example
- Example
- Fade in Tabs:
- Example
- Show a tab by default
- Example
- Close a tab
- Example
- London
- Elastic Active Tab Animation using only HTML & CSS
- Video Tutorial of an Elastic Active Tab Animation
- You might like this:
- Elastic Active Tab Animation [Source Codes]
How to make active tab in navigation menu using HTML CSS & JavaScript?
With the help of HTML, CSS, and JavaScript, it is possible to create a navigation menu with a curved active tab. This can be done by using the ::before and ::after pseudo-elements to create the desired shape, and then using JavaScript to add the active class to the element.
HTML
The HTML for this navigation menu is very simple. There is a ul element with a class of «nav» and within that, there are six li elements, each with a class of «nav-item».
ul class="nav"> li class="nav-item">a href="#">Homea>li> li class="nav-item">a href="#">Abouta>li> li class="nav-item">a href="#">Servicesa>li> li class="nav-item">a href="#">Portfolioa>li> li class="nav-item">a href="#">Contacta>li> ul>
CSS
The CSS for this navigation menu is fairly straightforward. The ::before and ::after pseudo-elements are used to create the two halves of the active tab. These are then positioned absolutely so that they sit on top of the other tabs.
The .nav-item class is used to style the rest of the navigation menu. The a elements are given a display of block so that they fill the entire space of the li elements.
.nav < position: relative; list-style: none; padding: 0; margin: 0; >.nav::before, .nav::after < content: ""; position: absolute; top: 0; width: 50%; height: 100%; background: #fff; z-index: 1; >.nav::before < left: 0; border-radius: 0 0 0 50%; >.nav::after < right: 0; border-radius: 0 0 50% 0; >.nav-item < position: relative; float: left; width: 16.66667%; >.nav-item a
JavaScript
The JavaScript for this navigation menu is very simple. It just needs to add the active class to the element when it is clicked. This can be done with the help of the classList property.
var navItems = document.querySelectorAll(".nav-item"); for (var i = 0; i navItems.length; i++) navItems[i].addEventListener("click", function() this.classList.add("active"); >); >
Example
Below is the full working program to create active tab in navigation menu. We use above discussed HTML, CSS and JavaScript to achieve this goal.
!DOCTYPE HTML> html> head> style>HTML .nav position: relative; list-style: none; padding: 0; margin: 0; > .nav::before content: ""; position: absolute; top: 0; width: 50%; height: 100%; background: #fff; z-index: 1; > .active background: rgb(177, 177, 177); > .nav::after content: ""; position: absolute; top: 0; width: 50%; height: 100%; background: rgb(0, 0, 0); z-index: 1; > .nav::before left: 0; border-radius: 0 0 0 50%; > .nav::after right: 0; border-radius: 0 0 50% 0; > .nav-item position: relative; float: left; width: 16.66667%; > .nav-item a display: block; padding: 10px 20px; border: 1px solid #ccc; text-decoration: none; color: #333; position: relative; z-index: 2; > /style> /head> body> ul class="nav"> li class="nav-item">a href="#">Home/a>/li> li class="nav-item">a href="#">About/a>/li> li class="nav-item">a href="#">Services/a>/li> li class="nav-item">a href="#">Portfolio/a>/li> li class="nav-item">a href="#">Contact/a>/li> /ul> script> var navItems = document.querySelectorAll(".nav-item"); for (var i = 0; i navItems.length; i++) navItems[i].addEventListener("click", function() this.classList.add("active"); >); > /script> /body> /html>
In conclusion, it is possible to create a navigation menu with a curved active tab using HTML, CSS, and JavaScript. This can be done by using the ::before and ::after pseudo-elements to create the desired shape, and then using JavaScript to add the active class to the element.
W3.CSS Navigation Tabs
It is the most populous city in the United Kingdom, with a metropolitan area of over 9 million inhabitants.
Paris
Paris is the capital of France.
The Paris area is one of the largest population centers in Europe, with more than 12 million inhabitants.
Tokyo
Tokyo is the capital of Japan.
It is the center of the Greater Tokyo Area, and the most populous metropolitan area in the world.
Tabbed Navigation
Tabbed navigation is a way to navigate around a website.
Normally, tabbed navigation uses navigation buttons (tabs) arranged together with the selected tab highlighted.
This example uses elements with the same class name («city» in our example) , and changes the style between display:none and display:block to hide and display different content:
Example
London
London is the capital of England.
And some clickable buttons to open the tabbed content:
Example
And a JavaScript to do the job:
Example
function openCity(cityName) <
var i;
var x = document.getElementsByClassName(«city»);
for (i = 0; i < x.length; i++) <
x[i].style.display = «none»;
>
document.getElementById(cityName).style.display = «block»;
>
JavaScript Explained
The openCity() function is called when the user clicks on one of the buttons in the menu.
The function hides all elements with the class name «city» (display=»none»), and displays the element with the given city name (display=»block»);
Closable Tabs
London
London is the capital city of England.
Paris
Paris is the capital of France.
Tokyo
Tokyo is the capital of Japan.
To close a tab, add onclick=»this.parentElement.style.display=’none'» to an element inside the tab container:
Example
London
London is the capital city of England.
Active/Current Tab
To highlight the current tab/page the user is on, use JavaScript and add a color class to the active link. In the example below, we have added a «tablink» class to each link. That way, it is easy to get all links that is associated with tabs, and give the current tab link a «w3-red» class, to highlight it:
Example
function openCity(evt, cityName) <
var i, x, tablinks;
x = document.getElementsByClassName(«city»);
for (i = 0; i < x.length; i++) <
x[i].style.display = «none»;
>
tablinks = document.getElementsByClassName(«tablink»);
for (i = 0; i < x.length; i++) <
tablinks[i].className = tablinks[i].className.replace(» w3-red», «»);
>
document.getElementById(cityName).style.display = «block»;
evt.currentTarget.className += » w3-red»;
>
Vertical Tabs
Example
Animated Tab Content
Use any of the w3-animate-classes to fade, zoom or slide in tab content:
Example
Tabbed Image Gallery


×

×

×

×
Example
×
Tabs in a Grid
Using tabs in a third column layout. Note that we add a bottom border to the active tab, instead of a background color:
How TO — Tabs
Tabs are perfect for single page web applications, or for web pages capable of displaying different subjects:
London
London is the capital city of England.
Paris
Paris is the capital of France.
Tokyo
Tokyo is the capital of Japan.
Create Toggleable Tabs
Step 1) Add HTML:
Example
London
London is the capital city of England.
Paris
Paris is the capital of France.
Tokyo
Tokyo is the capital of Japan.
Create buttons to open specific tab content. All elements with class=»tabcontent» are hidden by default (with CSS & JS). When the user clicks on a button — it will open the tab content that «matches» this button.
Step 2) Add CSS:
Style the buttons and the tab content:
Example
/* Style the tab */
.tab overflow: hidden;
border: 1px solid #ccc;
background-color: #f1f1f1;
>
/* Style the buttons that are used to open the tab content */
.tab button background-color: inherit;
float: left;
border: none;
outline: none;
cursor: pointer;
padding: 14px 16px;
transition: 0.3s;
>
/* Change background color of buttons on hover */
.tab button:hover background-color: #ddd;
>
/* Create an active/current tablink class */
.tab button.active background-color: #ccc;
>
/* Style the tab content */
.tabcontent display: none;
padding: 6px 12px;
border: 1px solid #ccc;
border-top: none;
>
Step 3) Add JavaScript:
Example
function openCity(evt, cityName) <
// Declare all variables
var i, tabcontent, tablinks;
// Get all elements with and hide them
tabcontent = document.getElementsByClassName(«tabcontent»);
for (i = 0; i < tabcontent.length; i++) tabcontent[i].style.display = "none";
>
// Get all elements with and remove the class «active»
tablinks = document.getElementsByClassName(«tablinks»);
for (i = 0; i < tablinks.length; i++) tablinks[i].className = tablinks[i].className.replace(" active", "");
>
// Show the current tab, and add an «active» class to the button that opened the tab
document.getElementById(cityName).style.display = «block»;
evt.currentTarget.className += » active»;
>
Fade in Tabs:
If you want to fade in the tab content, add the following CSS:
Example
.tabcontent <
animation: fadeEffect 1s; /* Fading effect takes 1 second */
>
/* Go from zero to full opacity */
@keyframes fadeEffect from
to
>
Show a tab by default
To open a specific tab on page load, use JavaScript to «click» on the specified tab button:
Example
Close a tab
If you want to close a specific tab, use JavaScript to hide the tab with a click of a button:
Example
London
London is the capital city of England.
x
Tip: Also check out How To — Vertical Tabs.
Elastic Active Tab Animation using only HTML & CSS
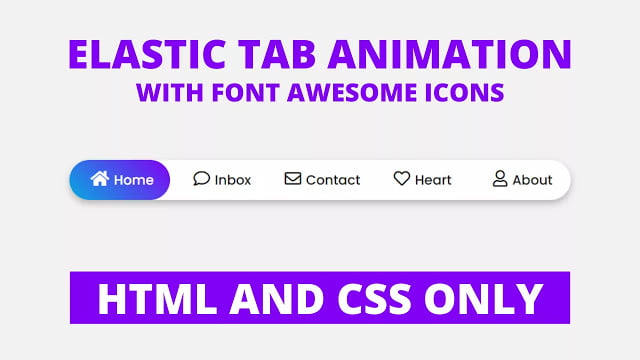
Hello readers, Today in this blog you’ll learn how to create an Elastic Active Tab Animation using only HTML & CSS. Earlier I’ve shared a blog on how to create an Active Tab Hover Animation using HTML & CSS and that design is similar but this design is a little bit advanced and attractive that means this design has an elastic active tab animation.
The menu bar is where visitors find links to the important pages on your website. And the tabs are perfect for single-page web applications, or for displaying different topics in a smaller area. Today you will learn to create an Elastic Tab Animation using only HTML & CSS.
In this program, there is a menu bar on the webpage with five different menu icons with the texts. But when you click on the particular menu item, there is shown an Elastic Tab Animation which is filled with the gradient background color. You may have seen this type of animation somewhere, there is a used JavaScript or JavaScript library but this is a pure CSS program that’ means I used only HTML & CSS to create this animation.
If you’re feeling difficult to understand what I am saying. You can watch a full video tutorial on this program (Elastic Tab Animation).
Video Tutorial of an Elastic Active Tab Animation
In the video, you have seen an elastic active tab animation that is created using only HTML & CSS. And I hope you’ve understood the basic codes behind creating this animation. This is a simple CSS program so if you’re a beginner in web designing and you know basic HTML & CSS then you can easily understand the codes of the program.
If you like this program (Elastic Tab Animation) and want to get source codes. You can easily get the source codes of this program. To get the source codes you just need to scroll down. You can use this program on your projects and the website’s menu bar.
You might like this:
Elastic Active Tab Animation [Source Codes]
To create this program (Elastic Tab Animation). First, you need to create two Files one HTML File and another one is CSS File. After creating these files just paste the following codes in your file.
First, create an HTML file with the name of index.html and paste the given codes in your HTML file. Remember, you’ve to create a file with .html extension.
Second, create a CSS file with the name of style.css and paste the given codes in your CSS file. Remember, you’ve to create a file with .css extension.
@import url(‘https://fonts.googleapis.com/css?family=Poppins:400,500,600,700&display=swap’); * < margin: 0; padding: 0; box-sizing: border-box; font-family: 'Poppins', sans-serif; >html,body < display: grid; height: 100%; place-items: center; text-align: center; background: #f2f2f2; >.wrapper < height: 60px; width: 55vw; background: #fff; line-height: 60px; border-radius: 50px; box-shadow: 0 5px 10px rgba(0,0,0,0.25); >.wrapper nav < position: relative; display: flex; >.wrapper nav label < flex: 1; width: 100%; z-index: 1; cursor: pointer; >.wrapper nav label a < position: relative; z-index: -1; color: #1d1f20; font-size: 20px; font-weight: 500; text-decoration: none; transition: color 0.6s ease; >.wrapper nav #home:checked ~ label.home a, .wrapper nav #inbox:checked ~ label.inbox a, .wrapper nav #contact:checked ~ label.contact a, .wrapper nav #heart:checked ~ label.heart a, .wrapper nav #about:checked ~ label.about a < color: #fff; >.wrapper nav label a i < font-size: 25px; margin: 0 7px; >.wrapper nav .tab < position: absolute; height: 100%; width: 20%; left: 0; bottom: 0; z-index: 0; border-radius: 50px; background: linear-gradient(45deg, #05abe0 0%,#8200f4 100%); transition: 0.6s cubic-bezier(0.68, -0.55, 0.265, 1.55); >.wrapper nav #inbox:checked ~ .tab < left: 20%; >.wrapper nav #contact:checked ~ .tab < left: 40%; >.wrapper nav #heart:checked ~ .tab < left: 60%; >.wrapper nav #about:checked ~ .tab < left: 80%; >.wrapper nav input
That’s all, now you’ve successfully created an Elastic Active Tab Animation using only HTML & CSS. If your code doesn’t work or you’ve faced any error/problem then please comment down or contact us from the contact page.