- Create Editable Table in HTML5, Bootstrap and jQuery
- HTML5 Editable Table:
- Creating Editable Table in HTML5 and Bootstrap:
- HTML Markup:
- CSS Styles:
- Adding jQuery Script:
- Here is the Complete Script for the Demo:
- Create an Editable HTML Table
- Create a Cell in an HTML Table
- Create an Editable Table in HTML
- Conclusion
- Related Article — HTML Table
- Simple Editable HTML Table (A Quick Example)
- EXAMPLE CODE DOWNLOAD
- EDITABLE TABLE DEMO
- SUPPORT
- EDITABLE HTML TABLE
- TUTORIAL VIDEO
- PART 1) THE HTML
- PART 2) THE JAVASCRIPT
- 2A) DOUBLE-CLICK TO “EDIT CELL”
- 2B) “CONVERT” CELL TO EDITABLE FIELD
- 2C) END “EDIT MODE”
- PART 3) THE CSS
- EXTRAS
- HOW TO TIE CELL VALUE TO AN ID?
- CLICK OUTSIDE CELL TO CANCEL
- COMPATIBILITY CHECKS
- LINKS & REFERENCES
- THE END
Create Editable Table in HTML5, Bootstrap and jQuery
Hi! Today we are going to see an interesting tutorial which is about creating editable table in html5, bootstrap and jquery. Usually, any form of organized data will be presented in as table or lists on web pages. But those tables cannot be edited by users. We can say HTML Tables are non-editable and you need the help of complex jquery plug-ins to make them editable. But thanks to HTML5, you can now easily create editable tables on the fly, without any complex coding or add-ons.
HTML5 is just enough to create an editable table, but to make this demo interesting, I’m going to use bootstrap and jquery along with it. Come, let’s see how to apply inline editable option to html table element.
HTML5 Editable Table:
Creating Editable Table in HTML5 and Bootstrap:
Let’s see a demo, where we have this html table with each cell being editable. There would also be an option for the user to add a new row to the table and delete the rows from it.
For the demo I’m going to use,
- HTML5 — To create the editable table
- Bootstrap CSS — To make the table visually appealing
- jQuery — To perform user actions on the table like adding row, deleting row etc.
First let’s write the markup for the table.
HTML Markup:
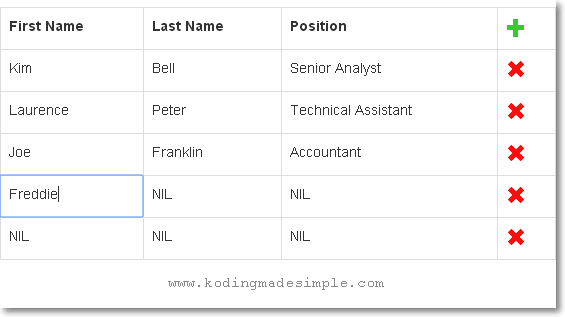
First Name Last Name Position Kim Bell Senior Analyst Laurence Peter Technical Assistant Joe Franklin Accountant NIL NIL NIL
Above, we have created a html table with three rows of data by default. There is a Plus sign (‘+’) in the upper right corner of the table header for adding rows, and a ‘x’ mark at the end of each row indicating the option to delete rows. We have also set the contenteditable=»true» for each ‘td’ element which makes inline editing of the cell possible.
Towards the end, there is a hidden row which will be used to clone and add a new row at the end of the table when user cliks on the ‘+’ icon.
CSS Styles:
Next let’s add some css styles so that the table looks attractive.
#mytable < margin: 0 auto; width: 60%; position: relative; >.glyphicon < font-size: 20px; >.add-row < color: #32CD32; >.add-row:hover < color: #228B22; >.delete-row < color: #FF0000; >.delete-row:hover
Adding jQuery Script:
Finally, we need to write the jquery script to make the table respond to the user actions. Let’s add two functions, one to add and the other to remove the row.
The first function is for adding new rows to the table. When the user clicks on the green ‘+’ icon, the script will look for the hidden row in the table markup, duplicate it and append it to the end of the table.
Likewise, when the user clicks on red ‘x’ icon, the second function will delete the specific row from the table.
 |
| Inline Editing in HTML5 Table |
Here is the Complete Script for the Demo:
#mytable < margin: 0 auto; width: 60%; position: relative; >.glyphicon < font-size: 20px; >.add-row < color: #32CD32; >.add-row:hover < color: #228B22; >.delete-row < color: #FF0000; >.delete-row:hover
First Name Last Name Position Kim Bell Senior Analyst Laurence Peter Technical Assistant Joe Franklin Accountant NIL NIL NIL
That explains about creating editable table with html5 and bootstrap. Though inline text editing is a cool feature, the data on the table will be gone once the page is refreshed or redirected. So, we need to use some kind of back-end logic such as php or ajax to save the user edited data. I hope you like this tutorial. Kindly share this post on your social circle. Good Day.
Create an Editable HTML Table

- Create a Cell in an HTML Table
- Create an Editable Table in HTML
- Conclusion
This article will discuss creating HTML tables and how to make their cells editable.
Create a Cell in an HTML Table
When creating web pages, sometimes we might need to create tables for data representation. HTML provides us the table attribute to achieve that.
The syntax to create a cell in a table is as below.
table> tr> td>This is a celltd> tr> table> html lang="en"> head> meta charset="UTF-8"> link rel="stylesheet" href="styles.css"> title>HTML Tabletitle> head> body> table> tr> td>This is a celltd> tr> table> body> html> As you can see, we retrieved a table with one cell. But it is displayed as plain text because we have not given any style to it.
Let’s add some styles to the cell.
table background-color: rgb(139, 220, 247); width: auto; > td border: 1px solid #000000; text-align: center; padding: 16px; > In the above output, we can now see it as a table cell.
Create an Editable Table in HTML
On some occasions, users might need to change the content of the cells of a table.
The HTML table element provides the contenteditable property where users can create editable cells. Using this, we can easily edit a table cell.
The syntax to make a cell editable using the contenteditable attribute is as follows.
We can give true or false as the value of the contenteditable attribute. The cell can be editable if the value is true , whereas we can’t edit the cell if the value is false .
Let’s see how we can do that using the previous example with the same styles. You can change the data of the cell accordingly.
table> tr> td contenteditable="true">This is a celltd> tr> table> As a result, we can have an editable cell as below. To edit the cell, we can double-click on it.
Now, let’s observe what happens when we give false as the value of the contenteditable attribute.
table> tr> td contenteditable="false">This is an editable celltd> tr> table> As you can see, the data or content of the table is no longer editable. Both true and false values are important on different occasions.
Some developers create forms and other stuff using tables. Sometimes some data needs to remain as they are, and that’s where the developers can use the false value.
If there are data that a user can change, as in the above example, we can use the true option.
Now, let’s make a table where we can use both true and false .
For example, let’s assume a lecturer wants a table on a web page to store the data of three students, and we will implement it. He needs Student ID , Name , and Grade as column headers, and the data we add under the Name and Grade columns must be editable.
The reason is he might type the name inaccurately. Also, the grades may need to be changed because students might ask for re-corrections.
Let’s create a table using the following code chunk.
table> tr> th>Student IDth> th>Nameth> th>Gradeth> tr> tr> td>001td> td>Simon Nicktd> td>Atd> tr> tr> td>002td> td>John Robberttd> td>Ctd> tr> tr> td>007td> td>Chris Hendersontd> td>Btd> tr> table> We can see the table cells separately by adding some styles to the table.
table background-color: beige; font-family: arial, sans-serif; border-collapse: collapse; width: 50%; > td, th border: 1px solid #dddddd; text-align: left; padding: 8px; > Now, our table looks more evident than before.
Our next step is to set editable cells. Let’s add contenteditable attributes to the relevant cells with relevant values as below.
table> tr> th>Student IDth> th>Nameth> th>Gradeth> tr> tr> td contenteditable="false">001td> td contenteditable="true">Simon Nicktd> td contenteditable="true">Atd> tr> tr> td contenteditable="false">002td> td contenteditable="true">John Robberttd> td contenteditable="true">Ctd> tr> tr> td contenteditable="false">007td> td contenteditable="true">Chris Hendersontd> td contenteditable="true">Btd> tr> table> As in the above code, we have set contenteditable attributes with the true values to all the cells related to Name and Grade .
Now, if we run the above code, all the cells except the Student ID cells will be editable as below.
Output When Editing the Names and Grades :
Output When Trying to Edit the Student ID Cells:
As you can see, we can’t edit the Student ID cells because the value of the contenteditable is false .
Conclusion
In this article, we have discussed how to create an HTML table and how to make that table editable using some examples. Also, we learned how to use contenteditable attributes along with the values: true and false .
If you want an editable cell, assign true as the value, and if you don’t need that feature, set false as the value or remove the attribute.
We can make cells editable using JavaScript, but this is a simple way to achieve the goal.
Nimesha is a Full-stack Software Engineer for more than five years, he loves technology, as technology has the power to solve our many problems within just a minute. He have been contributing to various projects over the last 5+ years and working with almost all the so-called 03 tiers(DB, M-Tier, and Client). Recently, he has started working with DevOps technologies such as Azure administration, Kubernetes, Terraform automation, and Bash scripting as well.
Related Article — HTML Table
Simple Editable HTML Table (A Quick Example)
Here is the download link to the example code, so you don’t have to copy-paste everything.
EXAMPLE CODE DOWNLOAD
Just click on “download zip” or do a git clone. I have released it under the MIT license, so feel free to build on top of it or use it in your own project.
EDITABLE TABLE DEMO
SUPPORT
600+ free tutorials & projects on Code Boxx and still growing. I insist on not turning Code Boxx into a «paid scripts and courses» business, so every little bit of support helps.
EDITABLE HTML TABLE
All right, let us now get into more details about how the editable HTML table works.
TUTORIAL VIDEO
PART 1) THE HTML
Name Email Job Doe job@doe.com Joe Doe joe@doe.com Joi Doe joi@doe.com Jon Doe jon@doe.com Joy Doe joy@doe.com
Well, nothing special here. This is just a “normal HTML table” with an editable CSS class.
PART 2) THE JAVASCRIPT
2A) DOUBLE-CLICK TO “EDIT CELL”
// (A) INITIALIZE - DOUBLE CLICK TO EDIT CELL window.addEventListener("DOMContentLoaded", () => < for (let cell of document.querySelectorAll(".editable td")) < cell.ondblclick = () =>editable.edit(cell); > >);2B) “CONVERT” CELL TO EDITABLE FIELD
- (C1) Remove “double click” to edit cell… Since it is already in “edit mode”.
- (C2) Set contentEditable on the selected cell and focus on it.
- (C3) Set the “currently editing cell” into editable.selected , and its current value into editable.value .
- (C4) There are 2 ways to end the “edit mode”.
- Click outside of editable.selected .
- By pressing “enter” or “escape” within editable.selected .
2C) END “EDIT MODE”
// (D) END "EDIT MODE" close : evt => < if (evt.target != editable.selected) < // (D1) CANCEL - RESTORE PREVIOUS VALUE if (evt === false) < editable.selected.innerHTML = editable.value; >// (D2) REMOVE "EDITABLE" window.getSelection().removeAllRanges(); editable.selected.contentEditable = false; // (D3) RESTORE CLICK LISTENERS window.removeEventListener("click", editable.close); let cell = editable.selected; cell.onkeydown = ""; cell.ondblclick = () => editable.edit(cell); // (D4) "UNMARK" CURRENT SELECTED CELL editable.selected.classList.remove("edit"); editable.selected = null; editable.value = ""; // (D5) DO WHATEVER YOU NEED if (evt !== false) < console.log(cell.innerHTML); // check value? // send value to server? // update calculations in table? >>>PART 3) THE CSS
/* (A) ENTIRE PAGE */ * < font-family: Arial, Helvetica, sans-serif; box-sizing: border-box; >/* (B) EDITABLE TABLE */ .editable < border-collapse: collapse; >.editable th, .editable td < text-align: left; padding: 15px; >.editable tbody tr:nth-child(even) < background: #f2f2f2; >.editable td.edit
Not important actually. Just some cosmetics to make things look better.
EXTRAS
That’s all for the tutorial, and here is a small section on some extras and links that may be useful to you.
HOW TO TIE CELL VALUE TO AN ID?
- Simply add a custom data attribute to the table cells .
- Get the cell value and custom data in Javascript – if (evt !== false)
CLICK OUTSIDE CELL TO CANCEL
// (C4) PRESS ENTER/ESC OR CLICK OUTSIDE TO END EDIT window.addEventListener("click", () => editable.close(false));This may make more sense for mobile devices “without an escape key”. Well, you decide.
COMPATIBILITY CHECKS
This example will work on all modern browsers.
LINKS & REFERENCES
THE END
Thank you for reading, and we have come to the end. I hope that it has helped you to better understand, and if you want to share anything with this guide, please feel free to comment below. Good luck and happy coding!