- Выбор версии Java в Eclipse
- How to run Eclipse under different version of JDK or JRE
- 1. Find the JDK / JRE that runs Eclipse
- 2. How to Change JDK / JRE for Eclipse
- Other Eclipse Tutorials:
- About the Author:
- How to Change Eclipse Java Version for Compiler and JRE
- Install JRE in Eclipse
- Configure Compiler Compliance Level and Settings
- Project specific Compiler Compliance level and Settings
- Change Java Version Eclipse Project
- Check Available JRE in the Eclipse IDE
- Add JRE to the Eclipse IDE
- Change Java Version for the Project in Eclipse
- Check Compiler Version for the Java Project
Выбор версии Java в Eclipse
Для выбора версии Java в Eclipse выберите пункт главного меню Window ➣ Preferences, как показано на картинке ниже.


В следующем окне выберите каталог, в котором установлена, например, JDK 17:

В результате окно станет выглядеть примерно вот так:

Кликните на экранную кнопку “Finish” в правом нижнем углу окна.
В окне “Installed JREs” теперь будет новый пункт с добавленной JDK. Выберите её и кликните на “Apply and Close”:

Теперь вы можете обновить проекты (для проектов Maven комбинация клавиш Alt+F5).
Кроме версии Java, с которой Eclipse собирает и запускает проекты, есть ещё версия Java, на которой он запускается сам.
Это могут быть две абсолютно разные версии. Версия Java, на которой запускается Eclipse, указывается в файле “eclipse.ini”. В самом файле написано обычно что-то вроде:
How to run Eclipse under different version of JDK or JRE
In this article, I will guide you how to change JDK/JRE that runs Eclipse IDE, on Windows operating system. First, you need to know exactly which version of Java on which Eclipse is running.
1. Find the JDK / JRE that runs Eclipse
In Eclipse, click menu Help > About Eclipse IDE. Then in the About Eclipse IDE dialog, click the Installation Details button. Then in the next screen, click Configuration tab. Wait for a moment while Eclipse is retrieving configuration information, and you will see a screen as below:
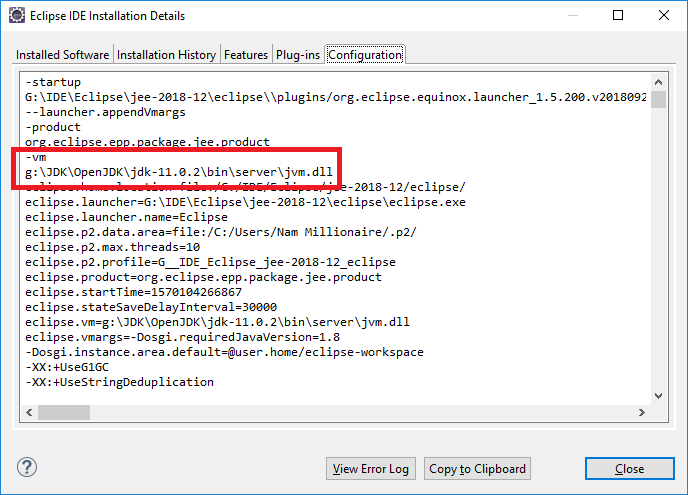
Find the line that starts with –vm and the value in the next line shows the exact path of JDK/JRE on which Eclipse is running. In the above screenshot, you see Eclipse is running on OpenJDK 11.0.2.
2. How to Change JDK / JRE for Eclipse
You know, Eclipse IDE is written in Java so it needs a JDK/JRE installed to run. By default, the first instance of JDK/JRE found in the PATH environment variable is used to run Eclipse. Consider a typical value of the PATH environment variable like this:
path1;path2;path3;…;%JAVA_HOME%\bin;
In this case, the Java Virtual Machine found in the JAVA_HOME path will run Eclipse IDE. So changing the Java version that run Eclipse is just a matter of updating the value of the JAVA_HOME variable.
However, sometimes it doesn’t work like that. You changed JAVA_HOME points to a newer JDK/JRE, but Eclipse still runs under the old one. Why? What happens?
- An installation of Oracle Java putting its path before your JAVA_HOME, or
- Your Eclipse IDE is configured to stick with a JDK/JRE in its configuration file.
Edit the PATH environment variable on Windows, and you may see a screen as below:
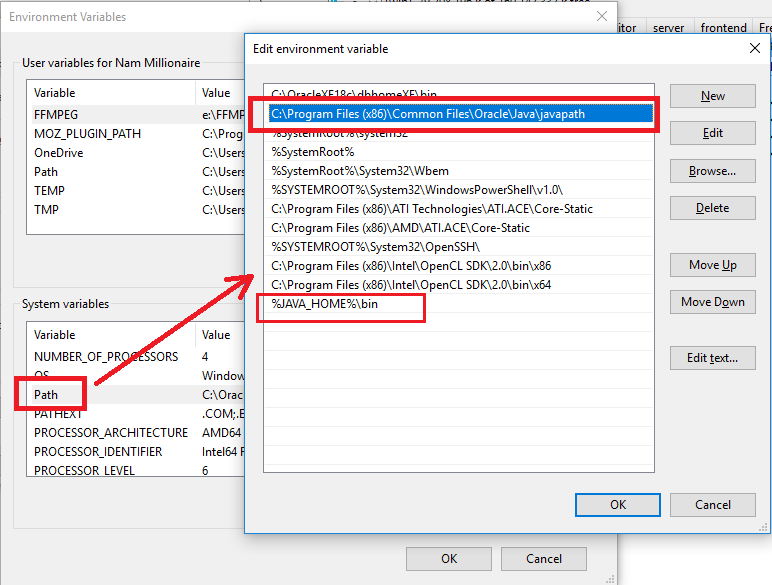
Here, an installation of Oracle Java puts the following line before your JAVA_HOME :
C:\Program Files (x86)\Common Files\Oracle\Java\javapath
That means the JDK/JRE found in this path is always used to run Eclipse. Your JAVA_HOME is ignored. So to change, just move your JAVA_HOME before Oracle’s javapath using the Move Up and Move Down buttons; or delete that Oracle’s javapath. Then restart Eclipse and check configuration again to make sure Eclipse is actually running on the JDK/JRE you specified.
If that doesn’t work, it’s very likely that your Eclipse is somehow configured to stick with a specific version of Java Virtual Machine in its configuration file.
Open the eclipse.ini file in Eclipse’s installation directory in a text editor like Notepad. You may see something like this:
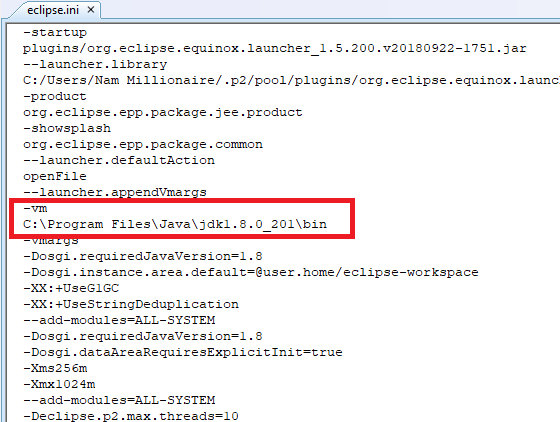
Now, you can change the path after the –vm line to point to a different path of JDK, or delete these two lines to use the Java version specified in the PATH system environment variable.
Phew! That’s how to change the version of Java virtual machine that powers your Eclipse IDE. I hope you found this article helpful.
You can also watch the video version below:
Other Eclipse Tutorials:
About the Author:

Nam Ha Minh is certified Java programmer (SCJP and SCWCD). He started programming with Java in the time of Java 1.4 and has been falling in love with Java since then. Make friend with him on Facebook and watch his Java videos you YouTube.
How to Change Eclipse Java Version for Compiler and JRE
This page will provide how to change eclipse java version for compiler and JRE. We can install all the JREs versions in eclipse which are present in our operating system but we can activate only one at a time in eclipse IDE. The compiler compliance level in eclipse is available only up to that level of java version for which our eclipse version supports. In our demo we are using Eclipse Luna 4.4.2 version which supports compiler compliance level up to Java 8 i.e 1.8. Here on this page we will provide step wise demo to install JRE in eclipse as well as to change compiler compliance level and settings. The activated JRE version and selected compiler compliance level must be same.
Install JRE in Eclipse
Find the steps to install JRE in eclipse.
Step 1: Go to Window -> Preferences
Step 2: Go to Java -> Installed JREs
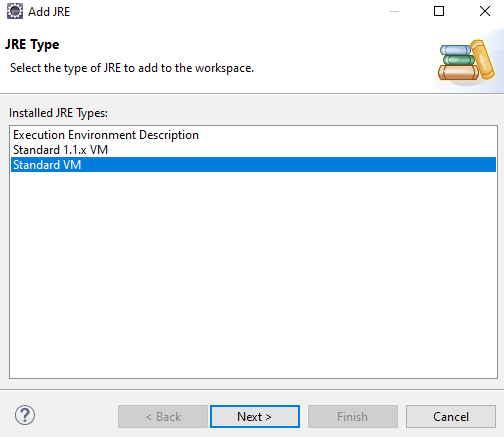
Step 3: Click on Add and select Standard VM and then click on Directory and select JRE home or JDK home. We can add more than one JRE versions. Find the print screen
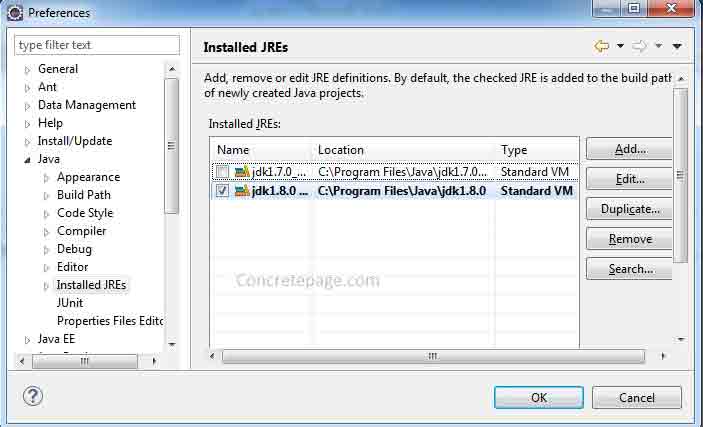
Step 4: Select the check box to activate the required version of JRE. In our demo we have activated JRE 1.8.
Configure Compiler Compliance Level and Settings
To configure compiler compliance level and settings in eclipse, find the below steps.
Step 1: Go to Window -> Preferences
Step 2: Go to Java -> Compiler . Find the print screen.
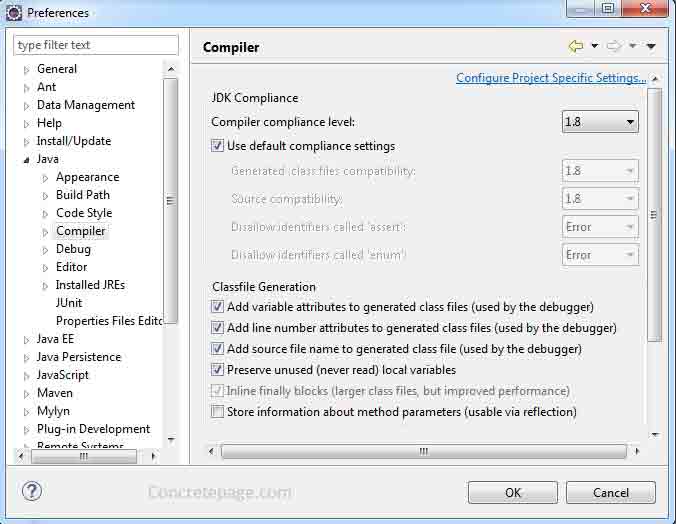
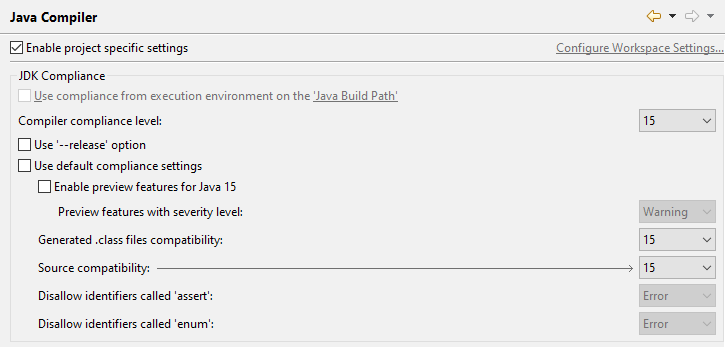
Step 3: Select Compiler compliance level
Step 4: To change default compliance settings, we need to uncheck Use default compliance settings and set the compiler java version for .class and source compatibility.
Step 5: We can also change the settings here for class file generation such as to add variable attribute, line number, source file name to generated class file which is used by the debugger. We can also change the settings to preserve unused local variables and to store information about method parameters introduced in java 8
If the version of compiler compliance level and Installed JRE is different, eclipse gives the messages as follows.
«When selecting 1.8 compliance, make sure to have a compatible JRE installed and activated (currently 1.7)»
These settings will be effective for new projects.
Project specific Compiler Compliance level and Settings
To change project specific compiler compliance level and settings, we need to follow below steps.
Step 1: Right click on selected java project and then click on Properties.
Step 2: Click on Java Compiler and then perform the changes.
Whenever we change the settings, eclipse rebuilds the project. It gives the message as follows.
«The compiler settings have changed. A rebuild of the project is required for changes to take effect. Build the project now?»
We need to click on Yes button.
Change Java Version Eclipse Project
In the Project Explorer section, we can see the JRE System Library which is also displaying the current Java version of the Project.

In this project the current Java version is 13, but we need to change to the higher version Java 15. Let us see how to do it.
Check Available JRE in the Eclipse IDE
Before changing the Java version for a project, first, check the JRE installed in the current system. Go to Window => Preferences => Java => Installed JREs.
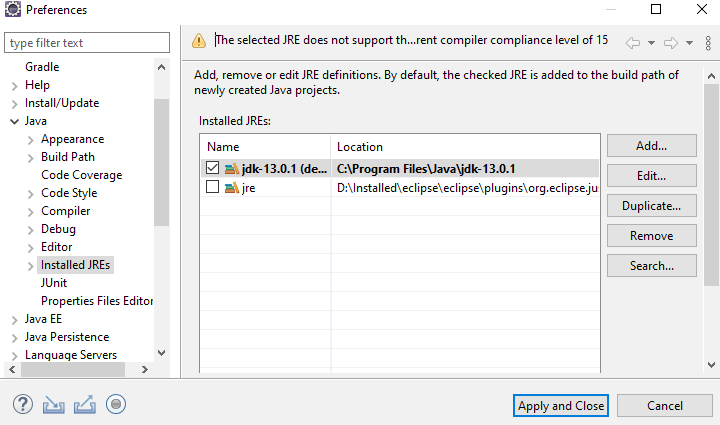
Currently, the Eclipse IDE is having the default JRE and JDK13 versions. To change the Java version, first, we need to add that Java version (with JRE) to the Eclipse IDE.
Add JRE to the Eclipse IDE
Click on “Add” to add the JRE, a new window will appear to ask the type of JRE. Here we will choose Standard VM.
Now, click on Directory, browse the Java home and add it to the Eclipse IDE. Based on the Java version, Eclipse IDE itself fetches the JRE name and JRE system libraries files. Click on Finish.

Adding JRE to the Eclipse IDE is completed. Now, our Eclipse IDE is having three installed JREs. Click on Apply and Close.
Change Java Version for the Project in Eclipse
Let us change the Java version for a particular Java project. Select Java project => right-click on it => Click on Build path => Configure Build Path.

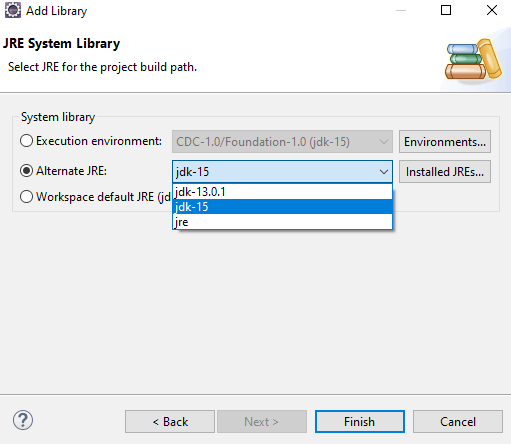
In the Libraries section, select the exiting JRE System Library and Remove it. After removing it, click on Add Libraries, and choose JRE System Library.
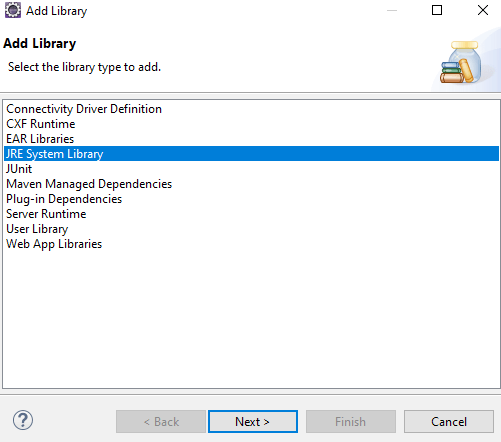
Now, select the Java version and click on “Finish”.
Check Compiler Version for the Java Project
At last to Change Java Version Eclipse Project, check the correct compiler is configured or not?
If not then change it. Select the Java project => Right-click => Build Path => Configure Build Path => Java compiler.
If you enjoyed this post, share it with your friends. Do you want to share more information about the topic discussed above or do you find anything incorrect? Let us know in the comments. Thank you!