- How to draw a dotted line with css in Html?
- Method 1: Using the «border-style» property
- Method 2: Using the «outline-style» property
- Method 3: Using a «background-image» property
- Method 4: Using the «box-shadow» property
- How to Draw Horizontal and Vertical Lines in CSS
- How to Draw a Line with CSS?
- Conclusion
- About the author
- Sharqa Hameed
How to draw a dotted line with css in Html?
Drawing a dotted line in HTML using CSS can be achieved in a variety of ways. Depending on the desired outcome and the context in which the line will be used, there are several options for creating a dotted line. The following are the methods for drawing a dotted line with CSS:
Method 1: Using the «border-style» property
To draw a dotted line with CSS, you can use the «border-style» property. Here is how you can do it step-by-step:
- Next, add some CSS to the element to create a dotted line using the «border-style» property. Set the «border-style» property to «dotted» and adjust the «border-width» and «border-color» properties to your liking:
.dotted-line border-style: dotted; border-width: 2px; border-color: black; >.dashed-line border-style: dashed; border-width: 2px; border-color: black; >.double-line border-style: double; border-width: 2px; border-color: black; >.groove-line border-style: groove; border-width: 2px; border-color: black; >.ridge-line border-style: ridge; border-width: 2px; border-color: black; >.inset-line border-style: inset; border-width: 2px; border-color: black; >These are some examples of how to create different types of lines using the «border-style» property in CSS. Adjust the properties to your liking to create the desired effect.
Method 2: Using the «outline-style» property
To draw a dotted line with CSS using the «outline-style» property, you can follow these steps:
- First, select the element that you want to add the dotted line to. For example, let’s select a div with the class «dotted-line».
- Next, in your CSS file, add the following code:
.dotted-line outline: 1px dotted black; >This will add a 1 pixel dotted black outline around the div.
- You can customize the width and color of the outline by changing the values in the code. For example, to make the line red and thicker, you can change the code to:
.dotted-line outline: 3px dotted red; >- You can also use the «outline-offset» property to adjust the distance between the outline and the element. For example:
.dotted-line outline: 1px dotted black; outline-offset: 5px; >This will add a 1 pixel dotted black outline with an offset of 5 pixels from the element.
Overall, the «outline-style» property is a simple and effective way to add dotted lines to your HTML elements using CSS.
Method 3: Using a «background-image» property
To create a dotted line with CSS, you can use the «background-image» property. Here is an example code:
.dotted-line background-image: radial-gradient(circle at 2px 2px, rgba(0, 0, 0, 0) 0, rgba(0, 0, 0, 0) 3px, #000 3px, #000 4px); background-repeat: repeat-x; height: 4px; width: 100%; >- The «background-image» property sets a radial gradient that creates the dots. The «circle at 2px 2px» part sets the position of the gradient. The first color stop is transparent, so the dots start from nothing. The second color stop is also transparent, so there is a space between the dots. The third color stop is black, so the dots are black. The fourth color stop is also black, so the dots end with black.
- The «background-repeat» property sets the repetition of the gradient. In this case, it is set to «repeat-x», so the gradient is repeated horizontally.
- The «height» property sets the height of the dotted line.
- The «width» property sets the width of the dotted line. In this case, it is set to 100% to fill the entire width of the container.
To use this code, you can add the «dotted-line» class to any HTML element that you want to have a dotted line. Here is an example HTML code:
This code will create a horizontal dotted line that looks like this:

You can adjust the size and color of the dots by changing the values in the «background-image» property. You can also adjust the height and width of the dotted line by changing the values in the «height» and «width» properties.
Method 4: Using the «box-shadow» property
To draw a dotted line with CSS using the «box-shadow» property, follow these steps:
- Create an HTML element that will contain the dotted line. For example, a div element with a class of «dotted-line».
.dotted-line box-shadow: 0 0 0 2px #000, 0 0 0 4px #fff, 0 0 0 6px #000, 0 0 0 8px #fff; >This code will create a dotted line with four dots, each with a different color and size. You can adjust the size and color of each dot by changing the values in the «box-shadow» property.
- Alternatively, you can use the «inset» keyword to create a dotted line inside an element. For example:
.dotted-line box-shadow: inset 0 0 0 2px #000, inset 0 0 0 4px #fff, inset 0 0 0 6px #000, inset 0 0 0 8px #fff; >This code will create a dotted line inside the element, with the same four dots as before.
- You can also create a dashed line by changing the values in the «box-shadow» property. For example:
.dashed-line box-shadow: 0 0 0 2px #000, 0 0 0 8px #000; >This code will create a dashed line with two dashes, each with a different size and color.
- Finally, you can combine multiple «box-shadow» properties to create more complex lines. For example:
.complex-line box-shadow: 0 0 0 2px #000, 0 0 0 4px #fff, 0 0 0 6px #000, 0 0 0 8px #fff, inset 0 0 0 2px #000, inset 0 0 0 4px #fff, inset 0 0 0 6px #000, inset 0 0 0 8px #fff; >This code will create a complex line with four dots and four dashes, each with a different size and color.
That’s it! Using the «box-shadow» property is a simple and effective way to draw dotted and dashed lines with CSS.
How to Draw Horizontal and Vertical Lines in CSS
![]()
As we know, HTML provides the structure of web pages, and CSS can be utilized to apply styles. CSS also has different styling properties that are used to draw different shapes, such as squares, circles, rectangles, ovals, lines, and more. More specifically, a line is one of design’s most versatile and commonly used elements that can be added horizontally and vertically.
This article will teach the procedure to draw horizontal and vertical lines using CSS. Let’s get started!
How to Draw a Line with CSS?
To draw horizontal and vertical lines using CSS, different properties can be utilized, such as:
Let’s move ahead to understand the working of the above-provided properties one by one!
HTML
To draw lines, firstly, we will specify the “ ” element inside the body of our HTML file:
Now, to style a div, utilize the suitable properties. In our case, we will assign the “background-color” property value as “#e4a2a4”, and the “border” property value as “2px solid #0fafc4”, which indicates its width, type, and color, respectively, and the “height” property is set as “200px”.
Example 1: Draw Horizontal Line with CSS
Usually, the
element is utilized to draw horizontal lines in HTML. However, to draw a horizontal line with CSS, add element for the heading and then place a named “h_line” inside the above-described div of the HTML file.
Horizontal Line < / h1 >
< / div >Now, use CSS properties to draw a horizontal line:
- We will use the “border-bottom” property, which is associated with one to three values for line width, line type, and color. The below-provided example sets its value as “6px solid rgb(80,80,78)”.
- To adjust the size of the line, we have set the “width” property value as “300px”.
- The “margin” property value is set as “auto”, representing that the margin is equal from all sides. The “bottom-top” property can also be utilized for this purpose.
Now, save the HTML file and open it in your browser:
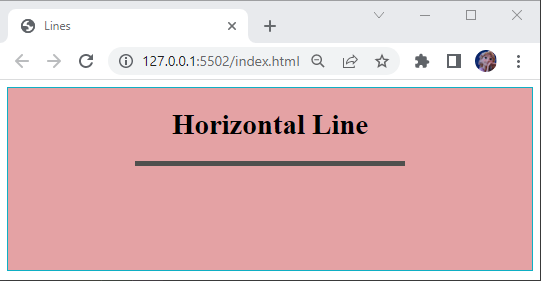
As you can see, we have drawn a horizontal line successfully with the CSS border property.
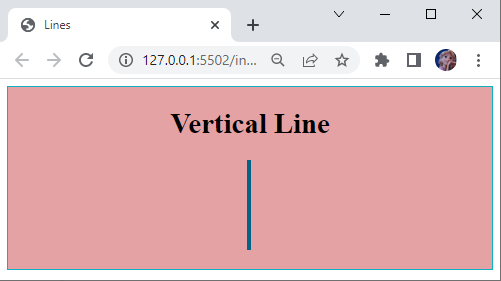
Example 2: Draw Vertical Line With CSS
To draw a vertical line, we will add tag for the heading and then place a named “v_line” inside the above-described div of the HTML file.
Vertical Line < / h1 >
< / div >Let’s provide the “v_line” div with some CSS properties. To draw a vertical line, we will utilize:
- The “border-left” property is assigned with values “5px solid rgb(2, 99, 135)”, where the first value represents the line width, the second value represents the line type, and the third value indicates the color.
- The “bottom-right” property can also be utilized for the same purpose.
- Next, we have defined the “height” of the line by setting its value as “100px”.
- Set “margin” as “0 auto”, where 0 indicates the top and bottom and auto represents the equal margin to the left and right.
- To show the width of the line, we have assigned the “width” property value as “2px”.
.v_line {
border-left : 5px solid rgb ( 2 , 99 , 135 ) ;
height : 100px ;
margin : 0 auto ;
width : 2px ;
}
Applying these values will draw a vertical line like this:
That’s it! We have used different CSS properties to draw horizontal and vertical lines.
Conclusion
You can use the “border-top” or “border-bottom” properties to draw a horizontal line and the “border-left” or “border-right” properties to draw a vertical line in CSS. This property has values one to three, where the first value defines the width, the second value defines its type, whether solid, dotted, dashed, or groove and the third value indicates the color of the line. This guide has explained how to draw horizontal and vertical lines with CSS.
About the author
Sharqa Hameed
I am a Linux enthusiast, I love to read Every Linux blog on the internet. I hold masters degree in computer science and am passionate about learning and teaching.