- Drupal 7 настройка модуля Domain Access
- Комментарии
- Cross Domain Session In PHP (Step-by-Step Example)
- TABLE OF CONTENTS
- TEST SERVER SETUP
- SETUP OVERVIEW
- OS HOSTS
- VIRTUAL HOSTS
- SSL CERTIFICATE
- ACCESS & VERIFY
- PHP SHARED SESSION
- PART 1) DATABASE SESSIONS TABLE
- PART 2) DATABASE SESSIONS CLASS
- PART 3) SITE A – SESSION START & SYNC
- PART 4) SITE B – SESSION SYNC
- PART 5) SITE B – VERIFICATION
- DOWNLOAD & NOTES
- SUPPORT
- EXAMPLE CODE DOWNLOAD
- EXTRA BITS & LINKS
- SECURITY CHECKS
- I WANT TO “SYNCHRONIZE” MORE SITES
- COMPATIBILITY CHECKS
- LINKS & REFERENCES
- THE END
- Мультисайтинг на Друпал с помощью Domain access
Drupal 7 настройка модуля Domain Access
Drupal 7 настройка модуля Domain Access возникла проблема после установки и запуска появляется такое сообщение.
http://xmages.net/i/3295788 Прошу помощи.
Комментарии
Кто не может просмотреть изображение вот текст — Domain access failed to load during phase: bootstrap include. Please check your settings.php file and site configuration.
В файле install.txt нашел следующую инструкцию. Не могу понять, что откуда и куда нужно переместить?
4.4.1 Installation
In the Domain Access download, find the following file:
You will need to load this file from inside your settings.php file. There
are two methods for this.
This method is preferred, since any updates to the module release
will be reflected in this file.
NOTE: the elements inside the ==== marks are php code that
should be copied into your settings.php file. DO NOT COPY THE ==== MARKS.
Add the following lines to the end of your settings.php file:
====
/**
* Add the domain module setup routine.
*/
include DRUPAL_ROOT . ‘/path/to/modules/domain/settings.inc’;
====
In this case, change ‘path/to/modules’ with the directory where your modules are
stored. Typically this will be ‘sites/all/modules’, which makes the lines:
====
/**
* Add the domain module setup routine.
*/
include DRUPAL_ROOT . ‘/sites/all/modules/domain/settings.inc’;
====
Нашел файл settings.php — /sites/default/settings.php.
/**
*
* file
* settings.inc
*
* This file should be included at the bottom of your settings.php file:
*
* include DRUPAL_ROOT . ‘/sites/all/modules/domain/settings.inc’;
*
* If you have installed the domain module into a different folder than
* /sites/all/modules/domain please adjust the path appropriately.
*
* ingroup domain
*/
/**
* Include bootstrap file and start bootstrap phases.
*/
include ‘domain.bootstrap.inc’;
domain_bootstrap();
Насколько понял, нужно. Залить файл settings.inc В папку к файлу или в сам файл settings.php
+ поменять путь к settings.inc или?
Этот файл должен быть включен у основания Вашего settings.php файла: (насколько понимаю в папку вместе с settings.php)
В папке с settings.php файл settings.inc(меняем путь) и єтот же файл settings.inc в папке sites/all/modules/domain/settings.inc. Или как?
Нашел писал skepka
В файл settings.php своего сайта добавь в самом конце
/**
* Add the domain module setup routine.
*/
include ‘./sites/all/modules/domain/settings.inc’;
В общем укажи в settings.php точный путь к установленному модулю Domain Access и его настройкам settings.inc и ему будут переданы права на управление мультисайтингом, сохрани файл, обнови страницу.
http://xmages.net/i/3297498
Не могу заменить файл, не могу заменить содержание файла по адресу public_html/sites/default/settings.php
Необходимо в самом низу дописать php-код:
/**
* Add the domain module setup routine.
*/
include ‘./sites/all/modules/domain/settings.inc’;
Почему нельзя изменить содержание и что делать?
Разобрался.
Теперь у меня новая проблема. Теперь меня выкинуло с панели управления сайтом и пишет:
Доступ запрещен
У вас нет доступа к этой странице.
Какой логин и пароль вводить? не пойму.
Несколько понимаю заработал модуль Domain Access с его наверно внутренними настройками.
Ура. Модуль работает
Со вторым понятно — надо убрать www и модуль будет правильно работать с доменами (я прав?)
а вот с первым — как-то не понятно. Искал в интернете, нашел только страницу друпал.орг, где пользователь устанавливал модуль Femail.
http://drupal.org/node/1795444
Там было предложено установить патч, который якобы заполняе поля description
но вопрос — поможет ли это при установке модуля Domain Access?
Была подобная проблема — но модуль ругался на тот факт, что в денвере доменное имя прописано было без точки. И хоть, вроде как, для локалхоста это не принципиально, оказалось что принципиально. Добавила точку в имени папки с названием сайта и всё заработало.
Cross Domain Session In PHP (Step-by-Step Example)
Welcome to a tutorial on how to support cross-domain sessions in PHP. Yes, it is technically possible to share a single session across multiple domains, but it is quite a challenging task.
- Save the sessions into a shared common database.
- Set one of your websites to facilitate the shared session.
That covers the basic idea, read on for the details!
TABLE OF CONTENTS
TEST SERVER SETUP
Before we get into the code, here is a quick walkthrough and overview of the server setup – If you don’t have multiple domains for testing, no sweat. Here is how we can simulate multiple domains in localhost.
SETUP OVERVIEW
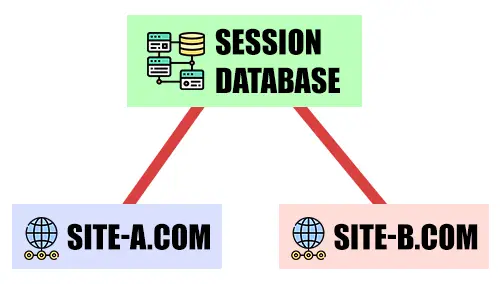
For this example, we are going to have 2 websites – site-a.com and site-b.com . Both websites have access to a shared database.
OS HOSTS
127.0.0.1 site-a.com 127.0.0.1 site-b.com ::1 site-a.com ::1 site-b.comFirst, open the hosts file and add in the above. For the uninitiated, there’s no need to panic. This is just a manual DNS override to point site-a.com and site-b.com to your local server.
P.S. Linux and Mac users, your host file should be located in /etc/hosts .
VIRTUAL HOSTS
DocumentRoot "D:\http\a" ServerName site-a.com SSLEngine On SSLCertificateFile "C:/xampp/apache/conf/ssl.crt/server.crt" SSLCertificateKeyFile "C:/xampp/apache/conf/ssl.key/server.key" Options Indexes FollowSymLinks Includes ExecCGI AllowOverride All Require all granted DocumentRoot "D:\http\b" ServerName site-b.com SSLEngine On SSLCertificateFile "C:/xampp/apache/conf/ssl.crt/server.crt" SSLCertificateKeyFile "C:/xampp/apache/conf/ssl.key/server.key" Options Indexes FollowSymLinks Includes ExecCGI AllowOverride All Require all granted Next, we add the virtual hosts to “map” https://site-a.com to HTTP/a/ and https://site-b.com to HTTP/b/ .
P.S. This is for the Apache webserver. IIS and NGINX users, please do some of your own research.
SSL CERTIFICATE
Using https:// is a critical part to make this entire example work. If you have not already set this up, self-sign and generate your own SSL cert. It is quite a hassle to do it, but there are many good guides online – Do your own research.
ACCESS & VERIFY
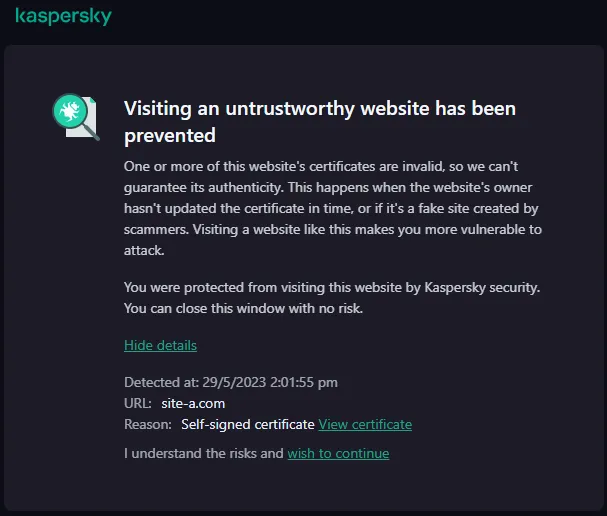
Once everything is set up, access https://site-a.com and https://site-b.com in the browser for verification. Yes, that is HTTPS . If you have a self-signed SSL cert, the browser or anti-virus will complain “not a secure website”. No sh1t Sherlock, I signed the certificate myself. So, just click on continue.
PHP SHARED SESSION
Now that the server setup is in place, let us walk through the steps to support cross-domain sessions.
PART 1) DATABASE SESSIONS TABLE
CREATE TABLE `sessions` ( `id` varchar(64) NOT NULL, `access` bigint(20) UNSIGNED DEFAULT NULL, `data` text DEFAULT NULL ) ENGINE=InnoDB DEFAULT CHARSET=utf8mb4; ALTER TABLE `sessions` ADD PRIMARY KEY (`id`);- id The session ID, primary key.
- access Last accessed timestamp.
- data Session data.
PART 2) DATABASE SESSIONS CLASS
pdo = new PDO( "mysql:host=".SDB_HOST.";charset=".SDB_CHAR.";dbname=".SDB_NAME, SDB_USER, SDB_PASS, [ PDO::ATTR_ERRMODE => PDO::ERRMODE_EXCEPTION, PDO::ATTR_DEFAULT_FETCH_MODE => PDO::FETCH_ASSOC ]); > // (A3) HELPER - EXECUTE SQL QUERY function exec ($sql, $data=null) : void < $this->stmt = $this->pdo->prepare($sql); $this->stmt->execute($data); $this->lastID = $this->pdo->lastInsertId(); > // (A4) SESSION OPEN - NOTHING IN PARTICULAR. function open ($path, $name) < return true; >// (A5) SESSION CLOSE - CLOSE DATABASE CONNECTION function close () < if ($this->stmt !== null) < $this->stmt = null; > if ($this->pdo !== null) < $this->pdo = null; > return true; > // (A6) SESSION READ - FETCH FROM DATABASE function read ($id) < $this->exec("SELECT `data` FROM `sessions` WHERE `id`=?", [$id]); $data = $this->stmt->fetchColumn(); return $data===false ? "" : $data ; > // (A7) SESSION WRITE - WRITE INTO DATABASE function write ($id, $data) < $this->exec("REPLACE INTO `sessions` VALUES (?, ?, ?)", [$id, time(), $data]); return true; > // (A8) SESSION DESTROY - DELETE FROM DATABASE function destroy ($id) < $this->exec("DELETE FROM `sessions` WHERE `id`=?", [$id]); return true; > // (A9) GARBAGE COLLECT - DELETE OLD ENTRIES function gc ($max) < $this->exec("DELETE FROM `sessions` WHERE `access` < ?", [(time() - $max)]); return true; >> // (B) DATABASE SETTINGS - CHANGE TO YOUR OWN! define("SDB_HOST", "localhost"); define("SDB_CHAR", "utf8mb4"); define("SDB_NAME", "test"); define("SDB_USER", "root"); define("SDB_PASS", ""); // (C) START! session_set_save_handler(new MySess(), true); session_start();Not going to explain this library line-by-line, but we basically use session_set_save_handler() to set our own custom PDO database session handlers. Remember to change the database settings to your own.
PART 3) SITE A – SESSION START & SYNC
date("Y-m-d H:i:s")]; ?> THIS IS SITE A
" readonly> 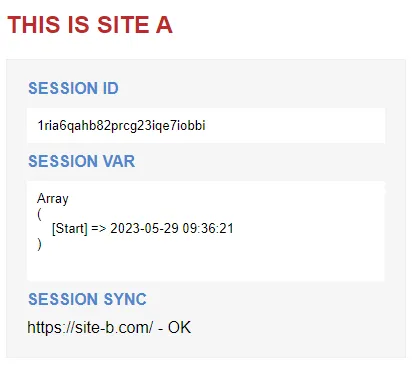
- Remember the database session library we created earlier on? Loading this library will automatically start the session, and we set a timestamp into the session for testing.
- Just some “nice HTML” to display information on the current $_SESSION .
- Getting the rest of the domains to sync is tricky. We have to do a cross-origin AJAX fetch call with the session ID to set the PHPSESSID cookie.
PART 4) SITE B – SESSION SYNC
// (C) SET CROSS ORIGIN SESSION COOKIE setcookie("PHPSESSID", $_POST["sid"], [ "path" => "/", "domain" => "site-b.com", "secure" => true, "samesite" => "None" ]); // (D) DONE echo "OK";This is the “session sync handler” on site-b.com . Basically, just setting the PHPSESSID cookie. Yep, if you don’t know what that is, roll back and follow up with your own studies on the basics. Links below.
PART 5) SITE B – VERIFICATION
?> THIS IS SITE B
" readonly> 
Once a “synchronized” PHPSESSID cookie is set across all the domains, everything is good to go.
DOWNLOAD & NOTES
Here is the download link to the example code, so you don’t have to copy-paste everything.
SUPPORT
600+ free tutorials & projects on Code Boxx and still growing. I insist on not turning Code Boxx into a «paid scripts and courses» business, so every little bit of support helps.
EXAMPLE CODE DOWNLOAD
Click here for the source code on GitHub gist, just click on “download zip” or do a git clone. I have released it under the MIT license, so feel free to build on top of it or use it in your own project.
EXTRA BITS & LINKS
That’s all for the tutorial, and here is a small section on some extras and links that may be useful to you.
SECURITY CHECKS
- Create a “sync request” table with 3 fields – id , hash and expiry .
- On accessing https://site-a.com , create a random hash and set the expiry to 1 minute from now.
- The fetch call should also include the random hash .
- The PHP sync will cross-check the hash against the database to verify and make sure it has not expired.
I WANT TO “SYNCHRONIZE” MORE SITES
- Just deploy the same PHP sync handler on all your other domains.
- Add your other sites to the fetch call.
COMPATIBILITY CHECKS
This example requires a “Grade A” modern browser that is capable of handling cross-origin calls and cookies.
LINKS & REFERENCES
- Cookies In PHP – Code Boxx
- Sessions In PHP – Code Boxx
- Setting CORS Cookie In PHP – Code Boxx
- Save PHP Session In Database – Code Boxx
- Edit Windows, Mac, Linux Host File – HowToGeek
- Virtual Hosts Example – Apache
- Set Session Handler – PHP
THE END
Thank you for reading, and we have come to the end. I hope that it has helped you to better understand, and if you want to share anything with this guide, please feel free to comment below. Good luck and happy coding!
Мультисайтинг на Друпал с помощью Domain access

Но у меня не сработало. Была ошибка 500, пришлось загружать вручную.
3)включить модули
drush en domain_conf, domain_settings, domain_nav, domain_source, domain_theme, domain_content, domain_strict, domain_alias, domain
Если выдается ошибка, то можно сделать это через UI
4)настроить работу на странице
/admin/structure/domain/
в соответсвующих вкладках
На странице admin/structure/domain/roles

можно настроить присвоение определенной роли, пользователям, зарегистрировавшимся на одном из сайтов, что может быть потом полезно при разделении сайтов и в других случаях
5)добавить новые сайты admin/structure/domain/create

б)другой домен для мультисайтинга
Например, чтобы добавить сайт fotoasist.ru в мультисайтинг с помощью модуля domain accsess на основном домене periodic-table.space нужно добавить его на странице /admin/structure/domain/ и на хостинге создать синоним fotoasist.ru для домена periodic-table.space
