- How to Make a Clickable SVG Map With HTML and CSS
- Here’s what we’ll cover:
- What Is an SVG Map?
- What Are the Benefits of an SVG Map?
- Example Of SVG Maps In the Wild
- What Are We Building?
- How to Build Our Interactive Map of Africa
- 1. Get the SVG Map of Africa
- 2. Create the basic HTML structure
- 3. Import the SVG map file
- How to Create CSS Map File
- How to Use Chrome to Enable CSS Map File (Sourcemap)
- Follow the Instructions Below to Get this to Work in Chrome:
- Steps to Create CSS Map File Using Sass
- Step 1. Install Sass 3.3 or Higher.
- Step 2. Sass Configuration
- Check that the CSS Map File is Working.
- SCSS Live Editing in the Browser
- To Activate Workspaces in Chrome, Follow these Steps:
- Conclusion
- HTML Image Maps
- Image Maps
- Example
- How Does it Work?
- The Image
- Create Image Map
- The Areas
- Shape
- Shape=»rect»
- Example
- Shape=»circle»
- Example
- Shape=»poly»
- Example
- Image Map and JavaScript
- Example
- Chapter Summary
- HTML Image Tags
How to Make a Clickable SVG Map With HTML and CSS

Rufai Mustapha

SVG, or Scalable Vector Graphics, is a versatile image format that you can use in a wide range of applications, from web design to print media and data visualization.
The scalability, small file size, and accessibility of SVG images make this format a popular choice among designers and developers.
Maps are a powerful tool for data visualization, providing a visual representation of data that can help viewers understand patterns and relationships that may not be evident in other types of visualizations.
In this article, you will learn how to make interactive maps using HTML and CSS. These maps will remain light-weight because we’ll be using SVGs.
If you have basic knowledge of HTML and CSS you’ll be able to understand this tutorial.
Here’s what we’ll cover:
II. How to Set Up the HTML File
- How to Create the Basic HTML Structure
- How to Import the SVG Map File
- How to Set Up the div Container for the Map
III. How to Add Interactivity with CSS
IV. How to Add Functionality
- Recap of Steps to Make a Clickable SVG Map
- Final Thoughts and Suggestions for Further Customization
What Is an SVG Map?
SVG maps are vector-based, meaning that the map elements are defined by mathematical equations rather than pixels. This allows you to scale them up or down without losing quality.
What Are the Benefits of an SVG Map?
Some benefits of using SVG maps include:
- Scalability: SVG maps can be scaled up or down without losing quality, which makes them ideal for use in responsive web design or for printing at different sizes.
- Customizability: SVG maps can be easily customized to suit specific needs, such as changing colors, adding labels, or modifying the size and shape of map elements.
- Interactivity: SVG maps can be made interactive through the use of JavaScript and CSS, allowing viewers to hover over or click on specific elements to see more detailed information.
- Accessibility: SVG maps can be read by assistive technologies such as screen readers, making them more accessible to people with disabilities.
- Cross-platform compatibility: SVG maps can be displayed on a wide range of devices and browsers, making them a versatile choice for web-based applications.
Example Of SVG Maps In the Wild
Stears and The BBC used SVG Maps to visualize election data. Users can click on a region to see the distribution of ballots cast. See here for more info.
Data visualization of ballots cast in NigeriaWhat Are We Building?
In this tutorial, we are building Tour Afrique , an interactive map of Africa.
- Users can hover to see the name of a country.
- Users can click on a country to see more information on Wikipedia.
How to Build Our Interactive Map of Africa
1. Get the SVG Map of Africa
You can create an SVG map using vector graphics software such as Adobe Illustrator or Inkscape, or with code using libraries such as D3.js or Leaflet.
You can also download SVG maps from Wikipedia using a creative-commons license. Click here for the map we’ll use in this tutorial.
2. Create the basic HTML structure
We need a basic HTML structure, which will look like this:
This HTML will give us the following result so far:
3. Import the SVG map file
To import an SVG map file to an HTML document, you can use the , , or tag.
First, open your HTML file in a text editor. Then add the downloaded SVG map to the section where you want it to appear:
How to Create CSS Map File

CSS map file is a JSON format file that connects the CSS file to its source files, further, it is often written in preprocessors (e.g., Less, Sass, Stylus, etc.), allowing for live debugging of the source files from the web browser. However, it is also known as a source map.
CSS map file (source map) enables browsers to map CSS created by a preprocessor, such as Sass, Back to the original source file, including Sass mixin, placeholder, or variable is responsible for a specific line of CSS. When CSS map file (source map) is combined with Chrome’s new in-browser local file editing (workspaces) and automated stylesheet reloading, indeed, you get a speedy in-browser editing process.
How to Use Chrome to Enable CSS Map File (Sourcemap)
By enabling source maps, you will be able to construct a map with references. This compilation will produce two files: a.css and a.css.map. The map file will have the necessary information to allow you to pinpoint the specific spot where a style originated.
Follow the Instructions Below to Get this to Work in Chrome:
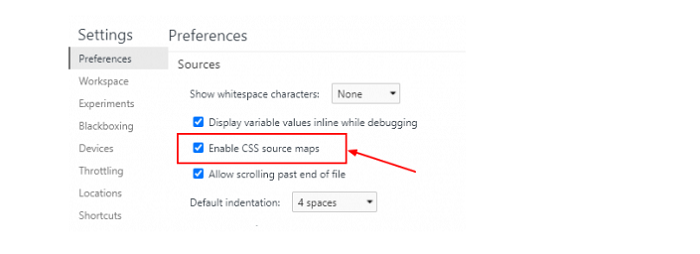
- Launch the developer tools.
- To enter Settings, click the gear symbol (upper right).
- Look for the “Sources” section under General. In that section, select the option “Enable CSS source maps.”
- Make sure the “Auto-reload produced CSS” option is also activated.
The last step allows you to refresh the CSS when it changes. Consider it a live reload functionality for the CSS alone.
Please remember that you will still be required, need to build the SCSS independently using Grunt, Gulp, sass watch, or also, compass watch. Besides, this feature will automatically refresh the CSS after it has been produced.
Steps to Create CSS Map File Using Sass
Follow these steps to create CSS map file using Sass-
Step 1. Install Sass 3.3 or Higher.

Sourcemap support is exclusively available in the yet-to-be-released Sass 3.3.
Step 2. Sass Configuration
2.1. When you have the most recent Sass, just use the new sourcemap flag.
scss --sourcemap sass/styles.scss public/styles.css
2.2. Use the watch flag and provide the input: output folders if you want Sass to automatically recompile the CSS anytime the SCSS file changes (you’ll need this later when updating the Sass in-browser).
scss --sourcemap --watch sass: public
2.3. If you look at the last line of your built CSS file, you should find a sourcemap statement:
/*# sourceMappingURL=styles.css.map */
2.4. Add a style.CSS.map file that looks like this:
2.5. That’s all there is to it for adding a map file (sourcemap) to your CSS.
Check that the CSS Map File is Working.
Step 1. For seeing your source map in action, certainly visit the Elements inspector and choose your styles from the properties list. In the CSS file, you should now see the original source file name and line number.
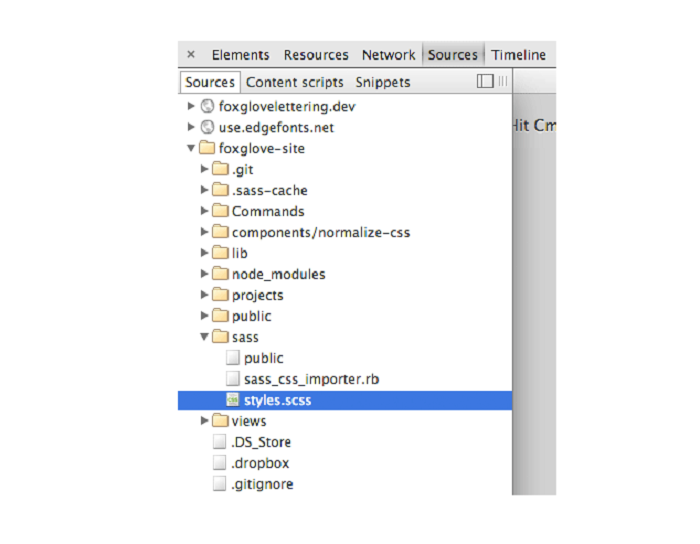
Step 2. If your source files are in a public place, you may just click the filename, and it will get open in the Sources panel; no other actions are necessary.
Sass is currently the only CSS processing tool that can generate CSS map files ( sourcemap ), although, thanks to the Chrome dev tools team donating the original sourcemap functionality to Sass and Nathan Weizenbaum getting it ready for release. Chrome Canary is the only browser that can interpret them. However, because it is an open format based on the Javascript source map, which already has widespread browser support, it shouldn’t be long until we see it in other browsers.
SCSS Live Editing in the Browser
Enabling Chrome Workspaces allows you to save (if desired) modifications made to your actual files in the Chrome web inspector. This eliminates the need to test your changes in the browser, also check what works, and then return to your editor to save the changes.
To Activate Workspaces in Chrome, Follow these Steps:
- Launch the Chrome developer tools.
- Click the gear symbol to open the Settings panel.
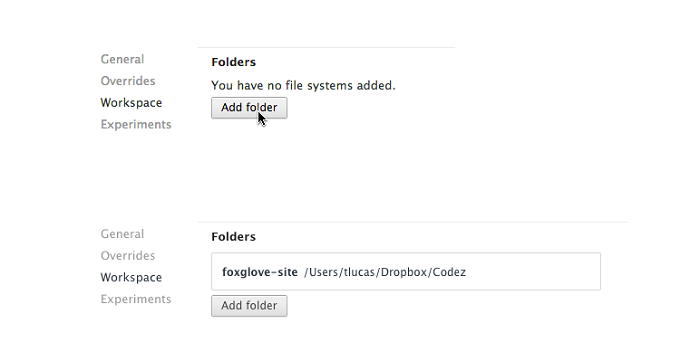
- On the left side of the Settings window, select “Workspace.”
- Under the “Folders” column, navigate to your project’s root folder.
- Finally, allow Chrome to access your local file system.
This will add all of your project files to the Developer Tools’ Sources panel.
Conclusion
You may avoid moving between editor and developer tools by using source maps. Moreover, it allows you to directly modify the source SCSS and quickly view how the changes look in the browser.
Although this post focuses on how to make source maps work in Chrome, you can also do it in Firefox and Safari. Internet Explorer 11 also supports source maps, but there doesn’t appear to be any information on utilizing source maps with Sass in that browser, hence, you’d have to experiment.
HTML Image Maps
With HTML image maps, you can create clickable areas on an image.
Image Maps
The HTML tag defines an image map. An image map is an image with clickable areas. The areas are defined with one or more tags.
Try to click on the computer, phone, or the cup of coffee in the image below:

Example
Here is the HTML source code for the image map above:
How Does it Work?
The idea behind an image map is that you should be able to perform different actions depending on where in the image you click.
To create an image map you need an image, and some HTML code that describes the clickable areas.
The Image
The image is inserted using the tag. The only difference from other images is that you must add a usemap attribute:
The usemap value starts with a hash tag # followed by the name of the image map, and is used to create a relationship between the image and the image map.
Tip: You can use any image as an image map!
Create Image Map
The element is used to create an image map, and is linked to the image by using the required name attribute:
The name attribute must have the same value as the ‘s usemap attribute .
The Areas
Then, add the clickable areas.
A clickable area is defined using an element.
Shape
You must define the shape of the clickable area, and you can choose one of these values:
- rect — defines a rectangular region
- circle — defines a circular region
- poly — defines a polygonal region
- default — defines the entire region
You must also define some coordinates to be able to place the clickable area onto the image.
Shape=»rect»
The coordinates for shape=»rect» come in pairs, one for the x-axis and one for the y-axis.
So, the coordinates 34,44 is located 34 pixels from the left margin and 44 pixels from the top:
The coordinates 270,350 is located 270 pixels from the left margin and 350 pixels from the top:
Now we have enough data to create a clickable rectangular area:
Example
This is the area that becomes clickable and will send the user to the page «computer.htm»:
Shape=»circle»
To add a circle area, first locate the coordinates of the center of the circle:
Then specify the radius of the circle:
Now you have enough data to create a clickable circular area:
Example
This is the area that becomes clickable and will send the user to the page «coffee.htm»:
Shape=»poly»
The shape=»poly» contains several coordinate points, which creates a shape formed with straight lines (a polygon).
This can be used to create any shape.
Like maybe a croissant shape!
How can we make the croissant in the image below become a clickable link?

We have to find the x and y coordinates for all edges of the croissant:
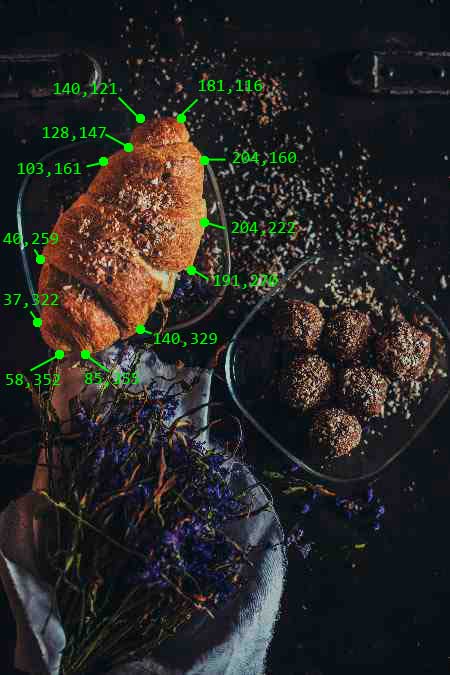
The coordinates come in pairs, one for the x-axis and one for the y-axis:
Example
This is the area that becomes clickable and will send the user to the page «croissant.htm»:

Image Map and JavaScript
A clickable area can also trigger a JavaScript function.
Add a click event to the element to execute a JavaScript function:
Example
Here, we use the onclick attribute to execute a JavaScript function when the area is clicked:
Chapter Summary
- Use the HTML element to define an image map
- Use the HTML element to define the clickable areas in the image map
- Use the HTML usemap attribute of the
element to point to an image map
HTML Image Tags
| Tag | Description |
|---|---|
| Defines an image | |
| Defines an image map | |
| Defines a clickable area inside an image map | |
| Defines a container for multiple image resources |
For a complete list of all available HTML tags, visit our HTML Tag Reference.