- How to display value of textbox in JavaScript?
- Example
- Example
- Example
- JavaScript methods to create and manipulate a textbox
- Create a textbox using JavaScript
- Adding id attribute to the textbox using JavaScript
- Manipulate textbox placeholder attribute using JavaScript
- Manipulate the value attribute of the textbox using JavaScript
- Learn JavaScript for Beginners 🔥
- About
- Search
- Tags
- Getting Started with TextBox
- Create a TextBox
- Configure the Input Mode
- Default Text Label in Textbox using JavaScript/jQuery
- Step 1: The HTML
- Step 2: The CSS
- Step 3: The JavaScript
How to display value of textbox in JavaScript?
In this article we are going to learn about “How to display value of textbox in JavaScript”.
JavaScript allows you to create a textbox in two easy steps: In order to construct an element, you must first utilize the document object’s createElement(«input«) method.
The next step is to use the Element to change the type attribute of the newly generated element to «text”. Text is contained in text boxes, which can be altered and moved around. They are helpful for underlining or embellishing text.
Example
In the following example, we are running the script along with a button with an OnClick event handler. When the click button is pressed, the repeatvalue() JavaScript function is called.
When the script gets executed, it will generate an output consisting of an input field along with a click button on the webpage. When the user enters the text and presses the click button, the event gets triggered and displays the value entered, by the user separately.
Example
Considering the following example, where we are running the script to display textbox value.
function repeatvalue()
On running the above script, the web-browser displays an input field for the user. When the user enters password-type text into it, it displays stars in the textbox as soon as the user finishes entering, and when the user clicks «enter,» the actual text is displayed on the webpage.
Example
Execute the below code to observe ‘How to display the textbox value on the webpage using JavaScript’.
Enter your Name:JavaScript methods to create and manipulate a textbox
This tutorial will help you to understand how you can create a textbox element as well as how you can manipulate various attributes of the textbox using JavaScript.
Create a textbox using JavaScript
- First, you need to use the createElement("input") method of the document object to create an element.
- Then, you need to set the type attribute of the element that you’ve created to "text" using the Element.setAttribute() method.
The code inside the tag below shows how you can create a textbox and append it to the body element:
The resulting HTML document will be as follows:
Now that you know how you can create a textbox using JavaScript, let’s learn how you can manipulate various attributes of the textbox element.
Adding id attribute to the textbox using JavaScript
First, you may want to add an id attribute to the element so that you can easily fetch the element and retrieve its value. You can easily add the attribute by using the same setAttribute() method.
The code below shows how you can add the id attribute with "username" as its value:
Next, you may want to add a tag to the textbox to make it clear to users what the textbox is there for. You can do so by using the same createElement() method but replace the parameter with "label" .
For example, you may want to create a textbox so that users can enter their username . Here’s how you can create a label for that:
The for attribute of the element must match the id attribute of the element so that the label will be bound to the right element. The label text will be read by the device for the user.
You also need to set the innerHTML property of the element. The text inside will be read by screen-reader devices.
- Append the label before the textbox with the same appendChild() method
- Grab the textbox element using document.getElementById() method, then use insertBefore() method to insert the label before the textbox.
For the first choice, you need to add the code for creating the label before the textbox:
Now you’re going to have the following output inside the tag:
As for the second choice, You need to call the insertBefore() method on the element’s parent, which is the element in this example.
- The newElement to be inserted
- And the existingElement where the newElement will be prepended.
The syntax for the method is as follows:
Let’s see how it works step by step. First, create the textbox element and append it to the HTML body:
Then, create the label element:
Finally, how you can grab the textbox element and call body.insertBefore() method to insert the element above the textbox:
The full code will be as shown below:
Now you’ve learned how to insert a label for the textbox element. Manipulate textbox placeholder attribute using JavaScript
You may also want to set the placeholder attribute for the textbox to give your users a hint about the expected value for the textbox.
Since your textbox already has an id attribute, you can use the document.getElementById() method to fetch the element and use the setAttribute() method to set the placeholder:
And with that, your textbox will have the placeholder attribute set.
Manipulate the value attribute of the textbox using JavaScript
Finally, the input element also has the value property which you can use the get or set the value stored inside the textbox.
For example, type any text you want into the textbox and then fetch its value:
You can also set the value as follows:
And that’s how you can get or set the value property of a textbox 😉
Learn JavaScript for Beginners 🔥
Get the JS Basics Handbook, understand how JavaScript works and be a confident software developer.
A practical and fun way to learn JavaScript and build an application using Node.js.

About
Hello! This website is dedicated to help you learn tech and data science skills with its step-by-step, beginner-friendly tutorials.
Learn statistics, JavaScript and other programming languages using clear examples written for people.
Search
Type the keyword below and hit enter
Tags
Click to see all tutorials tagged with:
Getting Started with TextBox
Before you start the tutorial, ensure DevExtreme is installed in your Angular, Vue, React, or jQuery application.
TextBox is a component that allows users to enter and edit a single line of text.
This tutorial shows how to add a TextBox to your application and configure its core features.
Each section in this tutorial describes a single configuration step. You can also find the full code in the GitHub repository.
Create a TextBox
jQuery
Add DevExtreme to your jQuery application and use the following code to create a TextBox:
Angular
Add DevExtreme to your Angular application and use the following code to create a TextBox:
import < Component >from '@angular/core'; @Component(< selector: 'app-root', templateUrl: './app.component.html', styleUrls: ['./app.component.css'] >) export class AppComponent
import < BrowserModule >from '@angular/platform-browser'; import < NgModule >from '@angular/core'; import < AppComponent >from './app.component'; import < DxTextBoxModule >from 'devextreme-angular'; @NgModule(< declarations: [ AppComponent ], imports: [ BrowserModule, DxTextBoxModule ], providers: [ ], bootstrap: [AppComponent] >) export class AppModule
Vue
Add DevExtreme to your Vue application and use the following code to create a TextBox:
React
Add DevExtreme to your React application and use the following code to create a TextBox:
import React from 'react'; import 'devextreme/dist/css/dx.light.css'; import < TextBox >from 'devextreme-react/text-box'; function App() < return ( ); > export default App;
Configure the Input Mode
Specify the TextBox mode property to allow users to type in a specific text type. Set this property to "email", "tel", or "url" to specify the set of keyboard buttons that a mobile device shows when the UI component is focused. When you set the mode property to "search", the TextBox contains the Clear button, which empties its contents. When you set the mode property to "password", the TextBox hides input characters behind asterisks.
jQuery
Default Text Label in Textbox using JavaScript/jQuery
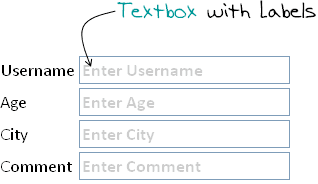 In one of my previous article about Change Form Textbox Style on Focus, we discussed about Usability and HCI issues. Slight change in web pages/input forms can increase user experience. Nowadays, it has became a common practice to give user labels on fields that they are editing. For example, if you see Google’s custom search textbox in any website, most of them will have a Google’s Logo in background and when user clicks on Textbox, the logo disappears. Thus we can create an input form with labels in background of textboxes. When user select the textboxes, the labels disappear enabling user to edit the textbox.
 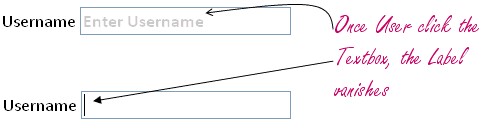 Let us see how can we use JavaScript/jQuery to achieve this.
Step 1: The HTML
Code language: HTML, XML (xml)FORM method="post"> TABLE> TR> TD>Username TD> TD>INPUT type="text" value="" name="username" title="Enter Username"/>TD> TR> TR> TD>Age TD> TD>INPUT type="text" value="" name="username" title="Enter Age"/>TD> TR> TR> TD>City TD> TD>INPUT type="text" value="" name="username" title="Enter City"/>TD> TR> TR> TD>Comment TD> TD>INPUT type="text" value="" name="username" title="Enter Comment"/>TD> TR> TABLE> FORM>
Notice that while defining each text fields, we have provided title attribute. The text that is displayed on background of textbox is taken from the Title attribute. So generally the title attribute should be like “Enter Email Address” or “Type Address”.
Step 2: The CSS
Code language: CSS (css).text-label < color: #cdcdcd; font-weight: bold; >
The above CSS class is applied to the Textbox when user has not entered anything in it. Once the user starts typing in Textbox the CSS class is removed.
Step 3: The JavaScript
We are almost done with our implementation. Only thing left is the JavaScript code that actually add and remove css to textboxes.
Code language: JavaScript (javascript)$('input[type="text"]').each(function( )< this.value = $(this).attr('title'); $(this).addClass('text-label'); $(this).focus(function( )< if(this.value == $(this).attr('title')) < this.value = ''; $(this).removeClass('text-label'); > >); $(this).blur(function( )< if(this.value == '') < this.value = $(this).attr('title'); $(this).addClass('text-label'); > >); >);
The above code is straight forward. For each textbox in the webpage, we hook handler function to events focus and blur. When Textbox is focused, check if the value is same as Title. If so, then remove the background label css and let user edit the value in textbox. And while blur event(focus lost), check the value: if user has not entered anything, set the background css again.