- How to hide and show DOM elements using JavaScript
- You might also like.
- Все значения свойства display
- Значение none
- Значение block
- Значение inline
- Значение inline-block
- Значения table-*
- Вертикальное центрирование с table-cell
- Значения list-item, run-in и flex
- JavaScript Display None Property
- Some useful property values in javascript for a better understanding of display concept:
- JavaScript Online Courses & Certification
- JavaScript Display none Examples
- “display” style property in JavaScript
- More Related Post
- More Tutorials
- Fuel Your Passion for Coding: Dive into Our Other Posts
How to hide and show DOM elements using JavaScript
There are multiple ways to show or hide DOM elements in vanilla JavaScript. In this article, we shall look at two ways to hide or show DOM elements using JavaScript.
The style display property is used to set and get the element’s display type in JavaScript. Majority of the HTML elements have the inline or block display type. The content of an inline element floats to its left and right sides. Block HTML elements are different because they * fill* the entire line and do not show content on their sides. To hide an element, set the display property to none :
document.querySelector('.btn').style.display = 'none' document.querySelector('.btn').style.display = 'block' Another way to show or hide DOM elements in JavaScript is using the style visibility property. It is similar to the above display property. However, if you set display: none , it hides the entire element from the DOM. The visibility:hidden hides the element contents, and the HTML element stays in its original position and size. To hide an element, set the visibility property to hidden :
document.querySelector('.btn').style.visibility = 'hidden' document.querySelector('.btn').style.visibility = 'visible' The style visibility property only hides the element but doesn’t remove the space occupied by the element. If you also want to remove the space, set display: none using the display property.
jQuery provides hide() , show() , and toggle() utility methods that use inline styles to update the display property of the element. Let us use the style property to create the above jQuery methods in vanilla JavaScript:
// hide an element const hide = elem => elem.style.display = 'none' > // show an element const show = elem => elem.style.display = 'block' > // toggle the element visibility const toggle = elem => // if the element is visible, hide it if (window.getComputedStyle(elem).display !== 'none') hide(elem) return > // show the element show(elem) > // hide element hide(document.querySelector('.btn')) // show element show(document.querySelector('.btn')) // toggle visibility toggle(document.querySelector('.btn')) Notice the use of the getComputedStyle() method, which we just learned the other day, to check if an element is already visible. We used this method because the style property only deals with inline styles specified using the element’s style attribute. But the HTML element could be hidden through an embedded element or an external stylesheet. The getComputedStyle() method returns the actual CSS styles used to render an HTML element, regardless of how those styles were defined. Another thing to notice is the getComputedStyle(elem).display !== ‘none’ statement. We are not checking whether the display type is block because block is not the only way to show an element. You could use flex , inline-block , grid , table , etc., for the display property to show an element. However, to hide an element, there is only one value, display: none . If you prefer to use a CSS class to hide and show DOM elements instead of inline styles, read this guide. ✌️ Like this article? Follow me on Twitter and LinkedIn. You can also subscribe to RSS Feed.
You might also like.
Все значения свойства display
Свойство display имеет много разных значений. Обычно, используются только три из них: none , inline и block , потому что когда-то браузеры другие не поддерживали.
Но после ухода IE7-, стало возможным использовать и другие значения тоже. Рассмотрим здесь весь список.
Значение none
Самое простое значение. Элемент не показывается, вообще. Как будто его и нет.
Невидимый div ( ) Стоит внутри скобок Значение block
- Блочные элементы располагаются один над другим, вертикально (если нет особых свойств позиционирования, например float ).
- Блок стремится расшириться на всю доступную ширину. Можно указать ширину и высоту явно.
Это значение display многие элементы имеют по умолчанию: , заголовок , параграф
.
Блоки прилегают друг к другу вплотную, если у них нет margin .
Значение inline
- Элементы располагаются на той же строке, последовательно.
- Ширина и высота элемента определяются по содержимому. Поменять их нельзя.
Например, инлайновые элементы по умолчанию: , .
Если вы присмотритесь внимательно к примеру выше, то увидите, что между внутренними и есть пробел. Это потому, что он есть в HTML.
Если расположить элементы вплотную – его не будет:
Содержимое инлайн-элемента может переноситься на другую строку.
При этом каждая строка в смысле отображения является отдельным прямоугольником («line box»). Так что инлайн-элемент состоит из объединения прямоугольников, но в целом, в отличие от блока, прямоугольником не является.
Это проявляется, например, при назначении фона.
Например, три прямоугольника подряд:
. Ля Ля Ля Ля Ля Ля Ля Ля Ля Ля Ля Ля Ля Ля Ля Ля Ля Ля Ля Ля Ля Ля Ля Ля Ля Ля Ля Ля Ля Ля Ля Ля Ля Ля Ля Ля Ля Ля Ля Ля . Если инлайн-элемент граничит с блоком, то между ними обязательно будет перенос строки:
Значение inline-block
Это значение – означает элемент, который продолжает находиться в строке ( inline ), но при этом может иметь важные свойства блока.
Во всём остальном – это блок, то есть:
Это значение display используют, чтобы отобразить в одну строку блочные элементы, в том числе разных размеров.
Свойство vertical-align позволяет выровнять такие элементы внутри внешнего блока:
Как и в случае с инлайн-элементами, пробелы между блоками появляются из-за пробелов в HTML. Если элементы списка идут вплотную, например, генерируются в JavaScript – их не будет.
Значения table-*
Современные браузеры (IE8+) позволяют описывать таблицу любыми элементами, если поставить им соответствующие значения display .
Для таблицы целиком table , для строки – table-row , для ячейки – table-cell и т.д.
Важно то, что это действительно полноценная таблица. Используются табличные алгоритмы вычисления ширины и высоты элемента, описанные в стандарте.
Это хорошо для семантической вёрстки и позволяет избавиться от лишних тегов.
table < display: table >tr < display: table-row >thead < display: table-header-group >tbody < display: table-row-group >tfoot < display: table-footer-group >col < display: table-column >colgroup < display: table-column-group >td, th < display: table-cell >caption
Очень подробно об алгоритмах вычисления размеров и отображении таблиц рассказывает стандарт CSS 2.1 – Tables.
Вертикальное центрирование с table-cell
Внутри ячеек свойство vertical-align выравнивает содержимое по вертикали.
Это можно использовать для центрирования:
 div Элемент
С неизвестной
Высотой
CSS не требует, чтобы вокруг table-cell была структура таблицы: table-row и т.п. Может быть просто такой одинокий DIV , это допустимо.
При этом он ведёт себя как ячейка TD , то есть подстраивается под размер содержимого и умеет вертикально центрировать его при помощи vertical-align .
Значения list-item, run-in и flex
У свойства display есть и другие значения. Они используются реже, поэтому посмотрим на них кратко:
Этот display по умолчанию используется для элементов списка. Он добавляет к блоку с содержимым ещё и блок с номером(значком) списка, который стилизуется стандартными списочными свойствами:
Если после run-in идёт block , то run-in становится его первым инлайн-элементом, то есть отображается в начале block .
Если ваш браузер поддерживает это значение, то в примере ниже h3 , благодаря display:run-in , окажется визуально внутри div :
Про пчёл.
Пчёлы - отличные создания, они делают мёд.Если же вы видите две строки, то ваш браузер НЕ поддерживает run-in .
Вот, для примера, правильный вариант отображения run-in , оформленный другим кодом:
Про пчёл.
Пчёлы - отличные создания, они делают мёд. Если этот вариант отличается от того, что вы видите выше – ваш браузер не поддерживает run-in . На момент написания этой статьи только IE поддерживал display:run-in .
Flexbox позволяет удобно управлять дочерними и родительскими элементами на странице, располагая их в необходимом порядке. Официальная спецификация находится здесь: CSS Flexible Box Layout Module
JavaScript Display None Property
JavaScript display none Style display property is used to hide and show the content of HTML DOM using JavaScript.
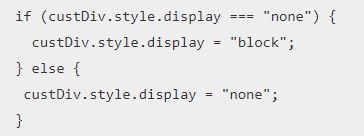
If you want to hide the element, set the style display property to “none”.
document.getElementById("element").style.display = "none";If you want to show the element, set the style display property to “block”.
document.getElementById("element").style.display = "block";The user can hide or show the elements according to his wish with the help of display property in Javascript. This process is also known as visibility. If the user will set the property as visibility: none, the entire element will be hidden. Otherwise, on setting the property as visibility: hidden, the elements will become invisible. However, these elements won’t change their original size and position.
Some useful property values in javascript for a better understanding of display concept:
JavaScript Online Courses & Certification
The display property sets the element’s display type. The display property is similar to the visibility property.
To set display: none, it hides the complete element with content, while visibility: hidden means that the contents of the element will be invisible but the element covers its size and position.
JavaScript Display none Examples
Click the "Check it" button to check the functionality of display property:
This is custom element.
Output : (Before Click in Check it button)
Click the "Check it" button to check the functionality of display property: Check it This is custom element.(After Click in Check it button)
Click the "Check it" button to check the functionality of display property: Check itExample : (visibility: hidden)
Click the "Check it" button to check the functionality of hidden property:
This is custom element.
function myFun() Output : (Before Click in Check it button)
Click the "Check it" button to check the functionality of hidden property: This is custom element. Check it(After Click in Check it button)
Click the "Check it" button to check the functionality of hidden property: Check it“display” style property in JavaScript
The user has to create some div and assign them an id or class. Then add styling to it.
Width property and height property will set the width and height of the content, border-radius 0% will make a square border, 50% will make a circle and 25% will make a rounded shape and float will make the divs get positioned, margin-right will make them separated with a space at right.
The background color will set the background color of the div.
The document.getElementById will select the div with given id.
document.getElementById("circle").onclick = function()The style.display = “none” will make it disappear when clicked on div.
Thanks for the reading post. I hope you like and understand the post. If you have any doubts regarding this post please comment below.
More Related Post
More Tutorials
Fuel Your Passion for Coding: Dive into Our Other Posts
- css show hide div on click
- display block
- display none
- display none vs hidden
- hidden attribute vs display none
- hide and show div using javascript with example
- hide and show paragraph using javascript
- javascript display block
- javascript display none
- javascript show hide div onclick
- javascript show hide div onclick toggle
- onclick display block
- opposite of display none
- style=»display:none
Substring JavaScript Method
Java Object Class Tutorial