- Qt Designer
- Install the PyQt tools
- Create a new virtual environment
- Activate the virtual environment
- Install PyQt6 and its tools
- Launch the Qt Designer
- Creating a login form
- Setting widget properties
- Adding widgets to the login form
- Converting .ui file to Python code
- Referencing child widgets
- Using .ui file directly
- When you should use Qt Designer
- Summary
Qt Designer
Summary: in this tutorial, you’ll learn how to use the Qt Designer tool to design user interfaces for PyQt applications.
Install the PyQt tools
PyQt6 tools are compatible with Python 3.9 at the time of writing this tutorial. Therefore, you need to install Python 3.9 to continue the tutorial.
Note that if you have Python 3.10 or higher, you can install Python 3.9 in a separate directory and use PyQt6 tools. For example, you can install Python 3.9 in the C:\Python39 directory on Windows.
Create a new virtual environment
First, create a directory to host the PyQt6 projects e.g., D:\pyqt6
mkdir pyqt6Code language: Python (python)Second, create a virtual environment using Python 3.9 using the venv module:
python -m venv D:\pyqt6\pyqt6-envCode language: Python (python)Activate the virtual environment
First, navigate to the pyqt6-env virtual environment directory:
cd D:\pyqt6\pyqt6-envCode language: Python (python)Second, navigate to the Scripts folder:
cd ScriptsCode language: Python (python)Third, activate the virtual environment by executing the activate.bat file:
activateCode language: Python (python)It’ll show the following on Windows:
(pyqt6-env) d:\pyqt6\pyqt6-env\Scripts>Code language: Python (python)Install PyQt6 and its tools
First, execute the following command to install pyqt6 package in the pyqt6-env virtual environment:
pip install pyqt6Code language: Python (python)Second, install the pyqt6-tools package that contains the Qt Designer and other related tools:
pip install pyqt6-toolsCode language: Python (python)The pyqt-tools package will install the Qt Designer in the following location:
D:\pyqt6\pyqt6-env\Lib\site-packages\qt6_applications\Qt\bin\designer.exeCode language: Python (python)Third, execute the pyuic6 command (within the pyqt6-env virtual environment) to check the version:
pyuic6 -VCode language: Python (python)And you’ll see the following output:
6.1.0Code language: Python (python)The pyuic6 is a tool for converting a design file ( .ui ) generated by Qt Designer to a Python file ( .py ).
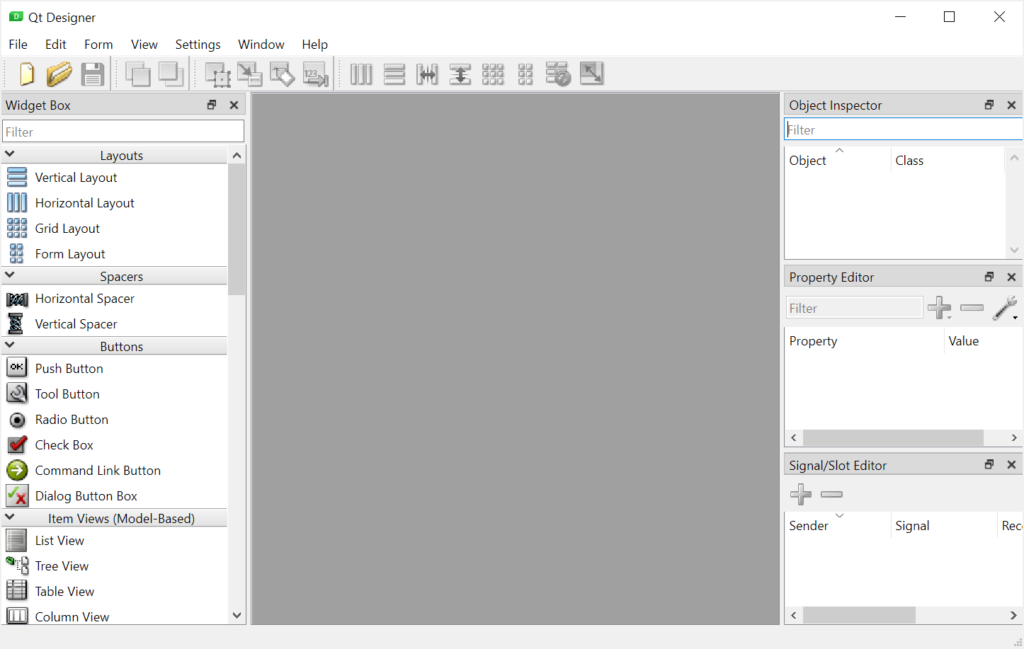
Launch the Qt Designer
From the Shell, type the designer command to launch the Qt Designer:
(pyqt6-env) d:\pyqt6\pyqt6-env\Scripts>designerCode language: Python (python)The Qt Designer will look like this:
Creating a login form
We’ll create a simple login form using the Qt designer and load it into our Python program.
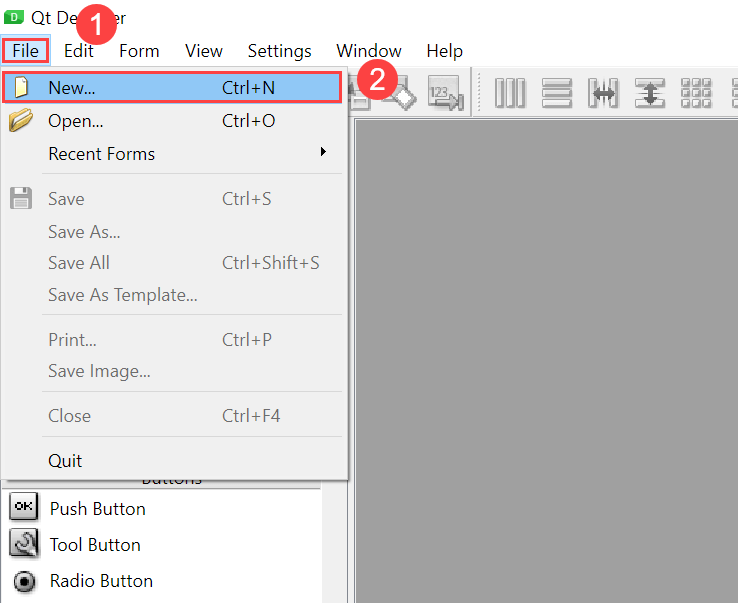
First, select File > New or press Ctrl-N keyboard shortcut to open the New Form dialog:
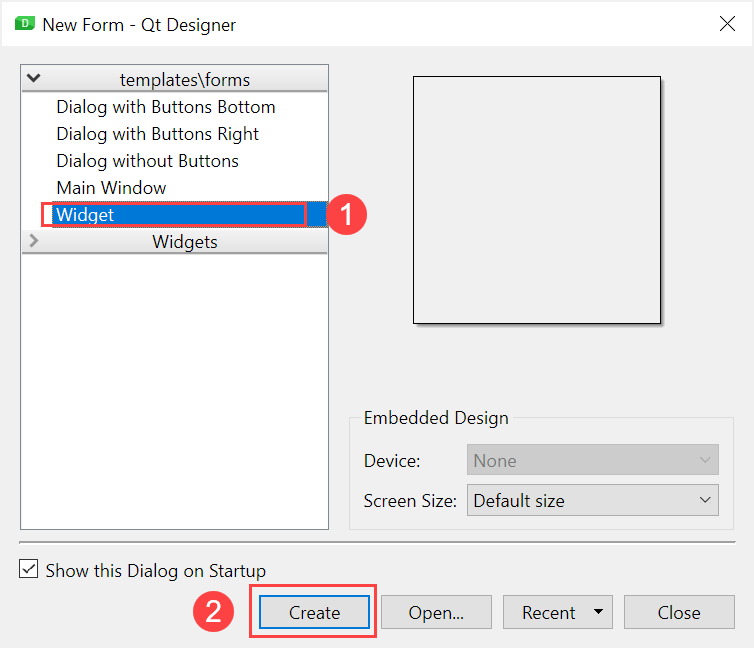
Second, select the Widget from the templates\forms and click the Create button:
It’ll create a QWidget as follows:
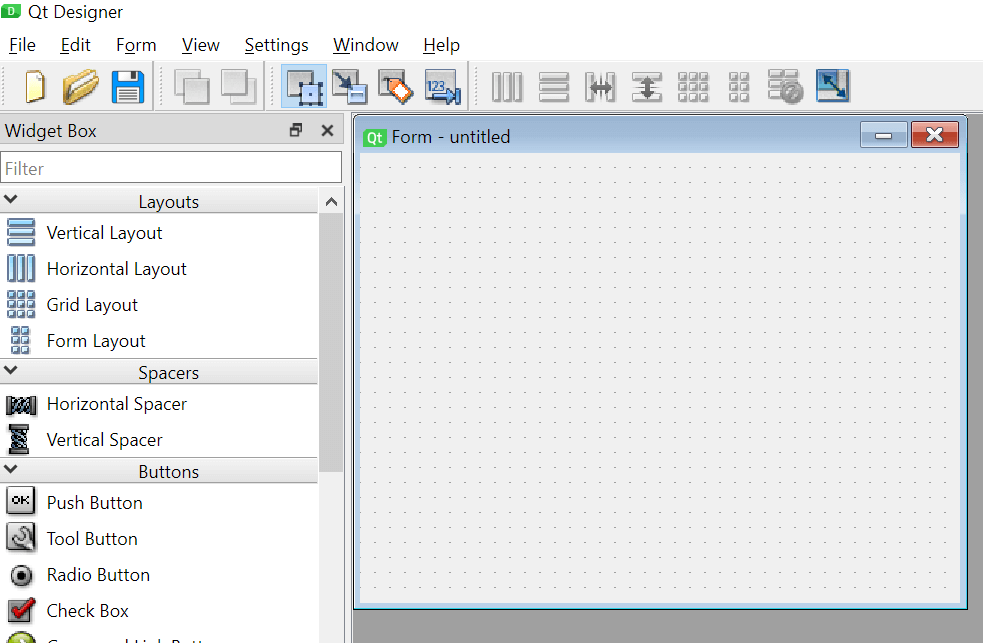
You can set the layout for the widget, and drag and drop widgets from the Widget Box to the form.
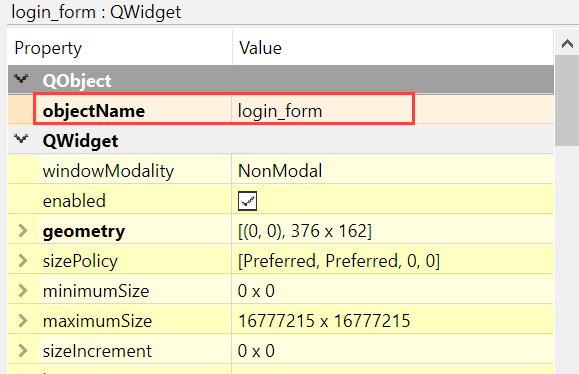
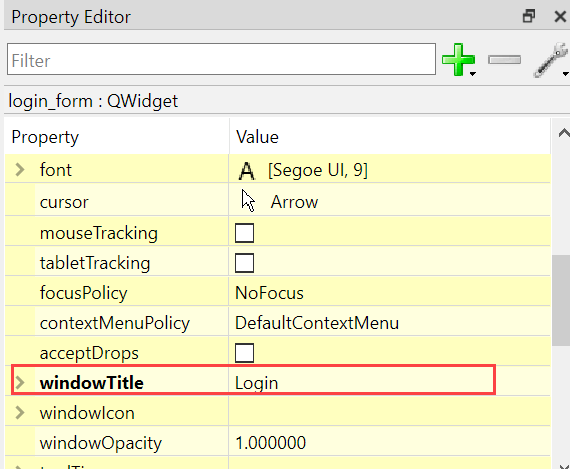
Setting widget properties
In the Property Editor, you can set a name for the widget e.g., login_form
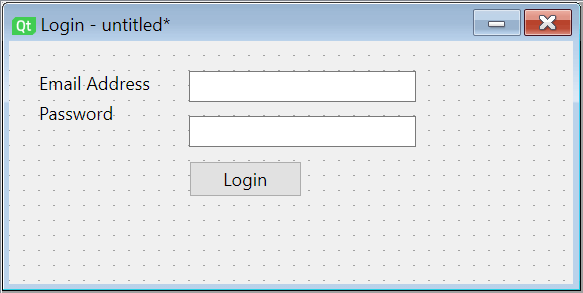
Adding widgets to the login form
First, add the widgets QLabel , QLineEdit , and QPushButton to the form:
The following table lists the fields, their types, and names:
| Field | Widget | Object Name |
|---|---|---|
| Login Window | QWidget | login_form |
| Email Address | QLineEdit | email_line_edit |
| Password | QLineEdit | password_line_edit |
| Login Button | QPushButton | btn_login |
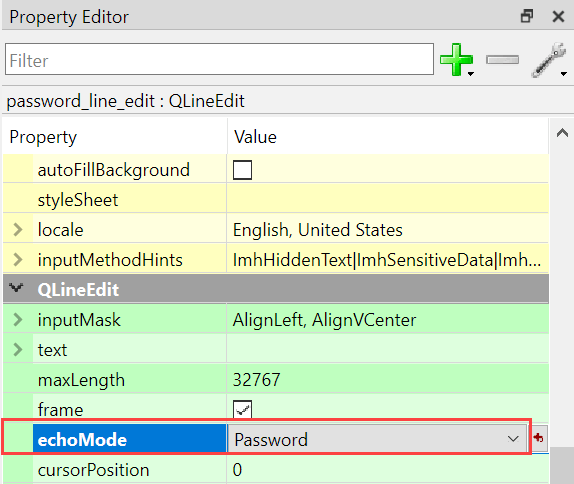
Second, set the echo mode of the password field to Password :
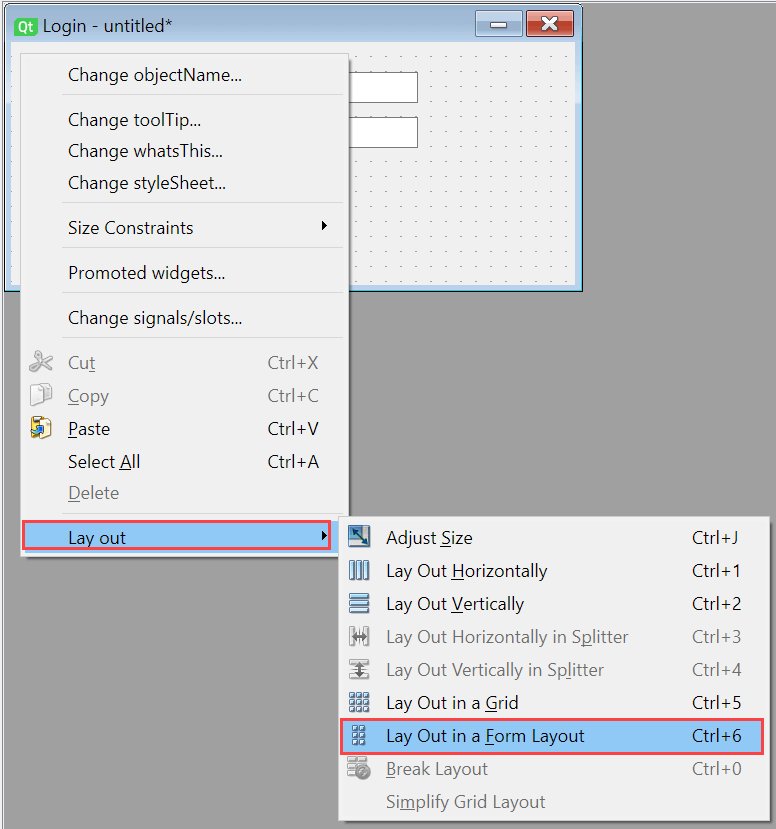
Third, right-click the widget and set its layout to Form Layout:
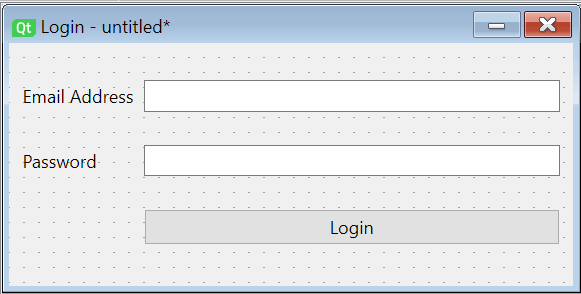
The form will change to the following:
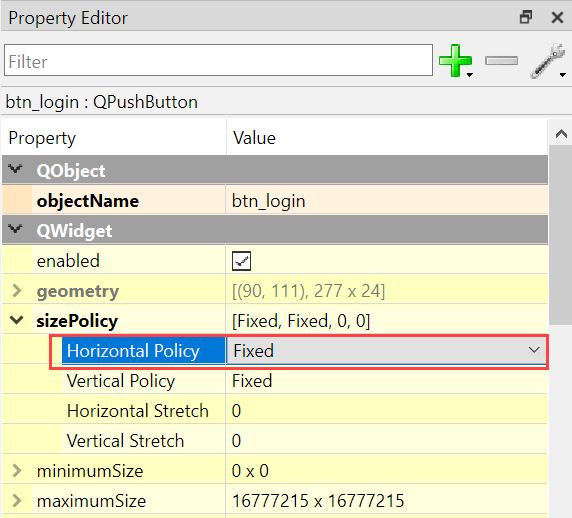
Fourth, change the size of the Login button by setting its Horizontal Size Policy to Fixed:
Fifth, save the form to the D:\pyqt6 directory as login_form.ui file.
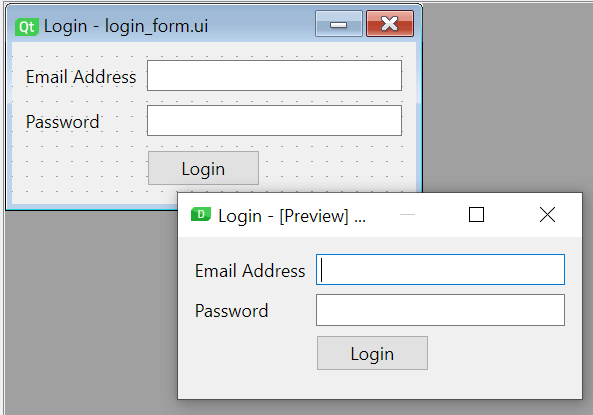
Sixth, select Form > Preview. menu or the keyboard shortcut Ctrl-R to preview the form:
Finally, close the Qt Designer.
There’re two ways to use the login_form .ui from a Python program:
- Convert the .ui file to Python code and use the generated code from the program.
- Directly use the .ui file in the program.
Converting .ui file to Python code
First, execute the following command to convert the login_form.ui file to login_form.py file:
pyuic6 -o login_form.py login_form.uiCode language: Python (python)Note that you need to run the pyuic6 from the pyqt6-env virtual environment.
The pyuic6 generated the login_form.py from the login_form.ui file. The login_form.py contains the following generated Python code:
# Form implementation generated from reading ui file 'login_form.ui' # # Created by: PyQt6 UI code generator 6.1.0 # # WARNING: Any manual changes made to this file will be lost when pyuic6 is # run again. Do not edit this file unless you know what you are doing. from PyQt6 import QtCore, QtGui, QtWidgets class Ui_login_form(object): def setupUi(self, login_form): login_form.setObjectName("login_form") login_form.resize(269, 108) self.formLayout = QtWidgets.QFormLayout(login_form) self.formLayout.setObjectName("formLayout") self.label = QtWidgets.QLabel(login_form) self.label.setObjectName("label") self.formLayout.setWidget(0, QtWidgets.QFormLayout.ItemRole.LabelRole, self.label) self.email_line_edit = QtWidgets.QLineEdit(login_form) self.email_line_edit.setObjectName("email_line_edit") self.formLayout.setWidget(0, QtWidgets.QFormLayout.ItemRole.FieldRole, self.email_line_edit) self.label_2 = QtWidgets.QLabel(login_form) self.label_2.setObjectName("label_2") self.formLayout.setWidget(1, QtWidgets.QFormLayout.ItemRole.LabelRole, self.label_2) self.password_line_edit = QtWidgets.QLineEdit(login_form) self.password_line_edit.setEchoMode(QtWidgets.QLineEdit.EchoMode.Password) self.password_line_edit.setObjectName("password_line_edit") self.formLayout.setWidget(1, QtWidgets.QFormLayout.ItemRole.FieldRole, self.password_line_edit) self.btn_login = QtWidgets.QPushButton(login_form) sizePolicy = QtWidgets.QSizePolicy(QtWidgets.QSizePolicy.Policy.Fixed, QtWidgets.QSizePolicy.Policy.Fixed) sizePolicy.setHorizontalStretch(0) sizePolicy.setVerticalStretch(0) sizePolicy.setHeightForWidth(self.btn_login.sizePolicy().hasHeightForWidth()) self.btn_login.setSizePolicy(sizePolicy) self.btn_login.setObjectName("btn_login") self.formLayout.setWidget(2, QtWidgets.QFormLayout.ItemRole.FieldRole, self.btn_login) self.retranslateUi(login_form) QtCore.QMetaObject.connectSlotsByName(login_form) def retranslateUi(self, login_form): _translate = QtCore.QCoreApplication.translate login_form.setWindowTitle(_translate("login_form", "Login")) self.label.setText(_translate("login_form", "Email Address")) self.label_2.setText(_translate("login_form", "Password")) self.btn_login.setText(_translate("login_form", "Login"))Code language: Python (python)It’s important to note that you should never manually change the login_form.py file. Because all your manual adjustments will be lost if you edit the login_form.ui in the Qt Designer and regenerate the login_form.py again.
Second, create the login.py file and import the login_ui.py file:
import sys from PyQt6.QtWidgets import QApplication, QWidget from login_form import Ui_login_form class Login(QWidget): def __init__(self): super().__init__() # use the Ui_login_form self.ui = Ui_login_form() self.ui.setupUi(self) # show the login window self.show() if __name__ == '__main__': app = QApplication(sys.argv) login_window = Login() sys.exit(app.exec())Code language: Python (python)- Import Ui_login_form class from the login_form.py file
- Create a new instance of the Ui_login_form and call the setupUi() method to set up the user interfaces.
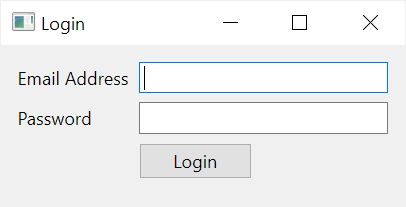
Third, execute the login.py file:
python login.pyCode language: Python (python)It’ll show the login window:
Referencing child widgets
To use the child widgets of Ui_login_form widget, you reference their names using the self.ui variable.
For example, you can add a simple authentication when the user enters an email address and password and click the Login button as follows:
import sys from PyQt6.QtWidgets import QApplication, QWidget, QMessageBox from login_form import Ui_login_form class Login(QWidget): def __init__(self): super().__init__() # use the Ui_login_form self.ui = Ui_login_form() self.ui.setupUi(self) # authenticate when the login button is clicked self.ui.btn_login.clicked.connect(self.authenticate) # show the login window self.show() def authenticate(self): email = self.ui.email_line_edit.text() password = self.ui.password_line_edit.text() if email == 'john@test.com' and password == '123456': QMessageBox.information(self, 'Success',"You're logged in!") else: QMessageBox.critical(self, 'Error',"Invalid email or password.") if __name__ == '__main__': app = QApplication(sys.argv) login_window = Login() sys.exit(app.exec())Code language: Python (python)First, connect the clicked signal of the button to the authenticate method. Notice that we reference the btn_login button via the self.ui variable:
self.ui.btn_login.clicked.connect(self.authenticate)Code language: Python (python)Second, define the authenticate() method that gets values from the email_line_edit and password_line_edit and perform a simple check of these values against hard-coded values:
def authenticate(self): email = self.ui.email_line_edit.text() password = self.ui.password_line_edit.text() if email == 'john@test.com' and password == '123456': QMessageBox.information(self, 'Success',"You're logged in!") else: QMessageBox.critical(self, 'Error',"Invalid email or password.")Code language: Python (python)Security Notice: Never do this in real applications.
Besides creating an instance of the Ui_login_form inside the login window, you can inherit the Ui_login_form window using multiple inheritances and directly reference the child widgets like this:
import sys from PyQt6.QtWidgets import QApplication, QWidget, QMessageBox from login_form import Ui_login_form class Login(QWidget,Ui_login_form): def __init__(self): super().__init__() # setup the UI self.setupUi(self) # authenticate when the login button is clicked self.btn_login.clicked.connect(self.authenticate) # show the login window self.show() def authenticate(self): email = self.email_line_edit.text() password = self.password_line_edit.text() if email == 'john@test.com' and password == '123456': QMessageBox.information(self, 'Success',"You're logged in!") else: QMessageBox.critical(self, 'Error',"Invalid email or password.") if __name__ == '__main__': app = QApplication(sys.argv) login_window = Login() sys.exit(app.exec())Code language: Python (python)Using .ui file directly
Another way to use the design generated by the Qt Designer is to load the .ui file directly using the loadUi() function of the uic module:
from PyQt6.QtWidgets import QApplication, QWidget, QMessageBox from PyQt6 import uic import sys class Login(QWidget): def __init__(self): super().__init__() self.ui = uic.loadUi('login_form.ui', self) # authenticate when the login button is clicked self.ui.btn_login.clicked.connect(self.authenticate) self.show() def authenticate(self): email = self.email_line_edit.text() password = self.password_line_edit.text() if email == 'john@test.com' and password == '123456': QMessageBox.information(self, 'Success',"You're logged in!") else: QMessageBox.critical(self, 'Error',"Invalid email or password.") if __name__ == '__main__': app = QApplication(sys.argv) login_window = Login() sys.exit(app.exec())Code language: Python (python)The loadUi() function returns an instance of the QWidget and you can reference the child widgets via the self.ui variable.
When you should use Qt Designer
The .ui file generated by the Qt designer creates an abstraction layer between the available widget and the code that consumes it.
Therefore, if you are starting out with PyQt, you should code the UI manually instead of using Qt Designer. By doing this, you know exactly what widgets are available in the application.
However, if you’re familiar with PyQt and work on a large application, you should use Qt Designer to create a good design and improve productivity.
Summary
- Use Qt Designer to design user interfaces for large applications.
- Use the pyuic6 tool to convert a .ui file into a Python source code file.
- Use loadUi() function of the uic module to load the .ui file directly.