PHP Form Processing
In this article, we will discuss how to process form in PHP. HTML forms are used to send the user information to the server and returns the result back to the browser. For example, if you want to get the details of visitors to your website, and send them good thoughts, you can collect the user information by means of form processing. Then, the information can be validated either at the client-side or on the server-side. The final result is sent to the client through the respective web browser. To create a HTML form, form tag should be used.
Attributes of Form Tag:
| Attribute | Description |
|---|---|
| name or id | It specifies the name of the form and is used to identify individual forms. |
| action | It specifies the location to which the form data has to be sent when the form is submitted. |
| method | It specifies the HTTP method that is to be used when the form is submitted. The possible values are get and post. If get method is used, the form data are visible to the users in the url. Default HTTP method is get. |
| encType | It specifies the encryption type for the form data when the form is submitted. |
| novalidate | It implies the server not to verify the form data when the form is submitted. |
Controls used in forms: Form processing contains a set of controls through which the client and server can communicate and share information. The controls used in forms are:
- Textbox: Textbox allows the user to provide single-line input, which can be used for getting values such as names, search menu and etc.
- Textarea: Textarea allows the user to provide multi-line input, which can be used for getting values such as an address, message etc.
- DropDown: Dropdown or combobox allows the user to provide select a value from a list of values.
- Radio Buttons: Radio buttons allow the user to select only one option from the given set of options.
- CheckBox: Checkbox allows the user to select multiple options from the set of given options.
- Buttons: Buttons are the clickable controls that can be used to submit the form.
Creating a simple HTML Form: All the form controls given above is designed by using the input tag based on the type attribute of the tag. In the below script, when the form is submitted, no event handling mechanism is done. Event handling refers to the process done while the form is submitted. These event handling mechanisms can be done by using javaScript or PHP. However, JavaScript provides only client-side validation. Hence, we can use PHP for form processing.
Working with HTML Forms in ASP.NET Web Pages (Razor) Sites
Reading User Input from the Form
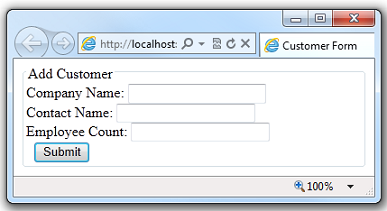
To process the form, you add code that reads the submitted field values and does something with them. This procedure shows you how to read the fields and display the user input on the page. (In a production application, you generally do more interesting things with user input. You’ll do that in the article about working with databases.)
- At the top of the Form.cshtml file, enter the following code:
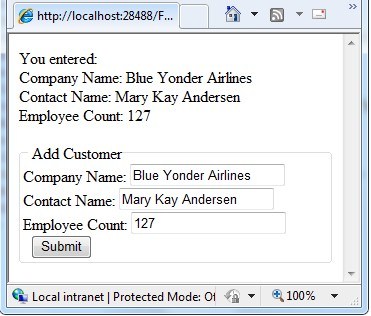
@ < if (IsPost) < string companyname = Request.Form["companyname"]; string contactname = Request.Form["contactname"]; int employeecount = Request.Form["employees"].AsInt(); You entered:
Company Name: @companyname
Contact Name: @contactname
Employee Count: @employeecount
> > 
When the user first requests the page, only the empty form is displayed. The user (which will be you) fills in the form and then clicks Submit. This submits (posts) the user input to the server. By default, the request goes to the same page (namely, Form.cshtml). When you submit the page this time, the values you entered are displayed just above the form: Look at the code for the page. You first use the IsPost method to determine whether the page is being posted — that is, whether a user clicked the Submit button. If this is a post, IsPost returns true. This is the standard way in ASP.NET Web Pages to determine whether you’re working with an initial request (a GET request) or a postback (a POST request). (For more information about GET and POST, see the sidebar «HTTP GET and POST and the IsPost Property» in Introduction to ASP.NET Web Pages Programming Using the Razor Syntax.) Next, you get the values that the user filled in from the Request.Form object, and you put them in variables for later. The Request.Form object contains all the values that were submitted with the page, each identified by a key. The key is the equivalent to the name attribute of the form field that you want to read. For example, to read the companyname field (text box), you use Request.Form[«companyname»] . Form values are stored in the Request.Form object as strings. Therefore, when you have to work with a value as a number or a date or some other type, you have to convert it from a string to that type. In the example, the AsInt method of the Request.Form is used to convert the value of the employees field (which contains an employee count) to an integer.
HTML Encoding for Appearance and Security
HTML has special uses for characters like < , >, and & . If these special characters appear where they’re not expected, they can ruin the appearance and functionality of your web page. For example, the browser interprets the < character (unless it's followed by a space) as the beginning of an HTML element, like or . If the browser doesn't recognize the element, it simply discards the string that begins with < until it reaches something that it again recognizes. Obviously, this can result in some weird rendering in the page.
HTML encoding replaces these reserved characters with a code that browsers interpret as the correct symbol. For example, the < character is replaced with < and the >character is replaced with > . The browser renders these replacement strings as the characters that you want to see.
It’s a good idea to use HTML encoding any time you display strings (input) that you got from a user. If you don’t, a user can try to get your web page to run a malicious script or do something else that compromises your site security or that’s just not what you intend. (This is particularly important if you take user input, store it someplace, and then display it later — for example, as a blog comment, user review, or something like that.)
To help prevent these problems, ASP.NET Web Pages automatically HTML-encodes any text content that you output from your code. For example, when you display the content of a variable or an expression using code such as @MyVar , ASP.NET Web Pages automatically encodes the output.
Validating User Input
Users make mistakes. You ask them to fill in a field, and they forget to, or you ask them to enter the number of employees and they type a name instead. To make sure that a form has been filled in correctly before you process it, you validate the user’s input.
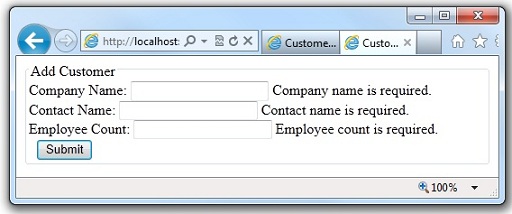
This procedure shows how to validate all three form fields to make sure the user didn’t leave them blank. You also check that the employee count value is a number. If there are errors, you’ll display an error message that tells the user what values didn’t pass validation.
- In the Form.cshtml file, replace the first block of code with the following code:
@ < Validation.RequireField("companyname", "Company name is required."); Validation.RequireField("contactname", "Contact name is required."); Validation.RequireField("employees", "Employee count is required."); Validation.Add("employees", Validator.Integer()); if (IsPost) < var companyname = Request.Form["companyname"]; var contactname = Request.Form["contactname"]; var employeecount = Request.Form["employees"]; if(Validation.IsValid())< You entered:
Company Name: @companyname
Contact Name: @contactname
Employee Count: @employeecount
> > > To display validation error messages, you can call Html. ValidationMessage and pass it the name of the field that you want the message for.
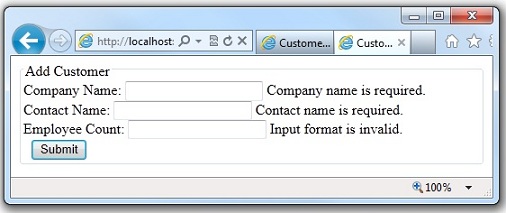
ASP.NET Web Pages provides more options for validating user input, including the ability to automatically perform validation using client script, so that users get immediate feedback in the browser. See the Additional Resources section later for more information.
Restoring Form Values After Postbacks
When you tested the page in the previous section, you might have noticed that if you had a validation error, everything you entered (not just the invalid data) was gone, and you had to re-enter values for all the fields. This illustrates an important point: when you submit a page, process it, and then render the page again, the page is re-created from scratch. As you saw, this means that any values that were in the page when it was submitted are lost.
You can fix this easily, however. You have access to the values that were submitted (in the Request.Form object, so you can fill those values back into the form fields when the page is rendered.
- In the Form.cshtml file, replace the value attributes of the elements using the value attribute.:
The value attribute of the elements has been set to dynamically read the field value out of the Request.Form object. The first time that the page is requested, the values in the Request.Form object are all empty. This is fine, because that way the form is blank.