- Адаптивное меню на CSS flexbox
- Работаем над адаптивностью шапки
- Комментарии ( 2 ):
- Flexbox Dropdown Menu CSS
- CSS Code For Dropdown menu:-
- Video Output Of Flexbox Dropdown Menu CSS:-
- Live Preview Of Flexbox Dropdown Menu CSS:-
- Dropdown Navigation Menu using Flexbox
- Post a Comment
- Popular Posts
- Responsive Infinite Client Logo Carousel slider
- Navigation Bar with Slider using HTML CSS & Bootstrap 4
- Transparent Login Form HTML CSS
- Main Tags
- About Us
Адаптивное меню на CSS flexbox

Всем привет! На начало 2018 года, по данным сайта Can I Use, верстка на flexbox-ах, поддерживается браузерами на 97.8%. Это отличные показатели для этой уже далеко не новой технологии по верстки сайтов. Теперь уже нет причин, почему не пользоваться этим удобным способом верстки. Чем мы сейчас и займемся.
Сверстав несколько макетов на CSS flexbox-ах, уже не хочется возвращаться к устаревшим float-ам и даже к такому любимому среди верстальщиков фреймворку, как Bootstrap. Хотя, Bootstrap ещё рано списывать со счетов, ведь используя его знаменитую сетку, можно «не париться» по поводу медиа запросов.
На этом уроке мы сверстаем шапку сайта с типичным адаптивным меню с применением flexbox CSS метода.

Шапка состоит из трех логичных блоков:
- Блок с логотипом
- Блок с меню, сделанное на списках
- Блок с иконкой и номером телефона
Эти три блока будут помещены в общий внешний блок-обертку header, который внутри себя будет делать display: flex; для трех блоков.

Внутри блока nav, еще раз пропишем display: flex; для пунктов меню. Таким образом мы добьёмся гибкости, при уменьшении размеров экрана, пункты меню могут выстраиваться друг под другом.
Для наглядной демонстрации сделаем всю HTML разметку для шапки сайта.
+380973457685
Так будет выглядеть шапка без применения стилей, так и должно быть.

А сейчас внимание! Достаточно указать двум блокам display: flex; и всё содержимое шапки вытянется в строчку.
.header .menu ul display: flex;
>
Вот так работает flexbox.

Добавим стили и шапка готова. Дальше нам нужно будет её адаптировать под разные размеры экранов. Обратите внимание, как мало написано кода.
body background-color: #fff;
font-family: «Open Sans», sans serif;
line-height: 1.5;
>
.header border: 2px solid #ccc;
display: flex;
flex-wrap: wrap; /*перенос строки */
justify-content: space-between; /*прижимает содержимое к краям */
align-items: center; /*выравнивает элементы по центру на вертикальной */
>
.header .logo padding-left: 30px;
>
.header .menu ul display: flex;
list-style: none;
>
.header .menu ul li margin: 20px 10px;
>
.header .menu ul a text-transform: uppercase;
text-decoration: none;
font-weight: bold;
color: #06a327;
>
.phone font-size: 110%;
color: #333;
padding-right: 40px;
>
Работаем над адаптивностью шапки
Суть процесса по адаптивности сайта заключается в поиске контрольных точек, при которых элементы сайта будут не видны или выглядеть небрежно. Наша задача при сжатии браузера по ширине, увидеть проблему и исправить, дописав соответствующий код (медиа запрос) в файл стилей.
Например, на ширине экрана 900 пикселей, блок с телефон прижался к левому краю шапки.
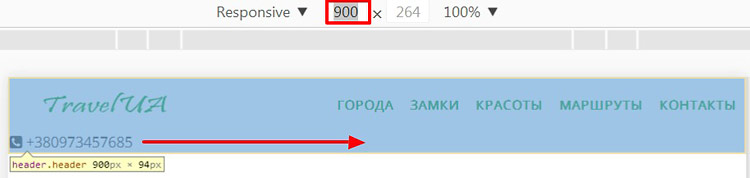
Решение проблемы, вы видите ниже. Выравниваем блок .phone по центру.
@media screen and (max-width: 900px) .phone margin: auto;
>
>
На ширине экрана 500 пикселей начинает срезаться меню, так как не помещается в строчку.
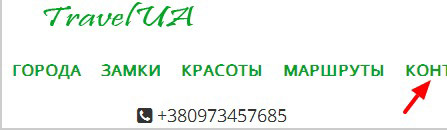
Легким движением руки для ul, прописываем свойство flex-direction: column; которое возвращает списки в естественное блочное состояние.
@media screen and (max-width: 500px) .header flex-direction: column;
>
.header .menu ul flex-direction: column;
align-self: center;
>
.header .menu ul li margin: 5px;
>
>

Разобраться с адаптивной версткой на flexbox-ах, Вам поможет этот видеокурс «Вёрстка сайта с нуля»

![]()
Создано 08.03.2018 10:18:00
Копирование материалов разрешается только с указанием автора (Михаил Русаков) и индексируемой прямой ссылкой на сайт (http://myrusakov.ru)!
Добавляйтесь ко мне в друзья ВКонтакте: http://vk.com/myrusakov.
Если Вы хотите дать оценку мне и моей работе, то напишите её в моей группе: http://vk.com/rusakovmy.
Если Вы не хотите пропустить новые материалы на сайте,
то Вы можете подписаться на обновления: Подписаться на обновления
Если у Вас остались какие-либо вопросы, либо у Вас есть желание высказаться по поводу этой статьи, то Вы можете оставить свой комментарий внизу страницы.
Порекомендуйте эту статью друзьям:
Если Вам понравился сайт, то разместите ссылку на него (у себя на сайте, на форуме, в контакте):
- Кнопка:
Она выглядит вот так: - Текстовая ссылка:
Она выглядит вот так: Как создать свой сайт - BB-код ссылки для форумов (например, можете поставить её в подписи):
Комментарии ( 2 ):
Доброго времени суток Михаил! От себя хочу предложить маленькую поправочку в стили, а именно: в коде CSS с указанием размеров отступов margin: 0; padding: 0; Указывать не просто ноль (0), а дописывать 0px, так как просто ноль не срабатывает.
уверяю Вас, что работают оба варианта.
Для добавления комментариев надо войти в систему.
Если Вы ещё не зарегистрированы на сайте, то сначала зарегистрируйтесь.
Copyright © 2010-2023 Русаков Михаил Юрьевич. Все права защищены.
Flexbox Dropdown Menu CSS
Hello coders, a very warm welcome to the Codewithrandom blog. Today we are going to Create a Responsive Flexbox Dropdown Menu Using Html and Css. We have seen many dropdown menus on a number of websites we visit while surfing the internet.
By which we can make many projects in different ways of presentation. But, before going to the code part. Let us understand what is flex drop-down menu.
Do you want to learn HTML to JavaScript? 🔥
If yes, then here is our Master Frontend: Zero to Hero eBook! 📚 In this eBook, you’ll learn complete HTML, CSS, Bootstrap, and JavaScript from beginner to advance level. 💪 It includes 450 Projects with source code.
What is a flex dropdown menu?

CSS Code For Dropdown menu:-
Using css we can style the layout/html page. Here we are using some basic properties of css like border-box, flex-box, css class and id selectors, pseudo selectors, and pseudo-element.
What are pseudo-elements?
A css pseudo-element is used to style specified parts of an element.
For example, it can be used to:
Style the first letter, or line, of an element
Insert content before, or after, the content of an element
Css – the ::after pseudo-element
The ::after pseudo-element can be used to insert some content after the content of an element.
* < margin: 0; padding: 0; outline: none; -webkit-box-sizing: border-box; -moz-box-sizing: border-box; box-sizing: border-box; >*:after, *:before < -webkit-box-sizing: border-box; -moz-box-sizing: border-box; box-sizing: border-box; >article, aside, details, figcaption, figure, footer, header, hgroup, nav, section < display: block; >html < font-size: 100%; height: auto !important; height: 100%; -webkit-text-size-adjust: 100%; -ms-text-size-adjust: 100%; >.clear < display: block; >.clear::after < clear: both; content: "."; display: block; height: 1px; visibility: hidden; >/*GENERIC STYLES*/ body < background: #f2f2f2; color: #222; -webkit-font-smoothing: antialiased; font-family: "Helvetica Neue", Helvetica, Arial, sans-serif; font-size: 1.05em; font-weight: 400; height: auto !important; height: 100%; line-height: 1.6rem; min-height: 100%; >/*NAV*/ header < background: linear-gradient( to left, rgba(54, 194, 182, 0.96) 0, rgba(62, 188, 207, 0.96) 100% ); border-bottom: 1px solid rgba(0, 0, 0, 0.1); box-shadow: 0 1px 1px 0 rgba(0, 0, 0, 0.1); display: block; position: fixed; width: 100%; z-index: 1000; >header > nav > ul < display: flex; flex-wrap: wrap; justify-content: flex-start; list-style: none; margin: 0; padding: 0; >header > nav > ul > li < flex: 0 1 auto; margin: 0; padding: 0; position: relative; transition: all linear 0.1s; >header > nav > ul > li:hover < background: rgba(58, 162, 173, 1); >header > nav > ul > li a + div < background: linear-gradient( to bottom, rgba(58, 162, 173, 1) 0, rgba(62, 188, 207, 0.96) 100% ); border-radius: 0 0 2px 2px; box-shadow: 0 3px 1px rgba(0, 0, 0, 0.05); display: none; font-size: 1rem; position: absolute; width: 195px; >header > nav > ul > li:hover a + div < display: block; >header > nav > ul > li a + div > ul < list-style-type: none; >header > nav > ul > li a + div > ul > li < margin: 0; padding: 0; >header > nav > ul > li a + div > ul > li > a < color: rgba(255, 255, 255, 0.9); display: block; font-size: 0.75rem; letter-spacing: 1.5px; padding: 0.25rem 1.5rem; text-decoration: none; text-transform: uppercase; >header > nav > ul > li a + div > ul > li:hover > a < background-color: rgba(0, 0, 0, 0.15); >header > nav > ul > li > a < align-items: flex-start; color: #fff; display: flex; font-size: 1.55rem; font-weight: 200; letter-spacing: 1px; max-width: 130px; padding: 1rem 1.5rem; text-decoration: none; text-shadow: 0 1px 1px rgba(0, 0, 0, 0.1); transition: all linear 0.1s; >header > nav > ul > li > a > div > span < color: rgba(255, 255, 255, 0.75); display: block; font-family: Georgia, "Times New Roman", Times, serif; font-size: 0.7rem; font-style: italic; line-height: 1rem; max-width: 260px; >@media (min-width: 990px) < header >nav > ul > li > a < max-width: 500px; font-size: 1.7rem; line-height: 2rem; >header > nav > ul > li > a > div > span < margin: 4px 0 0; >>
Step1:We will set the padding, margin, and outline properties to “zero,” “none,” and “border-box,” respectively, using the universal tag identifier (*).
Once the multiple element has been chosen, we will change its display to “block” using the multiple tag selector. We will use HTML to change the font size to “100%” and the height property to “100%”.
*
< margin: 0; padding: 0; outline: none; -webkit-box-sizing: border-box; -moz-box-sizing: border-box; box-sizing: border-box; >*:after, *:before < -webkit-box-sizing: border-box; -moz-box-sizing: border-box; box-sizing: border-box; >article, aside, details, figcaption, figure, footer, header, hgroup, nav, section < display: block; >html < font-size: 100%; height: auto !important; height: 100%; -webkit-text-size-adjust: 100%; -ms-text-size-adjust: 100%; >.clear < display: block; >.clear::after < clear: both; content: "."; display: block; height: 1px; visibility: hidden; >/*GENERIC STYLES*/ body
Step2:Now, using the header element selector, we will style our navbar. We’ll make the background using the background property to be a “linear gradient” using the colours “see green” and “blue.” We’ll change the display to “block” using the display property. We’ll change the width to “100%” using the width property.
The display will be changed to flex using the header, navbar, and ul. The flex wrap will be set to wrap, and the background colour will be cyan.
We will specify the maximum screen width using the media query property. Since we defined the size of the element according to screen sizes, if the screen size decreases below the prescribed width, the header and the content inside the drop-down menu immediately adjust.
All of the tags specified in the HTML code have been styled in this external CSS, and the submenus have been arranged in a drop-down format to prevent confusion. Additionally, a hover effect has been introduced so that it appears as soon as the user places the mouse pointer over it. It will demonstrate the outcome. Let’s examine the project’s results.
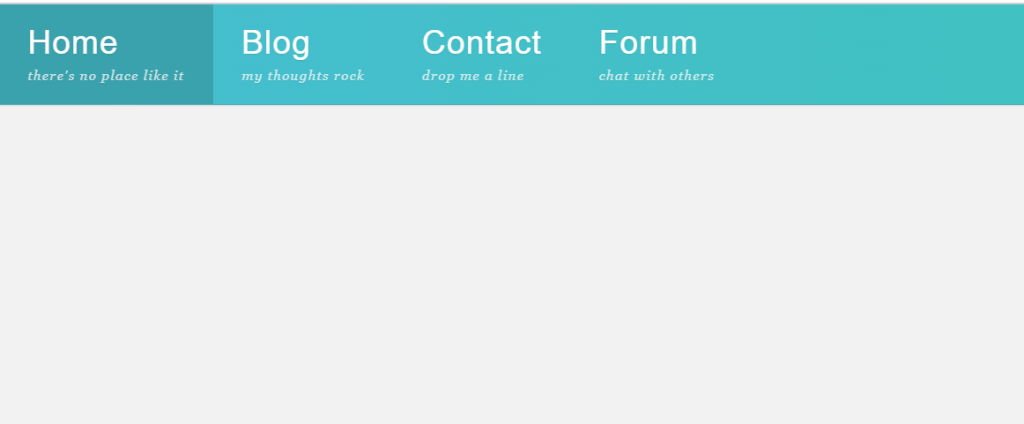
Final Output Of Responsive Flexbox Dropdown Menu Css:
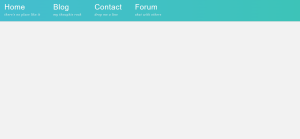
We have created the flexbox dropdown menu, We have created an HTML file we have defined all the required tags and classes for the making of the navbar. We have also created a CSS file for the styling of our project, we have styled all the tags defined in the HTML file. We have also added a hover effect. If you loved it do comment it boosts our motivation to bring new projects for you guys. If you face any difficulty while performing reach out to us with the help of the comment section.
Video Output Of Flexbox Dropdown Menu CSS:-
Live Preview Of Flexbox Dropdown Menu CSS:-
Written by @Harsh_9& Himanshu Singh
Dropdown Navigation Menu using Flexbox

In this snippet, I am sharing another simple snippet on how to create a Dropdown Navigation Menu using CSS Flexbox. This is a basic CSS navbar with a dropdown menu, and it is not responsive. I have tried to show the basic method of how to make a dropdown navbar. All the HTML and CSS code available easy to understand. so without explaining further, I am providing you the code so that you can play around with the code by yourself.
Thanks for visiting the blog.
Please do not enter any spam link in the comment box.
Post a Comment
Please do not enter any spam link in the comment box.
Popular Posts
Responsive Infinite Client Logo Carousel slider
Navigation Bar with Slider using HTML CSS & Bootstrap 4
Transparent Login Form HTML CSS
Main Tags

About Us
Coding Flicks provides free HTML, CSS and Javascript tutorials along with practical examples. Improve your Skills in HTML,CSS,Javascript, CSS Animations etc.