- :target
- Кратко
- Как пишется
- Как понять
- Пример
- CSS Selectors
- CSS Selectors
- The CSS element Selector
- Example
- The CSS id Selector
- Example
- The CSS class Selector
- Example
- Example
- Example
- The CSS Universal Selector
- Example
- The CSS Grouping Selector
- Example
- All CSS Simple Selectors
- :target
- Syntax
- Examples
- A table of contents
- HTML
- CSS
- Result
- Pure-CSS lightbox
- HTML
- CSS
- Result
- Specifications
- Browser compatibility
- :target
- Синтаксис
- Спецификации
- Примеры
- Пример 1
- Пример 2
- Пример 3
- Ссылки
:target
Управляет стилем элемента, на который ссылается якорная ссылка.
Время чтения: меньше 5 мин
Кратко
Скопировать ссылку «Кратко» Скопировано
Есть ссылки которые ведут не просто на страницу, а на конкретный HTML-элемент внутри. Псевдокласс :target управляет стилем этого элемента.
Как пишется
Скопировать ссылку «Как пишется» Скопировано
После любого селектора ставим двоеточие и пишем ключевое слово target.
.title color: black;> .title:target color: pink;>.title color: black; > .title:target color: pink; >
p:target::before content: ''; font-size: 10px; color: yellow;>p:target::before content: ''; font-size: 10px; color: yellow; >
Как понять
Скопировать ссылку «Как понять» Скопировано
Браузер видит идентификатор в адресной строке — он идёт после символа # — и находит HTML-элемент, у которого такой же id. Стилем этого элемента и управляет псевдокласс :target .
Пример
Скопировать ссылку «Пример» Скопировано
Сейчас в адресной строке такой URL:
https://doka.guide/html/a/#podskazki
Движок находит элемент с id «podskazki» и подставляет ему дополнительный автоматический класс, чтобы пометить изменение состояния.
Подсказки
div class="container" id="podskazki"> h2>Подсказкиh2> div>
.container background-color: white;> .container:target background-color: yellow;>.container background-color: white; > .container:target background-color: yellow; >
Этому классу мы можем задавать любые стили, подходящие по дизайну.
Когда мы перейдём по другому якорю и ссылка сменится, то и все свойства :target перейдут со старого элемента на новый. При этом логика подставления или удаления этого класса скрыта под капотом движка браузера.
CSS Selectors
A CSS selector selects the HTML element(s) you want to style.
CSS Selectors
CSS selectors are used to «find» (or select) the HTML elements you want to style.
We can divide CSS selectors into five categories:
- Simple selectors (select elements based on name, id, class)
- Combinator selectors (select elements based on a specific relationship between them)
- Pseudo-class selectors (select elements based on a certain state)
- Pseudo-elements selectors (select and style a part of an element)
- Attribute selectors (select elements based on an attribute or attribute value)
This page will explain the most basic CSS selectors.
The CSS element Selector
The element selector selects HTML elements based on the element name.
Example
Here, all
elements on the page will be center-aligned, with a red text color:
The CSS id Selector
The id selector uses the id attribute of an HTML element to select a specific element.
The id of an element is unique within a page, so the id selector is used to select one unique element!
To select an element with a specific id, write a hash (#) character, followed by the id of the element.
Example
The CSS rule below will be applied to the HTML element with
Note: An id name cannot start with a number!
The CSS class Selector
The class selector selects HTML elements with a specific class attribute.
To select elements with a specific class, write a period (.) character, followed by the class name.
Example
In this example all HTML elements with will be red and center-aligned:
You can also specify that only specific HTML elements should be affected by a class.
Example
In this example only
elements with will be red and center-aligned:
HTML elements can also refer to more than one class.
Example
In this example the
element will be styled according to and to
This paragraph refers to two classes.
Note: A class name cannot start with a number!
The CSS Universal Selector
The universal selector (*) selects all HTML elements on the page.
Example
The CSS rule below will affect every HTML element on the page:
The CSS Grouping Selector
The grouping selector selects all the HTML elements with the same style definitions.
Look at the following CSS code (the h1, h2, and p elements have the same style definitions):
h2 text-align: center;
color: red;
>
p text-align: center;
color: red;
>
It will be better to group the selectors, to minimize the code.
To group selectors, separate each selector with a comma.
Example
In this example we have grouped the selectors from the code above:
All CSS Simple Selectors
| Selector | Example | Example description |
|---|---|---|
| #id | #firstname | Selects the element with > |
| .class | .intro | Selects all elements with > |
| element.class | p.intro | Selects only elements with > |
| * | * | Selects all elements |
| element | p | Selects all elements |
| element,element. | div, p | Selects all elements and all elements |
:target
The :target CSS pseudo-class represents a unique element (the target element) with an id matching the URL’s fragment.
/* Selects an element with an ID matching the current URL's fragment */ :target border: 2px solid black; >
For example, the following URL has a fragment (denoted by the # sign) that points to an element called section2 :
http://www.example.com/index.html#section2
The following element would be selected by a :target selector when the current URL is equal to the above:
section id="section2">Examplesection>
Syntax
Note: Due to a possible bug in the CSS specification, :target doesn’t work within a web component because the shadow root doesn’t pass the target element down to the shadow tree.
Examples
A table of contents
The :target pseudo-class can be used to highlight the portion of a page that has been linked to from a table of contents.
HTML
h3>Table of Contentsh3> ol> li>a href="#p1">Jump to the first paragraph!a>li> li>a href="#p2">Jump to the second paragraph!a>li> li> a href="#nowhere"> This link goes nowhere, because the target doesn't exist. a> li> ol> h3>My Fun Articleh3> p id="p1"> You can target i>this paragraphi> using a URL fragment. Click on the link above to try out! p> p id="p2"> This is i>another paragraphi>, also accessible from the links above. Isn't that delightful? p>
CSS
p:target background-color: gold; > /* Add a pseudo-element inside the target element */ p:target::before font: 70% sans-serif; content: "►"; color: limegreen; margin-right: 0.25em; > /* Style italic elements within the target element */ p:target i color: red; > Result
Pure-CSS lightbox
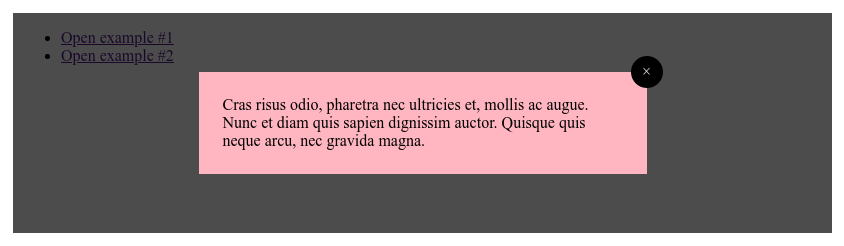
You can use the :target pseudo-class to create a lightbox without using any JavaScript. This technique relies on the ability of anchor links to point to elements that are initially hidden on the page. Once targeted, the CSS changes their display so that they are shown.
Note: A more complete pure-CSS lightbox based on the :target pseudo-class is available on GitHub (demo).
HTML
ul> li>a href="#example1">Open example #1a>li> li>a href="#example2">Open example #2a>li> ul> div class="lightbox" id="example1"> figure> a href="#" class="close">a> figcaption> Lorem ipsum dolor sit amet, consectetur adipiscing elit. Donec felis enim, placerat id eleifend eu, semper vel sem. figcaption> figure> div> div class="lightbox" id="example2"> figure> a href="#" class="close">a> figcaption> Cras risus odio, pharetra nec ultricies et, mollis ac augue. Nunc et diam quis sapien dignissim auctor. Quisque quis neque arcu, nec gravida magna. figcaption> figure> div>
CSS
/* Unopened lightbox */ .lightbox display: none; > /* Opened lightbox */ .lightbox:target position: absolute; left: 0; top: 0; width: 100%; height: 100%; display: flex; align-items: center; justify-content: center; > /* Lightbox content */ .lightbox figcaption width: 25rem; position: relative; padding: 1.5em; background-color: lightpink; > /* Close button */ .lightbox .close position: relative; display: block; > .lightbox .close::after right: -1rem; top: -1rem; width: 2rem; height: 2rem; position: absolute; display: flex; z-index: 1; align-items: center; justify-content: center; background-color: black; border-radius: 50%; color: white; content: "×"; cursor: pointer; > /* Lightbox overlay */ .lightbox .close::before left: 0; top: 0; width: 100%; height: 100%; position: fixed; background-color: rgba(0, 0, 0, 0.7); content: ""; cursor: default; >
Result
Specifications
Browser compatibility
BCD tables only load in the browser
:target
Для перехода к выбранному фрагменту документа, в адресе пишется символ # и указывается имя идентификатора. К примеру, в адресе http://www.w3.org/TR/css3-selectors/#target-pseudo происходит переход к элементу, атрибут id которого задан как target-pseudo . Такая запись адреса называется «целевой элемент».
Псевдокласс :target применяется к целевому элементу, иными словами, к идентификатору, который указан в адресной строке браузера.
Синтаксис
/* Selects an element with an ID matching the current URL's fragment */ :target border: 2px solid black; > Спецификации
Примеры
Пример 1
В данном примере целевой элемент выделяется цветом фона.
1 2 3 4 5 6 7 8 9 10 11 12 13 14 15 16 17 18 19 20 21 22 23 24 25 26 27 28 29 30 31
html> head> meta charset="utf-8" /> title>targettitle> style> h2:target background: #fc0; /* Цвет фона */ padding: 3px; > style> head> body> ul> li>a href="#h1">История 1a>li> li>a href="#h2">История 2a>li> ul> h2 id="h1">История 1h2> p> История о том, как необходимо было сделать могилу, ее начали копать, а потом закапывать, и что из этого получилось. p> h2 id="h2">История 2h2> p> История о том, как возле столовой появились загадочные розовые следы с шестью пальцами, и почему это случилось. p> body> html> Пример 2
Псевдокласс :target может быть использован для выделения части страницы, которая была связана, чтобы сформировать оглавление.
1 2 3 4 5 6 7 8 9 10 11 12 13 14 15 16 17 18 19 20 21
h3>Table of Contentsh3> ol> li>a href="#p1">Jump to the first paragraph!a>li> li>a href="#p2">Jump to the second paragraph!a>li> li> a href="#nowhere" >This link goes nowhere, because the target doesn't exist.a > li> ol> h3>My Fun Articleh3> p id="p1"> You can target i>this paragraphi> using a URL fragment. Click on the link above to try out! p> p id="p2"> This is i>another paragraphi>, also accessible from the links above. Isn't that delightful? p> 1 2 3 4 5 6 7 8 9 10 11 12 13 14 15 16
p:target background-color: gold; > /* Add a pseudo-element inside the target element */ p:target::before font: 70% sans-serif; content: '►'; color: limegreen; margin-right: 0.25em; > /* Style italic elements within the target element */ p:target i color: red; > 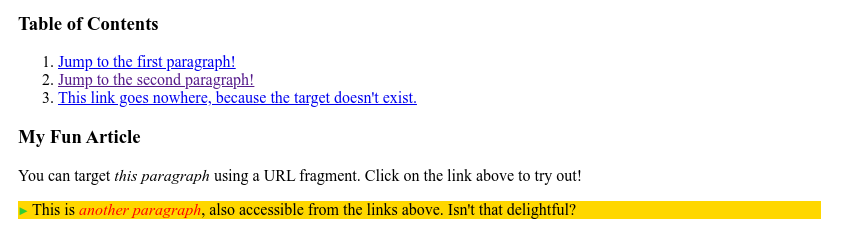
Пример 3
Вы можете использовать псевдокласс :target для создания лайтбокса без использования JavaScript. Этот метод основан на способности якорных ссылок указывать на элементы, которые изначально скрыты на странице. После нацеливания CSS изменяет свое отображение так, чтобы они отображались.
1 2 3 4 5 6 7 8 9 10 11 12 13 14 15 16 17 18 19 20 21 22 23 24 25 26
ul> li>a href="#example1">Open example #1a>li> li>a href="#example2">Open example #2a>li> ul> div class="lightbox" id="example1"> figure> a href="#" class="close">a> figcaption> Lorem ipsum dolor sit amet, consectetur adipiscing elit. Donec felis enim, placerat id eleifend eu, semper vel sem. figcaption> figure> div> div class="lightbox" id="example2"> figure> a href="#" class="close">a> figcaption> Cras risus odio, pharetra nec ultricies et, mollis ac augue. Nunc et diam quis sapien dignissim auctor. Quisque quis neque arcu, nec gravida magna. figcaption> figure> div> 1 2 3 4 5 6 7 8 9 10 11 12 13 14 15 16 17 18 19 20 21 22 23 24 25 26 27 28 29 30 31 32 33 34 35 36 37 38 39 40 41 42 43 44 45 46 47 48 49 50 51 52 53 54 55 56 57 58 59
/* Unopened lightbox */ .lightbox display: none; > /* Opened lightbox */ .lightbox:target position: absolute; left: 0; top: 0; width: 100%; height: 100%; display: flex; align-items: center; justify-content: center; > /* Lightbox content */ .lightbox figcaption width: 25rem; position: relative; padding: 1.5em; background-color: lightpink; > /* Close button */ .lightbox .close position: relative; display: block; > .lightbox .close::after right: -1rem; top: -1rem; width: 2rem; height: 2rem; position: absolute; display: flex; z-index: 1; align-items: center; justify-content: center; background-color: black; border-radius: 50%; color: white; content: '×'; cursor: pointer; > /* Lightbox overlay */ .lightbox .close::before left: 0; top: 0; width: 100%; height: 100%; position: fixed; background-color: rgba(0, 0, 0, 0.7); content: ''; cursor: default; >