- Comment Box in HTML & CSS Code
- Comment Box HTML Code
- The CSS Styles
- The JavaScript for Displaying Comments
- What’s an “Action Page”?
- Add Comments the Easy Way
- How to Style Comment Box Using CSS
- How to Change the Background Color of Your Comment Box?
- Example of changing the background color of the comment box:
- Result
- Example of changing the text color and size within the comment box:
- How to Add a Background Image to Your Comment Box?
- Example of adding a background image to the comment box:
- How to Add Borders to Your Comment Box?
- Example of adding borders to the comment box:
- Example of adding a left border to the comment box:
- How to Style and Customize WordPress Comment Form? Plus, Modify appearance of Comments with CSS
- Let’s get started:
- Method-1) Using functions.php file – only for Genesis
- No Responses
- 1 Response
- % Responses.
- Method-2) For any other WordPress theme
- Comment form – Before:
- Comment form – After:
- Now what? Do you want to modify CSS with below look and feel?
- Suggested Articles.
Comment Box in HTML & CSS Code
This tutorial explains how to create a simple comment box input in HTML, CSS, and JavaScript. Basically, it is a frontend functionality (that can be handled in both jQuery and Vue JS) to quickly append a comment to the webpage. Further, it can be submitted to the server through JSON to publish a comment in real-time.
You can use this simple project for appending strings to the page in comment forms, to-do lists, or feedback forms in HTML. Similarly, you can use this technique in any web project to quickly append the text to the page. Before starting with coding I would suggest checking the demo page to check the comment form in action.
This comment form only appends the comment text to a specific div element without actually publishing it on the page. So, the entered text will be lost after refreshing the page. You have to submit (and store) the comment to the server for permanent.
Comment Box HTML Code
In HTML, create a section with an id «app» and place a textarea (for comment input) and p element for comment output.
The CSS Styles
After creating the HTML structure, now it’s time to style it using CSS. So, target the very first element «container» class and define its max-width of 640px. Similarly, define the background, margin, and padding properties as follows:
Now, target the «comment» class and display it as a block element. Likewise, specify min-height, border, and padding properties for commentClicked the class ad described below:
You can style the textarea/comment box according to your needs. Anyhow, the basic styles of the comment input are given below:
The «primaryContained» class defined the style for the comment submit button. Specify its background color, padding, box-shadow, and border-radius property as follows. You can set the custom color and font-size in order to customize it.
Target the button class with a hover pseudo-selector in order to define the hover styles. There you can set a different background color that will show on the hover event. You can also set the 3D button hover effect if you want to make a mindblowing hover effect for your comment form.
button.primaryContained:hover
The JavaScript for Displaying Comments
You can handle the comment string in both jQuery and Vue JS to submit and append the comment. So, load the jQuery and Vue JavaScript libraries by adding the following CDN link to your HTML page.
Finally, initialize the comment append function in the jQuery document ready function and done.
$(document).ready(function()< $(".primaryContained").on('click', function()< $(".comment").addClass("commentClicked"); >);//end click $("textarea").on('keyup.enter', function()< $(".comment").addClass("commentClicked"); >);//end keyup >);//End Function new Vue(< el: "#app", data:< title: 'Add a comment', newItem: '', item: [], >, methods: < addItem ()< this.item.push(this.newItem); this.newItem = ""; >> >); Note: The example provided above about creating an HMTL comment box is required an action page to process the content of the comment box when the user clicks on submit button.
What’s an “Action Page”?
An “action page” in web development is a web page that processes the data submitted by the user through a form. In the context of the content you provided earlier, an action page would be the page that receives and processes the contents of the comment box after the user clicks the “Submit” button.
Typically, an action page would contain a server-side script, such as PHP or Python, that processes the form data and performs some action with it, such as saving it to a database or sending it in an email.
Add Comments the Easy Way
There are free scripts available online that can help you create an action page to process the contents of a comment box submitted by users on your website. However, creating an action page can be complex, so using a pre-made script can be a simpler solution.
One such solution is HTMLCommentBox.com, which provides an easy way to add a comments section to your website by copying and pasting code. However, to moderate comments, you’ll need to log in using a Google account.
The advantage of using a pre-made script like this is that it’s free and easy to use. But keep in mind that you may have less control over how the script handles user comments. You can customize the comments section to some extent, but the level of control may be limited.
Ultimately, the decision to create your own script or use a pre-made one is up to you. There are also other pre-made guestbook scripts available online that you could consider, such as those from Matt’s Script Archive or JsWidget.com.
That’s all! I hope you have successfully created a simple comment box using HTML, CSS, and JS. If you have any questions or suggestions, let me know by commenting below.
Muhammad Asif
Muhammad Asif is a Front End Developer and Editor Staff at Codeconvey.com. He enjoys experimenting with new CSS features and helping others learn about them.
How to Style Comment Box Using CSS
While creating different types of forms you will need to give styling to them to have a more attractive impact on users who are going to fill the form. We will discuss the following aspects of styling forms:
How to Change the Background Color of Your Comment Box?
If you want to change the background color of your comment box, first define a class for the element for giving style to it, then use the CSS background-color property to define your preferred color. Also, set the CSS width, height, and padding properties to have a well-structured comment box.
Example of changing the background color of the comment box:
html> html> head> title>Title of the document title> style> .comment < width: 40%; height: 100px; padding: 10px; background-color: #d0e2bc; > style> head> body> form action="/form/submit" method="POST"> textarea class="comment">Type your comment here. textarea> br> input type="submit" name="submit" value="Send"> form> body> html>Result
You can also change the text color and size for your comment box. For that purpose use the color and font CSS properties.
Example of changing the text color and size within the comment box:
html> html> head> title>Title of the document title> style> .comment < width: 40%; height: 100px; padding: 10px; background-color: #d0e2bc; font: 1.4em/1.6em cursive; color: #095484; > style> head> body> form action="/form/submit" method="POST"> textarea class="comment"> Type your comment here. textarea> br> input type="submit" name="submit" value="Send"> form> body> html>How to Add a Background Image to Your Comment Box?
For setting a background image to your comment box you will need to add the background-image CSS property to the style of your element.
Example of adding a background image to the comment box:
html> html> head> title>Title of the document title> style> .comment < width: 40%; height: 100px; padding: 10px; background-image: url("/uploads/media/default/0001/01/a1d4caa225542c577689287a36f4209808b08c19.jpeg"); font: 1.4em/1.6em cursive; color: #095484; > style> head> body> form action="/form/submit" method="POST"> textarea class="comment"> Type your comment here. textarea> br> input type="submit" name="submit" value="Send"> form> body> html>You can easily resize the comment box according to what picture size you want. For that purpose, just change the values of width and height properties and set them to be the same or smaller to the image size. Alternatively, you can use the background-size property to define the size of the background image.
How to Add Borders to Your Comment Box?
For adding border to your comment box you just need to use the CSS shorthand border property. Choose your preferred border-style from here.
You can also define the border-width, border-style and border-color properties separately for your comment box.
Example of adding borders to the comment box:
html> html> head> title>Title of the document title> style> .comment < width: 40%; height: 100px; padding: 10px; border: 3px dashed #8ebf42; background-color: #d0e2bc; font: 1.4em/1.6em cursive; color: #095484; > style> head> body> form action="/form/submit" method="POST"> textarea class="comment">Type your comment here. textarea> br> input type="submit" name="submit" value="Send"> form> body> html>Use the border-left CSS property if you want to have only a left border for your comment box.
Use the border-right, border-top, border-bottom properties correspondingly for having a specific border side.
Example of adding a left border to the comment box:
html> html> head> title>Title of the document title> style> .comment < width: 40%; height: 100px; padding: 10px; border-left: 6px solid #095484; background-color: #d0e2bc; font: 1.4em/1.6em cursive; color: #095484; > style> head> body> form action="/form/submit" method="POST"> textarea class="comment"> Type your comment here. textarea> br> input type="submit" name="submit" value="Send"> form> body> html>How to Style and Customize WordPress Comment Form? Plus, Modify appearance of Comments with CSS
comment_form() outputs a complete commenting form for use within a WordPress template.
Most strings and form fields may be controlled through the $args array passed into the function, while you may also choose to use the comment_form_default_fields filter to modify the array of default fields if you’d just like to add a new one or remove a single field.
All fields are also individually passed through a filter of the form comment_form_field_$name where $name is the key used in the array of fields.
The WordPress 3.0+ function – comment_form() has 2 parameters that can be optionally modified to your liking.
Here is the example arguments that can be used:
- $args: This contains our options for our strings and fields within the form and etc.
- $post_id: Post ID is used to generate the form, if null it will use the current post.
I’ve today modified comment form and added some CSS and noticed very big difference in my comment form.
Would like to share my changes with you.
Let’s get started:
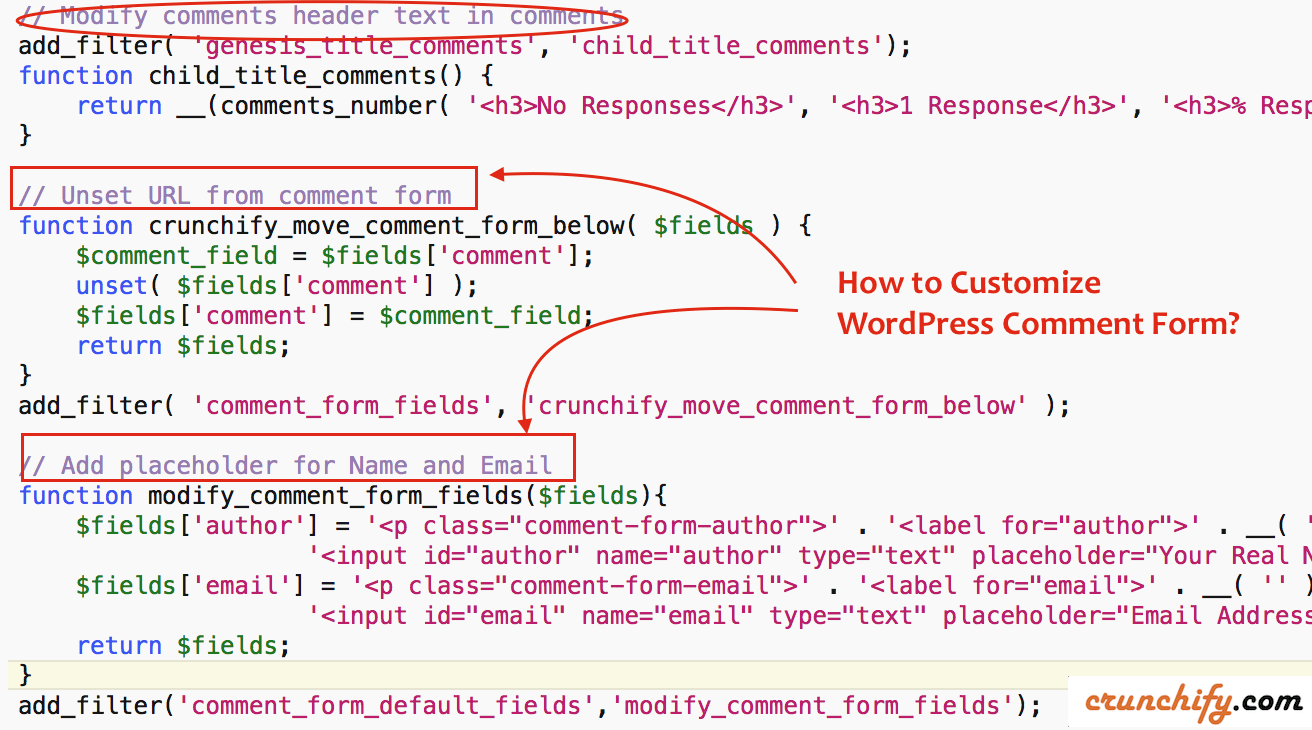
Method-1) Using functions.php file – only for Genesis
This is what I do have on Crunchify as I’m using Genesis WordPress framework theme.
// Modify comments header text in comments add_filter( 'genesis_title_comments', 'child_title_comments'); function child_title_comments() < return __(comments_number( 'No Responses
', '1 Response
', '% Responses.
' ), 'genesis'); > // Unset URL from comment form function crunchify_move_comment_form_below( $fields ) < $comment_field = $fields['comment']; unset( $fields['comment'] ); $fields['comment'] = $comment_field; return $fields; >add_filter( 'comment_form_fields', 'crunchify_move_comment_form_below' ); // Add placeholder for Name and Email function modify_comment_form_fields($fields)< $fields['author'] = ''. ' ' . ( $req ? ''; $fields['email'] = '' . ' ' . ( $req ? ''; $fields['url'] = ' ' . '' . ''; return $fields; > add_filter('comment_form_default_fields','modify_comment_form_fields');
Method-2) For any other WordPress theme
Just open comments.php file and replace $args with below code to beautify comment code with placeholders.
$args = array( 'fields' => apply_filters( 'comment_form_default_fields', array( 'author' =>''. ' ' . ( $req ? '' , 'email' => '' . ' ' . ( $req ? '', 'url' => ' ' . '' . '' ) ), 'comment_field' => '' . __( 'Let us know what you have to say:' ) . '' . ' ' . '
', 'comment_notes_after' => '', 'title_reply' => 'Please Post Your Comments & Reviews' );
To customize comment form, you can use any HTML tags/elements as you can see I’ve placed extra placeholder html tag above.
Comment form – Before:

Comment form – After:

There are number of different ways you could modify comment form. Just keep adding different texts and html Styles to modify it.
Now what? Do you want to modify CSS with below look and feel?

If you want to modify CSS of your comment form then here is a handy code which you could add to your theme’s style.css file.
/* ## Comments ——————————————— */ .comment-respond, .entry-pings, .entry-comments < color: #444; padding: 20px 45px 40px 45px; border: 1px solid #ccc; overflow: hidden; background: #fff; -webkit-box-shadow: 0px 0px 8px rgba(0,0,0,0.3); -moz-box-shadow: 0px 0px 8px rgba(0,0,0,0.3); box-shadow: 0px 0px 8px rgba(0,0,0,0.3); border-left: 4px solid #444; >.entry-comments h3 < font-size: 30px; margin-bottom: 30px; >.comment-respond h3, .entry-pings h3 < font-size: 20px; margin-bottom: 30px; >.comment-respond < padding-bottom: 5%; margin: 20px 1px 20px 1px; border-left: none !important; >.comment-header < color: #adaeb3; font-size: 14px; margin-bottom: 20px; >.comment-header cite a < border: none; font-style: normal; font-size: 16px; font-weight: bold; >.comment-header .comment-meta a < border: none; color: #adaeb3; >li.comment < background-color: #fff; border-right: none; >.comment-content < clear: both; overflow: hidden; >.comment-list li < font-size: 14px; padding: 20px 30px 20px 50px; >.comment-list .children < margin-top: 40px; border: 1px solid #ccc; >.comment-list li li < background-color: #f5f5f6; >.comment-list li li li < background-color: #fff; >.comment-respond input[type=»email»], .comment-respond input[type=»text»], .comment-respond input[type=»url»] < width: 50%; >.comment-respond label < display: block; margin-right: 12px; >.entry-comments .comment-author < margin-bottom: 0; position: relative; >.entry-comments .comment-author img < border-radius: 50%; border: 5px solid #fff; left: -80px; top: -5px; position: absolute; width: 60px; >.entry-pings .reply < display: none; >.bypostauthor < >.form-allowed-tags < background-color: #f5f5f5; font-size: 16px; padding: 24px; >.comment-reply-link < cursor: pointer; background-color: #444; border: none; border-radius: 3px; color: #fff; font-size: 12px; font-weight: 300; letter-spacing: 1px; padding: 4px 10px 4px; text-transform: uppercase; width: auto; >.comment-reply-link:hover < color: #fff; >.comment-notes
We are using currently Disqus comment plugin. So far we like it & will continue to use it.
If you liked this article, then please share it on social media. Have a question or suggestion? Please leave a comment to start the discussion. 👋