- width
- Пример
- CSS width 100%. Блок, который занимает всю ширину веб-страницы.
- How to create a website with fullscreen sections using CSS and HTML
- Defining our sections in HTML
- Making sections become full-screen
- Using viewport units
- Using percentage units
- Centering content vertically and horizontally
- Styling sections individually
- Conclusion
- Related articles
width
Свойство width отвечает за ширину элемента. С его помощью мы можем увеличивать или уменьшать ширину строчно-блочных ( inline — block ) и блочных ( block ) элементов. На строчные элементы это свойство не будет иметь никакого влияния.
Строчно-блочные ( inline — block ) элементы по умолчанию подстраиваются под ширину контента, лежащего у них внутри.
Блочные ( block ) элементы по умолчанию имеют ширину 100%. Если представить сайт как документ с текстом, то блочный элемент займёт всю строку, на которой стоит.
Кроме фиксированной ширины можно задавать элементу минимальную ширину min — width или максимальную ширину max — width .
В современном CSS есть логический аналог этого свойства — inline — size .
Пример
Скопировать ссылку «Пример» Скопировано
div class="block">Я — блочный элемент!div> div class="inline-block">Яdiv> div class="inline-block">строчно-блочныйdiv> div class="inline-block">элемент!div>
Не меняем display для .block , поскольку уже является блочным:
.block background-color: #2E9AFF;> .inline-block display: inline-block; background-color: #F498AD;>.block background-color: #2E9AFF; > .inline-block display: inline-block; background-color: #F498AD; >

Теперь любой текст будет занимать не больше, чем 50% от ширины карточки 🎉
CSS width 100%. Блок, который занимает всю ширину веб-страницы.

В современной верстке, на веб-страницах часто можно встретить блоки, которые занимают 100% ширины страницы.


Давайте разберемся, каким образом можно добиться такого эффекта.
Для примера, давайте рассмотрим следующую ситуацию.
Блок, который должен занимать 100% ширины.
Смотрим на результат, который получился.
Больше моих уроков по HTML, CSS и верстке сайтов здесь.
В целом хорошо, но по бокам блока видны небольшие отступы, которые портят всю картину. Хотелось бы их убрать.

Первое, что приходит на ум, это присвоить блоку свойство width:100%. Но, это никак не изменит ситуацию. Можете сами в этом убедиться.
Блок, который должен занимать 100% ширины.
Поэтому свойство width:100% можете смело убирать.
В чем же реальная причина таких отступов?
Дело в том, что блок div, ширину которого мы хотим сделать 100% хранится в двух родительских элементах body и html. По умолчанию, браузеры задают им определенные значения для свойств padding и margin.
Для того, чтобы решить проблему, нужно всего-лишь обнулить эти отступы. Сделать это очень просто:
Смотрим, как выглядит блок теперь.
Все отлично, пространство, которое было по бокам, было убрано.
Больше моих уроков по HTML, CSS и верстке сайтов здесь.
Чтобы оставить сообщение, зарегистрируйтесь/войдите на сайт через:
How to create a website with fullscreen sections using CSS and HTML
Large full-screen sections are quite a common element on nowadays websites, especially on landing pages acting as a hero slider. They take the full height and full width of the viewport with the intent of bringing the focus in a single portion of the page. Here we will be explaining how to achieve just that.
Defining our sections in HTML
Let’s start by adding a couple of section elements inside a the wrapper:
 main>
section>
h1>Hello!h1>
section>
section>
h1>Toodles~h1>
section>
main>
Making sections become full-screen
Making sections full-height and full-width can be done in two ways:
- Using viewport units ( vh and vw ) — May feel the most intuitive out of the two. In fact, the viewport units were introduced to do just these kinds of things.
- Using implicit units like percentages. ( % ). They used to be used more in the past when viewport units were not a thing or were not widely supported.
Using viewport units
First, we will style our sections so that they scale to the height of the viewable area. We will use the vh unit, which stands for «viewport height». The vh unit is roughly 1% of the viewport’s height. And what is the «viewport»? It is the visible area of your website in the browser. To make it take 100% of the vertical space, we will set min-height to 100vh , meaning, the section will take a minimum height of 100% of the viewport height.
We set min-height instead of height because this way each section can, if required, have a bigger height, while if you used just height any content that scales beyond the viewport height would be overflowing the container.
body
margin: 0;
>
section
font-family: sans-serif;
min-height: 100vh;
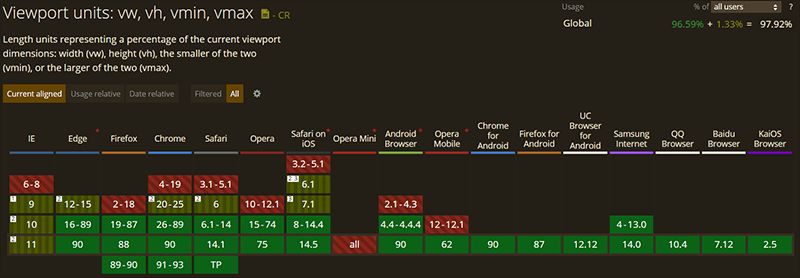
>It is important to note that if you intend to support legacy browsers, then you might want to use percentage units instead. Take a look at the following chart to verify if the browsers you intend to support are listed in green:
Using percentage units
The main difference between the percentage unit and the viewport units is that the percentage units rely on the height and width values of the parent. This means that all the parent elements must also scale to the full height and width if the children underneath wish to. This is why the html , body and main tags have height and width set to 100% . This will force each parent in the hierarchy to take up the full available height and width of the viewport.
html,
body
margin: 0;
height: 100%;
width: 100%;
>

main
height: 100%;
width: 100%;
>

section
font-family: sans-serif;
height: 100%;
width: 100%;
>
Centering content vertically and horizontally
You will very probably want to have some centered content on your section. If not text or images, probably a container element.
We will be using the align-items property to vertically center whatever content we have. Then, to center them horizontally we’ll be using justify-content: center .
And to make those two properties work, we’ll display: flex in order to turn each section into a flex container.
section
font-size: 120px;
display: flex;
justify-content: center;
align-items: center;
>
Styling sections individually
To make each section distinguishable from the other, we will use the nth-child selector to set a background and a color. You can achieve the same thing by using a class for each section too if you prefer so.
section:nth-child(1)
background: orange;
color: white;
>

section:nth-child(2)
background: cyan;
color: white;
>
With that, you should now be able to confidently create fullscreen sections with HTML and CSS. If you want to see how it looks like, take a look at the following CodePen and while you’re at it play around with it:
And here we have the same but using a percentage instead of vh units.
Conclusion
If you’re interested in creating fullscreen websites, then you can take a look at fullPage.js. As the name suggests, fullPage.js revolves around the idea of using full-screen sections, but on top of that, it allows you to add some nifty effects like snap scrolling or horizontal scrolling with little to no effort on your part. Easy to configure and with tends of options that will make your page look quite unique.
And if you want to keep on improving your fullscreen website, adding a sticky or fixed navbar is definetely the way to go. And if you want to consider adding videos, check out how to create a fullscreen video with CSS and HTML or how to add Youtube videos as a background with CSS.