- Css animation-play-state on click
- Css animation-play-state on click
- The Best Way to Enable CSS Animations with JavaScript?
- CSS Transition Effects onclick
- Button Click Transition Using HTML, CSS Animation, JavaScript
- How to synchronize CSS animations that were started/restarted at different times
- Edit
- Trigger CSS animations onlcick
- CSS3 animation on click without JS
- Эффекты при нажатии CSS
- Добавим эффекты на чистом JavaScript
- Статьи из данной категории:
Css animation-play-state on click
In the 3rd part, and applied to attribute of related animation (reverse 1st part). In this specific case, the most straightfoward approach may be to track time since class was added for the first time and then delay all the subsequent class additions to await beginning of the next animation iteration.
Css animation-play-state on click
You can use the ~ to change properties of changing css of the element’s sibling.
Assuming you want to totally do it in css, you can’t really make the button play & pause at the same time, you can use JS for a single button.
I have done it using 2 buttons here, one button for playing & one for pausing.
#stage < height:300px; border:1px solid #000; overflow: hidden; animation: stage-change 6s 6 forwards; animation-play-state: paused; >@keyframes stage-change < 0% < background-color: darkorange ; >100% < background-color: #1c1341; >> #play:focus ~ #stage < animation-play-state: running; >#pause:focus ~ #stage
You can use the checkbox hack, if you really just want to use one input element to control the animation.
#stage < height:300px; border:1px solid #000; overflow: hidden; animation: stage-change 6s 6 forwards; animation-play-state: paused; >@keyframes stage-change < 0% < background-color: darkorange ; >100% < background-color: #1c1341; >> #play:checked ~ #stage
If you replace the button with a checkbox and set the styles as for the button, then you can implement your task:
/* Styling for the button */ .button < display: inline-block; padding: 2px 7px; border: 1px solid #767676; border-radius: 3px; box-sizing: border-box; font: normal 13.3333px sans-serif; background-color: #efefef; user-select: none; >.button:hover < border-color: #474747; background-color: #e3e3e3; >.button:active < border-color: #8c8c8c; background-color: #f5f5f5; >/* Control element */ #start < position: absolute; height: 1px; width: 1px; opacity: 0; pointer-events: none; >/* Controllable element */ #stage < height: 300px; border: 1px solid #000; animation: stage-change 6s 6 forwards paused; >#start:checked + #stage < animation-play-state: running; >/* Animation */ @keyframes stage-change < 0% < background-color: darkorange; >100% < background-color: #1c1341; >>It is possible to simplify the styles by using a real button in the markup:
/* Button */ .button < pointer-events: none; >/* Control element */ #start < position: absolute; height: 1px; width: 1px; opacity: 0; pointer-events: none; >/* Controllable element */ #stage < height: 300px; border: 1px solid #000; animation: stage-change 6s 6 forwards paused; >#start:checked + #stage < animation-play-state: running; >/* Animation */ @keyframes stage-change < 0% < background-color: darkorange; >100% < background-color: #1c1341; >>Or you can further expand the functionality - the labels on the button will change:
/* Styling for the button */ .button < display: inline-block; padding: 2px 7px; border: 1px solid #767676; border-radius: 3px; box-sizing: border-box; font: normal 13.3333px sans-serif; background-color: #efefef; user-select: none; >.button:hover < border-color: #474747; background-color: #e3e3e3; >.button:active < border-color: #8c8c8c; background-color: #f5f5f5; >.button::before < content: 'play'; >#start:checked + .button::before < content: 'pause'; >/* Control element */ #start < position: absolute; height: 1px; width: 1px; opacity: 0; pointer-events: none; >/* Controllable element */ #stage < height: 300px; border: 1px solid #000; animation: stage-change 6s 6 forwards paused; >#start:checked + label + #stage < animation-play-state: running; >/* Animation */ @keyframes stage-change < 0% < background-color: darkorange; >100% < background-color: #1c1341; >>Css animation-play-state on click, You can use the ~ to change properties of changing css of the element’s sibling. Assuming you want to totally do it in css, you can’t really
The Best Way to Enable CSS Animations with JavaScript?
Very useful. It unleashes the power of CSS transitions I find myself using this method this Duration: 13:13
CSS Transition Effects onclick
CSS Transition Effects onclick | CSS TutorialIn this video we will design the onclick input Duration: 9:05
Button Click Transition Using HTML, CSS Animation, JavaScript
Button Click Transition Using HTML, CSS Animation, JavaScript#javascript #cssanimation
Duration: 4:42
How to synchronize CSS animations that were started/restarted at different times
In order to synchronize them, the animation should be initialized at the same time.
Here I specify the animation-name for span , the animation won’t run until the other props are defined (actually I’m curious to see if different rendering engines share the same behavior).
let pulseList = <>; function toggleFx(spanID) < let spanTarget = document.getElementById(spanID); // toggle setting if (spanID in pulseList) < delete pulseList(spanID) >else < pulseList[spanID] = true; >// update display for (let sp of 'ABCD') < let span = document.getElementById(`sp$`); span.classList.remove('pulse'); // clear any prev animation if (`sp$` in pulseList) < // add/re-add animation as needed span.classList.add('pulse'); >> >div < display: flex; flex-flow: column; >span < animation-name: pulse_active; >span.pulse < color: #f00; animation: pulse_active 1.5s ease-in infinite; >@keyframes pulse_active < 0% < opacity: 0 >50% < opacity: 0.66 >100% < opacity: 0 >>Edit
At least Blink and Gecko do share the same behavior, I didn’t test on WebKit Safari.
For this purpose document.getAnimations() is a useful method. It returns an array of all animation objects currently in effect whose target elements are descendants of the document. More information: https://developer.mozilla.org/en-US/docs/Web/API/Document/getAnimations
Items of document.getAnimations() include currentTime property, that can use for syncing animations. More information: https://drafts.csswg.org/web-animations/#dom-documentorshadowroot-getanimations
toggleFx function was modified and now it has three parts.
In the first part, search document.getAnimations() and find currentTime attribute where animationName is one of pulse_active or pulse_inverted ; then store them in the realted variables (i.e. pulseActiveStart and pulseInvertedStart ).
In the 2nd part, className of spanTarget changed as you told.
In the 3rd part, pulseActiveStart and pulseInvertedStart applied to currentTime attribute of related animation (reverse 1st part).
function toggleFx(spanID) < let spanTarget = document.getElementById(spanID); let pulseActiveStart; let pulseInvertedStart; let anims = document.getAnimations() for(let i = 0; i < anims.length; i++) < if(anims[i].animationName == "pulse_active") pulseActiveStart = anims[i].currentTime; else if(anims[i].animationName == "pulse_inverted") pulseInvertedStart = anims[i].currentTime; >if(spanTarget.classList.contains('pulse_invert')) < spanTarget.classList.remove('pulse_invert'); spanTarget.classList.remove('pulse'); >else if(spanTarget.classList.contains('pulse')) < spanTarget.classList.add('pulse_invert'); spanTarget.classList.remove('pulse'); >else < spanTarget.classList.add('pulse'); >anims = document.getAnimations() for(let i = 0; i < anims.length; i++) < if(anims[i].animationName == "pulse_active") < if(pulseActiveStart) anims[i].currentTime = pulseActiveStart; >else if(anims[i].animationName == "pulse_inverted") < if(pulseInvertedStart) anims[i].currentTime = pulseInvertedStart; >> >div < display: flex; flex-flow: column; >span.pulse < color: #f00; animation: pulse_active 1.5s ease-in infinite; >span.pulse_invert < color: #00f; animation: pulse_inverted 3s ease-in infinite; >@keyframes pulse_active < 0% < opacity: 0; >50% < opacity: 0.66; >100% < opacity: 0; >> @keyframes pulse_inverted < 0% < opacity: 1; >50% < opacity: 0.33; >100% < opacity: 1; >>I think that synchronizing CSS animations is quite a wide topic that cannot be easily addressed with a catch-all solution.
In this specific case, the most straightfoward approach may be to track time since pulse class was added for the first time and then delay all the subsequent pulse class additions to await beginning of the next animation iteration.
See modified jsfiddle with suggested solution. It also tweaks the styles a bit to achieve a smoother transition when awaiting next iteration. Hopefully, it is close to what you want to achieve.
You can theoretically use the base time offset to ‘compute’ and set the first round animation before the pulse class is added with a delay more precisely, to achieve even smoother transition. But it would also require a bit more math and it would definitely clutter the code to some extent. Depends on your goals and preference.
If somebody knew a cleaner solution, perhaps with pure CSS approach (?), it would be great.
Trigger CSS Animation on div click, Note that in your code, the elements that have «animation» css rules are the LI elements. So changing the animation property of the UL’s
Trigger CSS animations onlcick
CSS3 animation on click without JS
Today I share with you a little trick to trigger a CSS3 animation on click without javascript, with only pure CSS.
For this snippet, I’ll use a download link that will trigger an animated down arrow on click.
Let’s begin with the link with which we’ll work:
And our tiny arrow will be like this: (first we only place it in its initial position)
Important note: Geoffrey pointed in comments that animations/transitions don’t work yet on pseudo-elements with Webkit. Neither with Opera by the way. So the only browser where these animations/transitions work is Firefox 🙁 (perhaps with IE10?)
Now we can go further with the animation.
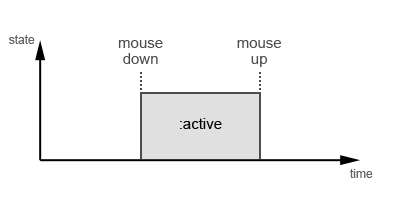
In CSS, unlike with javascript, we don’t have events, we only have selectors and pseudo-classes (like :hover or :focus ). For the onclick event, we have something quite similar in css, it’s :active . This « state » is active when we click on a link. Great! Let’s try this!
For the beginning we’ll only focus on the movement, we’ll hide it later:
.file_pdf:active:before < animation: goDown .4s ease-in-out; >@keyframes goDown < from < top: -6px; >to < top: 36px; >>Oh, wait! Nothing happen when I click!
Hmmm, yep, I think we need to learn more about :active to figure out what’s going on.
The :active « state » begins when we click the mouse button and ends when we release it. So it is the same for our animation: if we release the button before the animation ends, we won’t see it.
With javascript, the click event is triggered when we release the mouse button.
OK, in CSS, what appends at this moment?
The link goes from active to its normal state.
OK, now how can we « select » this « moment » with only CSS?
Precisely, we can’t, but we have a selector which can really help : :not() . With this, we can build a selector that will select the link when it is NOT active, so the animation will be launched when the link goes from its active state to the normal state.
Let’s try this:
.file_pdf:not(:active):before < animation: goDown .4s ease-in-out; >@keyframes goDown < from < top: -6px; >to < top: 36px; >>Yata! It works! But… wait! The animation is also launched after page load now!
Yep, it’s the downside of this method, BUT, we can manage it by cheating 😉
But first things first, it’s the good time to hide the arrow at the beginning and the end of the animation.
Since we can’t use display: none; without destroying the animation, we’ll use opacity. We’ll add opacity: 0; to the arrow and deal with it into the animation:
08091011121314151617181920212223242526
.file_pdf:before < content: ''; display: block; width: 13px; height: 14px; position: absolute; left: 28px; top: -6px; opacity: 0; background: transparent url(pdf-icon.png) 0 0 no-repeat; >.file_pdf:not(:active):before < animation: goDown .4s ease-in-out; >@keyframes goDown < from < opacity: 1; top: -6px; >60% < opacity: 1; >to < opacity: 0; top: 36px; >>Good, now we can deal with our page load problem.
The first thing to think is what we will use to hide (again) the arrow. We can’t use the display property or opacity: display will break our animation and opacity will be overwritten by the animation. But we have other possibilities: we could use overflow: hidden; on the link and place the arrow outside the link, but the downside is that we’ll can’t animate the arrow outside the link, we won’t see it. I chose to use the width property: width: 0; will hide the arrow somehow.
I first tried to do that with animation, but everything we add to our « goDown » animation will be done every time, not only on page load. Add another animation? Nop, the new animation will overwrite the « goDown » one.
There’s something else we can use: transitions.
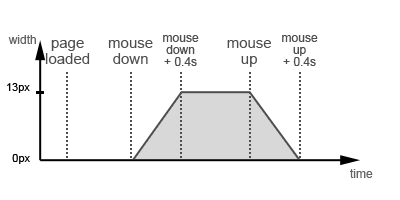
Now here’s the tricky part. Look what happens with a linear transition : (we begin with 0px and we set 13px for the active state)
Even worse with a normal click (we don’t hold the button):
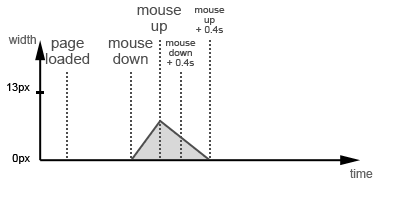
We need something like that:

I think most of you probably know the ease-in, ease-in-out, linear,… values for transition-timing-function, but there are 2 other values: step-start and step-end.
step-start: the element will take the final value of the transition at the beginning of the transition. We won’t see any visible transition.
step-end: the element will take the final value of the transition at the end of the period prescribed by it. We see that a delay has occurred (kind of).
When we release the button, the arrow needs to have a width of 13px: we’ll use step-start for the active state.
Then, the arrow must keep this width during the animation: we’ll use step-end for the normal state… I feel the headache coming…
In short:
08091011121314151617181920
.file_pdf:before < . width: 0; . >.file_pdf:not(:active):before < animation: goDown .4s ease-in-out; transition: width .4s step-end; >.file_pdf:active:before
Guess what, we have all we need!
Last detail, we add the browsers prefixes:
0102030405060708091011121314151617181920212223242526272829303132333435363738394041424344454647484950515253545556575859606162636465
.file_pdf < position: relative; display: inline-block; padding: 24px 0 0 50px; min-height: 26px; background: url(pdf-icon.png) -17px 0 no-repeat; >.file_pdf:before < content: ''; display: block; width: 0; height: 14px; position: absolute; left: 28px; top: -6px; opacity: 0; background: transparent url(pdf-icon.png) 0 0 no-repeat; >.file_pdf:not(:active):before < -webkit-animation: goDown .4s ease-in-out; -moz-animation: goDown .4s ease-in-out; -ms-animation: goDown .4s ease-in-out; -o-animation: goDown .4s ease-in-out; animation: goDown .4s ease-in-out; -webkit-transition: width .4s step-end; -moz-transition: width .4s step-end; -ms-transition: width .4s step-end; -o-transition: width .4s step-end; transition: width .4s step-end; >.file_pdf:active:before < width: 13px; -webkit-transition: width .4s step-start; -moz-transition: width .4s step-start; -ms-transition: width .4s step-start; -o-transition: width .4s step-start; transition: width .4s step-start; >@-webkit-keyframes goDown < from < opacity: 1; top: -6px; >60% < opacity: 1; >to < opacity: 0; top: 36px; >> @-moz-keyframes goDown < from < opacity: 1; top: -6px; >60% < opacity: 1; >to < opacity: 0; top: 36px; >> @-ms-keyframes goDown < from < opacity: 1; top: -6px; >60% < opacity: 1; >to < opacity: 0; top: 36px; >> @-o-keyframes goDown < from < opacity: 1; top: -6px; >60% < opacity: 1; >to < opacity: 0; top: 36px; >> @keyframes goDown < from < opacity: 1; top: -6px; >60% < opacity: 1; >to < opacity: 0; top: 36px; >>PS1: By the way, happy new year! 🙂
PS2: I hope you’ll forgive me for my English. 😉
Plus de détails sur cet article
Эффекты при нажатии CSS
Рассмотрим, как добавить красивые эффекты при нажатии на кнопку с помощью CSS и JavaScript.
Создадим 4 кнопки с разными эффектами. HTML структура:
Стили для анимации первой кнопки.
.mybutton--animate-click-one::after < box-shadow: inset 0 0 0 35px rgba(111, 148, 182, 0); >.mybutton--animate-click-one.mybutton--click::after < animation: anim-animate-click-one 0.6s ease-out forwards; >@keyframes anim-animate-click-one < 0% < opacity: 1; transform: scale3d(0.4, 0.4, 1); >80% < box-shadow: inset 0 0 0 2px lightgreen; opacity: 0.1; >100% < box-shadow: inset 0 0 0 2px lightgreen; opacity: 0; transform: scale3d(1.2, 1.2, 1); >>CSS для анимации второй кнопки.
.mybutton--animate-click-two::after < box-shadow: 0 0 0 3px rgba(111, 148, 182, 0.05); >.mybutton--animate-click-two.mybutton--click::after < animation: anim-animate-click-two 0.5s ease-out forwards; >@keyframes anim-animate-click-two < 0% < box-shadow: 0 0 0 3px lightgreen; opacity: 1; transform: scale3d(0.6, 0.6, 1); >100% < box-shadow: 0 0 0 100px rgb(110, 180, 110); opacity: 0; transform: scale3d(1, 1, 1); >>Эффекты для третьей кнопки:
.mybutton--animate-click-three::after < background: lightgreen; >.mybutton--animate-click-three.mybutton--click::after < animation: anim-nimate-click-three 0.5s forwards; >@keyframes anim-nimate-click-three < 0% < opacity: 1; transform: scale3d(0.1, 0.1, 1); >100% < opacity: 0; transform: scale3d(8, 8, 1); >>Будьте внимательны, должен быть подключен jQuery.
Добавление и удаление класса для появления анимации при нажатии на кнопку:
Первый эффект Второй эффект Третий эффект
Добавим эффекты на чистом JavaScript
Нативный JavaScript будет следующий.
document.addEventListener("DOMContentLoaded", () => < document.querySelectorAll(".beautiEff .mybutton").forEach(function (el) < el.addEventListener("click", function () < el.classList.add("mybutton--click"), setTimeout(function () < el.classList.remove("mybutton--click"); >, 600); >); >); >);Надеюсь, вам понравилась данная информация. Если вам интересна тема web-разработки, то можете следить за выходом новых статей в Telegram.