- How to make a page with header and left-sidebar?
- 7 Answers 7
- Linked
- Related
- Hot Network Questions
- Subscribe to RSS
- Bootstrap 3 — Панели
- Создание панели с заголовком
- Панель с h3 заголовком
- Панель с футером
- Классы, акцентирующие состояние контекста панели
- Заголовок панели
- Заголовок панели
- Заголовок панели
- Заголовок панели
- Заголовок панели
- Размещение таблиц и групповых списков внутри панелей
- How to Create a Panel in HTML?
- How to Create a Panel in HTML Using CSS?
- Step 1: Creating a Basic Panel
- Step 2: Create a Panel Containing Button Element
- Step 3: Apply Custom CSS Properties
- How to Create a Panel Using Bootstrap?
- Create a Panel with Different Colors in Bootstrap
- Conclusion
- About the author
- Abdul Moeed
How to make a page with header and left-sidebar?
The header has a fixed height but it’s width should be dynamic. The left-sidebar should have a fixed width but a dynamic height. For the content area, both height and width are dynamic. When user scale their browser, the scrolling bar should not appear(not set overflow:hidden; to hide it.). I tried to write code like this:
But it failed. EDIT: Content Area and Left-SideBar must fill the whole browser window. I don’t need
|----------------------------| | header | |----------------------------| | L | | | e | | | f | | | t | | | | | | S | Content Area | | i | | | d |----------------------| | e | | b | | a | | r | |-----| 7 Answers 7
@sandeeppattanaik In which browser, specifically, is my example failing? It’s true that, if you go way back to some really old browsers, then bottom , and right won’t work the same. If you need to support such ancient technology, then you will have to use some additional tricks (and float is just one of the tools in that particular toolbox). However, even in old browsers, for a full-window elastic layout, position:absolute is still (usually) the easiest way.
Here is the simple code for you. Try this & know the quality CSS coding.
.clear < clear:both; >.main < width:500px; >.top < background: blue; width:500px; height: 92px; >.left < float:left; width: 150px; background: red; >.right
Hi now you just do easily as like this
TOP LEFT N content here MAIN content here MAIN content here It seems that the content area and left side-bar are not as height as my browser window. I need both these two areas fill the whole browser window.
You just need to remove «float: left;» from your .main definition.
Also, when debugging positioning this really helps:
Also it might be worth dropping height: 100% from .left and .main to prevent vertical scrollbar
I need to make left-sidebar and content area fill the whole browser window. like the finger I draw 🙂
You can also use display : table and display : table-cell to create a page that holds a table-level element with 2 table-cells (sidebar & content area)

#outer-container < display: table; width: 100%; height: 100%; >#sidebar < display: table-cell; width: 15%; vertical-align: top; >#content
I’m a newbie to css, but I’ve been familiar with html. I took over a website created by someone else who extensively used tables for web page placements. I’m redoing one page of the website, leaving out the tables. I’m making a comment on Lee’s solution above in 2012. I made his solution work by adding «top:0;» as a property to the top css class. I figured I could do this since I note that left is also a property for the left css class in Lee’s solution. I imagine Lee’s solution, as is, was not working for me since there must be a conflict in the existing css file that was created by someone else.
Linked
Related
Hot Network Questions
Subscribe to RSS
To subscribe to this RSS feed, copy and paste this URL into your RSS reader.
Site design / logo © 2023 Stack Exchange Inc; user contributions licensed under CC BY-SA . rev 2023.7.20.43540
By clicking “Accept all cookies”, you agree Stack Exchange can store cookies on your device and disclose information in accordance with our Cookie Policy.
Bootstrap 3 — Панели
Иногда, на сайте может потребоваться разместить некоторый логически связанный текст в рамке. Это можно сделать с помощью компонента Bootstrap панель.
Для создания панели необходимо заключить текст в блочный элемент с классом .panel-body . Который в свою очередь заключить в ещё один блочный элемент с классами .panel и .panel-default .
Вышеприведенный пример будет выглядеть примерно так:

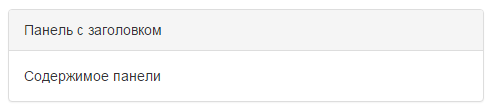
Создание панели с заголовком
Чтобы добавить заголовок в панель, его необходимо поместить в контейнер с классом .panel-heading .
Панель с заголовкомСодержимое панели
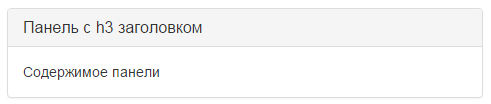
Вы также можете заключить текст заголовка в элементы от до и применить к нему стили с помощью класса .panel-title .
Панель с h3 заголовком
Содержимое панели
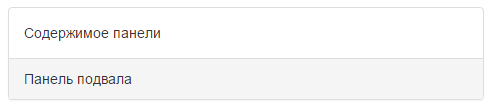
Панель с футером
Подобно панелям с заголовком, Вы также можете добавить секцию подвала для ваших панелей, используя класс .panel-footer . Футер панели может использоваться для размещения кнопок или дополнительного текста.
Содержимое панелиПанель подвала
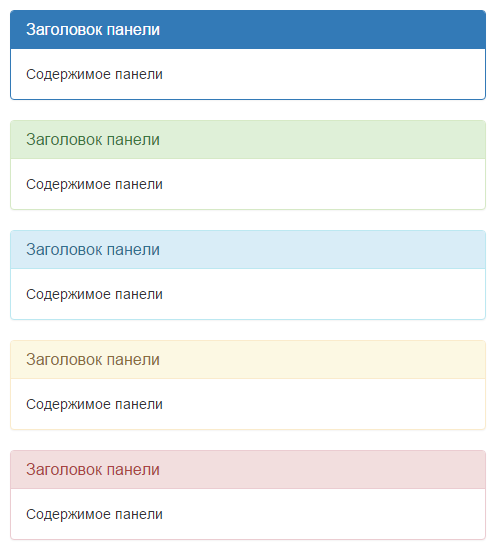
Классы, акцентирующие состояние контекста панели
К панелям, как и к большинству других компонентов Bootstrap, можно применять дополнительные классы ( .panel-primary , .panel-success , .panel-info , .panel-warning , .panel-danger ), которые выделяют её с помощью цвета. Таким образом, можно привлечь внимание пользователей.
Заголовок панели
Содержимое панелиЗаголовок панели
Содержимое панелиЗаголовок панели
Содержимое панелиЗаголовок панели
Содержимое панелиЗаголовок панели
Содержимое панели
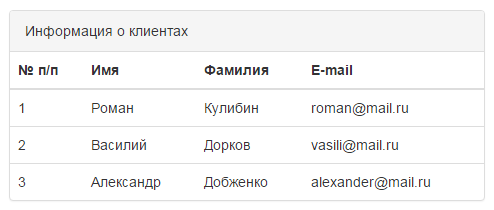
Размещение таблиц и групповых списков внутри панелей
В панелях Twitter Bootstrap 3 можно размещать любые таблицы следующим образом:
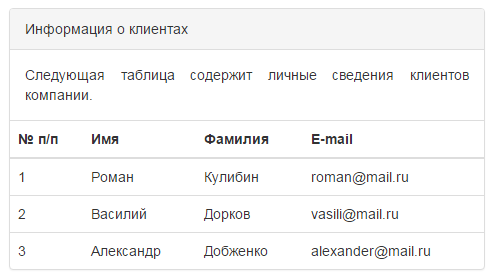
При отсутствии содержимого панели, таблица примыкает к заголовку без отступа.
Групповые списки, тоже можно, аналогичным способом размещать внутри любой панели Bootstrap.
ТоварыСписок наименований товаров, доступных в магазине.Смартфоны 32 Ноутбуки 204 Планшеты 517 Компьютеры 71
How to Create a Panel in HTML?
![]()
In HTML, a panel is created using a variety of HTML elements such as
This article demonstrates the possible methods to create a panel in HTML.
How to Create a Panel in HTML Using CSS?
In HTML, a panel is easy to create a consistent look for the users. Follow the below detailed steps and explore them:
Step 1: Creating a Basic Panel
In the HTML file, create a div element, and assign it a class or id. After that add some text that displays on the panel:
Welcome to linuxhint Panel Article
Next, select the div class and add the following CSS properties:
background- color : lightcyan;
The output of the above code is displayed as
The output illustrates that the panel is displayed perfectly.
Step 2: Create a Panel Containing Button Element
Sometimes, a panel contains some call-to-action elements like a button. To add a button in the panel, follow the below code:
Click on the below Button to Join our Community. < / p >
In the HTML file, create a div element and assign it a class or id. Inside the div, create some HTML elements “”, “
”, and “” tags.
Step 3: Apply Custom CSS Properties
After the creation of the structure, select the “ ”, “ ”, “ ”, and “ ” tags and apply custom CSS properties:
background- color : lightcyan;
In CSS, “padding” creates a space between the content and the border of that element. After that, style the button element by setting its color, background, font size, etc. These CSS properties are utilized only to enhance user visibility and to make a website more appealing.
After executing the above code snippet, the output looks like this:
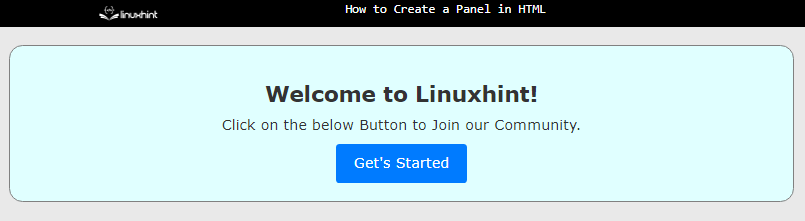
The output confirms that the panel is displayed and contains a “button” element in it.
How to Create a Panel Using Bootstrap?
Bootstrap is a framework of CSS that is very powerful and uses built-in classes to perform specific designs. It has a wide variety of classes for different design elements. The user just needs to download Bootstrap or use it in the HTML file.
The bootstrap code for making a panel is described below:
Creating Panels with Bootstrap < / h2 >
Panel with default design in Bootstrap < / div >
The description of above bootstrap code is explained below:
- Initially, CSS properties of “margin” and “padding” are used to create a space between element and webpage boundary.
- Next, a bootstrap class of “panel-group” groups all the panels and removes the “margin-bottom” from the panel.
- After that, the panel is created using the “panel” class and the style is set to default with the help “panel-default” class.
- Then, the “panel-heading” class is assigned to the child div to create the header portion of the panel.
- In the end, the bootstrap class of “panel-body” is utilized to create the body section of the panel.
After executing the above code:
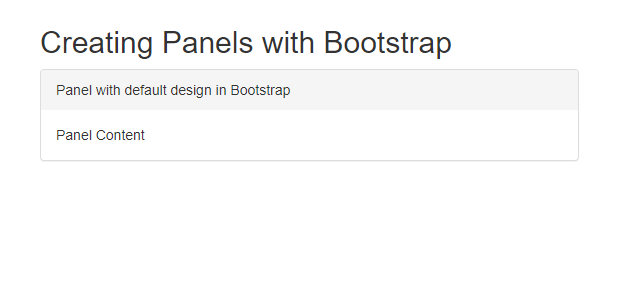
The above output shows that the panel is created using Bootstrap with default styles.
Create a Panel with Different Colors in Bootstrap
Bootstrap offers five types of color variations for panels like a warning, success, info, or danger, etc. These can be used by following codes:
Creating Panels with Bootstrap < / h2 >
Now, Bootstrap classes of “panel-primary”, “panel-danger”,”panel-success”,”panel-warning”, and” panel-info” are utilized for creating a panel for specific situations like a Signup/Login page.
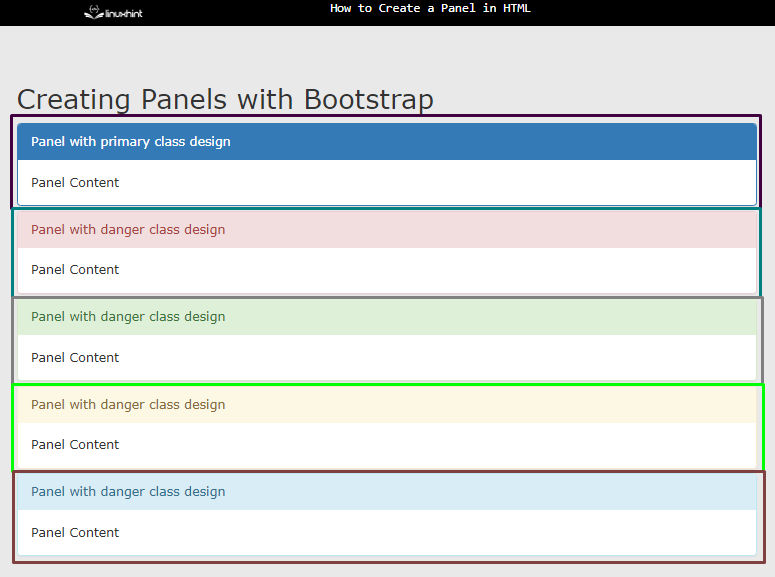
The above output displays that the panels with different classes are displayed using Bootstrap. Different colors of rectangles in the snapshot show the distinct type of panel design.
Conclusion
To create a panel in HTML, create a div element and assign it padding and margin. Using Bootstrap, set the “panel-group” class to the parent element. Then, assign “panel” and “panel-default” classes to its child div to create the panel. For styling the panel, users can change the class from “default” to danger, info, success, warning, and primary.
About the author
Abdul Moeed
I’m a versatile technical author who thrives on adaptive problem-solving. I have a talent for breaking down complex concepts into understandable terms and enjoy sharing my knowledge and experience with readers of all levels. I’m always eager to help others expand their understanding of technology.