- CSS-селектор :not. Полезные примеры
- Пример 1. Элемент без класса
- Пример 2. Изменение внешнего вида всех элементов, кроме наведенного
- Пример 3. Меню с разделителями между элементами
- Пример 4. Debug css
- Пример 5. Поля форм
- Поддержка
- How to Select All Child Elements Except the Last One
- Create HTML
- Add CSS
- Example of selecting all child elements except the last one:
- Result
- Example of using CSS properties on all child elements except the last one:
- CSS the :not() selector
- What is the :not() selector in CSS?
- :not() rules
- How to use the :not() selector with multiple classes
- Tricks with :first-child, :last-child and :nth-child()
- Conclusion
CSS-селектор :not. Полезные примеры
В спецификации и блогах про селектор :not обычно приводят какие-то искусственные примеры, которые хоть и объясняют синтаксис и принцип действия, но не несут никакой идеи о том, как получить пользу от нового селектора.
Ну окей, думаю я, в моей практике не встречались такие ситуации. Обходились мы ведь как-то раньше без :not . Приходилось немного переписать структуру селекторов или обнулить пару значений.
Пример 1. Элемент без класса
Селектор :not может быть крайне полезен, когда нам нужно застилить контент сгенерированный пользователем (нет возможности расставить в нем классы), или когда у нас контента очень много и расставлять в нем классы слишком трудоёмко.
Например, мы хотим на сайте сделать красивые буллиты для ненумерованных списков ul li . Мы пишем код:
ul li < /* наши красивые стили */ > В результате, наши красивые буллиты появляются не только в контенте, но и, например, в навигации, где тоже используются ul li .
Мы ограничиваем область действия селектора:
Навигацию мы спасли, но ненужные буллиты всё еще вылазят на слайдерах, списках новостей и других конструкциях внутри .content , где тоже используются ul li .
1) обнулить мешающие стили в слайдерах и других местах. Но это противоречит « DRY » и является одним из признаков «вонючего» кода. К тому же не решает проблему раз и навсегда: добавите, например, аккордеон и списки в нем снова придется обнулять.
2) пойти от обратного и ставить класс всем спискам, которые нужно стилизовать:
Это добавляет лишней работы по расстановке классов в контенте. Иногда имеет смысл, но лишнюю работу никто не любит.
3) стилизовать только те ul li , у которых нет никаких классов вообще:
Победа! Нам не нужно делать дополнительную работу по расстановке классов в контенте. А на слайдерах, аккордеонах и прочих конструкциях, которые не должны выглядеть как списки, но используют их в своей разметке, в 99% случаев уже будут свои классы, и наши стили их не затронут.
Этот прием — «выбирать только элементы без класса» — очень полезен для оформления пользовательского контента и его можно применять не только к спискам, но и для других случаев.
Пример 2. Изменение внешнего вида всех элементов, кроме наведенного
Такой эффект можно реализовать без :not путем перезаписи значений. И это будет работать в бо́льшем количестве браузеров.
/* с перезаписью свойств */ ul:hover li < opacity:0.5; > ul:hover li:hover < opacity:1; > Но если придется обнулять слишком много свойств, то есть смысл использовать :not .
/* используя :not() */ ul:hover li:not(:hover) < opacity:0.5; > Пример 3. Меню с разделителями между элементами
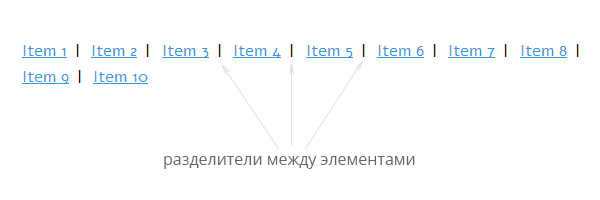
Как и в предыдущем примере, желаемого можно добиться несколькими способами.
Через перезапись свойств. Но тут два правила вместо одного, что не есть « DRY ».
.menu-item:after < content: ' | '; > .menu-item:last-child:after < content: none; > Через :nth-last-child() . Одно правило, но тяжело читается.
.menu-item:nth-last-child(n+2):after < content: ' | '; > Через :not() — самая короткая и понятная запись.
.menu-item:not(:last-child):after < content: ' | '; > Пример 4. Debug css
Удобно для отладки и самоконтроля искать/подсвечивать картинки без alt, label без for и другие ошибки.
/* подсвечиваем теги без необходимых атрибутов */ img:not([alt]), label:not([for]), input[type=submit]:not([value]) < outline:2px solid red; > /* тревога, если первый child внутри списка не li и прочие похожие примеры */ ul > *:not(li), ol > *:not(li), dl > *:not(dt):not(dd) < outline:2px solid red; > Пример 5. Поля форм
Раньше текстовых полей форм было не много. Достаточно было написать:
select, textarea, [type="text"], [type="password"] < /* стили для текстовых полей ввода */ > С появлением новых типов полей в HTML5 этот список увеличился:
select, textarea, [type="text"], [type="password"], [type="color"], [type="date"], [type="datetime"], [type="datetime-local"], [type="email"], [type="number"], [type="search"], [type="tel"], [type="time"], [type="url"], [type="month"], [type="week"] < /* стили для текстовых полей ввода */ > Вместо перечисления 14 типов инпутов можно исключить 8 из них:
select, textarea, [type]:not([type="checkbox"]):not([type="radio"]):not([type="button"]):not([type="submit"]):not([type="reset"]):not([type="range"]):not([type="file"]):not([type="image"]) < /* стили для текстовых полей ввода */ > Ладно, этот пример не очень красив, и я рекомендую всё же первый вариант с перечислением, он работает с IE8+, а второй вариант с IE9+.
Поддержка
Следует заметить, что согласно спецификации в скобках селектора :not() может стоять только простой селектор и в скобках нельзя использовать сам селектор :not() . Если нужно исключить несколько элементов, :not() можно повторить несолько раз, как в примере 5.
Если очень нужны CSS3-селекторы в браузерах, которые их не поддерживают, можно использовать полифил selectivizr.
How to Select All Child Elements Except the Last One
Sometimes, you may need to select all the child elements except the last element. It’s quite easy to do this using the :not and :last-child pseudo-classes.
The :not pseudo-class specifies elements that do not match a list of selectors and the :last-child selects the element if it is the last child among the other elements.
In our examples, we’ll use the following syntax:
Create HTML
nav> a href="https://www.w3docs.com/learn-html.html">Learn HTML a> a href="https://www.w3docs.com/learn-css.html">Learn CSS a> a href="https://www.w3docs.com/learn-git.html">Learn Git a> a href="https://www.w3docs.com/learn-javascript.html">Learn Javascript a> a href="https://www.w3docs.com/learn-php.html">Learn PHP a> a href="https://www.w3docs.com/snippets">Snippets a> nav>Add CSS
- Specify the margin property for the element.
- Style and position elements inside using the text-transform, text-decoration, color, font-family, text-align, display and other properties.
- Use the :not and :last-child pseudo-classes for the elements inside and mention the style that should not be applied to the last child element.
nav < margin: 30px; > nav a < text-transform: capitalize; text-decoration: none; color: rgba(60, 60, 60); font-family: sans-serif; padding: 5px 5px; margin-top: 20px; width: 140px; text-align: center; display: inline-block; > nav a:not(:last-child) < border-right: 5px solid #193fe6; >Example of selecting all child elements except the last one:
html> html> head> title>Title of the document title> style> nav < margin: 30px; > nav a < text-transform: capitalize; text-decoration: none; color: rgba(60, 60, 60); font-family: sans-serif; padding: 5px 5px; margin-top: 20px; width: 140px; text-align: center; display: inline-block; > nav a:not(:last-child) < border-right: 5px solid #193fe6; > style> head> body> nav> a href="https://www.w3docs.com/learn-html.html">Learn HTML a> a href="https://www.w3docs.com/learn-css.html">Learn CSS a> a href="https://www.w3docs.com/learn-git.html">Learn Git a> a href="https://www.w3docs.com/learn-javascript.html">Learn Javascript a> a href="https://www.w3docs.com/learn-php.html">Learn PHP a> a href="https://www.w3docs.com/snippets">Snippets a> nav> body> html>Result
So, we have created a navigation menu with elements separated by the right border except for the last element.
Let’s see another navigation menu, where we use some CSS properties on all child elements except the last one.
Example of using CSS properties on all child elements except the last one:
html> html> head> title>Title of the document title> style> nav < margin: 30px; > nav a < text-transform: capitalize; text-decoration: none; color: rgba(60, 60, 60); font-family: sans-serif; padding: 5px 5px; margin-top: 20px; width: 140px; text-align: center; display: inline-block; border: 1px solid #000000; border-radius: 10px; > nav a:not(:last-child) < background-color: #a2d4eb; > style> head> body> nav> a href="https://www.w3docs.com/learn-html.html">Learn HTML a> a href="https://www.w3docs.com/learn-css.html">Learn CSS a> a href="https://www.w3docs.com/learn-git.html">Learn Git a> a href="https://www.w3docs.com/learn-javascript.html">Learn Javascript a> a href="https://www.w3docs.com/learn-php.html">Learn PHP a> a href="https://www.w3docs.com/snippets">Snippets a> nav> body> html>CSS the :not() selector
In my previous post
I wrote a bit about the :not() selector and I got a lot feedback that people never heard of this element. So I figured I would dedicate a post just to the :not() CSS selector.
What is the :not() selector in CSS?
The :not() is a CSS pseudo-class that targets elements that do not match the selector given. Since it prevents specific items from being selected, it is known as the negation pseudo-class. In essence you can target anything except what you put in the :not() selector. Lets look at a quick example:
:not() rules
How to use the :not() selector with multiple classes
It is possible to use the :not() selector with multiple classes.
Normally you would just want to do:
But maybe you want to avoid multiple classes? There are no real combinators with :not() and you cannot nest them. But you can chain them, which works similar to and .
p:not(.foo):not(.bar):not(.bold):not(.italic) > Tricks with :first-child, :last-child and :nth-child()
I use the :not() CSS selector most often with the :first-child or :last-child pseudo-class.
Think of having a list that you want to add some spacing to, but you don’t want to last item to also have spacing at the bottom right? Well with :not() that is super easy to solve!
li:not(:last-child) margin-bottom: 20px; > You could also do the reverse with :first-child
li:not(:first-child) margin-top: 20px; > li:not(:nth-child(2)) margin: 20px 0; > Here is a quick codepen sample to see it in action:
Conclusion
A lot of handy things can be achieved by using the :not() CSS selector. I know I use it a lot of times, for menus, list items and what not. Even flexbox grids!
I hope you learned something from this post, and hopefully you can enhance your CSS skills with this knowledge.
Let me know how you apply the :not() selector, I’m always eager to new learn tricks with it.