- Управление размерами изображений в CSS
- Требования
- Стандартное поведение изображений
- Как работает object-fit: fill
- Как работает object-fit: cover
- Как работает object-fit: contain
- Как работает object-fit: none
- Как работает object-fit: scale-down
- Как работают свойства object-fit и object-position
- Заключение
- How to Resize Images Proportionally for Responsive Web Design With CSS
- Resize images with the HTML width and height attributes
- Example of resizing an image proportionally with the width and height attributes:
- Result
- Resize images with the CSS width and height properties
- Example of resizing an image proportionally with the width and height properties:
- Resize images with the CSS max-width property
- Example of adding a responsive resized image with the max-width property:
- Example of resizing an image proportionally using the max-width property:
Управление размерами изображений в CSS
Сохранение соотношения сторон предотвращает искажение изображений из-за растяжения или сжатия. Работая с CSS, вы, вероятно, рано или поздно попадете в ситуацию, когда вам будет нужно сохранить исходное соотношение сторон изображения. Очень часто для решения этой проблемы используется CSS-свойство background-image. Есть и более современный подход – это свойство object-fit.
В этом руководстве мы поговорим о таких значениях object-fit, как fill, cover, contain, none и scale-down. Мы обсудим, как они влияют на изображение в целом, а также как с их помощью можно обрезать и масштабировать изображения. Кроме того, вы изучите свойство object-position и увидите, как оно может смещать изображения.
Требования
- Чтобы выполнить этот мануал, вам нужно знать, что такое свойства и значения CSS.
- Вы должны уметь использовать декларации CSS, встроенные в свойство style.
- Редактор кода.
- Современный веб-браузер, поддерживающий object-fit and object-position.
Стандартное поведение изображений
В этом руководстве мы рассмотрим следующий код:

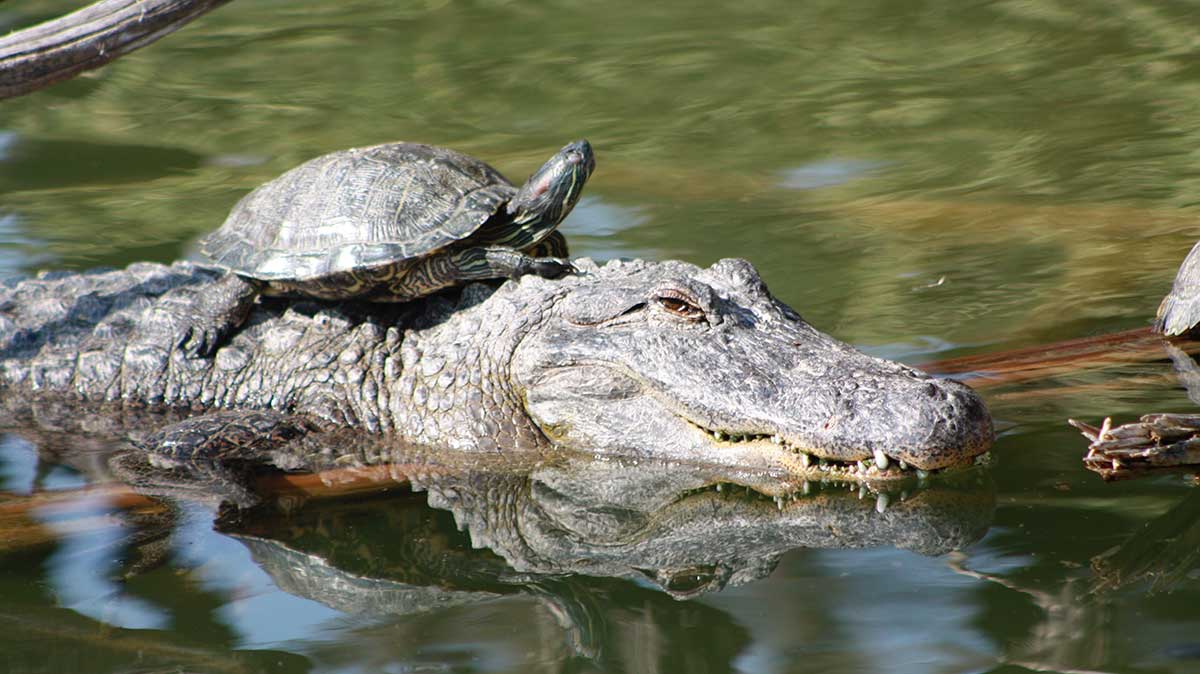
Исходная ширина этого изображения – 1200 пикселей, высота – 674 пикселей. С помощью атрибута img этим параметрам были присвоены значения 600 и 337 – это половина исходных размеров с сохранением соотношения сторон.
Давайте теперь предположим, что у нас есть макет, который ожидает, что изображения будут иметь ширину в 300 пикселей и высоту в 337 пикселей:

В браузере этот код покажет следующий результат:
Полученное изображение больше не сохраняет исходное соотношение сторон и кажется визуально сжатым.
Как работает object-fit: fill
fill – это начальное значение object-fit. Оно не сохраняет исходное соотношение сторон.
Этот код выдаст в браузере следующий результат:
Поскольку это исходное значение для движков рендеринга в браузерах, внешний вид масштабированного изображения не меняется. Полученное изображение по-прежнему выглядит сжатым.
Как работает object-fit: cover
Значение cover сохраняет исходное соотношение сторон изображения, но изображение занимает все доступное пространство.
Данный код покажет в браузере такой результат:
В определенных ситуациях object-fit: cover может обрезать изображение. В этом примере некоторые части исходного изображения (слева и справа) не отображаются, потому что они не умещаются в пределах заявленной ширины.
Как работает object-fit: contain
Значение contain сохраняет исходное соотношение сторон, но при этом изображение не может выходить за пределы доступного пространства.
Этот код выдаст в браузере следующий результат:
В некоторых ситуациях object-fit: contain приводит к тому, что изображение не может заполнить все доступное пространство. Как вы видите в данном примере, над и под изображением есть пустое горизонтальное пространство, потому что заявленная доступная высота больше, чем высота масштабированного изображения.
Как работает object-fit: none
Значение none вообще никак не изменяет размер изображения.
Этот код выдаст в браузере следующий результат:
Если изображение больше доступного места, оно будет обрезано. В нашем примере некоторые части исходного изображения слева, справа, сверху и снизу не отображаются, потому что они не помещаются в границах заявленных ширины и высоты.
Как работает object-fit: scale-down
Значение scale-down будет отображать картинку либо как contain, либо как none – в зависимости от того, что именно выдаст наименьшее изображение.
Этот код выдаст в браузере следующий результат:
В этом примере изображение было уменьшено по принципу contain.
Как работают свойства object-fit и object-position
Если в результате object-fit выдает обрезанное изображение, оно по умолчанию будет центрировано. Для изменения точки фокуса можно использовать свойство object-position.
Вернемся к примеру object-fit: cover.
Теперь давайте изменим положение видимой части изображения по оси X, чтобы показать правый край изображения:
Этот код покажет следующий результат:
В этом примере фрагмент изображения с черепахой вырезан.
А теперь давайте посмотрим, что произойдет, если указать позицию за пределами доступного пространства:
В этом примере изображение сдвинуто так, что мы видим только его левую часть. Кроме того, слева мы видим интервал, который составляет 20% доступного пространства.
Заключение
В этой статье мы рассмотрели доступные значения свойств object-fit и object-position.
Прежде чем использовать свойство object-fit в своем проекте, убедитесь, что ваша целевая аудитория пользуется браузерами, которые его поддерживают.
How to Resize Images Proportionally for Responsive Web Design With CSS
One of the main parts of responsive web design is resizing the image automatically to fit the width of its container. Since nowadays people use different kinds of desktops, our web pages must be appropriate for all types of screens.
So, let’s learn three ways of resizing images and making responsive images with only HTML and CSS.
Resize images with the HTML width and height attributes
Example of resizing an image proportionally with the width and height attributes:
html> html> head> title>Title of the document title> head> body> p>Resized image: p> img src="/uploads/media/default/0001/01/25acddb3da54207bc6beb5838f65f022feaa81d7.jpeg" alt="Aleq" width="160" height="145" /> p>Original image size: p> img src="/uploads/media/default/0001/01/25acddb3da54207bc6beb5838f65f022feaa81d7.jpeg" alt="Aleq" /> body> html>Result
While resizing an image, the aspect ratio (the viewable area and display shape) should be preserved. Otherwise, the image can get distorted and lose its quality.
Resize images with the CSS width and height properties
Another way of resizing images is using the CSS width and height properties. Set the width property to a percentage value and the height to «auto». The image is going to be responsive (it will scale up and down).
Example of resizing an image proportionally with the width and height properties:
html> html> head> title>Responsive Resized Image title> style> img < width: 100%; height: auto; > style> head> body> h2>Responsive Resized Image h2> p>Resize the browser to see the responsive effect: p> img src="/uploads/media/default/0001/03/5bfad15a7fd24d448a48605baf52655a5bbe5a71.jpeg" alt="New York" /> body> html>Note that the image could be scaled more than the original size. In several cases, a better option is to use the max-width property alternatively.
Resize images with the CSS max-width property
There is a better way for resizing images responsively. If the max-width property is set to 100%, the image will scale down if it has to, but never scale up to be larger than its original size. The trick is to use height: auto; to override any already present height attribute on the image.
Example of adding a responsive resized image with the max-width property:
html> html> head> title>Responsive Resized Image with max-width title> style> img < max-width: 100%; height: auto; > style> head> body> h2>Responsive Resized Image with max-width h2> p>Resize the browser to see the responsive effect: p> img src="/uploads/media/default/0001/03/5bfad15a7fd24d448a48605baf52655a5bbe5a71.jpeg" alt="New York" /> body> html>Let’s see another live web page example with the same method.
Example of resizing an image proportionally using the max-width property:
html> html> head> title>Responsive Resized Image in a Web Page title> style> * < box-sizing: border-box; > html < font-family: "Lucida Sans", sans-serif; > img < width: 100%; height: auto; > .row:after < content: ""; clear: both; display: table; > .menu, .content < float: left; padding: 15px; width: 100%; > @media only screen and (min-width: 600px) < .menu < width: 25%; > .content < width: 75%; > > @media only screen and (min-width: 768px) < .menu < width: 20%; > .content < width: 79%; > > .header < background-color: #1c87c9; color: #ffffff; padding: 10px; text-align: center; > .menu ul < list-style-type: none; margin: 0; padding: 0; > .menu li < padding: 8px; margin-bottom: 7px; background-color: #666666; color: #ffffff; box-shadow: 0 1px 3px rgba(0, 0, 0, 0.12), 0 1px 2px rgba(0, 0, 0, 0.24); > .menu li:hover < background-color: #1c87c9; > .footer < background-color: #1c87c9; color: #ffffff; text-align: center; font-size: 12px; padding: 15px; > style> head> body> div class="header"> h1>W3DOCS h1> div> div class="row"> div class="menu"> ul> li>Books li> li>Snippets li> li>Quizzes li> li>Tools li> ul> div> div class="content"> h2>About Us h2> p> W3docs provides free learning materials for programming languages like HTML, CSS, Java Script, PHP etc. p> p> It was founded in 2012 and has been increasingly gaining popularity and spreading among both beginners and professionals who want to enhance their programming skills. p> img src="/uploads/media/default/0001/02/8070c999efd1a155ad843379a5508d16f544aeaf.jpeg" alt="Team Work" /> div> div> div class="footer"> p> Resize the browser window to see how the content respond to the resizing. p> div> body> html>
