- How to Add Image in the Title Bar
- Let the browser finds the favicon!
- Let’s use HTML link tag:
- Depending on the favicon format, the type attribute must be changed:
- A favicon must have the following characteristics:
- Example of adding an image in the title bar:
- Different Platforms:
- Add it to your code in the following way:
- HTML Иконка
- Как добавить иконку в HTML
- Пример
- Это заголовок
- Поддержка файла favicon
- Краткое содержание главы
- HTML link
- Add an Icon to Blog Post Titles with CSS
- Demo
- Who Can Use This Tutorial
- Before You Get Started
- Step One: Upload Your Icon
- Step Two: Add the CSS
- Variations
- How To Add a Favicon to Your Website with HTML
- Tutorial Series: How To Build a Website with HTML
How to Add Image in the Title Bar
Most websites add an icon or image logo in the title bar. This icon logo is also called a favicon and can be useful for user engagement.
A favicon, also known as a URL icon, a tab icon, a shortcut icon, a website icon, or a bookmark icon, is a file containing one or more small icons associated with a particular website or web page.
You can let the browser detect your favicon or upload it to your hosting root area.
Let the browser finds the favicon!
One way, which is the easiest, is by uploading an icon as a .png or .ico file from your hosting’s File Manager. If you prepare your image in png or ico, you can upload it to your hosting area, and most modern browsers will automatically detect favicon.png and favicon.ico files from your host (naming matters here, it should be exactly favicon). So, you’ll need no coding.
The other way is by using the HTML link inside the head tag.
Let’s use HTML link tag:
/* it should be placed inside the head tag */ icon" type="image/png" href="path-to-your-favicon"/> If you use a different image format, implement the appropriate changes (read the next paragraph), and change the value of the href attribute to the path where your image is located in your project. The ICO format is not as reliable anymore, and it’s better to use png (to preserve transparency).
Depending on the favicon format, the type attribute must be changed:
- For PNG, use image/png.
- For GIF, use image/gif.
- For JPEG, use image/jpg.
- For ICO, use image/x-icon.
- For SVG, use image/svg+xml.
/* for gif files, for example, it should look like this: */ /* path-to-favicon should be changed to the location of your favicon file */ icon" type="image/gif" href="path-to-favicon">A favicon must have the following characteristics:
- Favicon.ico is the default name.
- Size should be 16×16, 32×32, 48×48, 64×64 or 128×128 pixels.
- Color should be 8 bites, 24 bites or 32 bites.
There are a lot of online tools that will help you create a favicon, convert the image formats, etc., and you can find them by a simple search on Google, by the way.
The image must be square dimensioned in any image format (ico, jpg, BMP, gif, png) to appear in browsers properly. Images with non-square dimensions will also work. However, such icons may not look professional.
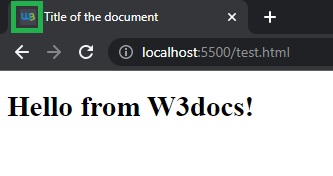
Example of adding an image in the title bar:
html> html> head> title>Title of the document title> link rel="icon" type="images/x-icon" href="https://www.w3docs.com/favicon.ico" /> head> body> h1>Hello from W3docs! h1> body> html>If you take a look at the result of the above code, it should be something like this.
Different Platforms:
For different platforms, the favicon size should also be changed:
| Platform | Name | Rel value | Favicon size |
|---|---|---|---|
| Google TV | favicon-96×96.png | icon | 96×96 |
| Ipad Retina, iOS 7 or later | apple-touch-icon-152×152-precomposed.png | apple-touch-icon-precomposed | 152×152 |
| Ipad Retina, iOS 6 or later | apple-touch-icon-144×144-precomposed.png | apple-touch-icon-precomposed | 144×144 |
| Ipad Min, first generation iOS 7 or later | apple-touch-icon-76×76-precomposed.png | apple-touch-icon-precomposed | 76×76 |
| Ipad Mini, first generation iOS 6 or previous | apple-touch-icon-72×72-precomposed.png | apple-touch-icon-precomposed | 72×72 |
| Iphone Retina, iOS 7 or later | apple-touch-icon-120×120-precomposed.png | apple-touch-icon-precomposed | 120×120 |
| Iphone Retina, iOS 6 or previous | apple-touch-icon-114×114-precomposed.png | apple-touch-icon-precomposed | 114×114 |
Add it to your code in the following way:
icon" href="/favicon.ico" type="image/x-icon"> icon" href="/favicon.png" sizes="32x32" type="image/png"> icon-precomposed" href="/apple-touch-icon-152x152-precomposed.png" type="image/png" sizes="152x152"> icon-precomposed" href="/apple-touch-icon-120x120-precomposed.png" type="image/png" sizes="120x120"> icon" href="/favicon-96x96.png" sizes="96x96" type="image/png">Please note that you must change the href attribute value based on the location of your favicon file, either in your host or in your project folder if you’re working locally. And the naming matters; otherwise, the browser can not detect it.
In the end, it is worth noting that you can use this open-source link which is a cheat sheet for favicon and has valuable information that may help you along the way.
HTML Иконка
Иконка — это небольшое изображение, отображаемое рядом с заголовком страницы на вкладке браузера.
Как добавить иконку в HTML
Вы можете использовать любое изображение, которое вам нравится, в качестве своего значка. Вы также можете создать свою собственную иконку на таких сайтах, как https://www.favicon.cc.
Совет: Иконка — это маленькое изображение, поэтому это должно быть простое изображение с высокой контрастностью.
Изображение значка отображается слева от заголовка страницы на вкладке браузера, вот так:

Чтобы добавить иконку на свой веб-сайт, либо сохраните изображение вашего значка в корневом каталоге вашего веб-сервера, либо создайте в корневом каталоге папку с именем images и сохраните изображение вашего значка в этой папке. Общее название изображения фавиконки — «favicon.ico».
Далее, добавьте элемент в свой файл «index.html» после элемент , например:
Пример
Это заголовок
This is a paragraph.
Теперь сохраните файл «index.html» и перезагрузите его в своем браузере. На вкладке вашего браузера теперь должно отображаться изображение вашего значка слева от заголовка страницы.
Поддержка файла favicon
В следующей таблице показана поддержка формата файла для изображения favicon:
| Браузер | ICO | PNG | GIF | JPEG | SVG |
|---|---|---|---|---|---|
| Edge | Да | Да | Да | Да | Да |
| Chrome | Да | Да | Да | Да | Да |
| Firefox | Да | Да | Да | Да | Да |
| Opera | Да | Да | Да | Да | Да |
| Safari | Да | Да | Да | Да | Да |
Краткое содержание главы
HTML link
Для получения полного списка всех доступных HTML тегов Справочник HTML Тегов.
Add an Icon to Blog Post Titles with CSS
A little icon next to your post title is a cute way to bring the design elements of your theme into your blog posts. And, it’s easy to do with a bit of CSS! You’ll probably spend more time choosing the perfect icon than you will on adding the CSS to your blog.
Demo

For a live demo, visit codeitpretty.blogspot.com, where I’ve added a heart icon to each of the post titles.
Who Can Use This Tutorial
If you can add CSS to your blog, you can do this! Blogger, self-hosted WordPress, and Typepad Unlimited users, you’re all set. WordPress.com users will need the Custom CSS upgrade.
Before You Get Started
You’ll need two things to use this tutorial: an icon, and the class name of your post titles. The icon is up to you, but I’ll show you how to find your post title class name.
Blogger & Typepad users who use a standard template and haven’t made changes to the post title class, your post title classes are:
WordPress title classes vary by theme. If you’re on WordPress, or you’ve made changes to your Blogger or Typepad template classes, here are two ways to find your post title class.
- Use your browser’s developer tools. If you’re using Firefox or Chrome, you can use your browser’s developer tools to identify your post title class by right-clicking a post title and selecting «Inspect Element» from the menu.
- Check your blog’s source code. Using your browser’s «View Source» option, open up your blog’s source code. Find a post title within your source, and find its class. The class might be inside your post title’s link element, or nearby in the code. It’s usually something like post-title, entry-title, headline, etc.
Once you have your icon and you’ve found your post title’s class, you’re ready to add your title icon!
Step One: Upload Your Icon
Blogger users, upload the icon to your blog’s Picasa Web Album. WordPress users, upload the image to your media library. Typepad users, upload the image to the File Manager. You can also use Photobucket or another image hosting service if you prefer. Wherever you upload it, copy the direct link to the image. You’ll need that soon.
Step Two: Add the CSS
You only need to add this CSS to your template once and the icons will appear on every post title.
In Blogger, go to Template > Customize > Advanced > Add CSS. If you’re on Typepad, go to Design > Custom CSS. On WordPress your custom CSS location will vary. If you’re using Jetpack’s Custom CSS option, it’s under Appearance > Edit CSS.
I’m going to demonstrate this with the class .post-title, since I’m on Blogger. Remember to change it if you blog elsewhere! Here’s the basic CSS:
Now that you’ve seen the CSS, let me break it down for you!
- In the first line, the selector ( .post-title in the example) tells the CSS to style all the links with the class post-title. Again, change that if .post-title isn’t your class. Don’t forget the dot (.) in front of the class name!
The next line has four parts:
- background: url(ICON-IMAGE-URL-HERE) sets a background image for the selected titles. Replace the text inside the parentheses with the direct link to your icon image.
- The «no-repeat» value makes it so the image only appears once for each link.
- «Left» places it to the left of the URL.
- «Transparent» sets the background color of the link and its associated icon.
Variations
Now that you’ve got the idea, you might want to try one of these variations. Thanks to Joelle and Marina for their prompts in the comments!
These variations work in modern browsers, but aren’t compatible with older versions of Internet Explorer. They don’t cause any problems in older IE, they just don’t show up.
Icon Above Your Title

If you’d like to place your icon above your title, find the class of the div surrounding your post using the class-finding methods described above. Once you’ve found the class, use this basic CSS:
I used «.post-outer» because I’m on Blogger. If you’re on another platform, you may need to use a different class.
You can also center the icon above your post title if you prefer.

If you’d like to center the icon, the CSS is:
Two Icons
If you’d like to add two icons to either side of your title, you can use :before and :after content to place the image. If you use this method, the second icon will be placed at the end of your title’s text, like in these examples:


.post-title:before, .post-title:after
Remember that I used .post-title because I’m on Blogger. If you’re on a different platform, be sure to change the selector if needed.
How To Add a Favicon to Your Website with HTML
In this tutorial, we will walk through the steps involved in adding a favicon to your webpage using HTML. You can use any image you like for your favicon, but keep in mind that simple, high-contrast images often work best given the favicon’s small size. You can also generate a custom favicon through sites like favicon.cc.
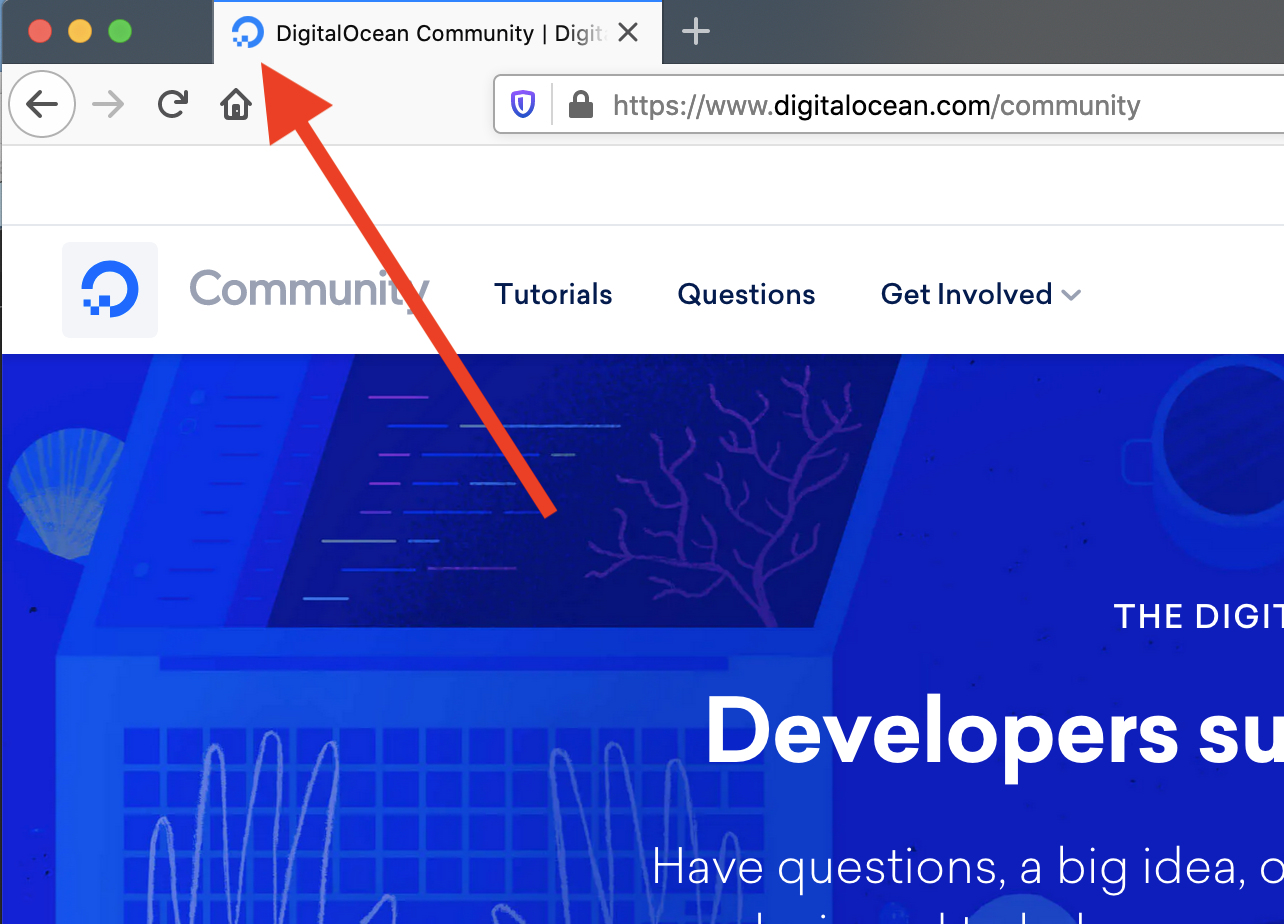
A favicon is a small image that is located in the browser tab to the left of a webpage’s title. The image below illustrates the location of a favicon.
To add a favicon to your site, create a folder in your project directory called images (if you don’t already have one) and save your desired favicon image in this folder. If you don’t have an image, you download this Sammy the Shark image that we have hosted on our demonstration website. (For a refresher on how to add images to webpages using HTML, please visit our tutorial HTML Images from earlier in this tutorial series.
Next, add the element (highlighted below) to your index.html file right below the element. Your code should now be like this:
. title> Sammy’s First Website title> link rel="shortcut icon" type="image/jpg" href="Favicon_Image_Location"/> . Make sure to replace Favicon_Image_Location with the relative file path of your favicon image. Save the index.html file and reload it in your web browser. Your browser tab should now contain a favicon image.
You should now know how to add favicon images to websites using HTML.
Want to deploy your application quickly? Try Cloudways, the #1 managed hosting provider for small-to-medium businesses, agencies, and developers — for free. DigitalOcean and Cloudways together will give you a reliable, scalable, and hassle-free managed hosting experience with anytime support that makes all your hosting worries a thing of the past. Start with $100 in free credits!
Tutorial Series: How To Build a Website with HTML
This tutorial series will guide you through creating and further customizing this website using HTML, the standard markup language used to display documents in a web browser. No prior coding experience is necessary but we recommend you start at the beginning of the series if you wish to recreate the demonstration website.
At the end of this series, you should have a website ready to deploy to the cloud and a basic familiarity with HTML. Knowing how to write HTML will provide a strong foundation for learning additional front-end web development skills, such as CSS and JavaScript.