- Saved searches
- Use saved searches to filter your results more quickly
- mjaverto/css-bar-chart
- Name already in use
- Sign In Required
- Launching GitHub Desktop
- Launching GitHub Desktop
- Launching Xcode
- Launching Visual Studio Code
- Latest commit
- Git stats
- Files
- readme.txt
- About
- Bar Chart HTML Create Beautiful Bar Charts Using HTML Tags
- Bar Charts — What The Heck Is A Bar Chart?
- #1 Bar Chart HTML — Using Only HTML And CSS
- Bar Chart HTML Live Example: Using Only HTML And CSS
- The Chart Area
- The Chart Grid And Drawing Area
- Bars For The Bar Chart
- #2 HTML Bar Graph Using CSS Flexbox
- HTML Bar Graph Live Example Using Flexbox
- The Chart Area
- The Chart Grid And Drawing Area
- Bars For The Flexbox HTML Bar Graph
- #3 Bar Chart HTML — Using The Infographic Charts Tag Library
- Bar Chart HTML Example: Using Only The HTML Charts Tag Library
- Css horizontal bar charts
- # Usage
- # Dimensions
- # Orientation
- # Heading
Saved searches
Use saved searches to filter your results more quickly
You signed in with another tab or window. Reload to refresh your session. You signed out in another tab or window. Reload to refresh your session. You switched accounts on another tab or window. Reload to refresh your session.
mjaverto/css-bar-chart
This commit does not belong to any branch on this repository, and may belong to a fork outside of the repository.
Name already in use
A tag already exists with the provided branch name. Many Git commands accept both tag and branch names, so creating this branch may cause unexpected behavior. Are you sure you want to create this branch?
Sign In Required
Please sign in to use Codespaces.
Launching GitHub Desktop
If nothing happens, download GitHub Desktop and try again.
Launching GitHub Desktop
If nothing happens, download GitHub Desktop and try again.
Launching Xcode
If nothing happens, download Xcode and try again.
Launching Visual Studio Code
Your codespace will open once ready.
There was a problem preparing your codespace, please try again.
Latest commit
Git stats
Files
Failed to load latest commit information.
readme.txt
Simple HTML / CSS percentage based width horizontal bar chart. After deciding the re-write the About section on my website, I looked around for some inspiration and realized many bar graphs around the net were just images. I decided to create some HTML / CSS that could create a nice looking bar graph without needing an image.
About
Bar Chart HTML Create Beautiful Bar Charts Using HTML Tags
We will create the bar chart with plain HTML without JavaScript or any fancy programming.
If you are interested to see how you can use JavaSript and canvas to draw bar charts check out this complete guide on How to Draw Bar Charts Using JavaScript and HTML5 Canvas
We will look at two methods for creating bar charts with HTML only.
Method #1 – We will simply create the bar chart using only HTML and CSS. The result looks awesome and anybody can do it.
Method #2 – We can also create a HTML bar graph using CSS flexbox.
Method #3 – We will use the Infographic Charts HTML Tag Library. Basically, we will include the library and write a few lines of HTML to create the bar chart.
Method #4 – Creating a bar chart from a HTML table
Bar Charts — What The Heck Is A Bar Chart?
Well, it’s that thing with colored bars in it. Some bigger, some smaller, you know, a bar chart.
No need to go into fancy definitions. But, if we want to draw a bar chart with HTML, we need to know what elements make up a bar chart.
Here’s a list of elements that make up a bar chart:
-
-
-
- A Dataset – all charts display data. Bar chart data looks like key1=value1, key2=value2,… etc.
- Chart Title – just a line of text usually above the chart
- Chart Grid – lines that setup a frame of reference for the elements within the chart. Usually the grid contains markers with numerical values.
- Chart Bars – colored rectangles that correspond in size with the values that the bar chart is representing
- Chart Labels – for each bar, usually, we want to display some text that indicates what the bar data is showing.
Now that we listed what makes a bar chart, let’s see how we can create these in HTML to make a HTML bar chart.
#1 Bar Chart HTML — Using Only HTML And CSS
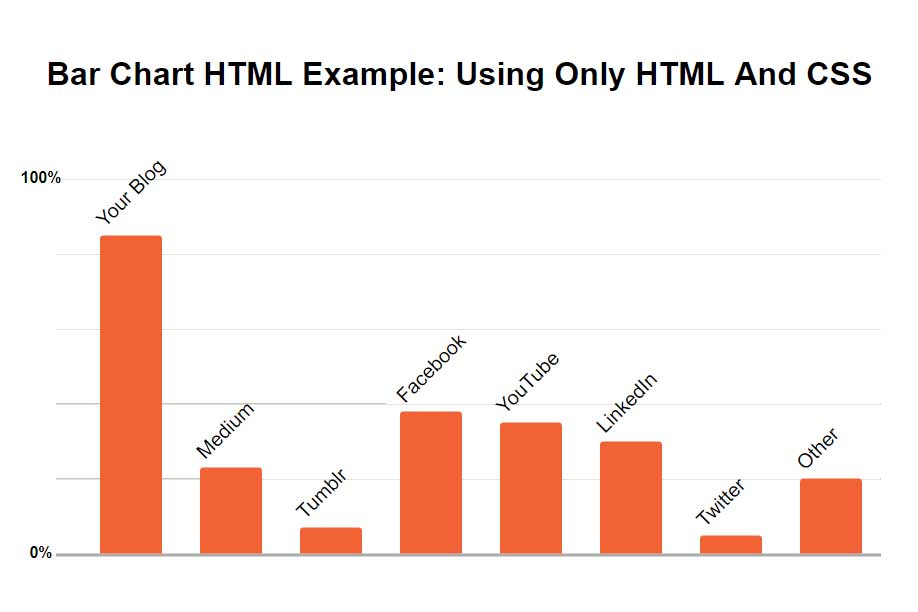
For this article I used some data about content marketing from the SEO guru Neil Patel. It’s data showing how authors distribute their content on various marketing channels.
Here’s what we will create:

Yes, this is an image, but it’s actually a print screen of the HTML bar chart we will create.
Since we want to create the bar chart using only HTML and CSS, we will have to implement each element of the chart using HTML elements.
The title and labels in the bar chart are just regular HTML text elements.
For the grid we will use a div with a border and a bit of a creative CSS gradient trick, which we will look into below.
The obvious choice for the bars is a simple div . Why? Because a bar is a rectangle, and so is the div element and we can easily fill it with the color of our choice.
Let’s take a look at the bar chart HTML code:
See the Pen Bar Chart HTML by John Negoita (@inegoita) on CodePen.16997
You can play around with changing the bar chart HTML attributes and CSS settings.
You can change the bar chart settings like in the video below:
-
-
- Switch between horizontal bar chart or vertical bar chart by changing the HTML CSS class
- Change the bar chart values
- Change labels and tooltips for the bars
- Choose the bar colors that you want
- Make the bar charts thinner or thicker
- Adjust the spacing between the bar chart bars
Bar Chart HTML Live Example: Using Only HTML And CSS
For the CSS part, we’ve used LESS. If you’re not familiar with LESS, you can quickly take a look at //lesscss.org/.
Basically LESS writing CSS in a more convenient way. The LESS code will be compiled to CSS, so in the end it’s plain old CSS.
The Chart Area
We have the div.chart-wrap wrapper that holds the entire bar chart area.
Bar charts are usually vertical, meaning that the layout of the chart is such that the bars height are proportional to the data they represent.
Bar charts can also be horizontal, meaning that the bars span from left to right horizontally and proportional to the data they represent.
For our chart we use two classes: vertical and horizontal for the div.chart-wrap element to indicate the type of bar chart.
In CSS/LESS we can change the width and height of the chart by changing the 2 variables @chart-width and @chart-height .
The Chart Grid And Drawing Area
We also have the div.grid that is used both for holding the bars and for drawing the grid elements.
For convenience, we will use a HTML/CSS trick. We will create our bar chart in a horizontal layout by default.
Because div elements tend to arrange better one below another. Just what we need our bars to do.
To transform our bar chart into a vertical bar chart, we will simply need to rotate our chart 90 degrees counter clock-wise. Since our chart’s height and width differ, when we rotate it, we also need to translate it by half of the width and height to avoid running off the screen.
We do this using the CSS transform with translate and rotate .
For the grid lines, we simply need a CSS border and for each 20% markers we set the background to a repeating gradient that will draw lines for each 20% of the div like this:
background:repeating-linear-gradient(90deg,transparent,transparent 19.5%,fadeout(@grid-color,30%) 20%);
Bars For The Bar Chart
How about the bars of the bar chart?
As mentioned before, we will use simple div elements that we will stylize and fill with orange.
We need to set the size of our bars according to the chart data. For this we will use another neat HTML/CSS trick.
In the style attribute of the div.bar element we can use custom CSS variables.
So, we use —bar-value to indicate the value for each bar as a percentage.
This is very useful in this case, because that becomes both the value, but also the size of the bar.
How can we use the —bar-value value in CSS?
Easy, we use it as the width of the bar like this:
Please keep in mind that our HTML bar chart is by default horizontal. That’s why we only need to adjust the bar width.
How about the labels for each bar?
We can use yet another HTML/CSS trick. We will add an attribute called data-name to our div.bar element. The string value of this attribute can then be used in the CSS like this:
We just add this via a CSS ::after pseudo element and style it such that it is displayed near each corresponding bar.
Well, we can set the bar color, bar thickness, spacing between bars and even how to round the corners of the bars using the CSS/LESS variables at the top:
@bar-color:#F16335; @bar-thickness:50px; @bar-rounded: 3px; @bar-spacing:30px;Play around with changing the —bar-value and data-name attributes in the div.bar elements to create an HTML bar chart with your data.
Let me know what features you might like to add to this.
#2 HTML Bar Graph Using CSS Flexbox

See the Pen HTML Bar Graph Using Flexbox by Ion Emil Negoita (@inegoita) on CodePen.16997
HTML Bar Graph Live Example Using Flexbox
This looks very similar to the previous HTML bar chart.
In this method I’m using CSS flexbox to layout the grid and the bars in the chart.
Using flexbox means that I will need far less CSS code to create a similar HTML bar graph.
The Chart Area
We also have the div.chart-wrap wrapper that holds the entire bar chart area.
There’s really nothing special about the wrapper. I only use it for setting the bar graph width and height.
The Chart Grid And Drawing Area
Just as before I use div.grid both for holding the bars and for drawing the grid elements.
Here comes the flexbox part. Flexbox allows you to have a CSS grid in which elements can be arranged on columns or rows.
If you want to find out more about flexbox I highly recommend reading this flexbox guide from CSS Tricks.
No need to get into the details as the code is pretty self-explanatory.
Basically we use a row flexbox grid for vertical (default) bar graph, and a column flexbox for the horizontal HTML bar chart.
In this way I don’t have to use the previous trick of rotating the entire bar chart.
Bars For The Flexbox HTML Bar Graph
How about the bars of the bar chart?
These are exactly the same as in the previous method. But, as you see in the text I need far less CSS code.
#3 Bar Chart HTML — Using The Infographic Charts Tag Library
Bar Chart HTML Example: Using Only The HTML Charts Tag Library
Number of posts Number of posts Number of posts Number of posts Number of posts Number of posts Number of posts Number of posts
This bar chart is not an image. It’s a live chart created with a custom HTML tags library called: Infographic Charts and Graphics HTML Tags Library. The library comes with full support and full documentation on how to install and use it.
This HTML tag library contains several tags for creating charts. For creating bar charts we can use the tag.
Please keep in mind that this library can create charts much more complex than what we created in Method #1. The library allows configuration of each and every aspect of the chart by using tag attributes.
For creating the chart above the HTML code looks like this:
Bar Chart HTML Example: Using Only The HTML Charts Tag Library
Number of posts Number of posts Number of posts Number of posts Number of posts Number of posts Number of posts Number of posts There’s no HTML tag , but through the magic of the Infographic Tag Library the browser knows to draw a bar chart when it sees this tag.
We can configure the look of the bar chart with HTML attributes. For example the colors attribute configures the colors used for the bars, the grid-color configures the color of the grid, and so on.
For a complete list of attributes check out the Infographic Tag Library Documentation.
For each bar in the bar chart we have to use the tab and . This library allows stacked bars or multiple bar groups, that’s why we need the . But in our case we only have one bar per group.
We use the value and name attributes to set the bar value and name (… duh!)
Css horizontal bar charts
Bar charts display raw data as horizontal bars.
# Usage
To visualize your data with bar chart, the main .charts-css class should be followed by the .bar class.
table class="charts-css bar"> . table># Dimensions
To control the chart dimensions you can use regular CSS. You can use media queries to set different dimensions for smaller devices.
#my-chart.bar height: 200px; max-width: 300px; margin: 0 auto; >table class="charts-css bar" id="my-chart"> . table># Orientation
You can control the chart orientation, or direction. The initial orientation depends on your language writing direction. Using the .reverse class you can reverse the orientation.
table class="charts-css bar reverse"> . table># Heading
You can add a heading to your chart using the tag. By default the heading is hidden. To display the heading use the .show-heading class.
table class="charts-css bar show-heading"> caption> Descriptive Chart Heading caption> . table>
-
-
-